
Effective February 28, 2023, Equinix-configured Network Edge devices are no longer available for renewal or purchase. Globally, all new Network Edge devices are now offered as Self-configured (customer managed) devices.
Equinix will end support of Network Edge Equinix-configured device types on June 30, 2024, and all users are advised to migrate to the Self-Configured device type.
This topic provides guidance on migrating Equinix-configured Fortinet Fortigate Firewall virtual devices to self-configured devices.
Note: To learn more about the difference between Equinix-Configured and Self-Configured devices, see Equinix-Configured Devices vs. Self-Configured Devices.
Understanding Migration Options
Depending on your current device type, you need to take different migration steps. The following table summarizes which migration path suits your device.
| Device Type | Existing License Type | Post-Migration Device Type | Migration Process |
|---|---|---|---|
| Fortinet FortiGate Firewall Equinix-Configured Device | Subscription | Fortinet FortiGate Firewall Self-Configured Device (BYOL) | Manual migration workflow documented in this guide. Users are required to procure support contracts with device vendors. |
Bring Your Own License (BYOL)
All Equinix-configured devices with subscription licenses (from Equinix) must be migrated to the Self-configured, BYOL option with vendor support. Self-configured devices allow you to contact vendor support directly for any device related issues. Use the following information to obtain a device license before the migration process.
High-Level Migration Steps
When migrating from an Equinix-configured device to a Self-configured device, follow these steps to properly migrate your devices:
-
Back up the device configuration for the Equinix-configured device.
-
Back up the Juniper Networks vSRX device configuration in “set” format.
-
Create a new instance of the virtual device.
-
Convert the Equinix-configured device configuration to Self-configured device configuration and apply the configuration to the new device.
-
If Device Link Group (DLG) is already configured for the old Equinix-configured device, then let the new device join the existing DLG by connecting. Repeat for all DLGs.
-
If your device is connected to a virtual connection, start the virtual connection migration using the Self-Guided Migration Tool available in Equinix Fabric. You may need to repeat the virtual connection migration process for each VC connection as the self-migration tool supports only one virtual connection at a time.
Backup Device Configuration for Equinix-Configured Devices
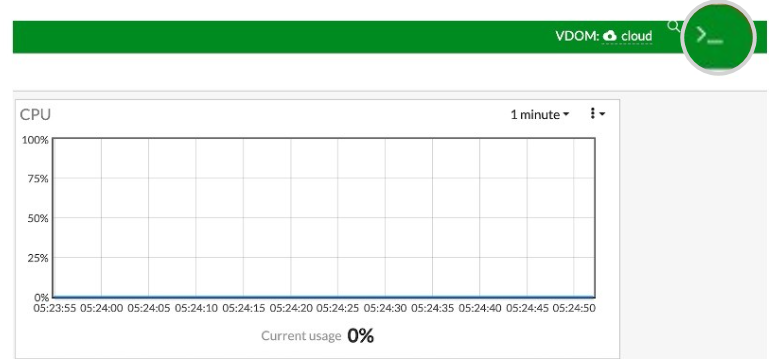
It is important to back up the existing device configuration from the Equinix-Configured device before any migration process is started. You need to first access your VDOM GUI for the device. In GUI on the top right, you can access the CLI by clicking the >_ button.
Use CLI commands listed below to back up the portions of the following configuration. You will modify the configuration on your local system.
-
Full configuration
-
Interface
-
BGP, route-map, and prefix list
-
Policy and zone
Create a New Device
Follow the workflow below to create a new Self-Configured device for Fortinet FortiGate Firewall device from the existing device detail page.
-
Go to the Virtual Device Inventory in Network Edge and select your existing Equinix-configured device to display the device details.
-
Confirm your Equinix-configured device for migration by locating the following message in the portal.

Note: If you create a device with this workflow, your newly migrated device will not be charged for 30 days.
-
Click Tools.
-
In the Migrate Equinix-Configure Device card, click Create a Device to Migrate.

Note: You will not be able to select a different Metro location to deploy this device. Your existing device location determines your new deployment.
Additionally, you will not be able to select a different billing account. The same billing account will be used for the new device deployment. -
Click Next: Device Details.
-
In the Licensing section, upload your BYOL license file.
-
Select Device Resources for your new device. See Palo Alto Networks VNF Specifications for more information.
-
In the Software Package section, select Standard package.
-
Select the preferred Software Version for your device.
-
In the Device Details section, enter:
- Device Name – Pre-populated with your old device name. You can enter a different name.
- Host Name Prefix – Pre-populated with your old device prefix. You can enter a different prefix.
- (Optional) In the Optional Details box, enter the Purchase Order Number and Order Reference/Identifier.
- In the Term Length drop-down menu, select a new term length.
- Click Next: Additional Services to add additional services.
-
Add Users – Enter a user name and select the RSA key you would like to use for SSH authentication. If you are using a new RSA Public Key, add the new RSA Public Key here.
- • Diverse Compute from an Existing Single Device –If you already have another single device and you want this new device to exist in a different plane, click Select Diverse From and then select the existing device. See Achieve Resiliency Through Geo-Redundancy for more information.
- Add Access Control List Templates – The ACL template from your original device is pre-selected. You can change the ACL template based on your business requirement. For more information, see the ACL documentation.
- Additional Internet Bandwidth – Add between 25 and 5000 additional Mbps of internet bandwidth (for a fee). 15 Mbps of Internet Bandwidth is included free in the package by default.
-
Check the Term Length as well as Pricing Overview to confirm your pricing information.
- Click Next: Review and review your order.
- Click Create Virtual Device.


Note: The Interfaces drop-down defaults to 8 and there is no option to increase. Additionally, all email addresses listed in the Device Status Notifications box carried over from the old device.
Note: By default, the communication required for initial bootstrap (DNS, NTP, License Server communication, SD-WAN controller communication, etc.) is allowed to properly configure the initial VNF configuration. Additional protocols such as SSH need to be intentionally permitted using an ACL template (Custom ACL). If you need to create a template to apply to your device, click Create Access Control List Template. See Configure Access Controls on Virtual Devices for more information.
General Guidelines for Converting Equinix-Configured to Self-Configured Device Configurations
Equinix-configured devices are managed by Equinix with a pre-defined configuration optimized for this device type. Some of the configurations are not needed for your Self-configured device instance. This section discusses the difference between those two types of device configurations.
The following table summarizes configuration difference between Equinix-Configured and Self-Configured devices.
| Component | Change | Description |
|---|---|---|
| WAN IP Address | WAN (SSH) interface IP address subnet | Subnet assignment on the WAN interface is different for EC and SC. When migrating to SC, user needs to make sure that other services point to the new IP address. DO NOT CHANGE the assigned IP address. |
| WAN Interface VRF | No WAN VRF external | VRF called external is not configured in the SC configuration |
| MGMT IP Address | Static to DHCP | Management interface obtains IP address from DHCP server instead of statically configured in the configuration |
| VRF | WAN VRF Name | Management VRF (typically GigabitEthernet1) is changed to EQUINIX-MGMT |
| Loopback | No loopback interfaces | Loopback interface is not configured in the SC configuration |
| AAA | No AAA commands | SC device is not restricted by AAA commands |
| License Server | License Server | License Server will be used to authorize your license |
| DNS/NTP Server | Google DNS/NTP Server | SC default configuration includes Google DNS server address and NTP server address |
When converting the configuration from an Equinix-configured device to a Self-configured device, follow the high-level steps below. This is a general guidance, and some configuration requirements may be different based on your business requirements.
-
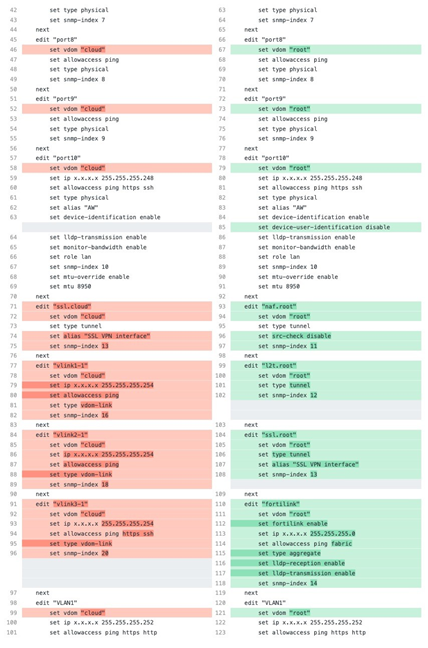
Retain the configuration of all the interfaces available within the VDOM. Add the retained configuration to the new Self-configured device under "root" VDROM.
-
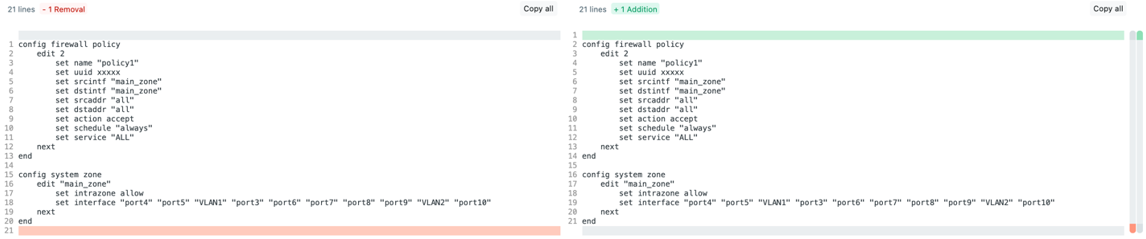
Modify the retained zones and policies configuration according to the requirements and configure the Self-configured device.
-
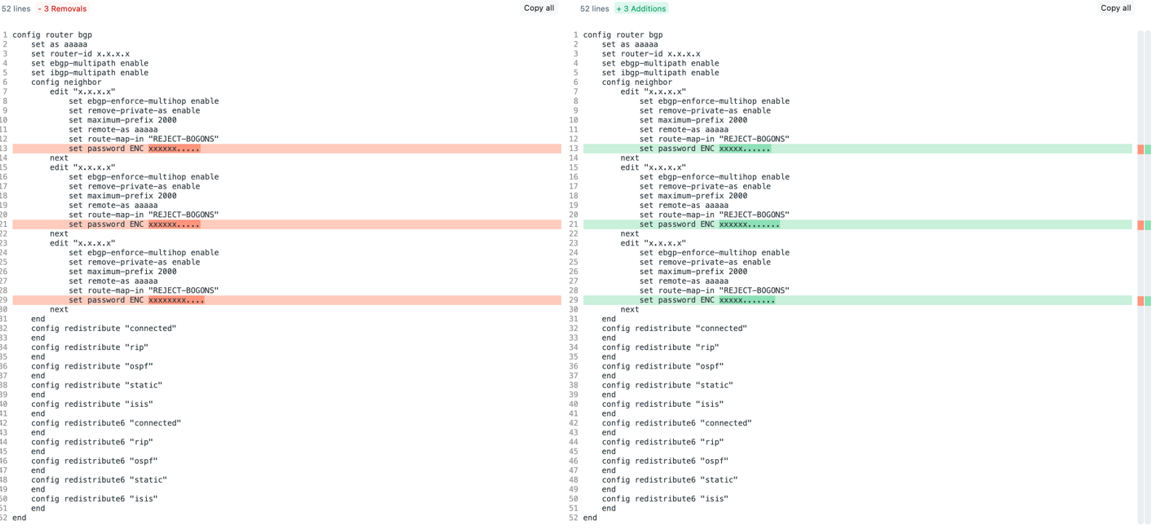
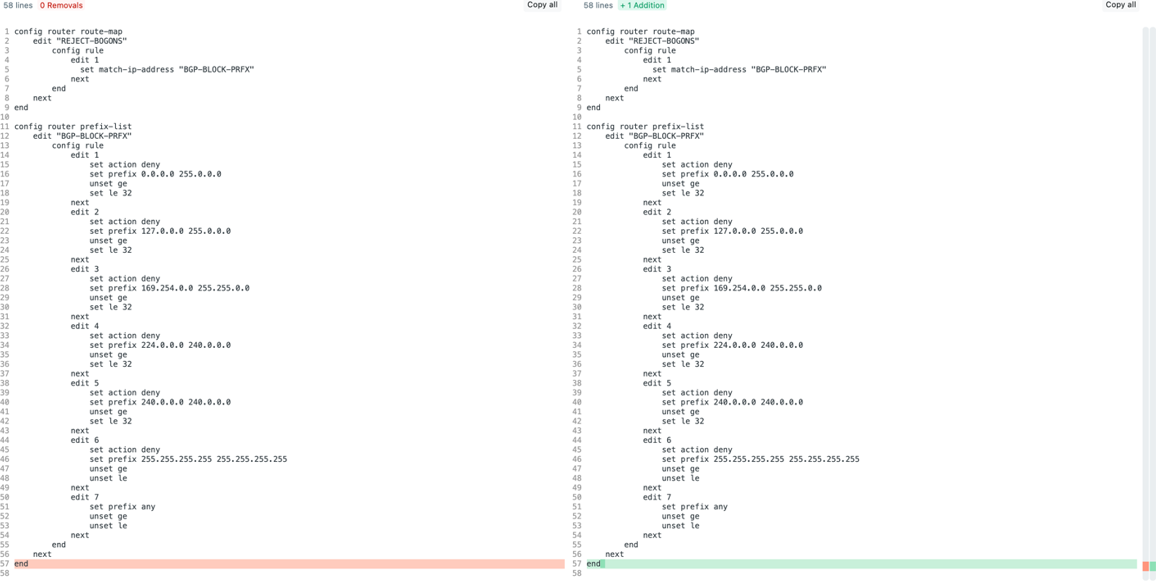
Modify the retained BGP, route-map and prefix-list configuration according to the requirements and configure the Self-onfigured device.
-
Retain all the custom configurations and modify if required before applying on Self-Configured FortiGate device.
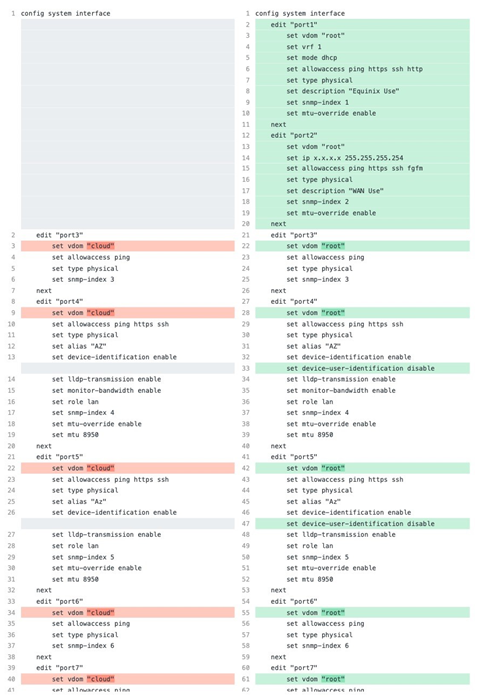
In the below examples, the column on the left shows the config on the Equinix Managed device. The column on the right shows the same config after the config was applied on the Self-configured device.
Important: Append the modified configuration to the vSRX; do not overwrite.
Migrating Fortinet FortiGate Firewall from Equinix-Configured to Self-Configured Device
-
Retain the configuration of all the interfaces available within the VDOM. Add the retained configuration to the new Self-Configured device under "root" VDROM.


-
Modify the retained zones and policies configuration according to the requirements and configure the Self-configured device.
-
Modify the retained BGP, route-map and prefix-list configuration according to the requirements and configure the Self-configured device.
-
Retain all the custom configurations and modify if required before applying on Self-Configured FortiGate device.


Device Link Group Setup
Once the configuration conversion is completed, and a new modified configuration is applied to a new Self-configured device, you can now re-establish existing connections to the new device. First, in case your existing Equinix-configured device has a Device Link Group setup to connect to other devices, you need to connect your new Self-Configured into this DLG.
See the Device Link Group documentation for further information.
Virtual Connection Migration
If you have one or more virtual connections connected to your existing Equinix-configured device, Equinix offers a self-guided Virtual Connection migration tool to to help you migrate your existing Virtual Connection to the new device. For more information, see Migrate Virtual Connections Between Network Edge Devices. This tool currently supports only one virtual connection migration at a time, so you’ll have to repeat the self-migration process for each connection.
Verify Your Device Migration
After your DLG and VC migrations are completed, you may want to log onto your new Self-configured virtual device and verify the following to complete your migration:
-
Device Login (Web-console access from Portal)
-
Device name, UUID
-
BYOL License registration
-
SSH Access to the WAN Interface
-
BGP Configuration and Connectivity
-
DLG Connectivity (If needed)
-
VC Connectivity (If needed)
-
Other router configurations and settings
