Connect to a Metal VLAN
Set up and provision new connections between Fabric Cloud Router and an Equinix Metal network.
- You must have an account on the Equinix Metal Console, and a Metal server available.
- You must have an existing Fabric Cloud Router in the Equinix metro where you want to establish the desired connectivity to Metal. (See Create a Fabric Cloud Router.)
You can create either a redundant or a single connection to a Metal VC. For more reliability, Equinix recommends setting up a redundant connection. Creating redundant connections requires the use of two Metal VLANs.
You must choose a Fabric Cloud Router for the A-side of the connection, and a Metal VLAN for the Z-side.
Connections from Fabric Cloud Routers to Metal VLANs are charged and invoiced by Fabric. The charges are made to the billing account under which the Cloud Router was ordered.
Create a Connection to a Metal VLAN
To begin the setup and provisioning process, you'll need a Metal VLAN available in the Equinix Metal console. Then, from the Equinix Fabric portal, you can create your Metal-to-Cloud Router connection. Finally, configure the routing details for your Cloud Router and verify the status of your connections.
Create a Metal VLAN
If you already have a Metal VLAN for the new Cloud Router connection, proceed to Select a Cloud Router and Metal Connection.
-
Sign into the Equinix Metal Console at console.equinix.com.
-
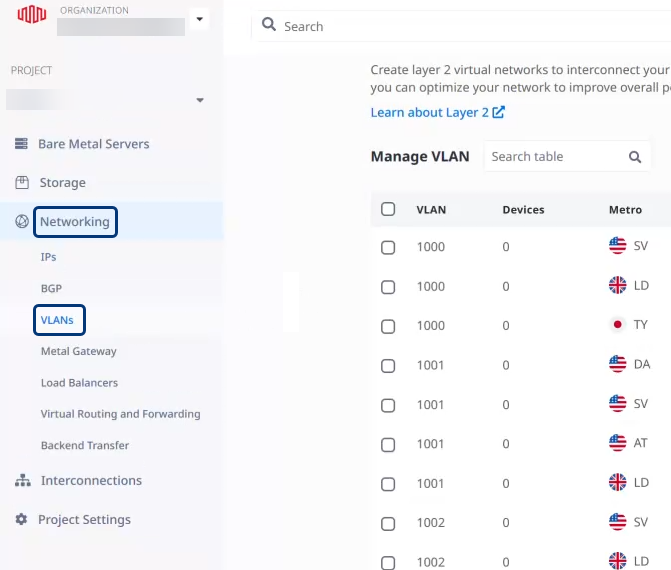
From the navigation menu on the left, click Networking and VLANs.
-
Create a new VLAN by clicking + Add VLAN.
-
Choose a Metro from the drop-down list.
-
Enter a Description and a VNID.
-
Click Add VLAN.
-
Repeat these steps to create a second VLAN in the same metro for redundancy.
For details, see Creating a VLAN.
-
-
In the Manage VLAN list, identify one or two VLANs to use for your new Cloud Router connections in the steps below.
More information about creating and managing Metal VLANs is available at VLANs on Equinix Metal.
Select a Cloud Router and Metal Connection
-
Sign into the Equinix Customer Portal and navigate to Fabric.
-
If your Fabric account has been transitioned to Equinix Identity and Access Management (IAM) platform, use the Context Switcher drop-down list to access your project and its assets.
For more information, see Identity and Access Management.
-
If you need to create a new Cloud Router, see Create a Fabric Cloud Router.
-
Identify the Cloud Router to use for your Metal connection:
-
From the Cloud Routers menu, select Fabric Cloud Router Inventory.
-
From the list of Fabric Cloud Router Names, select a Cloud Router that is provisioned and available.
-
-
From the Connections menu, select Create Connection.
-
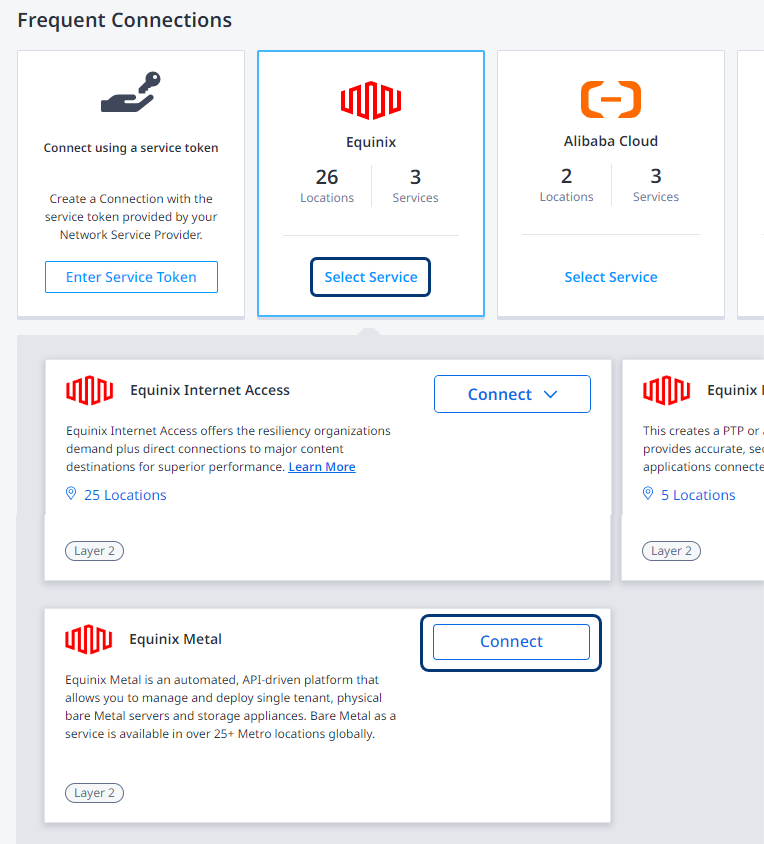
In the Equinix Frequent Connections card, click Select Service.
-
Click Connect in the Equinix Metal card.
The Connect – Metal and Fabric form is displayed.
Metal Configuration
-
In the Configuration Type section, click Redundant or Primary.
A redundant configuration requires two VLANs, and a primary configuration requires only one. Equinix recommends using a redundant configuration to increase the reliability of your connections.
-
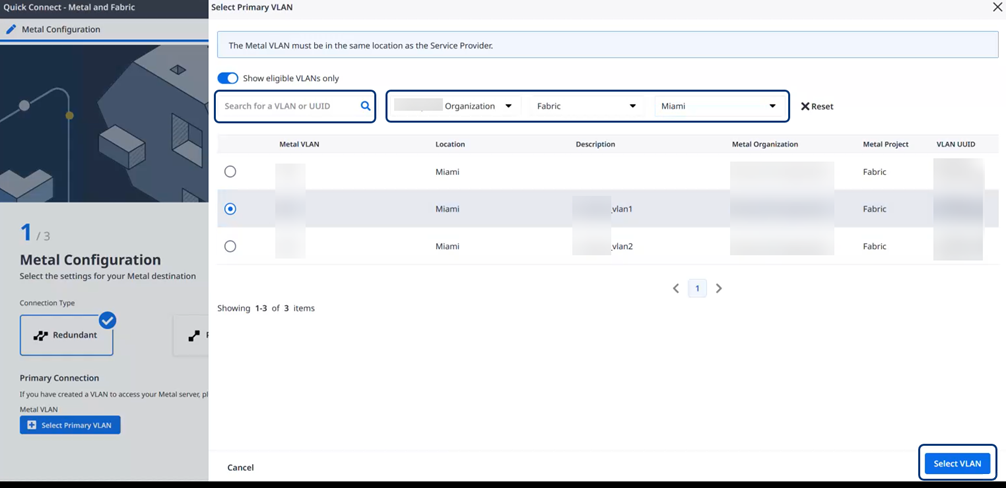
In the Primary Connection section, click + Select Primary VLAN.
The Select Primary VLAN form is displayed on the right side of your browser.
-
Select a Metal VLAN from the list. To locate the particular VLANs that you identified in the Manage VLAN step above, you can filter your results:
-
Enter a VLAN name or UUID in the search field, or
-
Click one or more of the Metal Organization, Metal Project, or Location drop-down lists to narrow the displayed list of VLANs.
Note: You can only connect a Cloud Router to other endpoints within the same metro location.
-
-
Click Select VLAN in the lower right corner. The summary configuration at the top of your web browser is updated to show your primary VLAN connection and location.
-
To set up a redundant connection, repeat the process above:
-
In the Secondary Connection section, click + Select Secondary VLAN. The Select Secondary VLAN form is displayed on the right side of your browser.
-
Select another Metal VLAN from the list, using the same organization and project as your primary connection. You can locate a particular VLAN by filtering your results:
-
Enter a VLAN name or UUID in the search field, or
-
Click one or more of the Metal Organization, Metal Project, or Location drop-down lists to narrow the displayed list.
-
-
Click Select VLAN in the lower right corner. Now your browser's summary configuration updates to show the secondary VLAN connection and location.
-
-
Click Next.
Configure Your Connection
-
In the Origin Asset Type drop-down list, choose Cloud Router for your A-side connection type.
-
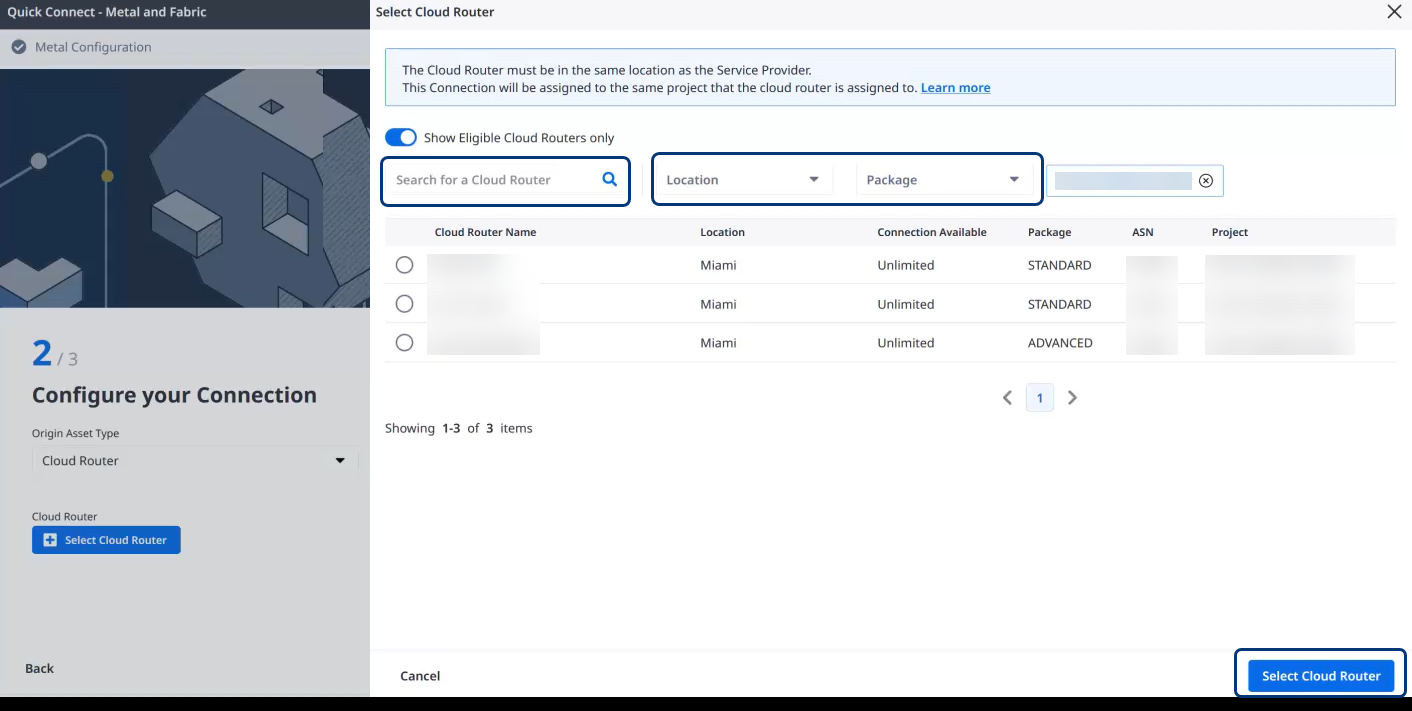
Click + Select Cloud Router. The Select Cloud Router form is displayed on the right side of your browser.
-
Select a Cloud Router from the list. Look for the name that you identified in the Inventory step above.
To locate a particular Cloud Router, you can filter your results:
-
Enter a name in the search field, or
-
Click one or more of the Location or Package drop-down lists to narrow the displayed list.
Note: You can only connect a Cloud Router to other endpoints within the same metro location.
-
-
Click Select Cloud Router in the lower right corner. The summary configuration at the top of your web browser updates to show your Cloud Router as the origin asset.
-
Enter the Metal Interconnection Name. This is the name for the Metal Interconnection that groups your primary and secondary connections (also known as Virtual Circuits on Equinix Metal). It will be displayed in the Metal console.
-
Enter a Connection Name for the Primary Connection. And if you are creating a redundant configuration, also enter a Connection Name for the Secondary Connection.
These are the names that will display in the Fabric Connections Inventory list, once the connections are created.
-
From the Bandwidth drop-down list, choose a bandwidth for the Primary Connection. If you are creating a redundant configuration, the Bandwidth for the Secondary Connection will automatically be set to match that of the Primary Connection.
-
Bandwidths from 50 Mbps–1 Gbps are available at no charge for paid Cloud Router packages.
-
Bandwidths from 2–10 Gbps are available at the listed prices. (Connections to Equinix Metal VLANs are currently only supported up to 10Gbps.)
Note: To view the pricing information and other details for this order, click Show Order Summary at the bottom right of the page. In the Order Summary that is displayed, click Download Order Summary for a PDF version.
-
-
Click Next.
Review Order and Additional Information
-
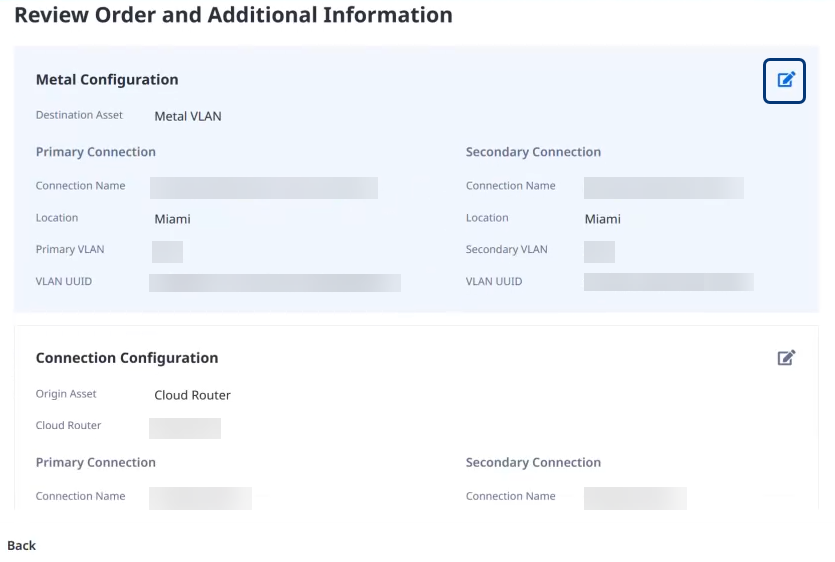
Review the details in the Metal Configuration section, including the virtual circuit connection name, and in the Connection Configuration section, including the primary and secondary connection names and bandwidths.
To return to previous steps to make changes, click the edit icon.
-
Review the Additional Information. If needed, enter additional email addresses in the Notifications section.
You can also enter a Purchase Order number and a Customer Reference ID.
-
Click Order Summary to review Order Details and pricing information.
-
To submit your order, click Create Connection.
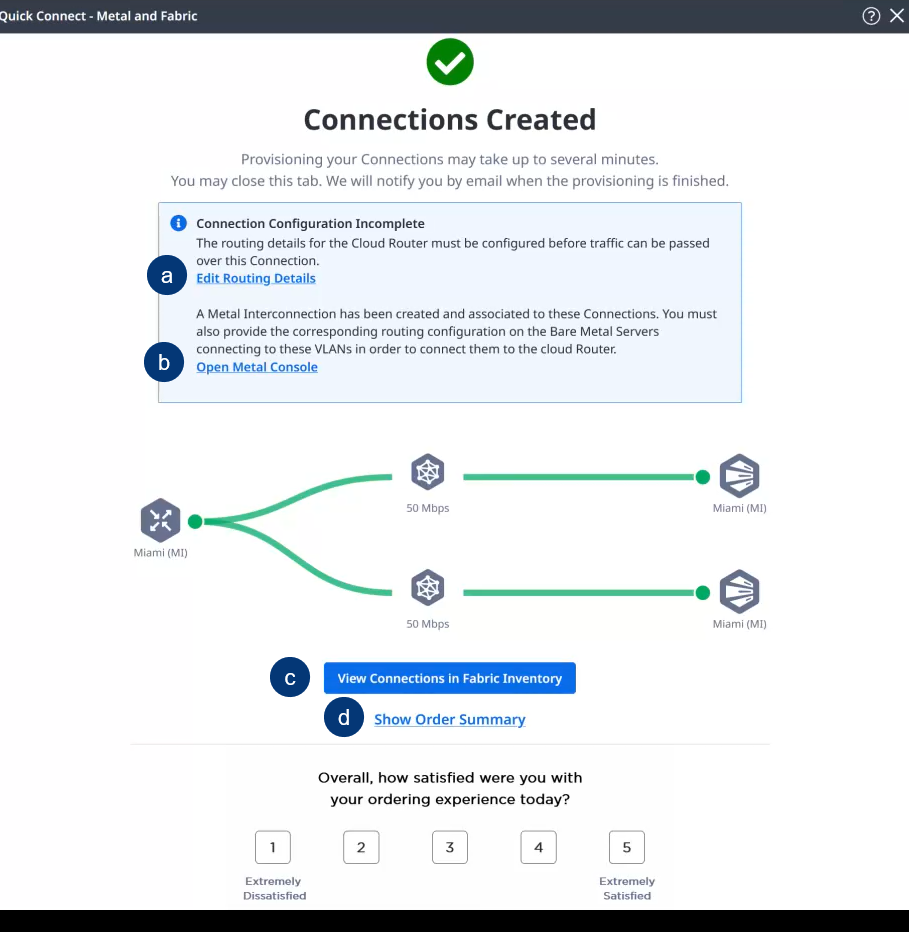
When the interconnection process is complete, a success page displays a summary view of the new connections. To guide you through the provisioning process, additional links are included:
-
Edit Routing – Provide details to complete the Cloud Router configuration.
-
Open Metal Console – Configure BGP routing on the Bare Metal servers connecting to the VLANs used by the new connection.
-
View Connections in Fabric Inventory – View the status and other details about this new connection in the Fabric portal.
Tip: In the Fabric Connections Inventory page, you can select the Fabric Cloud Router and Metal VLANs filtering options to easily locate your new connection.
-
Show Order Summary – View the pricing information and other details for this order.
Note: You must complete the additional sections below to fully activate the new connection.
-
Edit Routing Details to Provision the New Connection
To complete the activation process, you must edit the routing details for the connection in the Fabric portal to configure the routing protocols.
-
From the Fabric Connections Created success page, click Edit Routing.
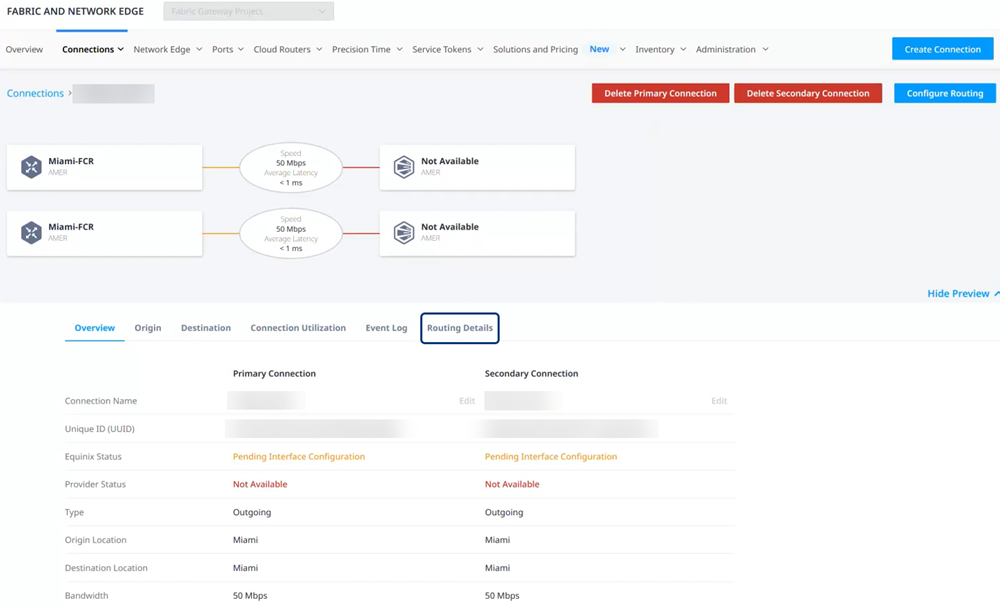
In the Fabric portal, the Connections details for your new primary and secondary connections are displayed in the Overview.
-
Click the Routing Details tab.
-
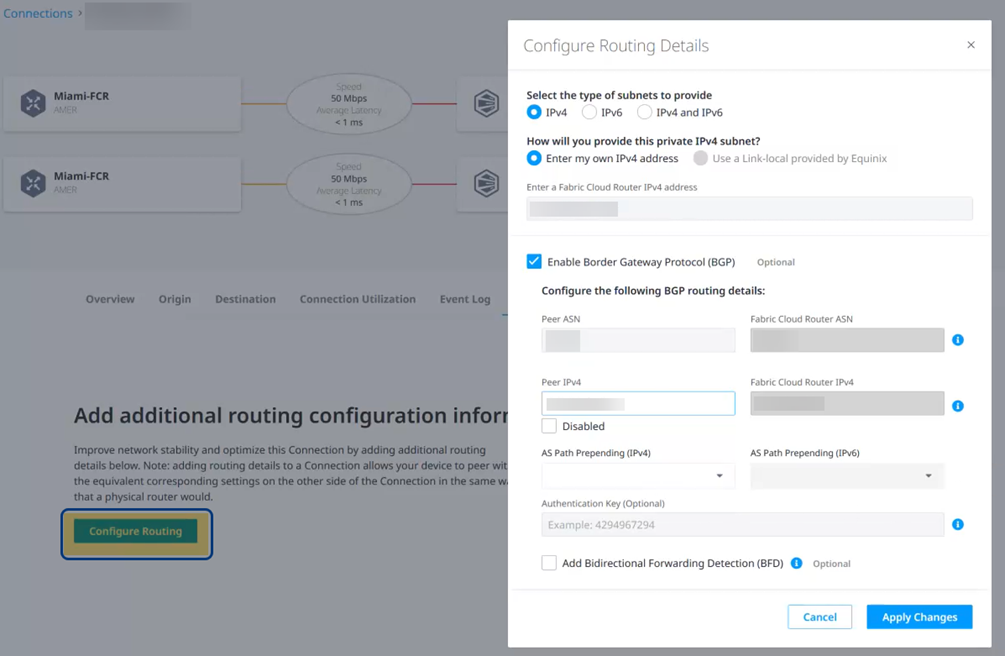
Click Configure Routing. The Configure Routing Details form is displayed.
-
In the Configure Routing Details form, enter a Fabric Cloud Router IPv4 address.
-
Select Enable Border Gateway Protocol (BGP).
-
To configure BGP routing details, enter a Peer ASN and a Peer IPv4.
-
Click Apply Changes.
-
If you created a redundant connection, repeat these steps for the secondary connection. [I will expand this explanation to use consistent terminology from the UI.]
-
In the Routing Details page, click the Overview tab to view your primary and secondary connections. When the process is complete, the Equinix Status changes to Provisioned, and the Provider Status changes to Available.
Continue to the Equinix Metal Console on the Interconnections page.
Open Metal Console to Configure Routing
Configure BGP routing on the Bare Metal servers connecting to the VLANs used by the new connection.
-
From the Fabric Connections Created success page, click Open Metal Console.
If needed, sign into the Equinix Metal Console.
-
Navigate to the desired Organization and Project.
-
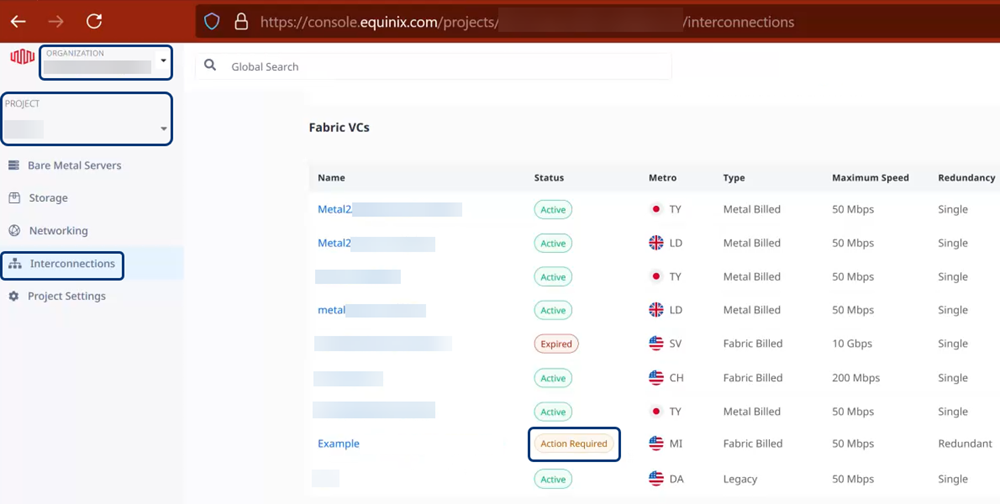
From the navigation menu on the left, click Interconnections.
The Cloud Router interconnection that you created is included in the list of Fabric VCs with the status Action Required.
-
If you have not yet configured the routing protocol details for the connection on Fabric, the Interconnection on the Metal console will display the Action Required status.
-
If routing protocol details are configured on the connection on Fabric, the Interconnection on the Metal console will display the Active status.
-
-
Click the name of your new Cloud Router interconnection.
The Overview page displays more information.
-
Click the Primary Port tab to verify the Active status of this connection.
Details of the virtual-circuit or Primary Connection, with the associated Metal VLAN, are included at the bottom of the page.
-
For a redundant connection, click the Secondary Port tab to verify the status of this connection.
Details of the virtual-circuit or Secondary Connection, with the associated Metal VLAN, are included at the bottom of the page.
-
Make sure that your VLAN connects to your Bare Metal server. For more details, see VLANs on Equinix Metal.
-
Once your Bare Metal Server is connected to the VLAN, you can configure your environment to peer with the Fabric Cloud Router.
You can do this directly from the Bare Metal Server by leveraging open source routing protocol suites such as FRRouting. Alternatively, any applications or software running on the server capable of peering with the Fabric Cloud Router can be used.
API Reference
For instructions on using Metal and Fabric APIs to create a Metal Interconnection along with its associated VLANs, and connecting to a Fabric Cloud Router, see Connect Fabric Cloud Router to Metal VLAN.
Connect to a Metal VLAN Using API
You can use Fabric Cloud Router API to automate this procedure and integrate it with your internal systems. For details, see Connect Fabric Cloud Router to Metal VLAN.

