Creating a Fabric Cloud Router
You can set up and provision a new Fabric Cloud Router through the Equinix Customer portal.
-
Sign into the Equinix Customer Portal and navigate to Fabric.
-
If your Fabric account has been transitioned to Equinix Identity and Access Management (IAM) platform, use the Context Switcher drop-down list to access your project and its assets. For more information, see Identity and Access Management.
-
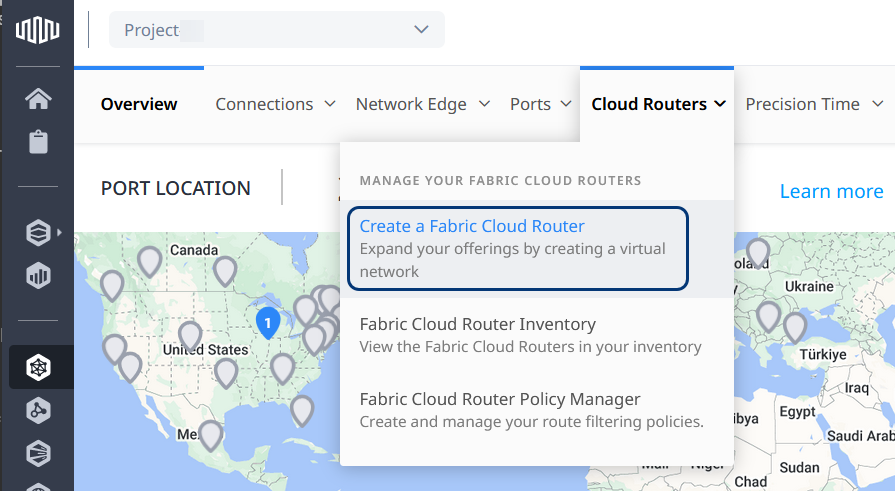
From the Cloud Routers menu, select Create a Fabric Cloud Router.
Select Location
-
In the Select Location form, click a region and a metro location. For a list of the Autonomous System Numbers used for Cloud Routers in each of the available metros, see the table below.
Autonomous System Numbers:
Metro Location Metro Code Autonomous System Number Amsterdam AM 60000 Ashburn DC 13531 Atlanta AT 30157 Barcelona BA 34952 Bogota BG 269971 Bordeaux BX 28744 Boston BO 18928 Brussels BL 48088 Calgary CL 27407 Canberra CA 137860 Chicago CH 32007 Culpeper CU 22232 Dallas DA 36641 Denver DE 64292 Dubai DX 48562 Dublin DB 60640 Frankfurt FR 59991 Geneva GV 16023 Hamburg HH 34972 Helsinki HE 47732 Hong Kong HK 24188 Houston HO 27315 Istanbul IL 42494 Kamloops KA 27433 Lima LM 273037 Lisbon LS 44729 London LD 60013 Los Angeles LA 33109 Madrid MD 25033 Manchester MA 39757 Melbourne ME 63525 Mexico City MX 270132 Miami MI 27354 Milan ML 43457 Montreal MT 27438 Mumbai MB 137859 Munich MU 24581 New York NY 40052 Osaka OS 63524 Ottawa OT 273032 Paris PA 59997 Perth PE 45508 Philadelphia PH 398975 Rio de Janeiro RJ 270475 Santiago ST 273032 São Paulo SP 61643 Seattle SE 33157 Seoul SL 139286 Silicon Valley SV 25658 Singapore SG 24116 Sophia SO 24581 Stockholm SK 43432 Sydney SY 24569 Tokyo TY 24114 Toronto TR 30159 Vancouver VA 27444 Warsaw WA 42319 Winnipeg WI 27466 Zurich ZH 42629 noteYou can only connect a Cloud Router to other endpoints within the same metro location.
-
Choose a Billing Account from the drop-down list.
noteYou can order a new Fabric Cloud Router and set up a billing account through the AWS Marketplace. For instructions, see Order a Cloud Router or VC in the AWS Marketplace.
-
Click Next: Fabric Cloud Router Details.
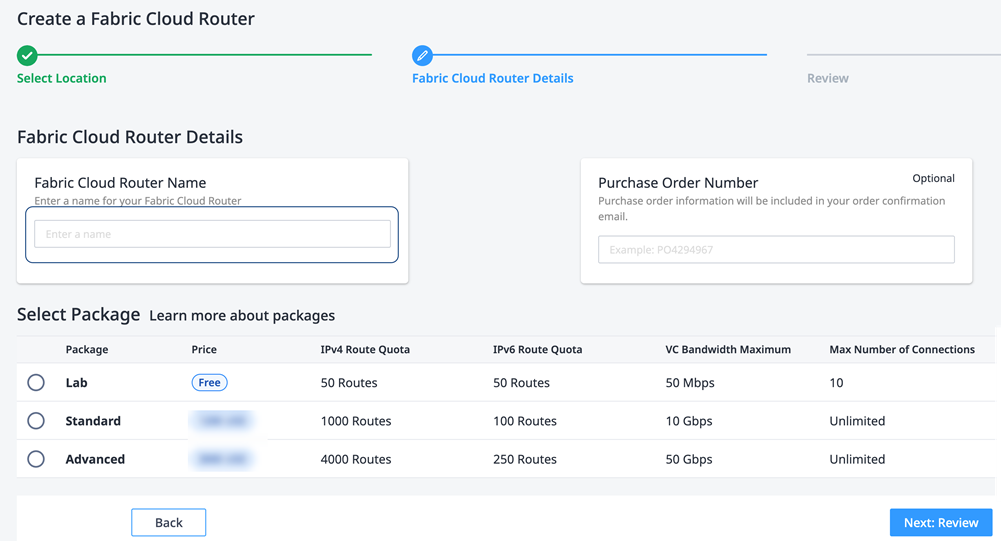
Details
-
In the Fabric Cloud Router Details section, enter the new Cloud Router name. The name must contain 3–24 characters.
-
Enter a Purchase Order Number.
-
Select a package with the maximum number of IPv4 and IPv6 routes that you need for the new Cloud Router.
noteYou can only connect a Cloud Router to other endpoints within the same metro location.
-
Click Next: Review.
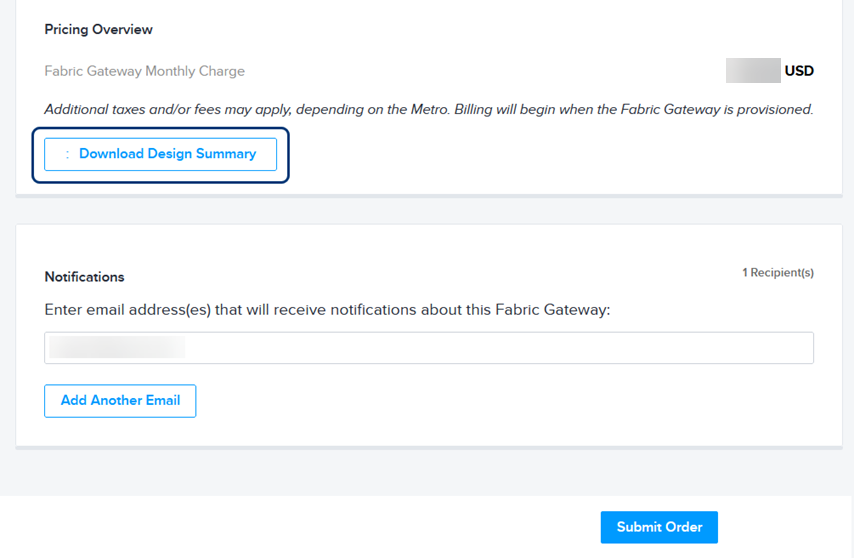
Review and Submit
-
Review your order. To download a PDF summary of the order, click Download Design Summary in the Pricing Overview section.
-
In the Notifications section, enter an additional email address and click Add Another Email.
-
Click Submit Order.
Confirmation of your new Cloud Router is displayed, with its unique ID and suggested follow-up actions.
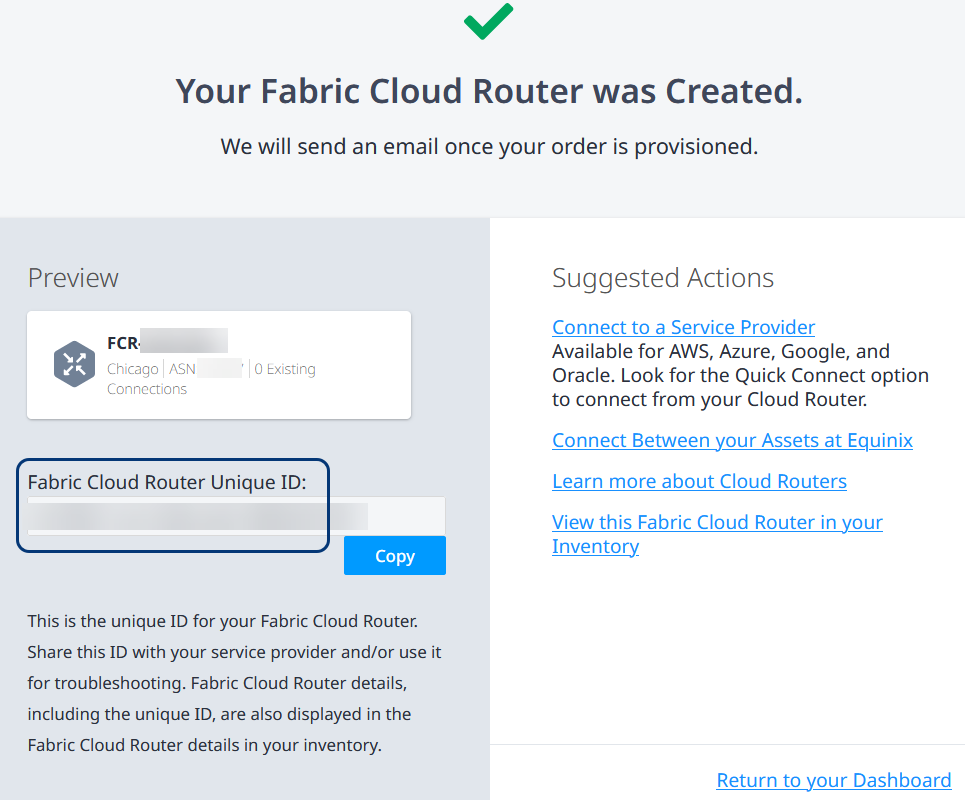
In the Suggested Actions section of your new Cloud Router order confirmation, you can click View this Fabric Cloud Router to display the inventory list. For more information, see Fabric Cloud Router Inventory.
Within a few minutes, you'll receive an email notification that your new Cloud Router is provisioned and ready for use.
Create a Cloud Router Using API
You can use Fabric Cloud Router API to automate this procedure and integrate it with your internal systems. For details, see Create a Fabric Cloud Router.