Create an SDWAN Device

Prerequisites
Authenticate - Submit your user credentials, Client ID, and Client Secret for OAuth2 authentication. Refer to API Authentication for instructions on how to call the OAuth API to validate and authenticate your credentials.
Step 2: Get Device Types and Account
Call Get Device Types
API to find the SD-WAN devices you can launch on the NE platform. You will learn about metros (metroCode) where these devices are available, the available number of cores (core), the software packages (packageCode and version), and all possible licensing and throughput options.
You may skip this step if you already know which device you want.
Check your account number (or accountReferenceId) and status in the metro where you want a virtual device by calling Get Accounts {metro} API. For billing reasons, you must have an account in the metro where you want a virtual device, either in the Active or Pending state. To learn how to create an account, go to Billing Account Management.
If you are a reseller trying to create a device for your customer, you must ensure that the customer's and your (reseller's) accounts are both in the Active or Pending status. Your account will get billed, however, you must send the customer's account number to the POST API to create an SD-WAN device for your customer.
You may skip this step if you already know your account number (or accountReferenceId) and
status.
Step 3: Configure a License
For now, bring your own license (BYOL) is the only licensing option available for SD-WAN devices and the process to BYOL is unique to every vendor.
To configure a license for a Cisco SD-WAN devices, you must do the following:
- Generate a bootstrap file on Cisco vManage platform.
- To create a C8000V-SDWAN, upload the Cisco bootstrap file by calling Upload File. You'll get a
fileUuidin the response. You can enter the value in theday0TextFileIdfield of the create payload to create a virtual C8000V-SDWAN device.
To configure a license for a CloudGenix device, you must do the following:
- Generate a license key (ION key) and license secret (Secret key) on CloudGenix platform.
- Input the license key (ION key) and secret (Secret key) when calling Equinix create device API to create a CloudGenix SD-WAN device.
License is not mandatory for Fortinet devices at the time of device creation. If you have a token,
enter it in the licenseToken field. To configure a license file for a Fortinet SD-WAN device, do the
following:
- Generate a license file on the Fortinet portal.
- Upload the license file on the Equinix portal by calling Post License File. You'll get a
fileIdthat you can use to create a virtual SD-WAN device.
To configure a Versa device, please create a vNF device template on Versa director and note the serial number.
You do not need a license file to configure an Aruba device on the Network Edge platform.
To upload a license for a Juniper SD-WAN, you must do the following:
- Generate a license file on the Juniper portal.
- Upload the license file on the Equinix portal by calling Post License File. You'll get a
fileIdthat you can use to create a Juniper SD-WAN device.
Step 4: Vendor-specific Parameters
Each SD-WAN vendor requires its own set of parameters other than the common parameters listed as part of POST API definition in Step 5. Please check the parameters of your vendor and pass the parameters in the vendorConfig{} object when creating a new device in Step 5.
Cisco SD-WAN
| Cisco vendorConfig{ } parameters | Mandatory | Type | Example | Possible Values | Description |
|---|---|---|---|---|---|
| siteId | Yes | string | 12345 | Site Id. Mandatory for Cisco SD-WAN devices. A siteId is a particular physical location within the Viptela overlay network, such as a branch office, or a campus. | |
| systemIpAddress | Yes | string | 192.168.1.5 | System IP address. Mandatory for Cisco SD-WAN devices. Each vEdge router and vSmart controller is assigned a system IP address. It should be in decimal four-part dotted notation, just like IPv4 address. | |
| hostname | Conditional | string | SR-01 | hostname. Mandatory for C8000V-SDWAN. |
CloudGenix PRISMA-SDWAN
| CloudGenix vendorConfig{ } parameters | Mandatory | Type | Example | Possible Values | Description |
|---|---|---|---|---|---|
| licenseKey (ION key) | Yes | string | <license_key> | License key (ION key). Mandatory for CloudGenix devices. | |
| licenseSecret (Secret key) | Yes | string | ec68e425-f973-452e-a866-76be5844d0ba | License secret (Secret key). Mandatory for CloudGenix devices. |
Versa VERSA_SDWAN
| Versa vendorConfig{ } parameters | Mandatory | Type | Example | Possible Values | Description |
|---|---|---|---|---|---|
| localId | Yes | string | SDWAN-Branch@Versa.com | Email address of the branch location. | |
| remoteId | Yes | string | Controller-01-staging@Versa.com | Email address of the controller side. | |
| serialNumber | Yes | string | 12345 | The customer selects a serial number when setting up the device template on Versa director. Versa post-staging device serial number on Versa director should match this input. | |
| controller1 | Yes | string | 54.219.248.29 | Ip address of the SD-WAN controller1. | |
| controller2 | Yes | string | 54.177.220.115 | Ip address of the SD-WAN controller2. |
FortiGate FG-SDWAN *
| FortiGate vendorConfig{ } parameters | Mandatory | Type | Example | Possible Values | Description |
|---|---|---|---|---|---|
| adminPassword | Yes | string | ThisPassword9 | Password. This password should be at least 6 characters long and must include an uppercase letter and a number. | |
| controller1 | Yes | string | 1.1.1.1 | System IP address. Mandatory for FortiGate SD-WAN devices. |
*FortiGate SD-WAN devices also need a hostname but it is not part of vendorConfig object, just passed as a parameter along with others like deviceTypeCode, accountNumber, etc.
Arista VELOCLOUD-SDWAN
| Arista vendorConfig{ } parameters | Mandatory | Type | Example | Possible Values | Description |
|---|---|---|---|---|---|
| activationKey | Yes | string | GJUK-JM2X-59BJ-SAMPLE | Activation key. Available on the VeloCloud Orchestration Portal. | |
| controllerFqdn | Yes | string | demo.velocloud.net | VeloCloud SD-WAN Gateway. In the list of ACLs for the device, please provide the IP addresses associated with the controllerFqdn. | |
| rootPassword | No | string | TestPassword! | CLI password for the device. |
Aruba EDGECONNECT-SDWAN
| Aruba vendorConfig{ } parameters | Mandatory | Type | Example | Possible Values | Description |
|---|---|---|---|---|---|
| accountName | Yes | string | accountName | The name of the account. | |
| hostname | Yes | string | myhostname1 | Host name for identification. This gets included as FQDN and ensures the device is reachable from the approved sources. Only a-z, A-Z, 0-9, and hyphen(-) are allowed. It should start with a letter and end with a letter or digit. The length should be between 2-30 characters. Exceptions - FTDv 2-14; Aruba 2-24. | |
| accountKey | Yes | string | accountKey | The account key. | |
| applianceTag | No | string | applianceTag | The appliance tag. |
Step 5: Create SD-WAN Devices
| POST /ne/v1/devices | |
|---|---|
| Method | POST |
| URL or End Point | /ne/v1/devices |
| Headers | Authorization, Content-Type |
| Query Parameters | draft, draftUuid |
If you want to create a redundant SD-WAN device that has two devices, primary and secondary, do the following:
-
Set
vendorConfigparameters of the optional secondary object.- provide two licenseFileIds for a Cisco SD-WAN in the request body payload
- provide two licenseKeys (ION keys) and license secrets (Secret keys) for a CloudGenix redundant device in the request body payload
- provide two activationKeys for a redundant Arista VeloCloud SD-WAN Edge device.
-
You may have a different ACL template, account number, additionalBandwidth, metroCode, and notifications for your secondary device.
-
If you are a reseller trying to create a redundant device for your customer, make sure both the primary and secondary metros are in the same country. Also, the primary and secondary account numbers must be the same. The reseller's account will get billed, however, this API accepts the customer's account number to create devices for the customer. The above restrictions are necessary as each customer is associated with a reseller's billing account.
If you do not have all the necessary information, you can still save the information as a draft. You must provide a deviceTypeCode, an accountNumber/accountReferenceId, and a metroCode to save a draft.
By creating a virtual device, you accept the Order Terms. Call Get Order Terms to review the details.
Sample Request
A sample curl request to create a redundant Cisco SD-WAN device.
curl -X POST
https://api.equinix.com/ne/v1/devices?draft=false
-H 'Authorization: Bearer <token>'
-H 'Content-Type: application/json'
-d '
{
    "deviceTypeCode": "C8000V-SDWAN",
    "projectId": "XXXXX",
    "metroCode": "DC",
    "termLength": "1",
    "licenseMode": "BYOL",
    "packageCode": "DNA",
    "virtualDeviceName": "sroy-cisco-8v-controller",
    "notifications": [
        "test@equinix.com"
    ],
    "version": "17.09.01a",
    "interfaceCount": 10,
    "deviceManagementType": "SELF-CONFIGURED",
    "core": 4,
    "vendorConfig": {
        "systemIpAddress": "1.1.1.1",
        "siteId": "4567",
        "hostname": "SR-01"
    },
    "aclTemplateUuid": "3319e378-be2f-40e4-8e79-13ea2aed7a5f",
    "day0TextFileId": "917f2621-11d4-468f-9a09-af8fd66c0e57",
    "accountNumber": "201091",
    "secondary": {
        "metroCode": "DC",
        "notifications": [
            "test@equinix.com"
        ],
        "virtualDeviceName": "sroy-cisco-8v-controller-secondary",
        "additionalBandwidth": "100",
        "vendorConfig": {
            "systemIpAddress": "1.1.1.1",
            "siteId": "9886",
            "hostname": "SR-02"
        },
        "aclTemplateUuid": "3319e378-be2f-40e4-8e79-13ea2aed7a5f",
        "day0TextFileId": "dec1dee5-eba9-4187-a029-ae76341e8874",
        "accountNumber": "201091"
    },
    "additionalBandwidth": "100"
}
'
For a complete list of parameters and options, see the API Reference.
Sample Response
Sample response for a single device 202: Request accepted.
{
    "uuid": "74d8c6b6-3153-4271-9f0e-45bdc7094dec"
}
Sample response for a redundant device 202: Request accepted.
{
    "uuid": "74d8c6b6-3153-4271-9f0e-45bdc7094dec",
    "secondaryUuid": "de5cf79b-3d16-4ccd-841b-3b68ecda2142"
}
If you get “Access Denied,” contact your local Equinix Service Desk for Portal access.
Device Status
When an SD-WAN device is created, the device transitions through various states within the Equinix infrastructure. These states can be monitored using the "status" response attribute of the Get Virtual Device {uuid} API. Once your device is provisioned and the license is applied, you can create connections to cloud service providers.
| Virtual device states | Description |
|---|---|
INITIALIZING | Equinix is in the process of reserving resources and creating the device. |
PENDING_ACCOUNT | Customer's account is not approved. The device creation will continue once the account gets approved. |
PROVISIONING | The device is booting. |
PENDING_ORDER | This status only applies to orders coming to NE from Siebel. Customers need to log in to the Network Edge portal and submit the pending order. |
PENDING_SIGNATURE | The customer has not yet accepted Network Edge terms. |
CANCEL_ORDER | The order from Siebel to NE is canceled. This status only applies to orders coming to Network Edge from Siebel. |
WAITING_FOR_PRIMARY | The secondary device is ready but the primary is not. This state may appear if you have requested a redundant device. |
WAITING_FOR_SECONDARY | The primary device is ready but the secondary is not. This state may appear if you have requested a redundant device. |
FAILED | The device creation failed. |
PROVISIONED | The device is ready. |
DEPROVISIONING | Equinix accepted the customer's request to delete the virtual device. |
DEPROVISIONED | The device is de-provisioned/deleted. |
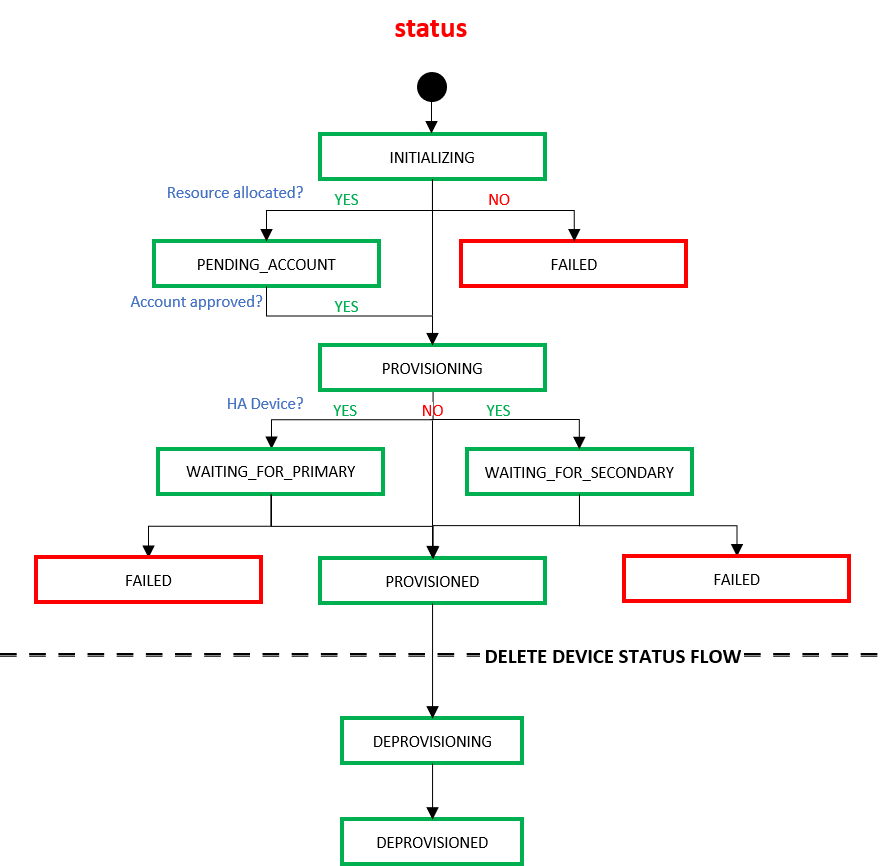
When an end-user deletes a device using the Delete Virtual Devices API, the device transitions through the following states within the Equinix infrastructure.
| status | Description |
|---|---|
DEPROVISIONING | Equinix accepted the customer's request to delete the virtual device. |
DEPROVISIONED | The device is de-provisioned/deleted. |