Cisco Catalyst 8000V Specifications
Cisco Licensing
The following table details the licensing types available on Network Edge for Cisco VNFs.
| VNF Type | BYOL | Subscription |
|---|---|---|
| Catalyst 8000V Autonomous Mode | Yes | Yes |
| Catalyst 8000V SD-WAN | Yes | No |
For Catalyst 8000V Autonomous mode, both Bring Your Own License (BYOL) and Subscription options are supported. The BYOL option requires a valid license. You are responsible for purchasing and managing your own licenses from Cisco or their partners or resellers.
Cisco Catalyst 8000V Router (Autonomous Mode)
- Cisco Catalyst 8000V Edge Software Data Sheet
- Cisco DNA Software for SD-WAN and Routing Ordering Guide
| 2 Cores | 4 Cores | 6 Cores | 8 Cores | 16 Cores | |
|---|---|---|---|---|---|
| Memory | 8 GB | 8 GB | 16 GB | 16 GB | 16 GB |
| Software Package (BYOL) | DNA Essentials, DNA Advantage, DNA Premier | ||||
| Software Package (Subscription) | DNA Essentials, DNA Advantage | ||||
| Speed Tier (BYOL) | T0, T1, T2, T3 | ||||
| Speed Tier (Subscription) | T2 | T2 and T3 | |||
| Virtual Data Interfaces Supported (Default/Max) | 10 / 24 | ||||
| System Reserved Interfaces | GigabitEthernet 1 (Management) GigabitEthernet 2 (WAN/SSH) | ||||
| Available License Type | BYOL / Subscription | ||||
| Access Methods | SSH (CLI) HTTPS (Web Console) | ||||
| Image Version | See Available Image Versions | ||||
| Restricted CLI Commands | None | ||||
| Deployment Option | Single Redundant |
Configuring a Cisco Catalyst 8000V Router (Autonomous Mode) Without an IP Address
If you choose to create your Catalyst 8000V Router (Autonomous Mode) Without an Equinix Public IP Address, the VNF is provisioned without any public IP addresses on the WAN or Management interface. When entering the Device Details, you can choose between the following:
- DHCP - a network management protocol that automatically assigns IP addresses.
- Static IP Address - enter the IP address, subnet mask, and default gateway.
- NO IP Address - an IP address will not be assigned.
Creating a Cisco Catalyst 8000V Router (Autonomous Mode)
When creating a Cisco Catalyst 8000V Router (Autonomous Mode) consider the following device-specific options.
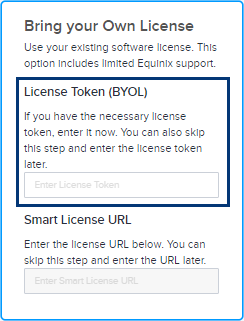
If you are Bringing Your Own License, the following device creation steps will apply:
-
You can enter your License Token during the device creation process. Once you enter the license token, your virtual device will be provisioned with the license based on the token provided. If you do not provide token information, your virtual device will still be provisioned but you will need to manually register your license with the smart server using your license token after the virtual device is provisioned.
-
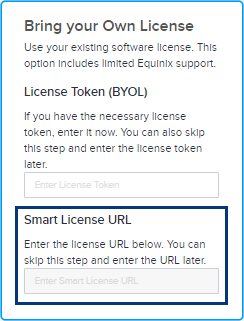
Alternatively, you can enter your Smart License URL. You must have a valid Cisco account to complete this process.
To get a Cisco Smart License token:
- Sign in to the Cisco Smart Software Manager (CSSM) with your Cisco.com account credentials.
- Locate the Virtual Accounts > Inventory section to create a new token.
- Your newly created token will appear in the token list. Click the token to see the details and copy the token string.
To register the new token on your device, access the device CLI and enter a command to register your token.
license smart register idtoken <your_token_string>To verify your token registration enter a command such as:
show license statusIf you encounter any issues or need more detailed steps, see Cisco DNA Center Administrator Guide or contact Cisco support.
-
You are responsible for obtaining support from Cisco or their partners. If you are subscribing with a license from Equinix Network Edge, you can open a support case with Cisco Technical Assistant Center (TAC) to troubleshoot Cisco IOX-XE software issues or ask Cisco IOX-XE configuration questions from the Network Edge portal. See Cisco Catalyst 8000V Subscription and Support for more information.
When configuring your Device Details:
-
When selecting your Device Resources, make sure you have successfully determined the maximum throughput for those resources. Throughput tier options are determined by the device resources.
-
Select a Software Package from: DNA Essentials, DNA Advantage, or DNA Premier.
-
Enter a Numeric Throughput (BYOL only) or select a Throughput Tier. You can only make one selection. You cannot enter a Numeric Throughput and then select a Throughput Tier.

Choosing the wrong throughput can result in experiencing less than optimal throughput for your device. See Entitled Throughput and Throttling Specifications in the Autonomous Mode (Table 4) for more information. Tier 4 listed on the table is not supported by Network Edge.
Applying an ACL template is a mandatory step in the device creation process. If you need to create a template to apply to your device, click Create Access Control List Template. See Configure Access Controls on Virtual Devices for more information.
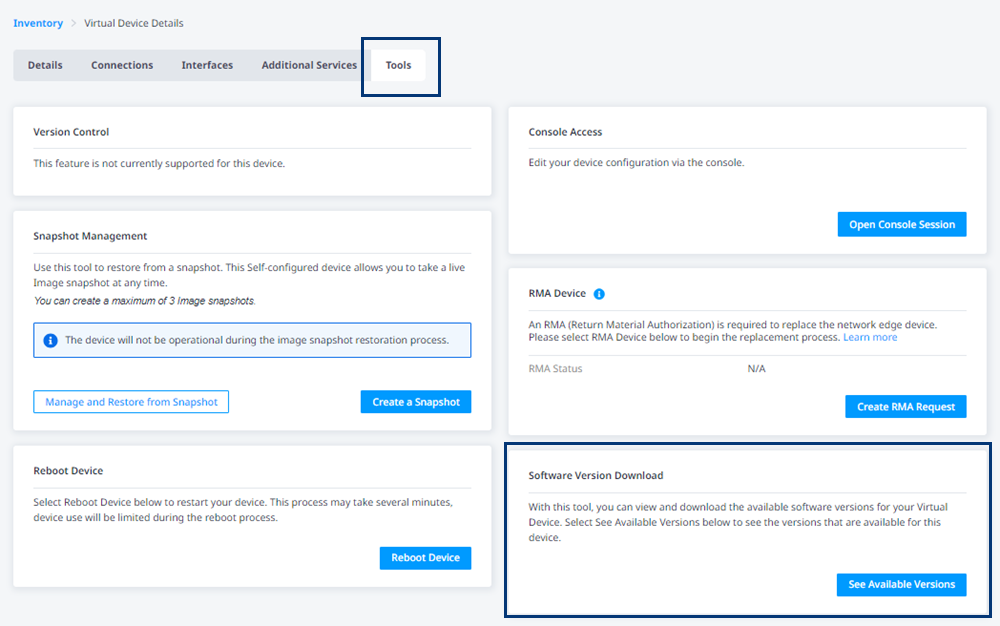
The image download tool in Network Edge allows you to view and download available software versions for the Cisco Catalyst 8000V (Autonomous Mode) and then upload them to your device in order to upgrade or downgrade it. This tool is for subscription devices with images certified by Equinix.
-
Sign in to the Equinix Customer Portal and navigate to Network Edge.
-
From the Network Edge menu, select Virtual Device Inventory. Make sure to switch to the intended Project Name/ID before proceeding.
-
Locate the Cisco Catalyst 8000 device and click the device name to view the Virtual Device Details page.
-
Click Tools.
-
In the Software Version Download card, click See Available Versions.
-
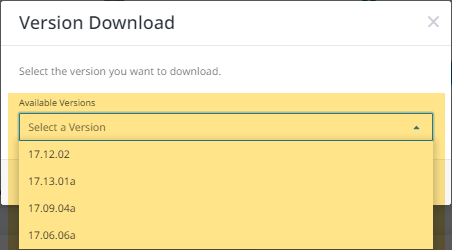
In the Available Versions drop-down, select the version you want to download.
-
Click Start Version Download.
-
When the download prompt displays, save the file to a location of your choice.
Cisco Catalyst 8000V Router (Controller Mode)
| 2 Cores | 4 Cores | 6 Cores | 8 Cores | 16 Cores | |
|---|---|---|---|---|---|
| Memory | 8 GB | 8 GB | 16 GB | 16 GB | 16 GB |
| Software Package | DNA Essentials DNA Advantage DNA Premier | ||||
| Virtual Data Interfaces Supported (Default/Max) | 10 / 24 | ||||
| System Reserved Interfaces | GigabitEthernet 1 (Management) GigabitEthernet 2 (WAN/SSH) | ||||
| Available License Type | BYOL | ||||
| Access Methods | HTTPS (Web Console)vManage | ||||
| Image Version | See Available Image Versions | ||||
| Restricted CLI Commands | None | ||||
| Deployment Option | Single Redundant |
Creating a Cisco Catalyst 8000V Router (Controller Mode)
The prerequisites for deploying Cisco Catalyst 8000V in the SD-WAN Controller mode are:
- Cisco.com log in credentials.
- The appropriate DNA licenses to provision and operate the Catalyst 8000V device from Cisco.com. This license is installed in vManage, not Equinix Fabric.
- Your Cisco vManage software (controller) should be running and operational (not managed by Equinix).
You will need to Generate a Bootstrap Configuration File.
-
Sign into the Cisco vManage SD-WAN Controller.
-
Locate the SD-WAN edge device in the controller.
-
On the Cisco vManage menu, select Configuration > Devices.
-
Select the logical C8000V SD-WAN you are using for your new Network Edge device and click
 and select Generate Bootstrap Configuration.
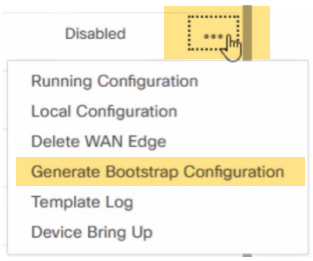 note
noteA chassis number for your C8000V is populated by syncing your Smart Account on SD-WAN Manager after your license is deposited to your Smart Account. Select any unused chassis number to generate the bootstrap file. It is important to follow Step 4 above before creating a profile.
-
In the Generate Bootstrap Configuration box, select Cloud-Init and click OK. Selecting Include Default Root Certificate is optional.
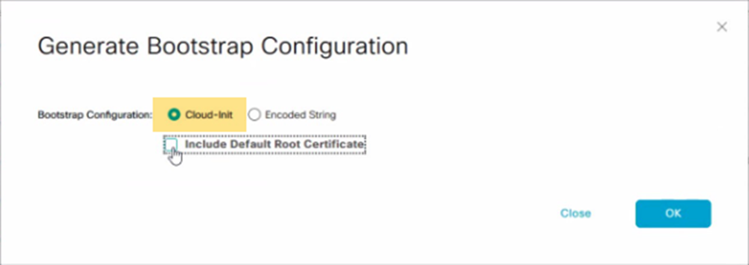
The Generate Bootstrap Configuration box displays the bootstrap configuration, including the OTP token for the license, vBond address, UUID, and organization information.
-
Click Download in the Generate Bootstrap Configuration box to save a copy of the bootstrap configuration.
-
Validate your bootstrap file content to ensure that no extra information is included. The example below shows the valid format and attributes allowed in the cloud-init file to be uploaded in the C8000V device creation workflow.
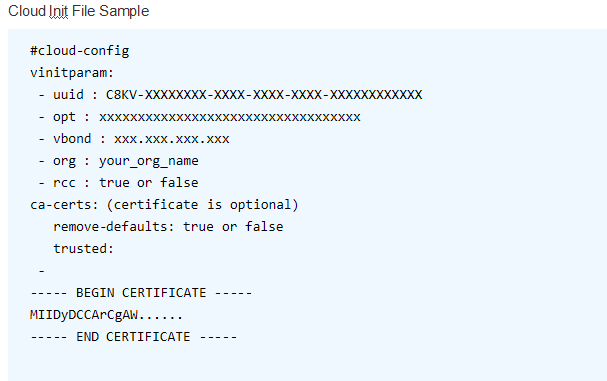 note
noteThis is a example of a Cloud Init file. Use the file downloaded from vManage and do not modify. For the most up-to-date documentation on the bootstrap generation, see Bootstrap Process for Cisco SD-WAN Cloud-Hosted Devices.
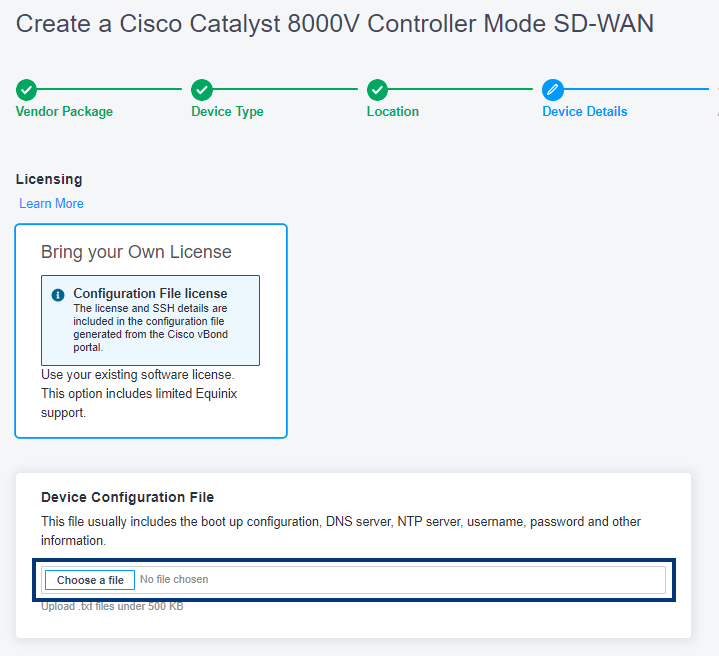
-
While specifying your Device Details, you will upload the device configuration file.
Enable Federal Information Processing Standards (FIPS) Mode on Cisco Catalyst 8000V
By default, FIPS mode is not enabled on Cisco Catalyst 8000V devices, so you will need to enable it manually.
To enable FIPS Mode on Catalyst 8000V:
-
Configure
platform ipse fips-mode.C8000V#conf t
>
Enter configuration commands, one per line. End with CNTL/Z.
C8000V-FIPS(config)#platform ipsec fips-mode
Enable FIPS mode will take effect after reboot! -
Save the configurations.
C8000V#copy running-config startup-config
>
Destination filename [startup-config]?
Building configuration...
[OK] -
Reload the router.
C8000V#reload
>
Proceed with reload? [confirm] -
Verify that FIPS mode is enabled after the router is online.
C8000V-#show running-config | inc fips
>
platform ipsec fips-mode
For more information, see the Cisco documentation.
Cisco Catalyst 8000V Subscription and Support
A license subscription option for Cisco Catalyst 8000V Autonomous mode is now available from the Equinix Network Edge portal. For Cisco VNFs support, refer to the following table to understand when to create a support case directly with Cisco.
| License Type | Equinix | Cisco |
|---|---|---|
| Subscription Through Equinix | For license subscription through Equinix, open Equinix support tickets for issues related to licensing such as license registration. | Open a Cisco TAC case through the Network Edge portal (see the Sections below) for IOX-XE related issues or configuration related questions. Work directly with Cisco TAC without Equinix engagement. |
| BYOL | No support from Equinix for license related issues. | You are responsible for obtaining Cisco support from Cisco or Cisco partners. Contact a Cisco sales representative or partner to purchase a license and support contract. |
For either license, you can open Equinix support tickets for Network Edge infrastructure related issues, including VNF operation, connectivity issues, and Network Edge service issues.
The Catalyst 8000V Autonomous mode subscription licensing option allows you to troubleshoot Cisco 8000V software or configuration issues directly with Cisco Technical Assistance Center (TAC). To do so, a Cisco TAC support case can be submitted from the Network Edge portal, and it is routed directly to the Cisco TAC. If it is determined that there is an Equinix Network Edge infrastructure-related issue, then Equinix will engage in troubleshooting. Equinix Support will not engage in Cisco 8000V software or configuration issues and troubleshooting.
Obtain a Cisco Smart License Token
This topic is intended to provide steps for acquiring a Cisco Smart License token for your Cisco Catalyst Catalyst 8000V Network Edge (BYOL) device.
To get a Cisco Smart License token, follow the instructions in the Cisco documentation.
To register the new token on your device, access the device CLI and enter a command to register your token.
Register Token Command Example:
license smart register idtoken <your_token_string>
In the above example, you would replace <your_token_string> with the new token string.
Token Verification Command Example:
show license status
If you encounter any issues or need more detailed steps, see Cisco DNA Center Administrator Guide or contact Cisco support.
Open a Cisco TAC Case for Catalyst 8000V Subscription License on Network Edge
To open a case with Cisco TAC for your Catalyst 8000V Autonomous mode Subscription license:
-
Click the support icon in the top right corner in Network Edge.
-
Click Open a Support Case.
-
In the Select a Product or Service drop-down, select Network Edge and click Virtual Device.
-
Click Existing Device.
-
Enter the UUID of your virtual device or select your existing Cisco C8000V virtual device with subscription option.
-
In the Case Type drop-down, select Open Cisco TAC Case to troubleshoot issue directly with Cisco.
-
A prompt will display to redirect you to the Device Details page for the C8000V to provide further information. Click Yes proceed. A notification displays when a request is submitted successfully.

-
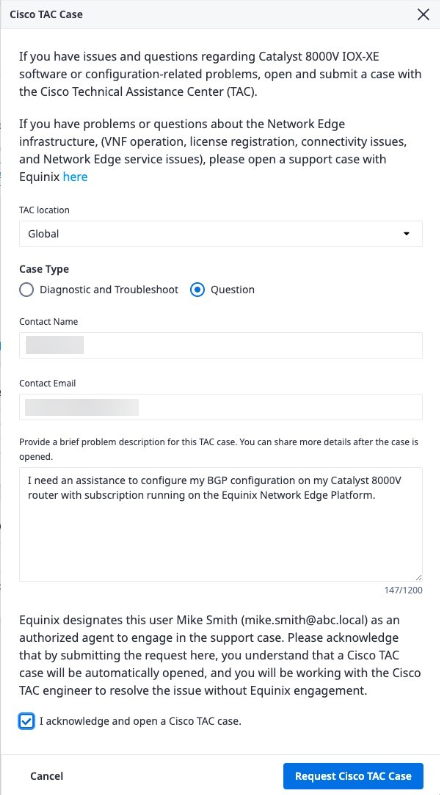
In the Device Details page, enter the information requested in the Cisco TAC Case box.
-
Click Request Cisco TAC Case.
infoMake sure that you are opening Cisco TAC case for Cisco 8000V IOX-XE software issue OR configuration question. You will be directly working with Cisco TAC without Equinix engagement.
You can also open the Cisco TAC case workflow by clicking Open Cisco TAC Case from the Device Details page.
-
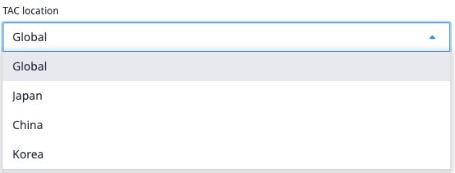
Select the TAC location first. Use Global TAC unless you are in Japan, Korea, or China and need to obtain support from the local TAC in a specific language, In that case, select the appropriate TAC location. The TAC case will be opened in the selected TAC location.
-
For Case Type:
- Select Diagnostic and Troubleshoot if you are seeing Cisco IOX-XE software issue and need to troubleshoot with Cisco TAC.
- Select Question if you need assistance with Cisco 8000V IOX-XE configuration questions.
-
Enter your Contact Name to be used to open a case with Cisco TAC.
-
Enter your Contact Email address. This will be the main email address used to exchange communication with Cisco TAC.
-
Provide a brief problem description for this TAC case. You can provide more details after the case is opened.
-
Select I acknowledge and open a Cisco TAC case.
-
Click Request Cisco TAC Case to initiate TAC case process. You will receive an email to confirm the request. The Cisco TAC case will be opened, and you will be working with Cisco TAC engineers.