
For an easier, more precise ordering experience, you can use a DiLOA token, or a file that contains DiLOA token information, to order standard Cross Connects in the Equinix Customer Portal (ECP).
Unified Cross Connects Portal with the New Scheduler Video
First, a Letter of Authorization (LOA) must be generated and approved. This LOA enables you to order a new Cross Connects connection. Use an LOA that includes a key generated online from the Digital LOA Manager.
Use a Digital LOA
-
Enter your username and password into the Equinix Customer Portal, and click Sign In.
-
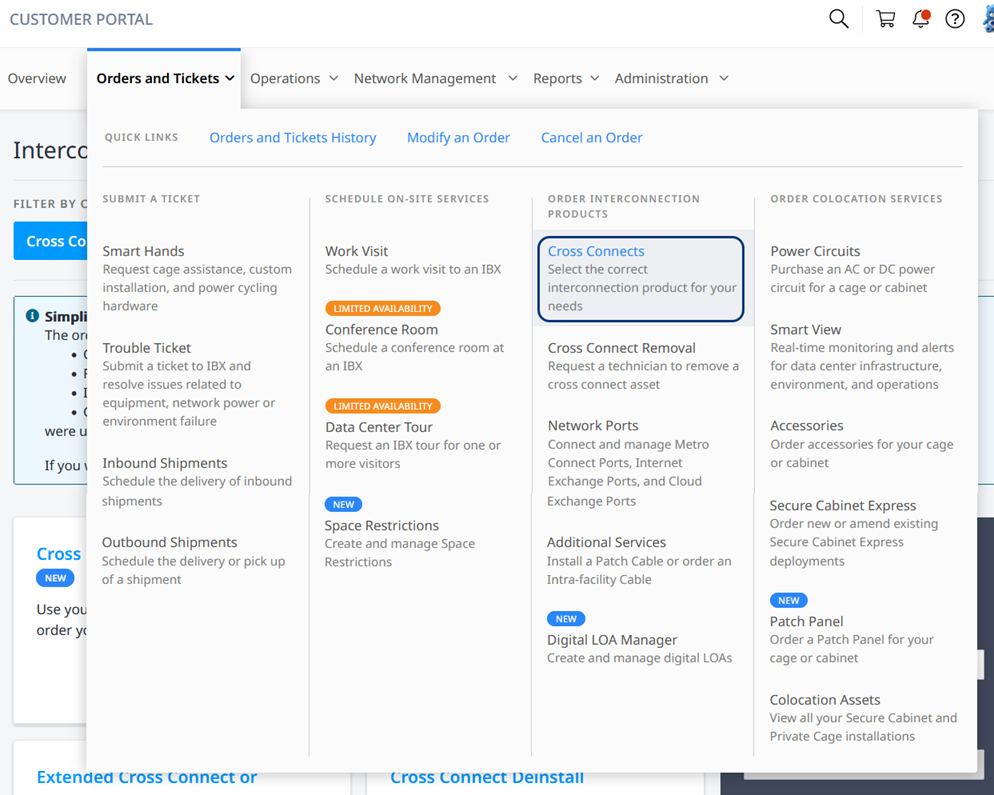
From the Orders and Tickets menu, choose Cross Connects.

-
Click Cross Connect with Digital LOA from the Interconnection Catalog.

-
In the Select LOA section, click Use a Digital LOA.


Note: The choices in the following forms are based on the assets that are assigned to your organization and account. The values that are displayed are the ones that are available for your situation.
-
In the Use a Digital LOA section, select an LOA ID to use for this order. You can filter the list by entering an ID or a keyword.
-
Click Next in the lower right corner.
Configure Your Cross Connect
A blue progress bar is displayed across the top of the page. Mouse over the bar to view a drop-down list that shows your steps for creating the Cross Connects order.

Completed sections are displayed with check marks. Click a completed section to return and make changes.
-
Below the summary in the Connection Overview section, choose an A-side IBX from the drop-down list.
The Z-side IBX is provided by the LOA ID that you selected.
-
In the Connection Details section, click + Assign port information for the A-side connection.

The A-side Detail – Connection 1 form is displayed on the right side of the page.
-
Provide connection details for the A-side connection:

-
Enter a Patch Panel number, or choose a Cage, a Cabinet, and a Patch Panel from the drop-down lists.
By default, the Connection Service and the Media Type are set to Single-Mode Fiber.
-
Choose a Protocol Type and a Connector Type from the drop-down lists.
-
Choose Port A and optional Port B from the drop-down lists, or from the Visual Patch Panel display of available ports below. The Next Available port is the default.
-
To request that Equinix install the new Cross Connect from the panel to your equipment, select Patch my equipment and choose the Device Cabinet, Connector Type, and Port. Additional Smart Hands fees will apply.
-
Select Add Cross Connect Light Link Verification. An additional charge for each connection will apply.
-
If your DiLOA includes additional connections, click Next Connection in the lower right corner. The Asset Selection Details form displays information for the next connection. By default, the details from the first connection are displayed.
-
Change the values for the Cage, Cabinet, Patch Panel, and ports as needed. To provide the details for additional connections, click Next Connection in the lower right.
-
Repeat the previous steps for all the A-side connections. When the connection details are complete, click Confirm Selection in the lower right corner. The updated A-side Connection Details are displayed.
-
-
Review the updated list in the Connection Details section.
-
To make changes, click the pencil
 on the right side of a connection row. Edit the information in the Asset Selection Details form and click Confirm Selection.
 -
To delete a connection, click the wastebasket
 on the right side of a connection. Click Delete Connection.
 Note: At least one connection must be present to complete the order.
-
-
To view all the details and charges, click Show Order Summary in the lower right corner. This information updates as you progress through the ordering process.

-
To place your order on hold to match the date that your circuit is enabled, select Circuit Delivery Date and select a date from the calendar. This is the date when your Carrier commits to enabling the circuit. After your Carrier delivers the service, Equinix completes the installation.
-
Enter or upload additional details and instructions that might help the Equinix technician.
-
When all the order details are correct, click Next in the lower right corner.


Schedule Your Order
-
To schedule the date for your completed installation, select a date in the calendar view. You can select from a date range suggested by Equinix. Or, you can request a different date based on your schedule and pricing needs. Select one of these calendar options:

-
Flexible (F) – Your order is completed on a date that Equinix recommends, and you receive a discount on your installation charge.
-
Standard (S) – Your order is completed during a typical, guaranteed installation interval.
-
Expedited (E) – Your order is completed more quickly. Click a date in the calendar, and choose a time from the drop-down list. Approval is required, and additional fees might apply.
-
-
Click Next in the lower right corner.

Provide Contact Information
In the A-side Contacts List, you are automatically assigned as the technical contact and the notification contact.
-
To add additional contacts, complete one of these steps:
-
Click the Search for a contact field, begin typing a name, and select the name from the filtered drop-down list.

-
Click Add from Directory to search the Contact Directory list. Select one or more contacts, and click Done in the lower right corner.
-
If the contact you want to add is not included in these lists, click Add New Contact. Complete the Add an Unlisted Contact form and click Add in the lower right corner.
-
-
The contacts that you add are automatically assigned as a Notification Contact to receive order updates. You can select one of them as a Technical Contact.
-
In the Z-side Contacts List section, select Notify Z-side contact upon completion. Enter the contact email address.
-
Click Next in the lower right corner.

Review Order
After you have reviewed the information for this new Cross Connects connection, you can make final changes and complete the ordering process.
-
In the Review Order form, verify that the Connection Details, Additional Details, and Contact Information sections are correct.
-
Enter additional Customer Reference information.
-
In the Terms and Conditions section, click Review Terms and Conditions.
-
In the form that displays on the right side, review the Acceptance section and click Accept in the lower right corner.

-
Click I Accept.
-
Click Submit in the lower right corner.
The Order Submitted confirmation window displays your order number.

-
To find details about the status of your order, click Track in Order History.
-
To send customer feedback, select a rating and enter any additional feedback. Click Submit.
-


