View, Update, and Deprovision Precision Time Services
Use the Equinix Fabric portal to view the details of an Equinix Precision Time service and to make changes, including the service tier. You can also retry the modified configuration or remove the service instance altogether.
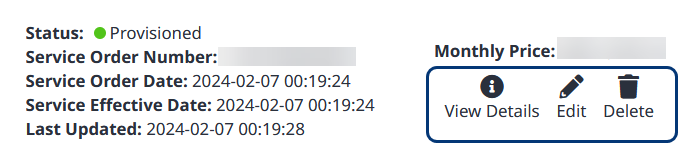
The Services section of the Fabric Precision Time Inventory lists all the Precision Time service instances that are included in a billing account, along with their provisioning status.
Not all options are available for each service instance. The available options are indicated by icons listed on the right side of each entry in the Services section. If an option is available, the icon is highlighted.
View a Precision Time Service Instance
-
Sign into the Fabric portal.
-
If your Fabric account has been transitioned to the Equinix Identity and Access Management (IAM) platform, use the Context Switcher
 drop-down list to access your project and its assets.
 -
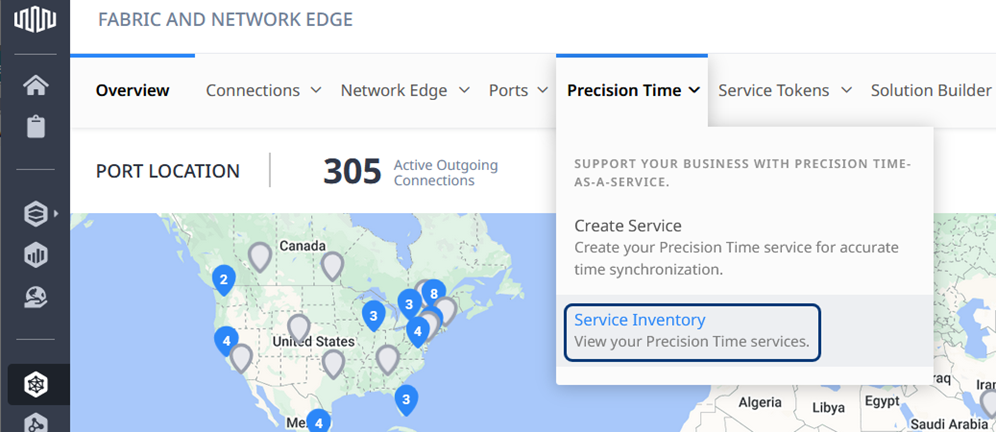
From the Precision Time menu, click Service Inventory.
-
Choose your Account and Location from the drop-down lists.
-
In the Services section, locate the service instance that you want to view.
-
Click View Details.
The Service Details window is displayed, showing basic information about the service. You can also find details on the locations, the networking and connection settings, NTP or PTP advanced configuration details, and pricing.
-
Click Go Back at the top left of the window to return to Services.
Modify a Precision Time Service Instance
Do not replace an existing Precision Time service by deleting and creating a new service. Instead, follow these steps to update your service configuration through the Fabric portal. You can modify the service and retry the configuration to verify your updates.
A service instance must be provisioned before you can change its configuration. The Services window shows an active Provisioned status for the service instances that can be modified.
Before updating a newly provisioned service, you must wait 6 hours. During this wait time, the invoice database updates its records to provide accurate pricing.
Note: If a Precision Time service instance was created manually by an Equinix sales representative, you must contact your sales representative to change the service tier. You will not be able to change the service tier by using the Edit Service window.
-
Sign into the Fabric portal.
-
If your Fabric account has been transitioned to the Equinix Identity and Access Management (IAM) platform, use the Context Switcher
drop-down list to access your project and its assets. -
From the Precision Time menu, click Service Inventory.
-
Choose your Account and Location from the drop-down lists.
-
In the Services window, locate the service instance that you want to modify.
-
Click Edit.
Warning: As explained in the Edit this time service? window, editing the configuration might disrupt the service. Click Continue to proceed.
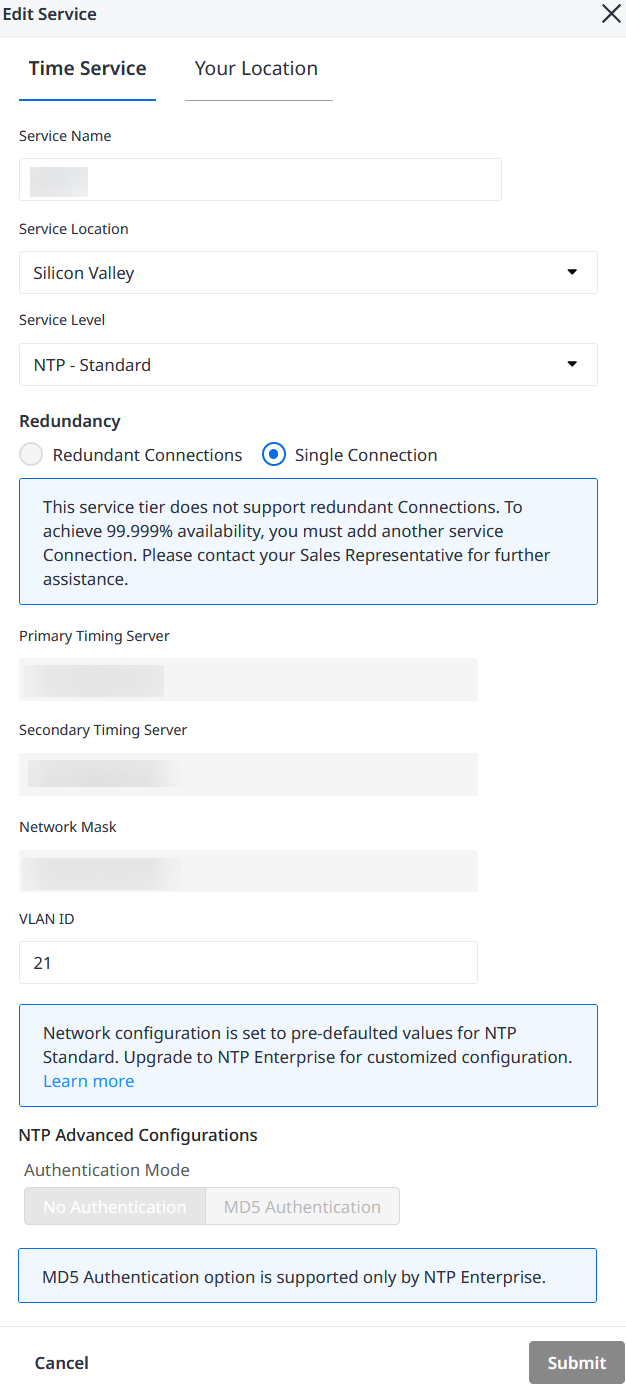
The Edit Service window is displayed.

-
Edit the service details that you want to change:
-
Service Name – Enter a new name.
-
Service Location – Choose the location of the time source for your service from the drop-down list.
Typically, two time source locations are available, depending on the country that you specified when you created your Equinix Precision Time service. To view the Precision Time sources, see Service Locations.
Choose one location from the following time-source sets:
-
New York, Silicon Valley, or Toronto for North American services
-
Hong Kong or Tokyo for APAC services
-
Sydney for Australia services
-
Singapore for Singapore services
-
Frankfurt or London for EMEA services
Note: For Brazil services, NTP protocol is supported from the NY or SV location. However, PTP protocol is supported only from NY.
-
-
Service Level – Choose the Standard or Enterprise service tier.
Note: To downgrade an NTP Enterprise-level service instance through a manual order to the Standard tier, you must contact your Equinix sales representative for assistance. Your sales representative can submit a manual order to deprovision, and then provision, a new instance at the Standard tier.
-
Redundancy – Select Redundant Connections to designate a redundant port, which provides connectivity if your primary port is unavailable. (This feature is not available for NTP with the Standard service tier.)
-
Primary Timing Server – Enter an IP address located in the same subnet as the primary server IP address
-
Secondary Timing Server – Enter an IP address located in the same subnet as the secondary server IP address
-
Network Mask – Enter the IP address of the mask
-
VLAN ID – Enter an identifier
-
Inner Tag or C-Tag – Enter a tag identifier
-
Outer Tag or S-Tag – Enter a tag identifier
-
PTP Advanced Configurations – Enter the values that you want to change.
-
Time Scale:
-
ARB – Generates timestamps in UTC format with UTC offset as 0. (This is the default.)
-
PTP – Generates timestamps in TAI format with current UTC offset value.
-
-
Domain – Enter a PTP domain value for the time server. Any clocks that synchronize with this server should be configured with the same domain value. The range is 0 (the default) to 127.
-
Priority 1 and Priority 2 – Enter a value between 0-248. Lower values indicate a higher priority.
-
Log Announce Interval – Choose an option from the drop-down list. This logarithmic value controls the rate of PTP Announce packets from the PTP server. The default is 1, which indicates 1 packet every 2 seconds.
-
Log Sync Interval – Choose an option from the drop-down list. This logarithmic value controls the rate of PTP Sync packets. The default is -4, which indicates 16 packets every second.
-
Log Delay Req Interval – Choose an option from the drop-down list. This logarithmic value controls the rate of PTP DelayReq packets. This setting might also need to be specified on the PTP client. The default is -4, which indicates 16 packets every second.
-
Transport Mode – Choose Multicast (default), Unicast, or Hybrid.
In the Unicast Grant Time field, enter the number of seconds from 30-7200.
-
-
NTP Advanced Configurations – If you are updating an NTP Enterprise service, you can adjust the authentication support. To add support, click MD5 Authentication and provide the following information.
-
MD5 Type – Select the type of key string, ASCII or HEX.
-
MD5 Key Id – Enter the key ID. Integers from 1-65535 are valid.
-
MD5 Key Password – Enter a password that contains 10-40 characters:
-
For HEX passwords, only HEX characters 0-9 and A-F can be used.
-
For ASCII passwords, all ASCII characters can be used, including numbers, letters, and special characters.
-
-
Add Another – Click this option to add up to 25 more keys.
-
-
-
If you changed the service tier:
-
Click Accept Terms and Conditions.
-
Review the Terms and Conditions, and click Accept.
-
-
Click Submit.
In the Services window, the service order number is updated, and if necessary, the instance is reconfigured and reprovisioned. A notification is displayed at the top right of the Services window, and the Status is updated at the top of the Services section.
Retry a Precision Time Service Configuration
-
From the Services window, locate the service instance that you want to retry
Note: You can only retry the configuration of a service instance that has a Provisioning failed status.

-
Click Retry. A progress bar displays the configuration progress.
The service order number is updated, and the updated configuration for the service instance is retried and reprovisioned. A status update notification is displayed at the top right of the Services window, and the Status progress bar is displayed at the top of the Services section.

Deprovision a Service
When a Precision Time service is deleted, its status changes to Deprovisioned, and the service is listed in the Deprovisioned Services section of the Precision Time Service Inventory in the Fabric portal.
-
From the Services window, locate the service instance that you want to deprovision.
-
Click Delete.

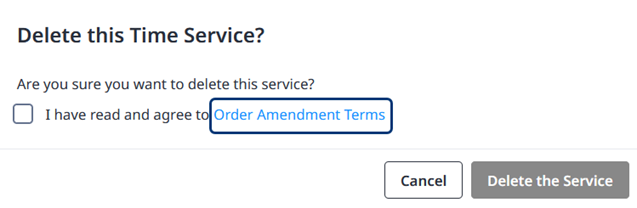
The Delete this Time Service? window is displayed.
-
Click and review the Order Amendment Terms, and click Accept.
-
Click Delete.
The service instance is deleted, and is moved to the Deprovisioned Services section.