Adicionar Redundância a um Único Dispositivo Virtual
Adicione um dispositivo secundário a um dispositivo virtual ativo para criar um par redundante . Adicionar resiliência a um dispositivo existente elimina a necessidade de começar do zero com dois novos dispositivos.
Algumas características do dispositivo secundário devem ser as mesmas do dispositivo primário, incluindo:
- configuração do dispositivo
- Licenciamento
- Recursos do dispositivo
- Pacote de software
- Taxa de transferência de licenças
Se ambos os dispositivos pertencerem à mesma conta, o período de vigência da conta secundária deverá ser o mesmo da conta principal.
Você pode personalizar os seguintes atributos do dispositivo secundário:
- Versão
- Hostname
- Lista de notificações
- Lista de usuários SSH
- Endereços IP de acesso
- Largura de banda adicional
Pré-requisitos
- Um único dispositivo virtual de Network Edge não redundante.
- O papel
Network Edge Device Manager.
- Portal
- API
-
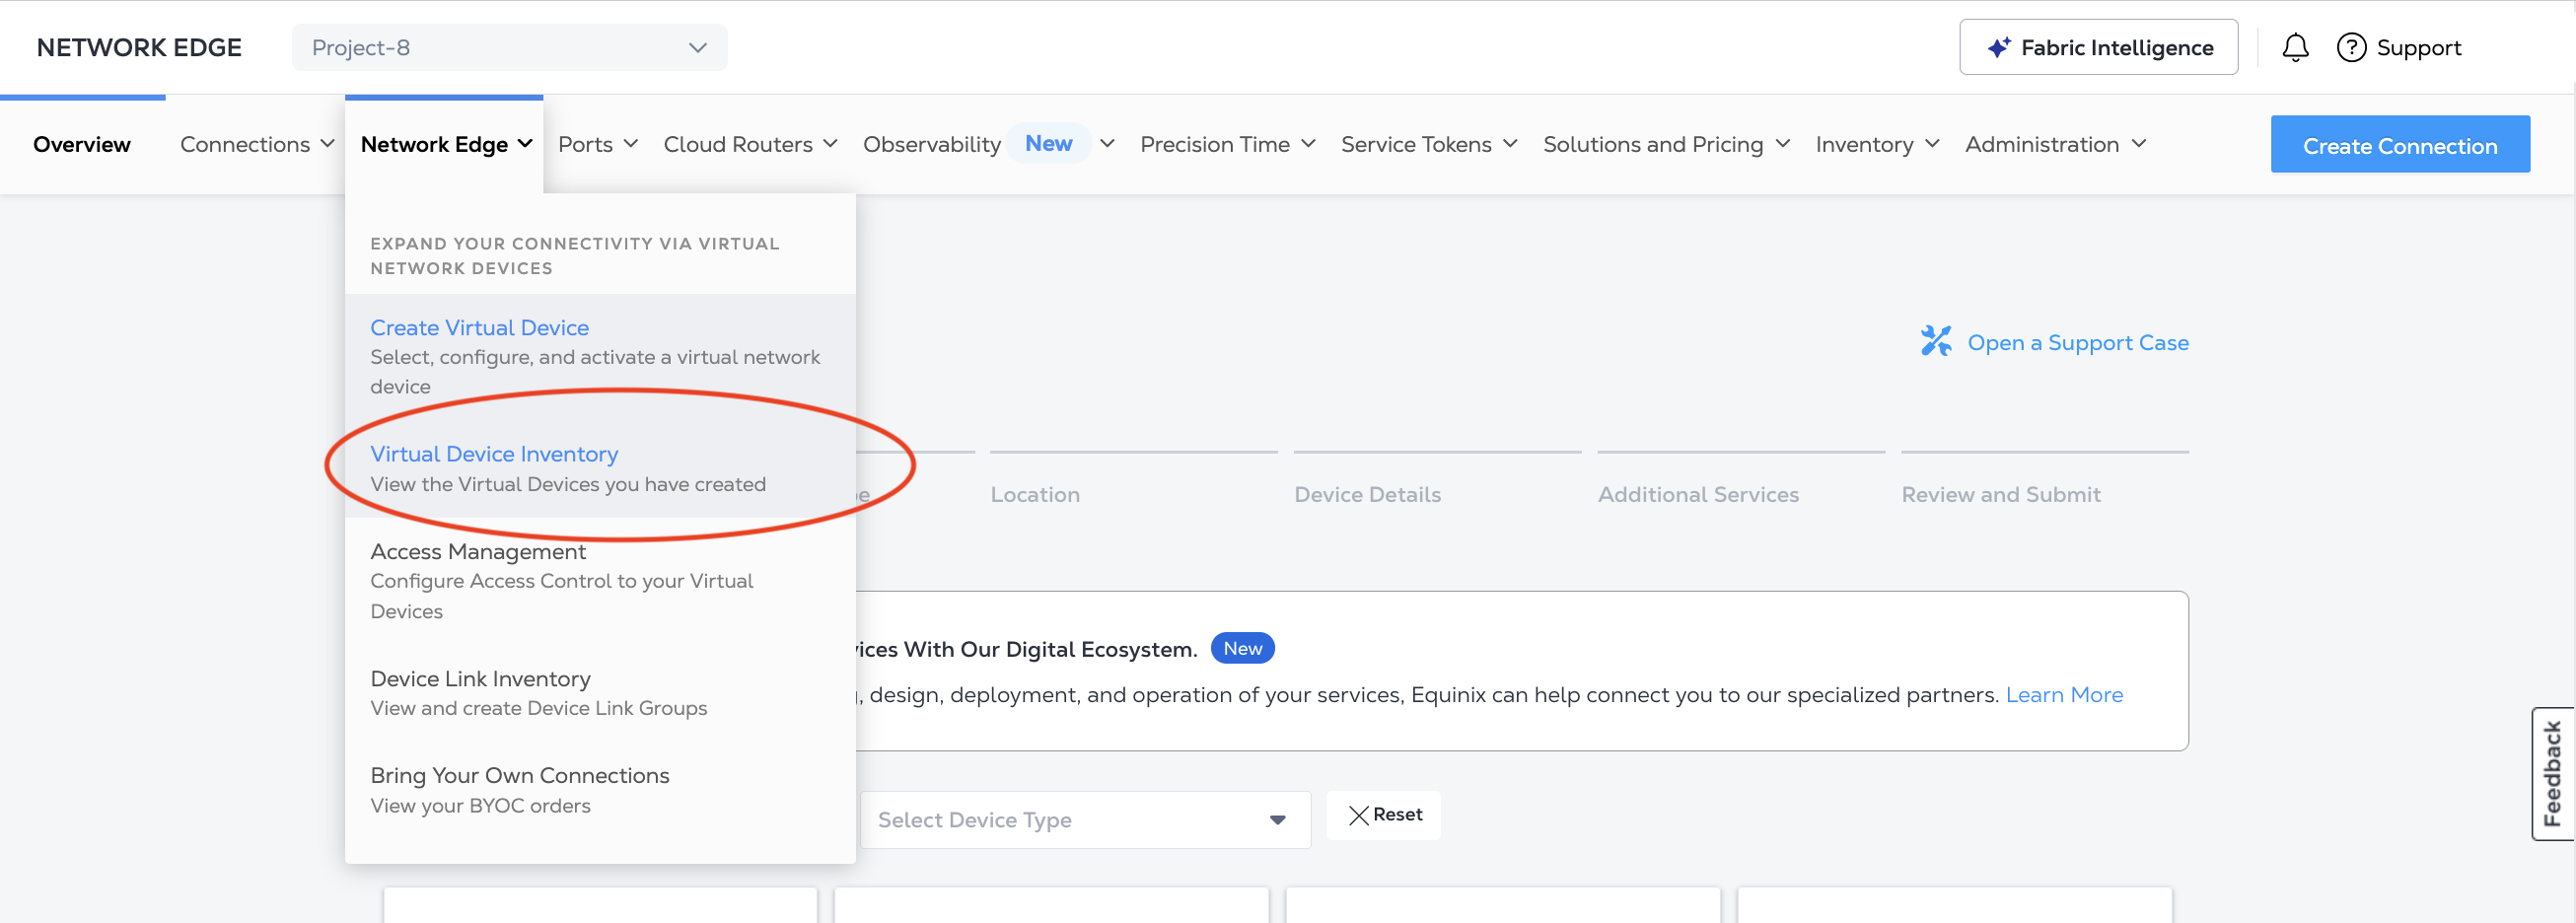
Faça login no Portal do Cliente Equinix (ECP) e navegue até Network Edge.
-
No menu Network Edge, selecione Inventário de Dispositivos Virtuais.
-
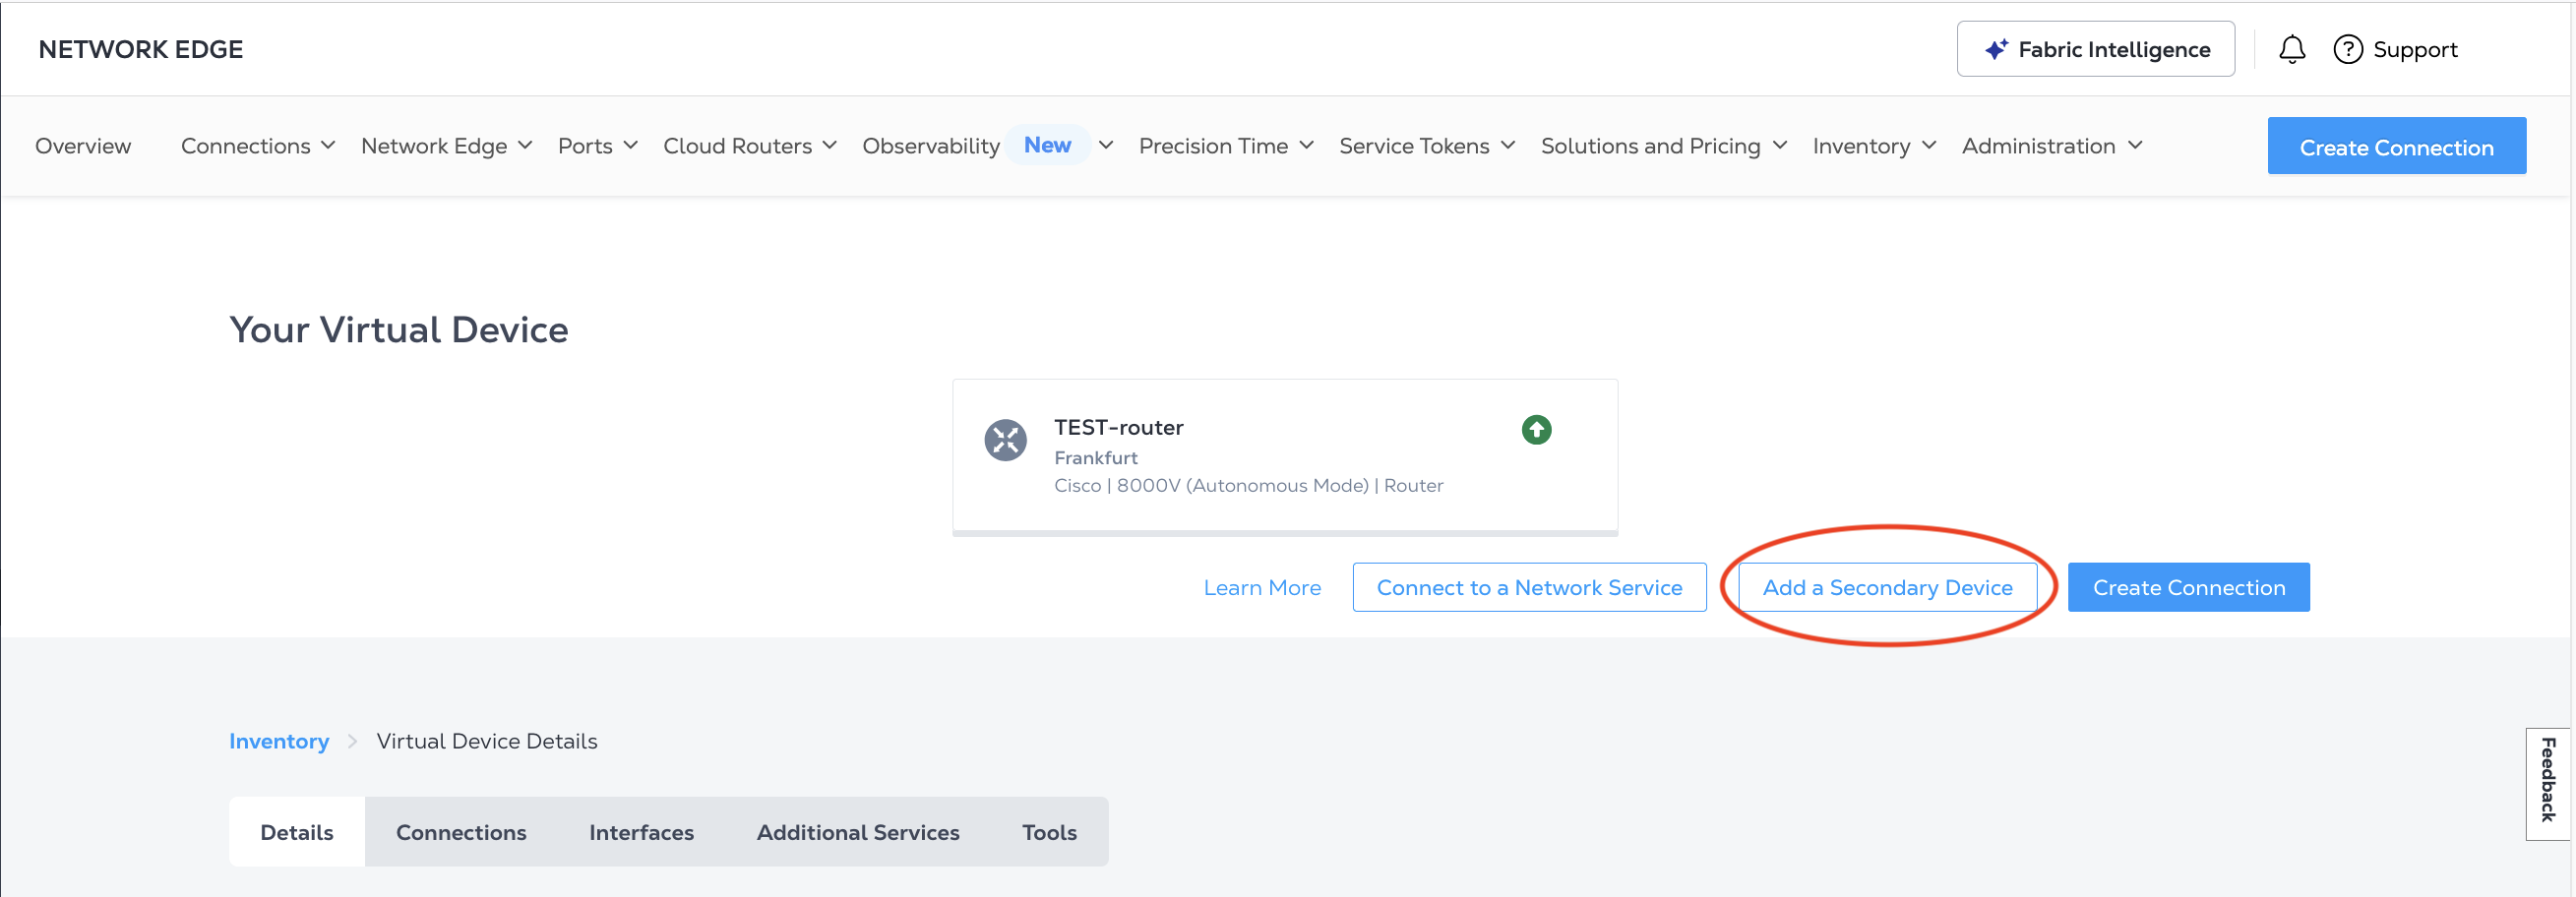
Clique no dispositivo que deseja editar. Os detalhes do dispositivo virtual serão exibidos.
-
Autenticar - Envie suas credenciais de usuário, ID do Cliente e Segredo do Cliente para autenticação OAuth2. Consulte Autenticação de API para obter instruções sobre como chamar a API OAuth para validar e autenticar suas credenciais.
-
Obtenha as informações do dispositivo primário. Envie uma solicitar
GETpara o endpoint/ne/v1/devicespara listar seus dispositivos virtuais. Identifique a qual dispositivo você está adicionando um secundário e envie uma solicitarGETpara obter o endpoint/ne/v1/devices/{uuid}para obter os atributos do dispositivo primário.
Adicionando o dispositivo virtual secundário
- Portal
- API
-
Na sua página de Inventário de Dispositivos Virtuais, clique no nome do dispositivo virtual para visualizar os seus Detalhes do Dispositivo Virtual.
-
Clique em Adicionar um dispositivo secundário.
-
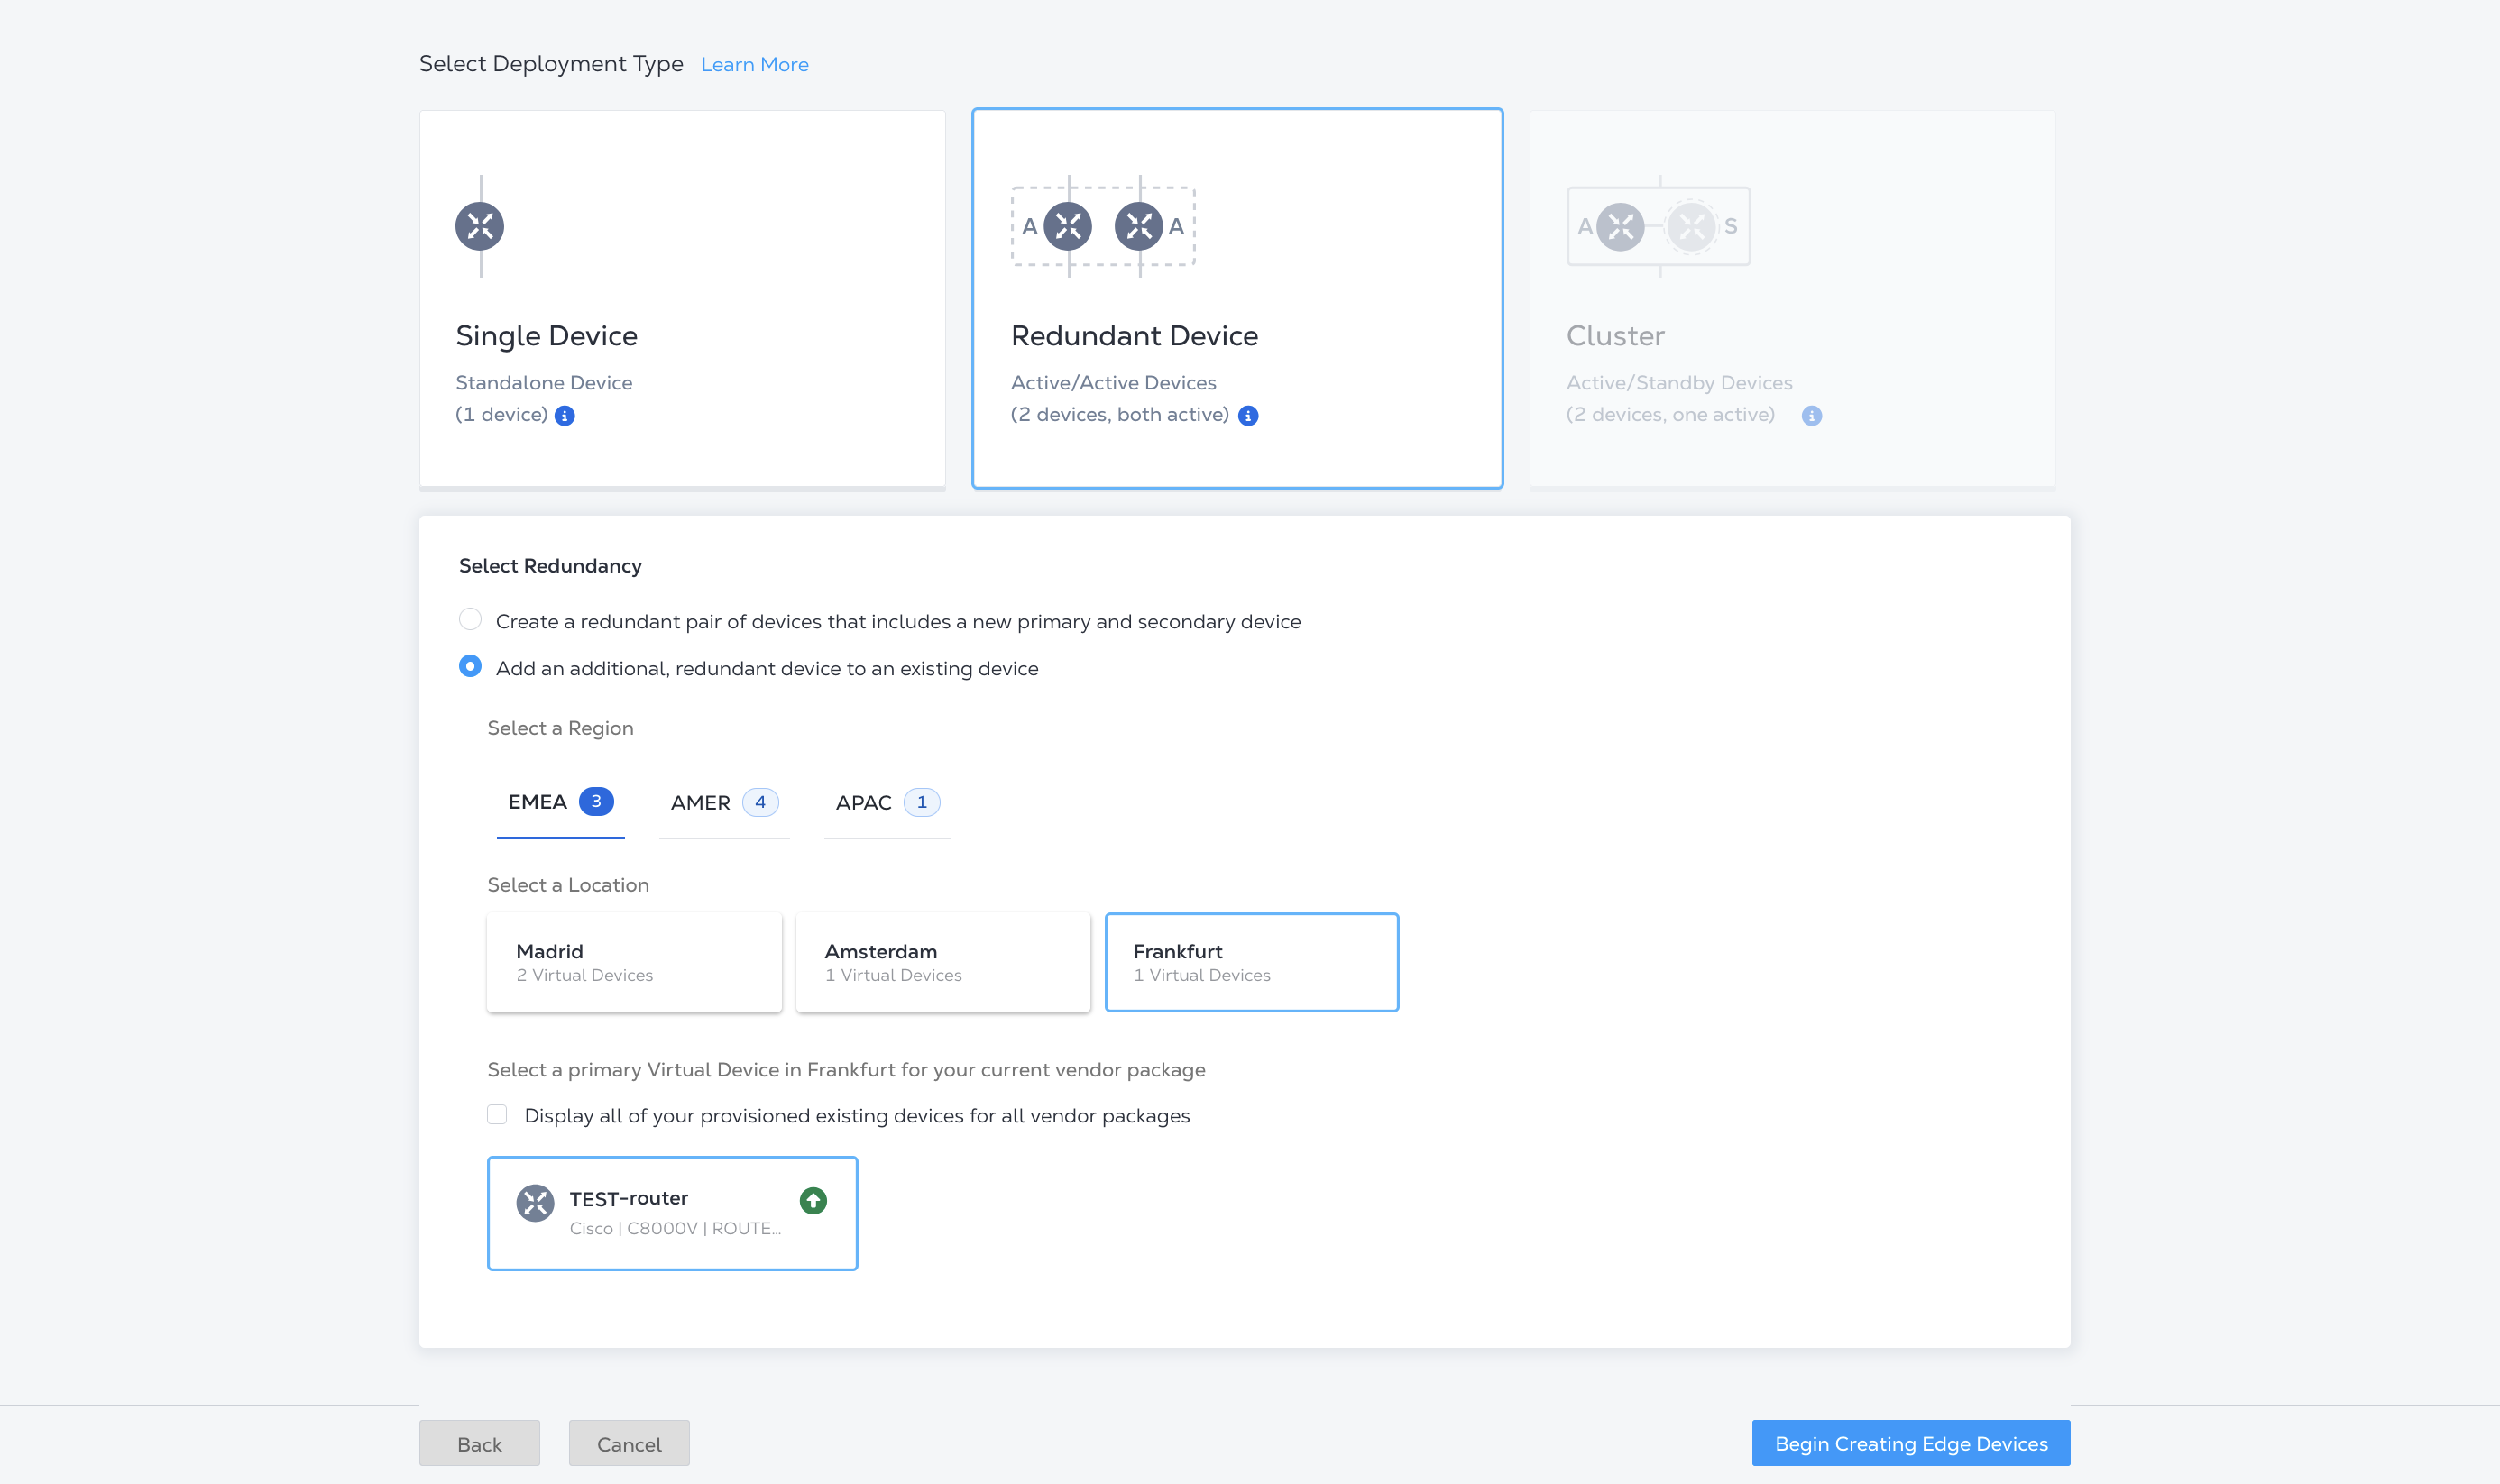
O pacote do fornecedor é configurado automaticamente para ser o mesmo do seu dispositivo principal. Você não precisa selecionar ou configurar o pacote do fornecedor para o dispositivo secundário.
-
Para a opção Selecionar Tipo de Implantação, as seguintes opções são configuradas automaticamente:
- Dispositivo redundante
- Adicionar um dispositivo redundante adicional a um dispositivo existente
- A localização e o dispositivo virtual principal
-
Clique em Iniciar a criação de dispositivos de borda.
-
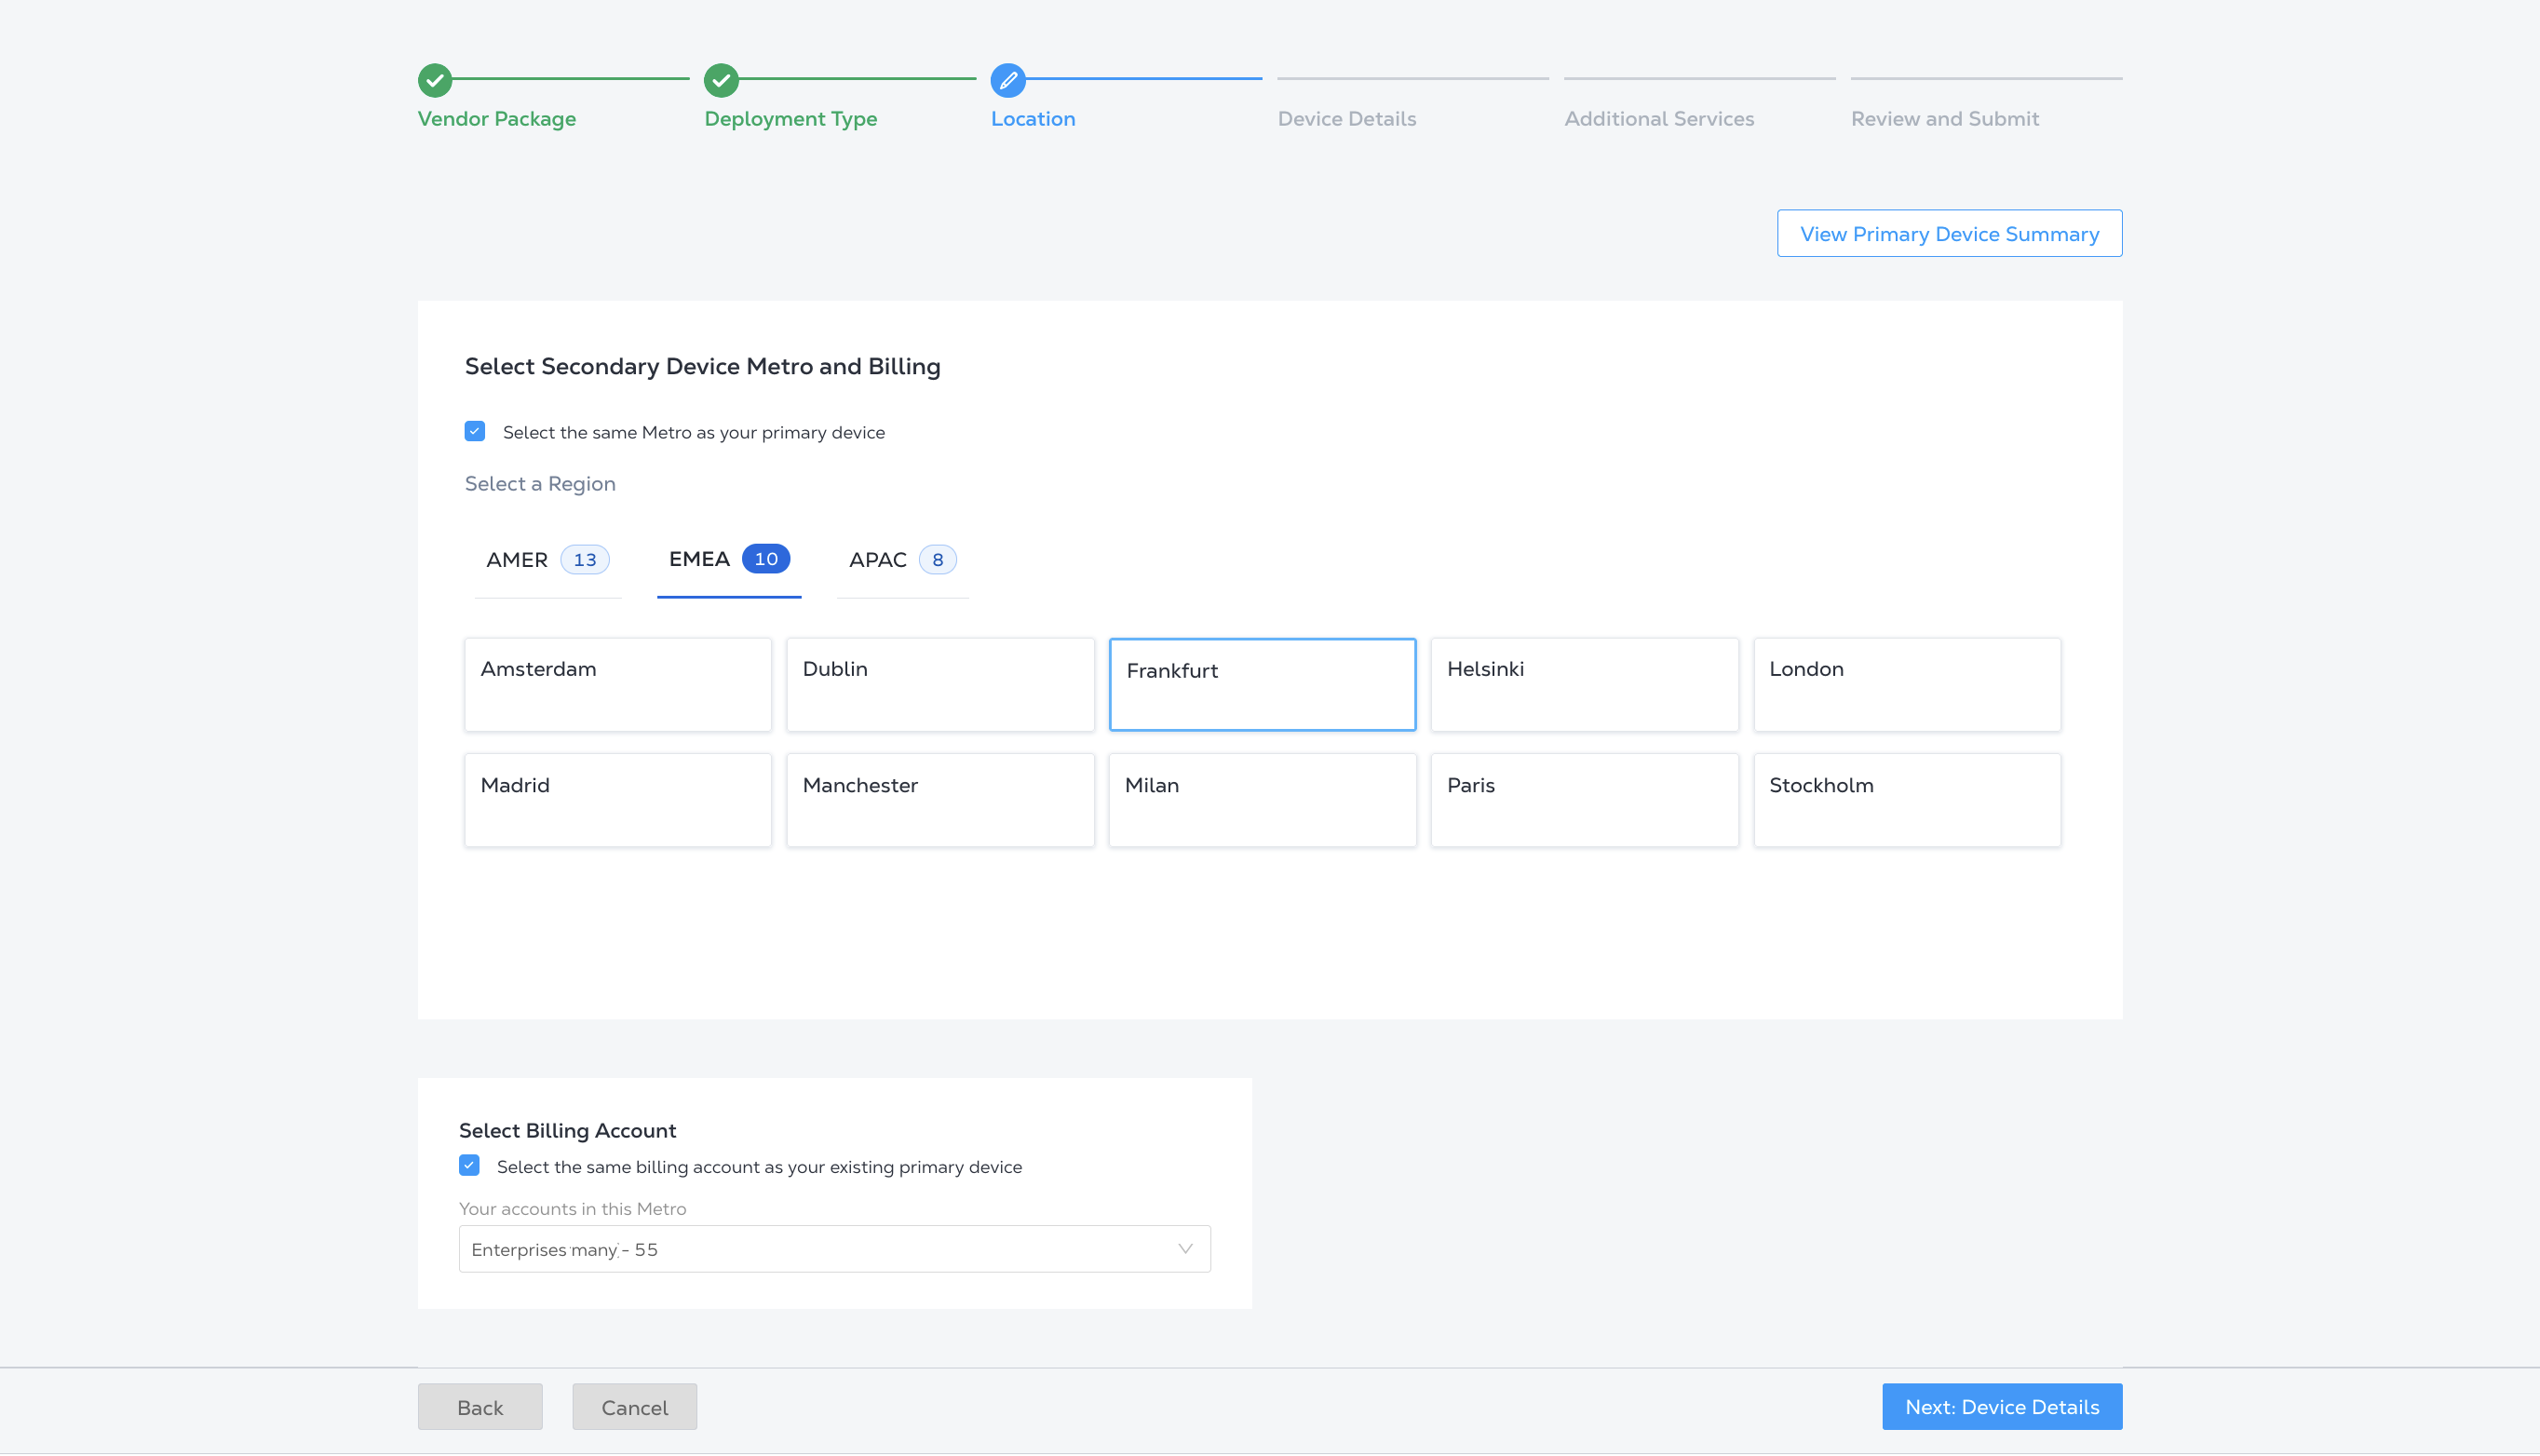
Selecione um local para o dispositivo secundário. Por padrão, a opção Selecionar a mesma área metropolitana que o dispositivo principal está marcada, e a área metropolitana do dispositivo principal é selecionada.
Para selecionar uma estação de área metropolitana diferente, desmarque a opção Selecionar a mesma área metropolitana que seu dispositivo principal e selecione uma área metropolitana diferente.
-
Selecione uma conta de cobrança na lista suspensa ou clique em Selecionar a mesma conta de cobrança do seu dispositivo principal atual.
informaçõesClique em Exibir resumo do dispositivo principal para visualizar detalhes da conta, detalhes do dispositivo, informações de licença, detalhes de notificação e informações de largura de banda do dispositivo principal.
-
Clique em Próximo: Detalhes do dispositivo.
-
A maioria dos Detalhes do Dispositivo deve ser igual à do dispositivo principal, é selecionada automaticamente e não pode ser modificada. Mas:
-
Se versões de software diferentes (mais recentes) forem compatíveis com o dispositivo secundário, ter dois dispositivos em um par redundante com versões de software diferentes pode afetar o desempenho. Recomendamos que você atualize a versão do software do seu dispositivo principal.
-
Você pode dar um nome diferente ao seu dispositivo secundário.
-
Se você escolheu uma conta de cobrança diferente daquela usada para o dispositivo principal, selecione a duração do contrato na seção Duração do Contrato.
-
-
Clique em Próximo: Serviços Adicionais.
-
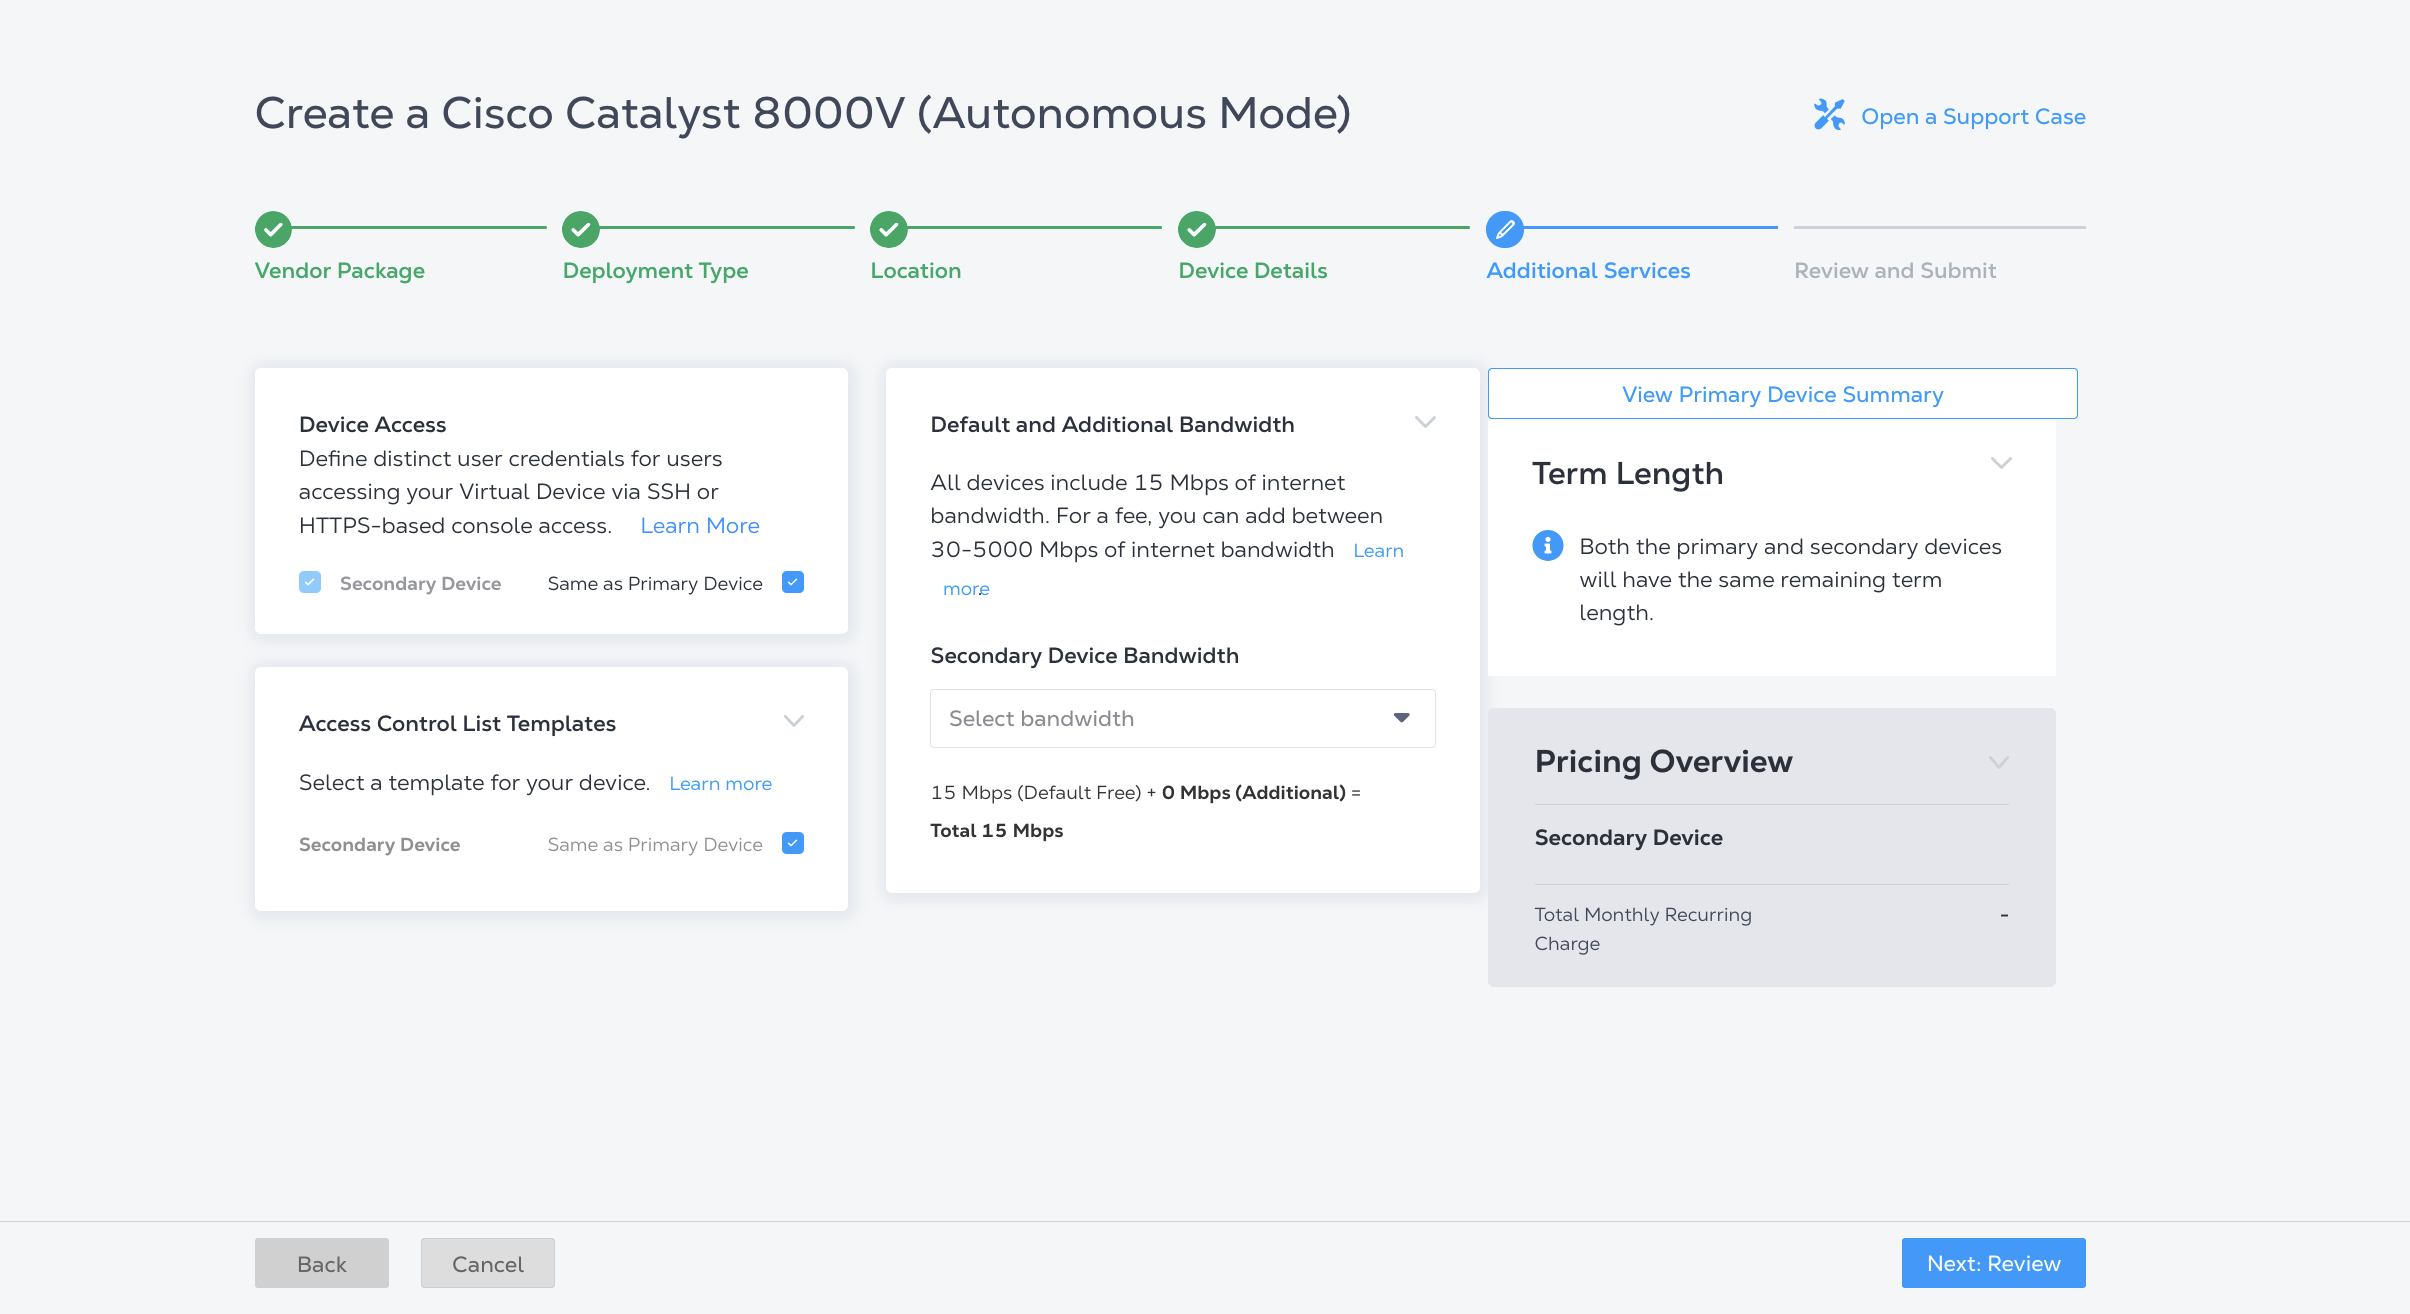
Selecione quaisquer serviços adicionais para o dispositivo secundário. Por padrão, eles terão as mesmas opções selecionadas que o dispositivo principal.
-
Para modificar o Acesso ao dispositivo, desmarque Igual ao dispositivo primário e configuração o acesso do dispositivo secundário.
-
Para modificar os Modelos de Lista de Controle de Acesso, desmarque Igual ao Dispositivo Primário e selecione um na lista suspensa ou crie um novo.
-
Para adicionar largura de banda adicional ao dispositivo secundário, selecione uma largura de banda na lista suspensa Largura de banda do dispositivo secundário.
-
-
Clique em Próximo: Revisar e revise seu pedido. Na seção Estrutura de Suporte Compartilhado, você deve clicar em _Li e confirmo a existência desta política de suporte
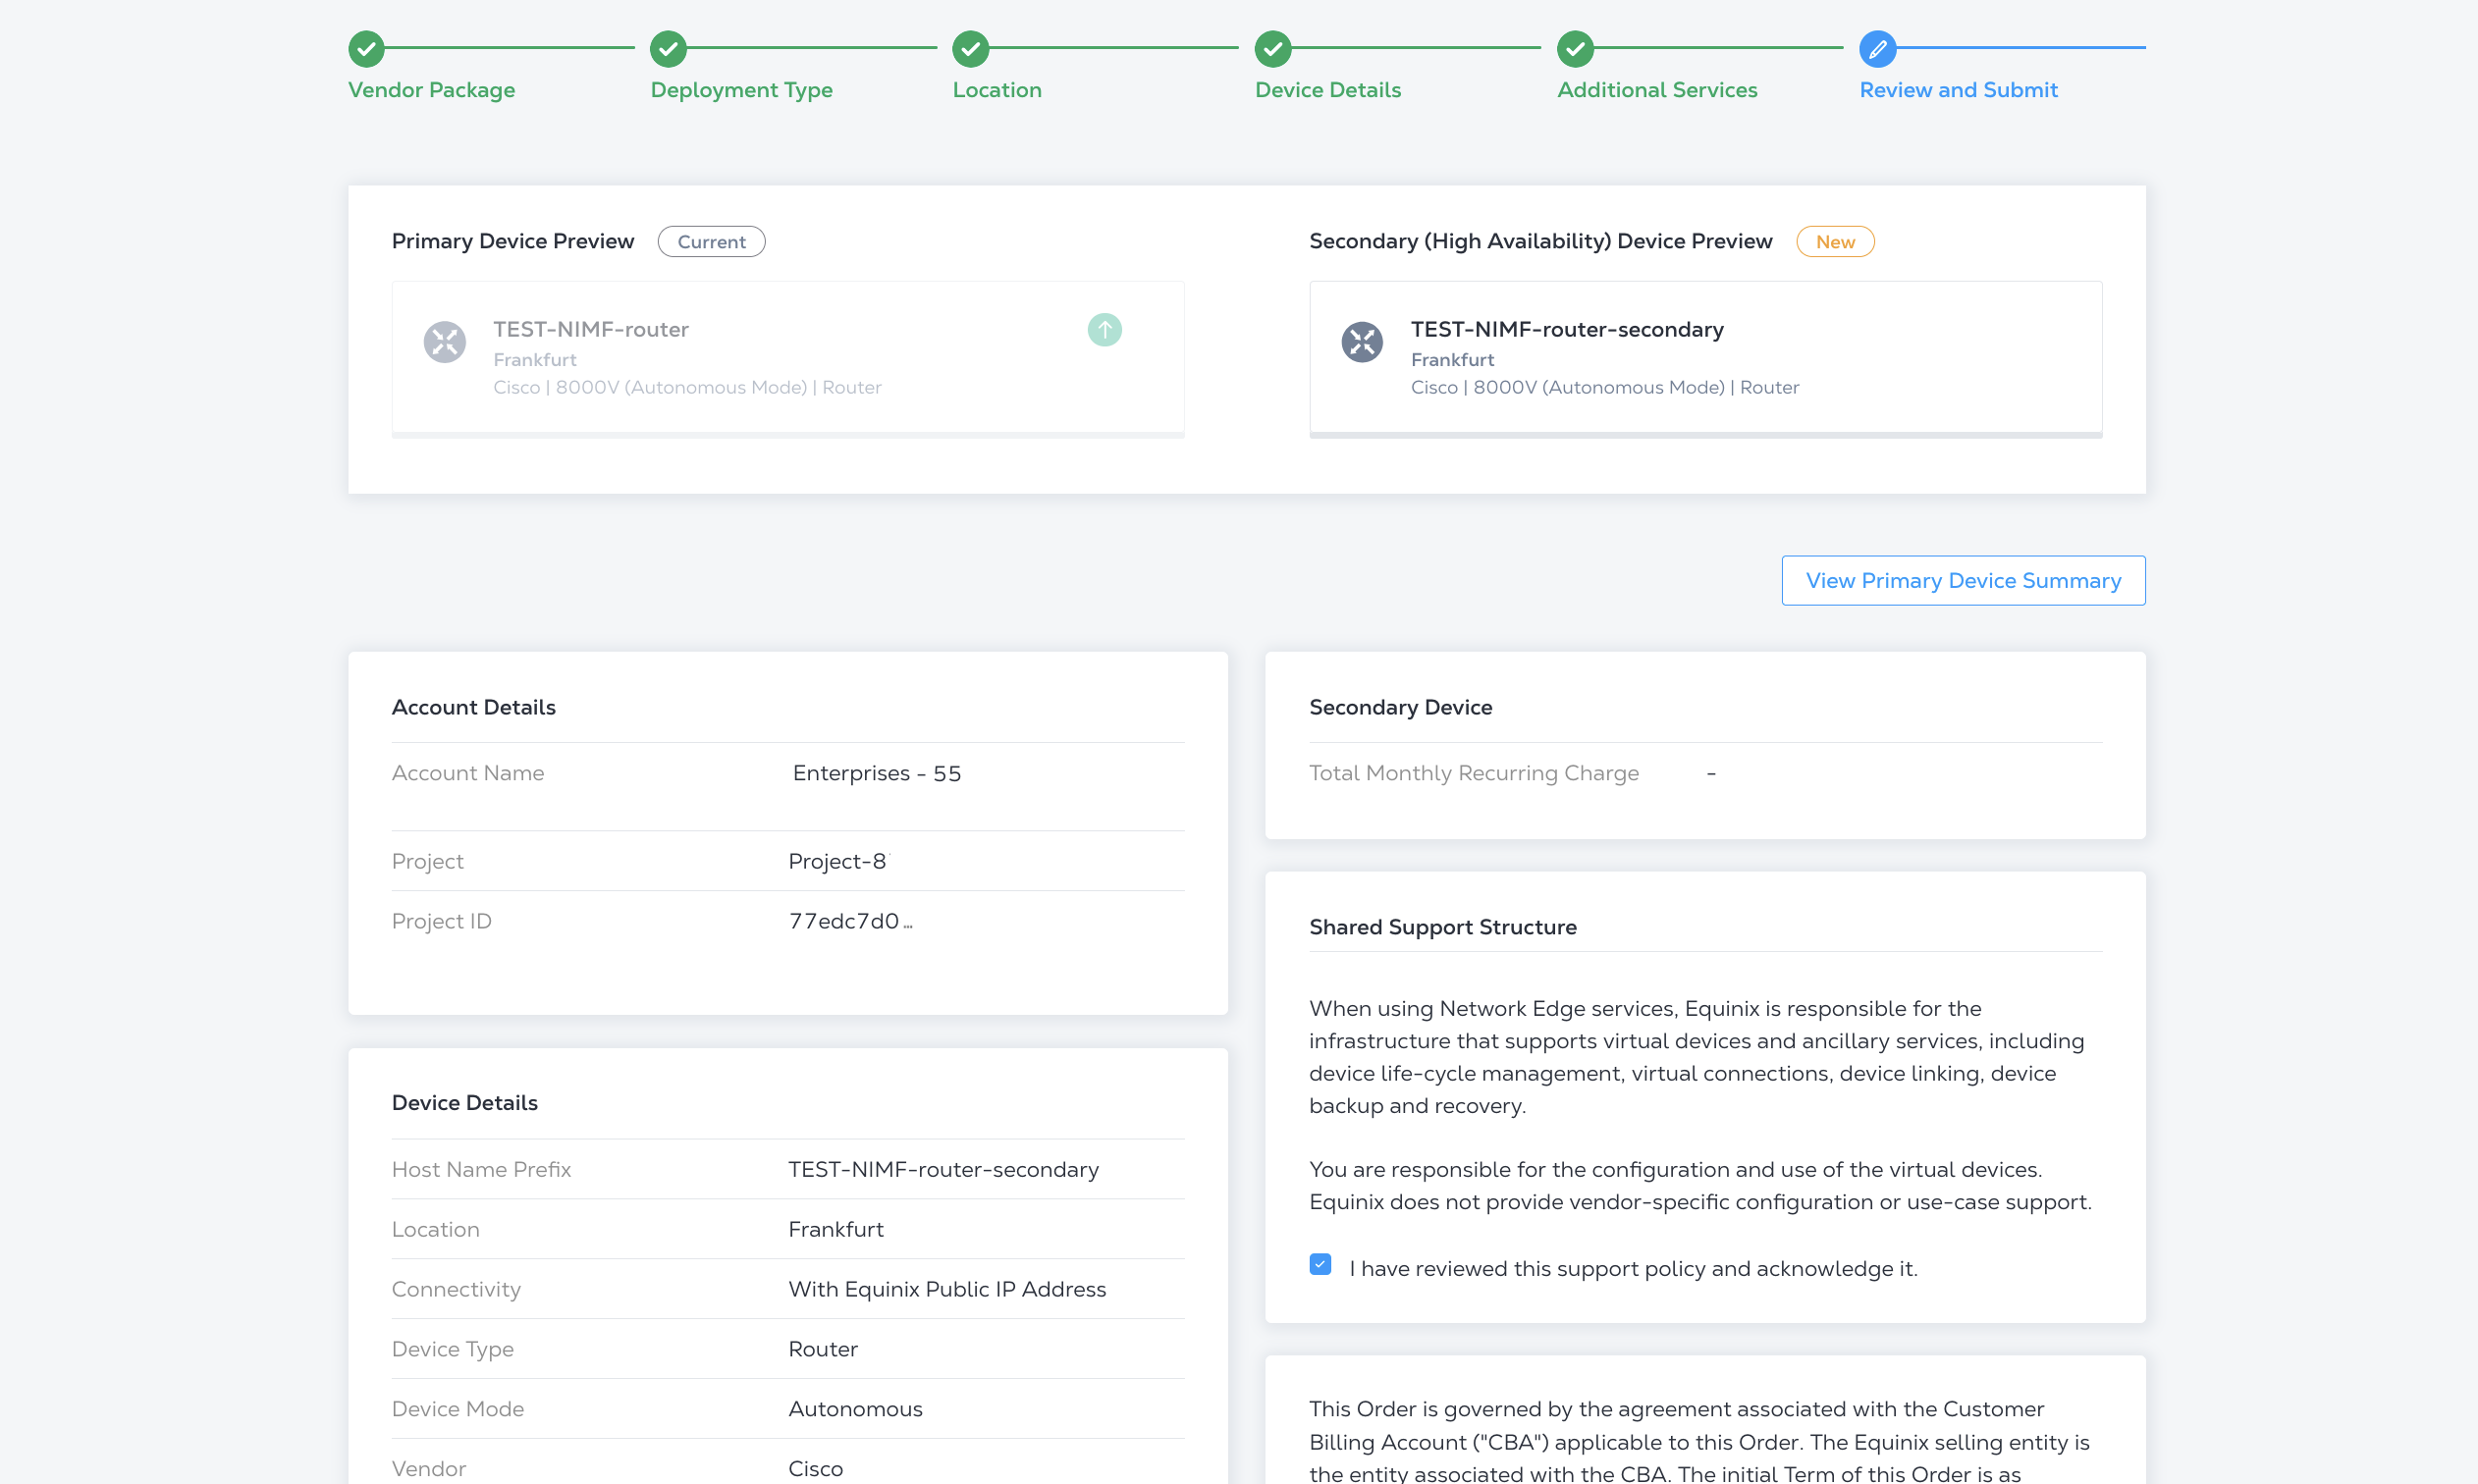
-
Clique em Criar dispositivo virtual.
Para criar um dispositivo secundário, envie uma solicitar POST para o endpoint /ne/v1/devices. No corpo da solicitar, especifique:
- O UUID do seu dispositivo principal para
primaryDeviceUuid. - A configuração do dispositivo secundário no objeto
secondary. Observe que, se versões de software diferentes (mais recentes) para o dispositivo secundário forem compatíveis, ter dois dispositivos em um par redundante com versões de software diferentes pode afetar o desempenho. Recomendamos que você atualize a versão do software do seu dispositivo primário.
Exemplo de solicitação cURL:
curl -X POST "https://api.equinix.com/ne/v1/devices" \
-H "content-type: application/json" \
-H "Authorization: Bearer <token>" \
-d '{
  "primaryDeviceUuid": "device_uuid",
  "secondary": {
    "metroCode": "<metro_code>",
    "version": "<version_number>",
    "virtualDeviceName": "<secondary_device_name>",
    "hostNamePrefix": "<secondary_device_hostname_prefix>",
    "notifications": [
      "<contact_email>"
    ],
    "termLength": 1,
    "aclDetails": [
      {
        "uuid": "<acl_uuid>",
        "interfaceType": "<acl_interface_type>"
      }
    ],
    "userPublicKey": {
      "username": "<username>",
      "keyName": "<keyname>"
    },
    "licenseFileId": "<license_file_id>",
    "accountNumber": "<account_number>"
  }
}'
Inclua licenseFileId somente se seu fornecedor e modo de licença exigirem um arquivo de licença.
Para obter uma lista completa de parâmetros e opções, consulte a Referência da API.
Enquanto o dispositivo secundário estiver sendo provisionado, o status do dispositivo primário mudará para
WAITING_FOR_SECONDARY. Se o servidor secundário falhar no provisionamento, o servidor primário retornará ao estado original.
estado provisionado. Se o provisionamento secundário for ativado, o status de ambos os dispositivos mudará para
PROVISIONED.