Modifying a Service Instance
Once you have created a Precision Time service, and its status is Provisioned, you can change its configuration. Before updating a newly provisioned service, you must wait 6 hours. During this wait time, the invoice database updates its records to provide accurate pricing.
To view and modify Precision Time services, you need the EPT Service Admin role.
To access Precision Time service information in the Customer Portal, sign in and navigate to your Precision Time Inventory.
To access Precision Time service information in the API, you must submit your Client ID and Client Secret for OAuth2 authentication. Refer to API Authentication for instructions on how to call the OAuth API to validate and authenticate your credentials.
Modifying the configuration might disrupt the service.
Service Name
- Portal
- API
Click Edit next to the service name.

Enter a new name and click Submit.

To update a time service's name, send a PATCH request to the /fabric/v4/timeServices/{serviceId} endpoint.
In the body in the request, specify:
op-replace.path-/name.value- The new name for your service.
Sample cURL Request:
curl -X
PATCH 'https: //api.equinix.com/fabric/v4/timeServices/<service_id>'
-H 'content-type: application/json'
-H 'authorization: Bearer <token>'
-d '[
{
    "op": "replace",
    "path": "/name",
    "value": "<new-service-name>"
}
]'
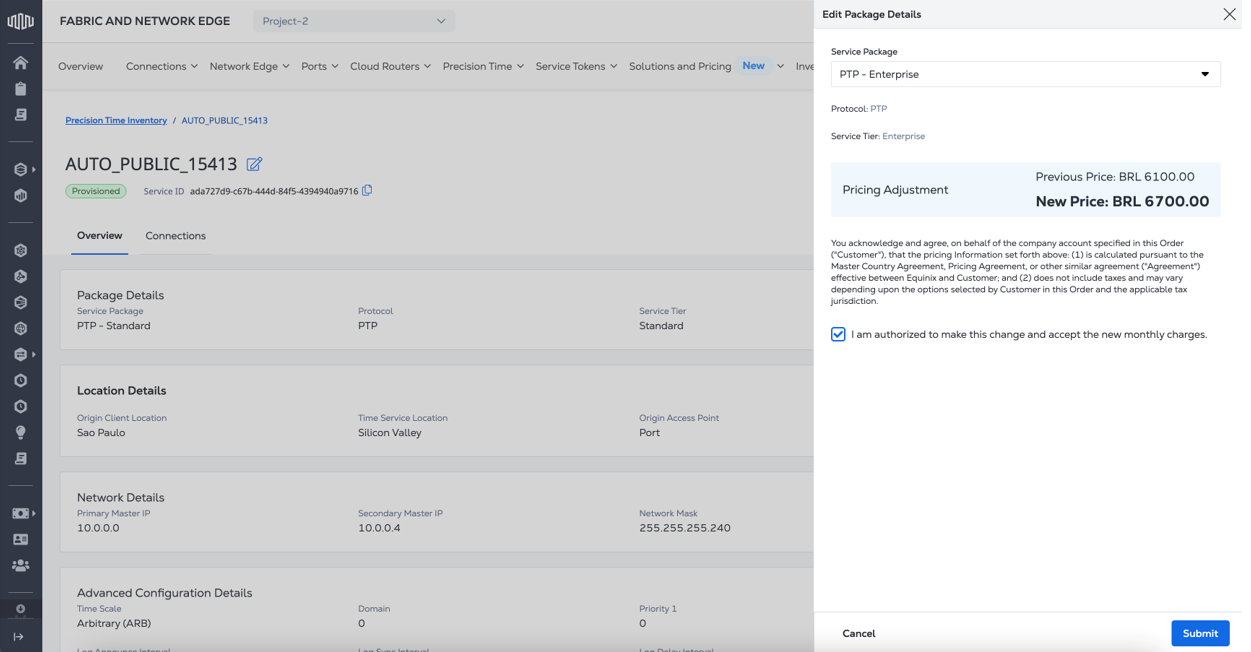
Service Package
If a Precision Time service instance was created manually by an Equinix sales representative, you must contact your sales representative to change the service tier. You will not be able to change the service tier using the Portal or API.
- Portal
- API
Click Edit in the Package Details section. Change the package, and then view and agree to the new price. Click Submit.
To update your service package, send a PATCH request to the /fabric/v4/timeServices/{serviceId} endpoint.
In the body in the request, specify:
op-replace.path-/package/code.value- The new package code:NTP_STANDARD,NTP_ENTERPRISE,PTP_STANDARD, orPTP_ENTERPRISE.
curl -X
PATCH 'https://api.equinix.com/fabric/v4/timeServices/<service_id>'
-H 'content-type: application/json'
-H 'authorization: Bearer <token>'
-d '[
  {
    "op": "replace",
    "path": "/package/code",
    "value": "<new_package_code>"
  }
]'
Asset Details
Click Edit in the Asset Details. Only provisioned services can be edited.

The Edit Precision Time Asset Details drawer will appear. Only eligible ports will appear based on the metro, encapsulation, previous VLAN ID and port type.
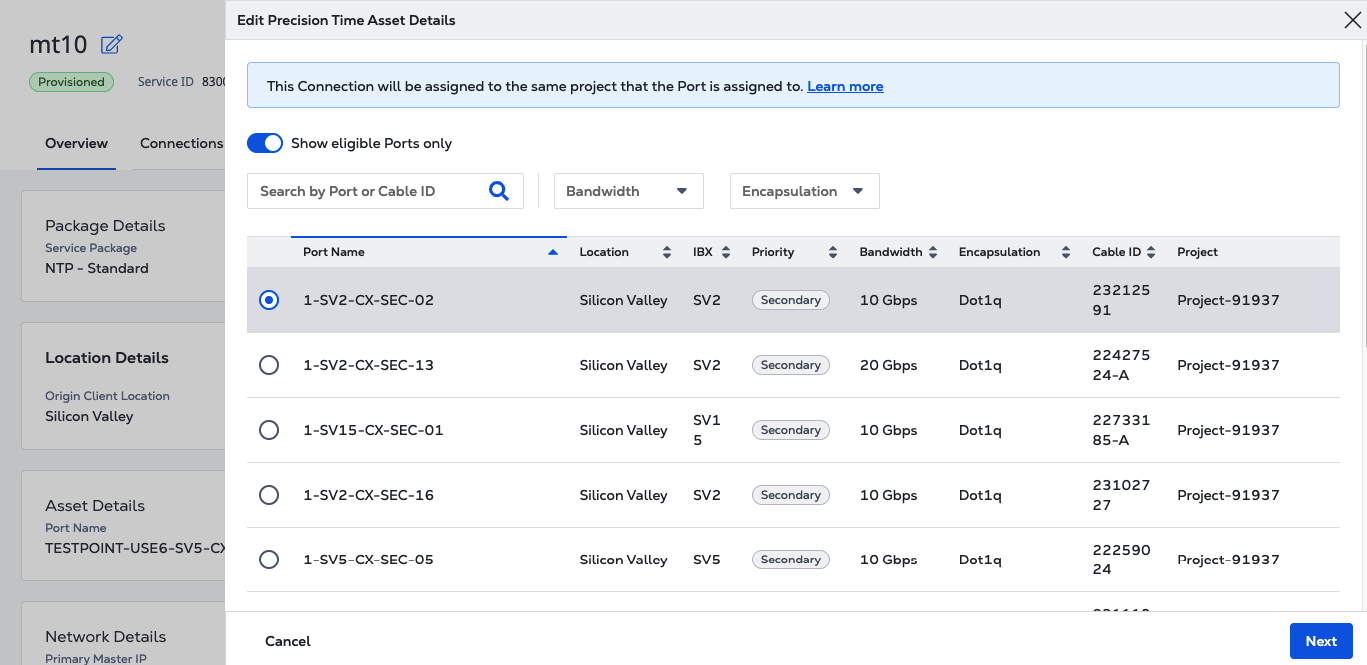
- Select the desired Port and click Next.
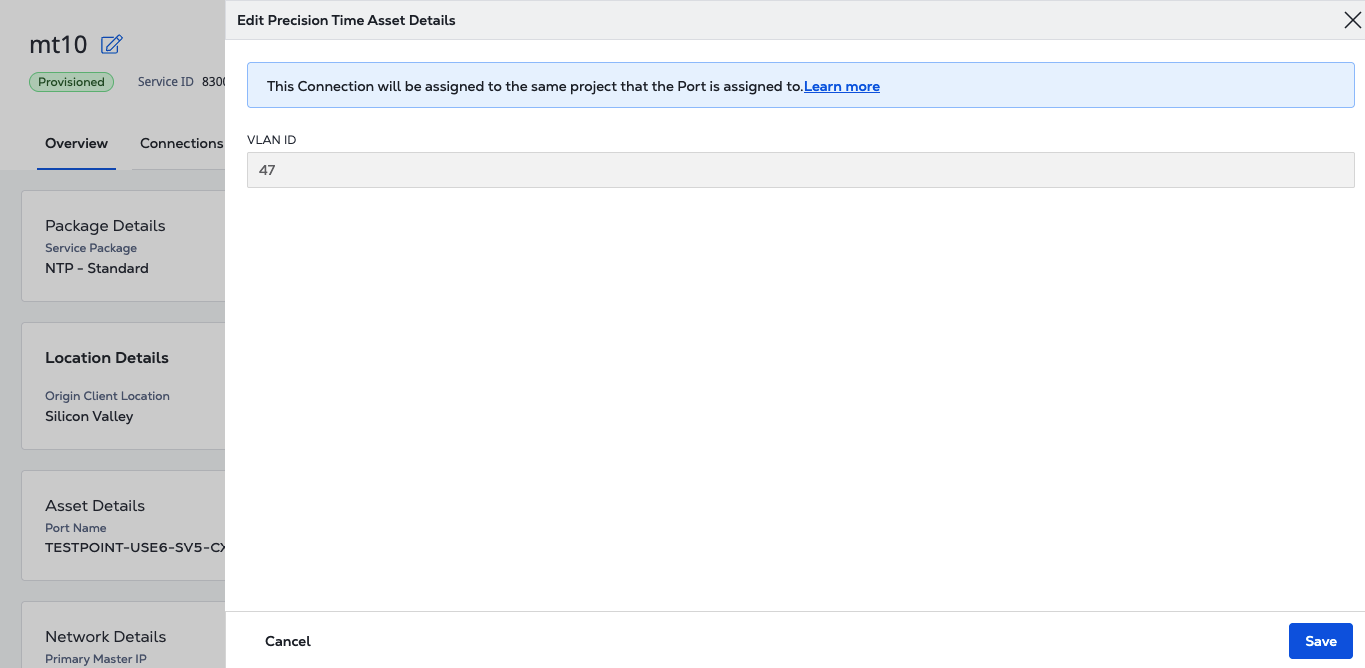
- The previously selected VLAN ID will be displayed.
- Click Save. The Port Connection details will be updated.
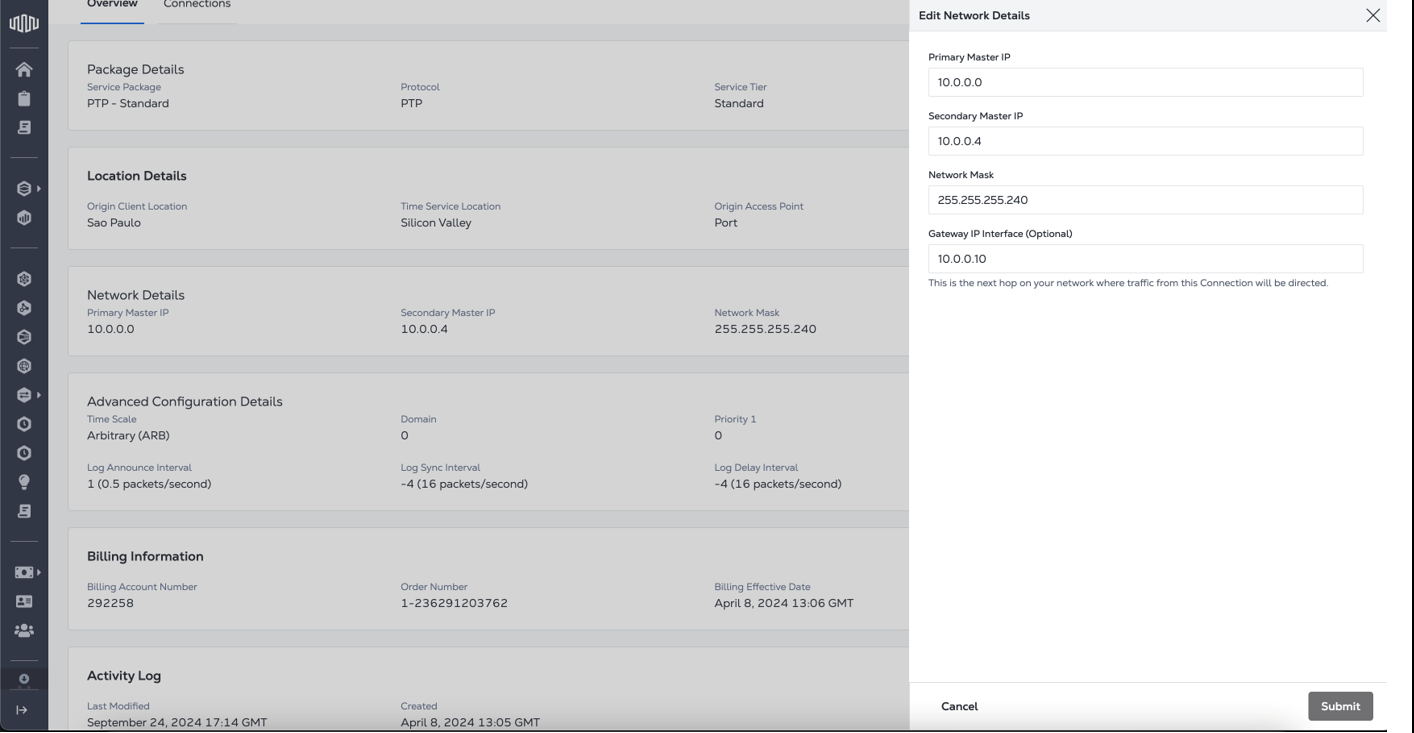
Network Details
- Portal
- API
Click Edit in the Network Details section to update Primary IP, Secondary IP, Network Mask, and Gateway IP Interface.
To update a service's network details, send a PATCH request to the /fabric/v4/timeServices/{serviceId} endpoint.
In the body in the request, specify:
op-replace.path-/ipv4.value- Specify new values for the primary IP address, secondary IP address, network mask, and gateway IP address.
Sample cURL Request:
curl -X
PATCH 'https://api.equinix.com/fabric/v4/timeServices/3a58dd05-f46d-4b1d-a154-2e85c396ea62'
-H 'content-type: application/json'
-H 'authorization: Bearer <token>'
-d '[
  {
    "op": "replace",
    "path": "/ipv4",
    "value": {
      "primary": "192.168.254.241",
      "secondary": "192.168.254.242",
      "networkMask": "255.255.255.240",
      "defaultGateway": "192.168.254.254"
    }
  }
]'
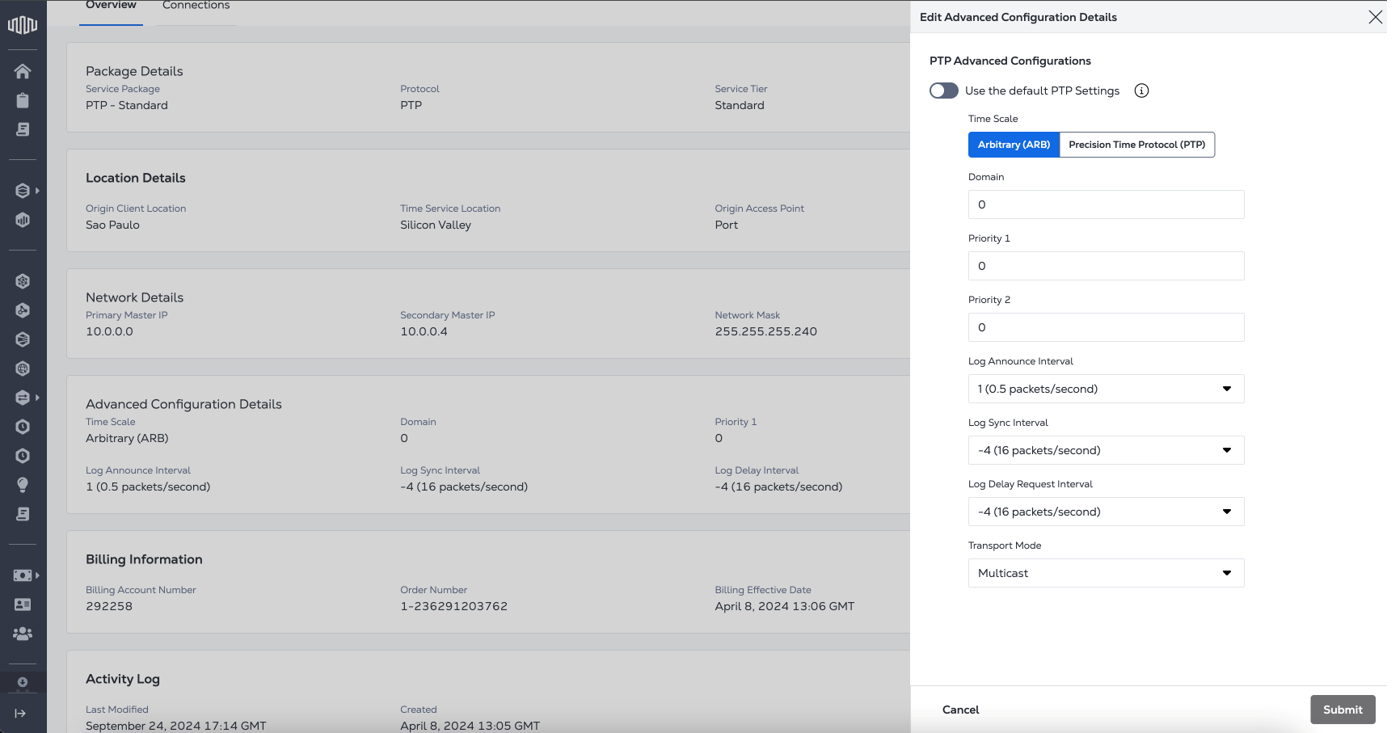
PTP Advanced Configuration Details
You can modify the following PTP advanced configuration details:
-
Time Scale:
- ARB - Generates timestamps in UTC format with UTC offset as 0. (This is the default.)
- PTP - Generates timestamps in TAI format with current UTC offset value.
-
Domain - Enter a PTP domain value for the time server. Any clocks that synchronize with this server should be configured with the same domain value. The range is 0 (the default) to 127.
-
Priority 1 and Priority 2 - Enter a value between 0-248. Lower values indicate a higher priority.
-
Log Announce Interval - Choose an option from the drop-down list. This logarithmic value controls the rate of PTP Announce packets from the PTP server. The default is 1, which indicates 1 packet every 2 seconds.
-
Log Sync Interval - Choose an option from the drop-down list. This logarithmic value controls the rate of PTP Sync packets. The default is -4, which indicates 16 packets every second.
-
Log Delay Req Interval - Choose an option from the drop-down list. This logarithmic value controls the rate of PTP DelayReq packets. This setting might also need to be specified on the PTP client. The default is -4, which indicates 16 packets every second.
-
Transport Mode - Choose Multicast (default), Unicast, or Hybrid.
- Portal
- API
Click Edit in the Advanced Configuration Details section to update PTP Settings.
To update your service's PTP configuration details, send a PATCH request to the /fabric/v4/timeServices/{serviceId} endpoint.
In the body in the request, specify:
op-replace.path-/ptpAdvancedConfiguration.value- An object containing your new configuration details.
Sample cURL Request:
curl -X
PATCH 'https://api.equinix.com/fabric/v4/timeServices/<service_id>'
-H 'content-type: application/json'
-H 'authorization: Bearer <token>'
-d '[
  {
    "op": "replace",
    "path": "/ptpAdvancedConfiguration",
    "value": {
      "timeScale": "PTP",
      "domain": 20,
      "priority1": 20,
      "priority2": 20,
      "logAnnounceInterval": 1,
      "logSyncInterval": -4,
      "logDelayReqInterval": -4,
      "transportMode": "UNICAST",
      "grantTime": 300
    }
  }
]'
NTP Advanced Configuration Details
Modifying the NTP advanced configuration is only supported for NTP Enterprise.
You can modify the following NTP advanced configuration details:
-
MD5 Type - Select the type of key string, ASCII or HEX.
-
MD5 Key Number - Enter the key number. Integers from 1-65535 are valid.
-
MD5 Key - Enter a key that contains 10-40 characters:
- Portal
- API
Click Edit in the Advanced Configuration Details section to add or update keys.
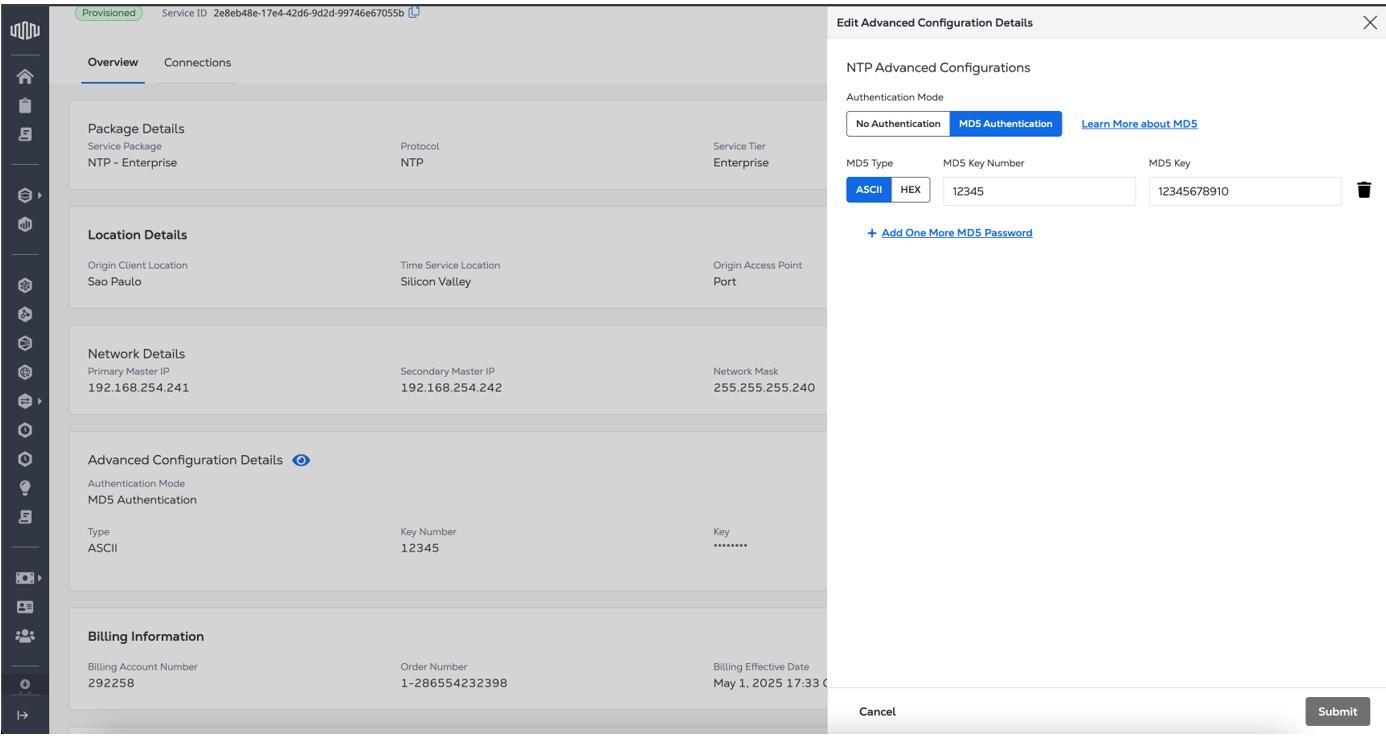
Once you have made all your changes, click Submit.
The service order number is updated, and if necessary, the instance is reconfigured and reprovisioned.
To update your service's NTP configuration details, send a PATCH request to the /fabric/v4/timeServices/{serviceId} endpoint.
In the body in the request, specify:
op-replace.path-/ntpAdvancedConfiguration.value- An object containing your new configuration details.
Sample cURL Request:
curl -X
PATCH 'https://api.equinix.com/fabric/v4/timeServices/<service_id>'
-H 'content-type: application/json'
-H 'authorization: Bearer <token>'
-d '[
  {
    "op": "replace",
    "path": "/ntpAdvancedConfiguration",
    "value": [
      {
        "type": "ASCII",
        "keyNumber": 65534,
        "key": "base64-encoded-ascii"
      },
      {
        "type": "HEX",
        "keyNumber": 65535,
        "key": "base64-encoded-hex"
      }
    ]
  }
]'