Creating a Palo Alto Networks VM-Series Firewall
If you are using the Panorama application to manage your device(s), you will need to enter the Panorama IP Address and Authentication Key during device creation. Panorama support is only offered for versions 10.1.12 and above.
The Palo Alto Networks VM-Series Firewall has three deployment options: Single, Redundant, and Clustered. The configuration options described below apply to Single and Redundant configurations. Cluster configuration options are on Creating a Clustered VM-Series Firewall
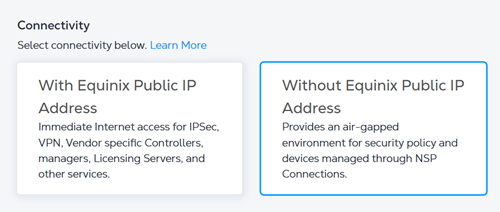
Connectivity Options
The Connectivity Type feature is available for the Palo Alto Networks VM-Series Firewall. This feature provides options to include a virtual interface with or without a Public IP address from Equinix. The option to have a VNF come up without a public IP address addresses the use case where the virtual device may need to be isolated from the Internet. Users can then manage the devices from their private network or virtual connection.
The following table summarizes connectivity type options and the difference between the two options.
| Connectivity Type | With Equinix Public IP Address | Without Equinix Public IP Address |
|---|---|---|
| Use Cases | This option comes with Public IP Addresses from Equinix and does not require an additional Virtual Connection to manage the virtual device. | This option removes Equinix-sourced Public IP Address assignment and will segregate the VNF from the Internet after the device creation. If the device needs to be managed by software running in the Colo cage or through a private virtual connection, this option is recommended. |
| Internet Connectivity | Public IP addresses from Equinix are assigned to the following interfaces and accessible from the Internet: Management (MGMT), Ethernet 1/1 (WAN). | No public IP Address from Equinix included. This option requires a separate virtual connection from your Network Service Provider (NSP) or Internet Service Provider (ISP). See Bring Your Own Connection - Remote Fabric Port for more information. |
| Access Control List | Create an Access Control List (ACL) to limit traffic to the VNF Management (MGMT) or WAN interface. | The ACL option is not available. Additional compensating controls can be implemented for traffic from any private virtual connection. |
| SSH Access | Use Ethernet 1/1 (WAN) interface for SSH Access. You are required to generate an RSA public key for SSH access and configure it in the device creation workflow (mandatory). | No SSH access by default. You need to create a user name for device access. One option is to generate an RSA public key for SSH access and configure it. Establish the Internet Connectivity through your NSP or ISP. |
| Device Manageability | For Single/Redundant devices, Management (MGMT) is mapped to Panorama access by default. Use the Service Route feature to re-map to the different interface. | A virtual connection (via the BYOC option) needs to be first assigned to the Management (MGMT) interface for Panorama accessibility for Single and Redundant deployments. |
| License Registration | Provide the AuthCode during the device creation workflow. The AuthCode will be registered automatically when the virtual device reaches out to the Palo Alto Network license registration server. | No AuthCode is required during device creation workflow. User is responsible for registering license using Internet access through private virtual connection (Online License Registration), or Offline Mode License. |
Configuring Your Device Without Equinix Public IP Address
If you create your VM-Series firewall Without an Equinix Public IP Address, the VNF is provisioned without any public IP Address on the WAN or Management interface. You are responsible for configuring the license registration, overlay network configuration, and clustering (optional).
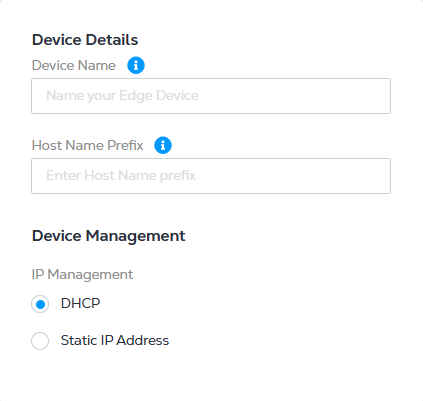
When entering the Device Details, select one of the following IP address options:
- DHCP - a network management protocol that automatically assigns IP addresses.
- Static IP Address - enter the IP address, subnet mask, and default gateway.
Management Interface Configuration
The following is a sample, reference-only configuration for management interface setup.
Commands:
set deviceconfig system type static
set deviceconfig system ip-address x.x.x.x
set deviceconfig system netmask y.y.y.y
set deviceconfig system default-gateway z.z.z.z
License Registration
You are responsible for manually adding the license to the device. You should already have access to the Palo Alto Networks Customer Support Portal (License portal), where you can register your device using UUID and CPU-ID information. Use the license key from the portal to add the license on the device. License activation documentation is available from the Palo Alto Networks documentation.
Deployment Scenarios
Scenario 1: Manage Firewall from Colocation (Offline License Registration) where the Management Interface is accessible only from the network connected to colocation space Offline License Registration.
- Create a VM-Series firewall VNF Without Equinix Public IP Address in the Network Edge portal.
- Log in to primary and secondary VNF consoles with your user name and password.
- Create a virtual connection from the VNF to colocation on the first interface (management interface).
- Assign an IP address to the management interface on both VNFs.
- Confirm IP reachability from devices in the colocation space.
- Access the VNF using SSH from device in the colocation space.
- Identify the CPU ID and UUID for the VNF.
- Access the Palo Alto Networks Customer Support Portal (License portal) and generate two identical licenses for the VNFs.
- Apply the offline mode license to both VNFs.
- (Optional) You can manage the VNF from Panorama management software configured in the colocation space.
- Create the virtual connections to the Cloud Service Providers (CSPs) from the remaining interfaces.
- Continue to use offline device management for software updates.
Scenario 2: Manage Firewall from an NSP Network (Online License Registration) where the Management interface accessible from the NSP Virtual Connection or BYOC connected interface. Online License registration.
- Create a VM-Series firewall VNF Without Equinix Public IP Address in the Network Edge portal.
- Log in to primary and secondary VNF consoles with your user name and password.
- Create a virtual connection from the VNF to the NSP on the first interface (management interface).
- Assign an IP address to the management interface on both VNFs.
- Confirm IP reachability from devices in the NSP network.
- Access the VNF using SSH from device in the NSP network.
- Access the Palo Alto Networks Customer Support Portal (License portal) and generate a license and auth code for this VNF.
- Apply the identical Auth Code to both VNFs.
- (Optional) You can manage the VNF from Panorama management software configured in the NSP network.
- Create virtual connections to CSPs from the remaining interfaces.
Enabling FIPS Mode
By default, FIPS mode is not enabled on Palo Alto Networks virtual firewall devices, so you will need to enable it.
Prerequisites:
- GUI and SSH access to the Management interface of the firewall either via Public IP or Colo.
- Console access to the virtual device.
- Unlicensed Palo Alto VM; after FIPS is enabled, you need to load the license manually.
- Backup of the device configuration.
- A strong understanding of Palo Alto Firewall operations.
- The Admin password needs to be SHA256 encrypted.
- SSH must be available to the device on the Management interface.
- OTP will be mandatory for FIPS mode.
-
Log into the device via console.
-
Enter the Maintenance Recovery Tool (MRT). The device will take few minutes to boot to MRT.
-
In the MRT, select Set FIPS--CC mode. Leave the values default and select
Enable FIPS-CC Modeand press Enter. Scrubbing is not recommended at the moment. -
Reboot the device.
-
SSH to the device and remove the following default configuration.
For CLI following message will be displayed when logged in.
**** FIPS-CC MODE ENABLED ****delete network ike crypto-profiles ike-crypto-profiles default encryption aes-128-cbcdelete network ike crypto-profiles ike-crypto-profiles default encryptionset network ike crypto-profiles ike-crypto-profiles default encryption aes-256-cbcdelete network ike crypto-profiles ike-crypto-profiles default dh-groupset network ike crypto-profiles ike-crypto-profiles default dh-group group19delete network ike crypto-profiles ipsec-crypto-profiles default esp encryptionset network ike crypto-profiles ipsec-crypto-profiles default esp encryption aes-256-cbcdelete network ike crypto-profiles ipsec-crypto-profiles default dh-groupcommit force -
Log in to the device GUI. FIPS-CC Mode should be displayed on initial log in page and at all times in the status bar at the bottom of the web interface.
-
Load the license.
request license fetch auth-code <auth-code>