Arista VNFs Specifications
Licensing
Bring Your Own License (BYOL) products require a valid license. You are responsible for purchasing and managing your own licenses from Arista. To purchase a software license, contact your Arista sales representative or partners.
Support
Arista support is available for BYOL licenses. Contact your Arista sales representative or partner to purchase a license and support contract.
Arista CloudRouter
- Arista CloudEOS product brief
- Arista Documentation
| 4 Cores | 8 Cores | 16 Cores | |
|---|---|---|---|
| Memory | 8 GB | 16 GB | 24 GB |
| Software Package | CloudEOS | ||
| Virtual Data Interfaces Supported (Default/Max) | 10 / 10 (Ethernet 1 ~ 10) | 10 / 16 (Ethernet 1 ~ 16) | |
| System Reserved Interfaces | Management 1 (control plane traffic only) | ||
| Available License Type | BYOL (license file uploaded manually) | ||
| Access Methods | SSH (CLI) | ||
| Image Version | See Available Image Versions | ||
| Restricted CLI Commands | None | ||
| Deployment Options | Single Redundant |
Creating an Arista CloudEOS Router Device
When creating an Arista CloudEOS Router device, consider the following vendor-specific configuration options.
-
You will need your Bring Your Own License file from Arista Networks. You must upload the license file manually after the device creation is complete and device becomes available. You will need vEOS (throughput) and an additional license for IPSec if required. For more information, see Arista documentation.
-
When specifying the Device Details, the Connect to CloudVision Portal option is automatically selected.
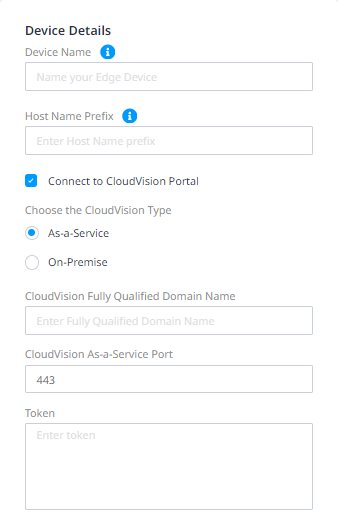
If you do want to connect to CloudVision:
- Choose the CloudVision Type – Select As-a-Service or On-Premise as your CloudVision type.
- If you selected As-a Service:
- CloudVision Fully Qualified Domain Name – Enter the FQDN.
- CloudVision As-a-Service Port – The default Port value will be pre-populated, but you can change it.
- Token – Enter your CloudVision token.
- If you selected On-Premise:
- CloudVision IP Address – Enter the IP Address.
- CloudVision On-premise-Port – The default Port value will be pre-populated, but you can change it.
- Token – Enter your CloudVision token.
Deselect Connect to CloudVision Portal if you do not want to connect to the CloudVision Portal.
Arista VeloCloud SD-WAN Edge Device
| 2 Cores | 4 Cores | 8 Cores | 10 Cores | |
|---|---|---|---|---|
| Memory | 8 GB | 16 GB | 32 GB | 32 GB |
| Software Package | Standard | |||
| Virtual Data Interfaces Supported (Default/Max) | 8 / 8 | |||
| System Reserved Interfaces | GigabitEthernet 1 (MGMT), GigabitEthernet 2 (NSP/BYOC), GigabitEthernet 3 (Public) | |||
| Available License Type | BYOL | |||
| Access Methods | GUI through VeloCloud Orchestrator | |||
| Image Version | See Available Image Versions | |||
| Restricted CLI Commands | None | |||
| Deployment Options | Single Redundant |
Creating an Arista VeloCloud SD-WAN Edge Device
Before creating your VeloCloud SD-WAN Edge device in Network Edge, you must perform these device configuration steps in VeloCloud Orchestrator.
Create an Equinix Managed Segment
In the VeloCloud Orchestrator, the Global segment is the default segment. You must create an Equinix Managed segment.
Then, you must assign the segment to a profile on the device configuration page. Follow the Configure Device Settings for Profiles instructions. Create a new profile or select a profile that already exists.
Edit Interfaces
In order for device provisioning to succeed, you must Configure Interface Settings with the following:
-
GE1 Interface - GE1 is a common interface required by both Equinix Internet Access (EIA) and Bring Your Own Connections (BYOC)
warningIf the GE1 interface is not edited as described, device provisioning will fail.
- Make sure Routed is selected in the Capability drop-down menu.
- De-select WAN Overlay.
- In the Segments drop-down menu, select your Equinix Managed segment.
- De-select NAT Direct Traffic.
-
GE2 Interface - A GE2 interface is required by Bring Your Own Connections (BYOC).
- Make sure Routed is selected in the Capability drop-down menu.
- In the Segments drop-down menu, select All Segments.
- De-select NAT Direct Traffic.
-
GE3 Interface - A GE3 interface is required by Public (EC) connections.
- Make sure Routed is selected in the Capability drop-down menu.
- In the Segments drop-down menu, select All Segments.
- De-select NAT Direct Traffic.
Locate the Activation Key and FQDN
From VeloCloud Orchestrator, locate your activation key and copy it.
When you are creating the device in Network Edge, in the Device Details section, enter:
- Device Name – Enter a name for the device to be used in the Equinix Customer Portal.
- Activation Key – The key generated in the VeloCloud Orchestrator.
- Controller FQDN – The VeloCloud Orchestrator fully qualified domain name. Confirm the FQDN before entering. If the FQDN is incorrect, the device cannot connect to your Orchestrator.
- Root Password (optional) – Root password for the VeloCloud SD-WAN Edge device.