Equinix Metal was sunset on June 30, 2026. The user documentation will be removed on September 30, 2026.
Virtual Routing and Forwarding
Equinix Metal™ Virtual Routing and Forwarding (VRF) provides a virtual router for Layer 3 network connectivity between a Metal Gateway Layer 2 private network and remote destinations.
To create and configure Virtual Routing and Forwarding, you need three components:
Limitations
Before you create a VRF, consider the following limitations:
- There is a limit of 8 VRFs per Project.
- There is a limit of one
/64IPv6 IP Reservation per VRF.
Preparing for Your VRF
Before you create a VRF, be aware of the subnets you plan to use and how you are going to use them. This information is important because you will need to specify the IP address range when you create a VRF.
In your Allowed IP Ranges (ip_ranges) include the following:
-
Subnets that your Metal Gateway and the servers connected to the Metal Gateway will use. A VRF’s IP address range must be defined to create the VRF IP address reservations, which are then used to make the VRF’s Metal Gateways.
-
Subnets that you will use as the peering information of the VRF and the remote side of the connection. See Using VRF with Interconnections for more information.
Creating a Virtual Router
- Console
- API
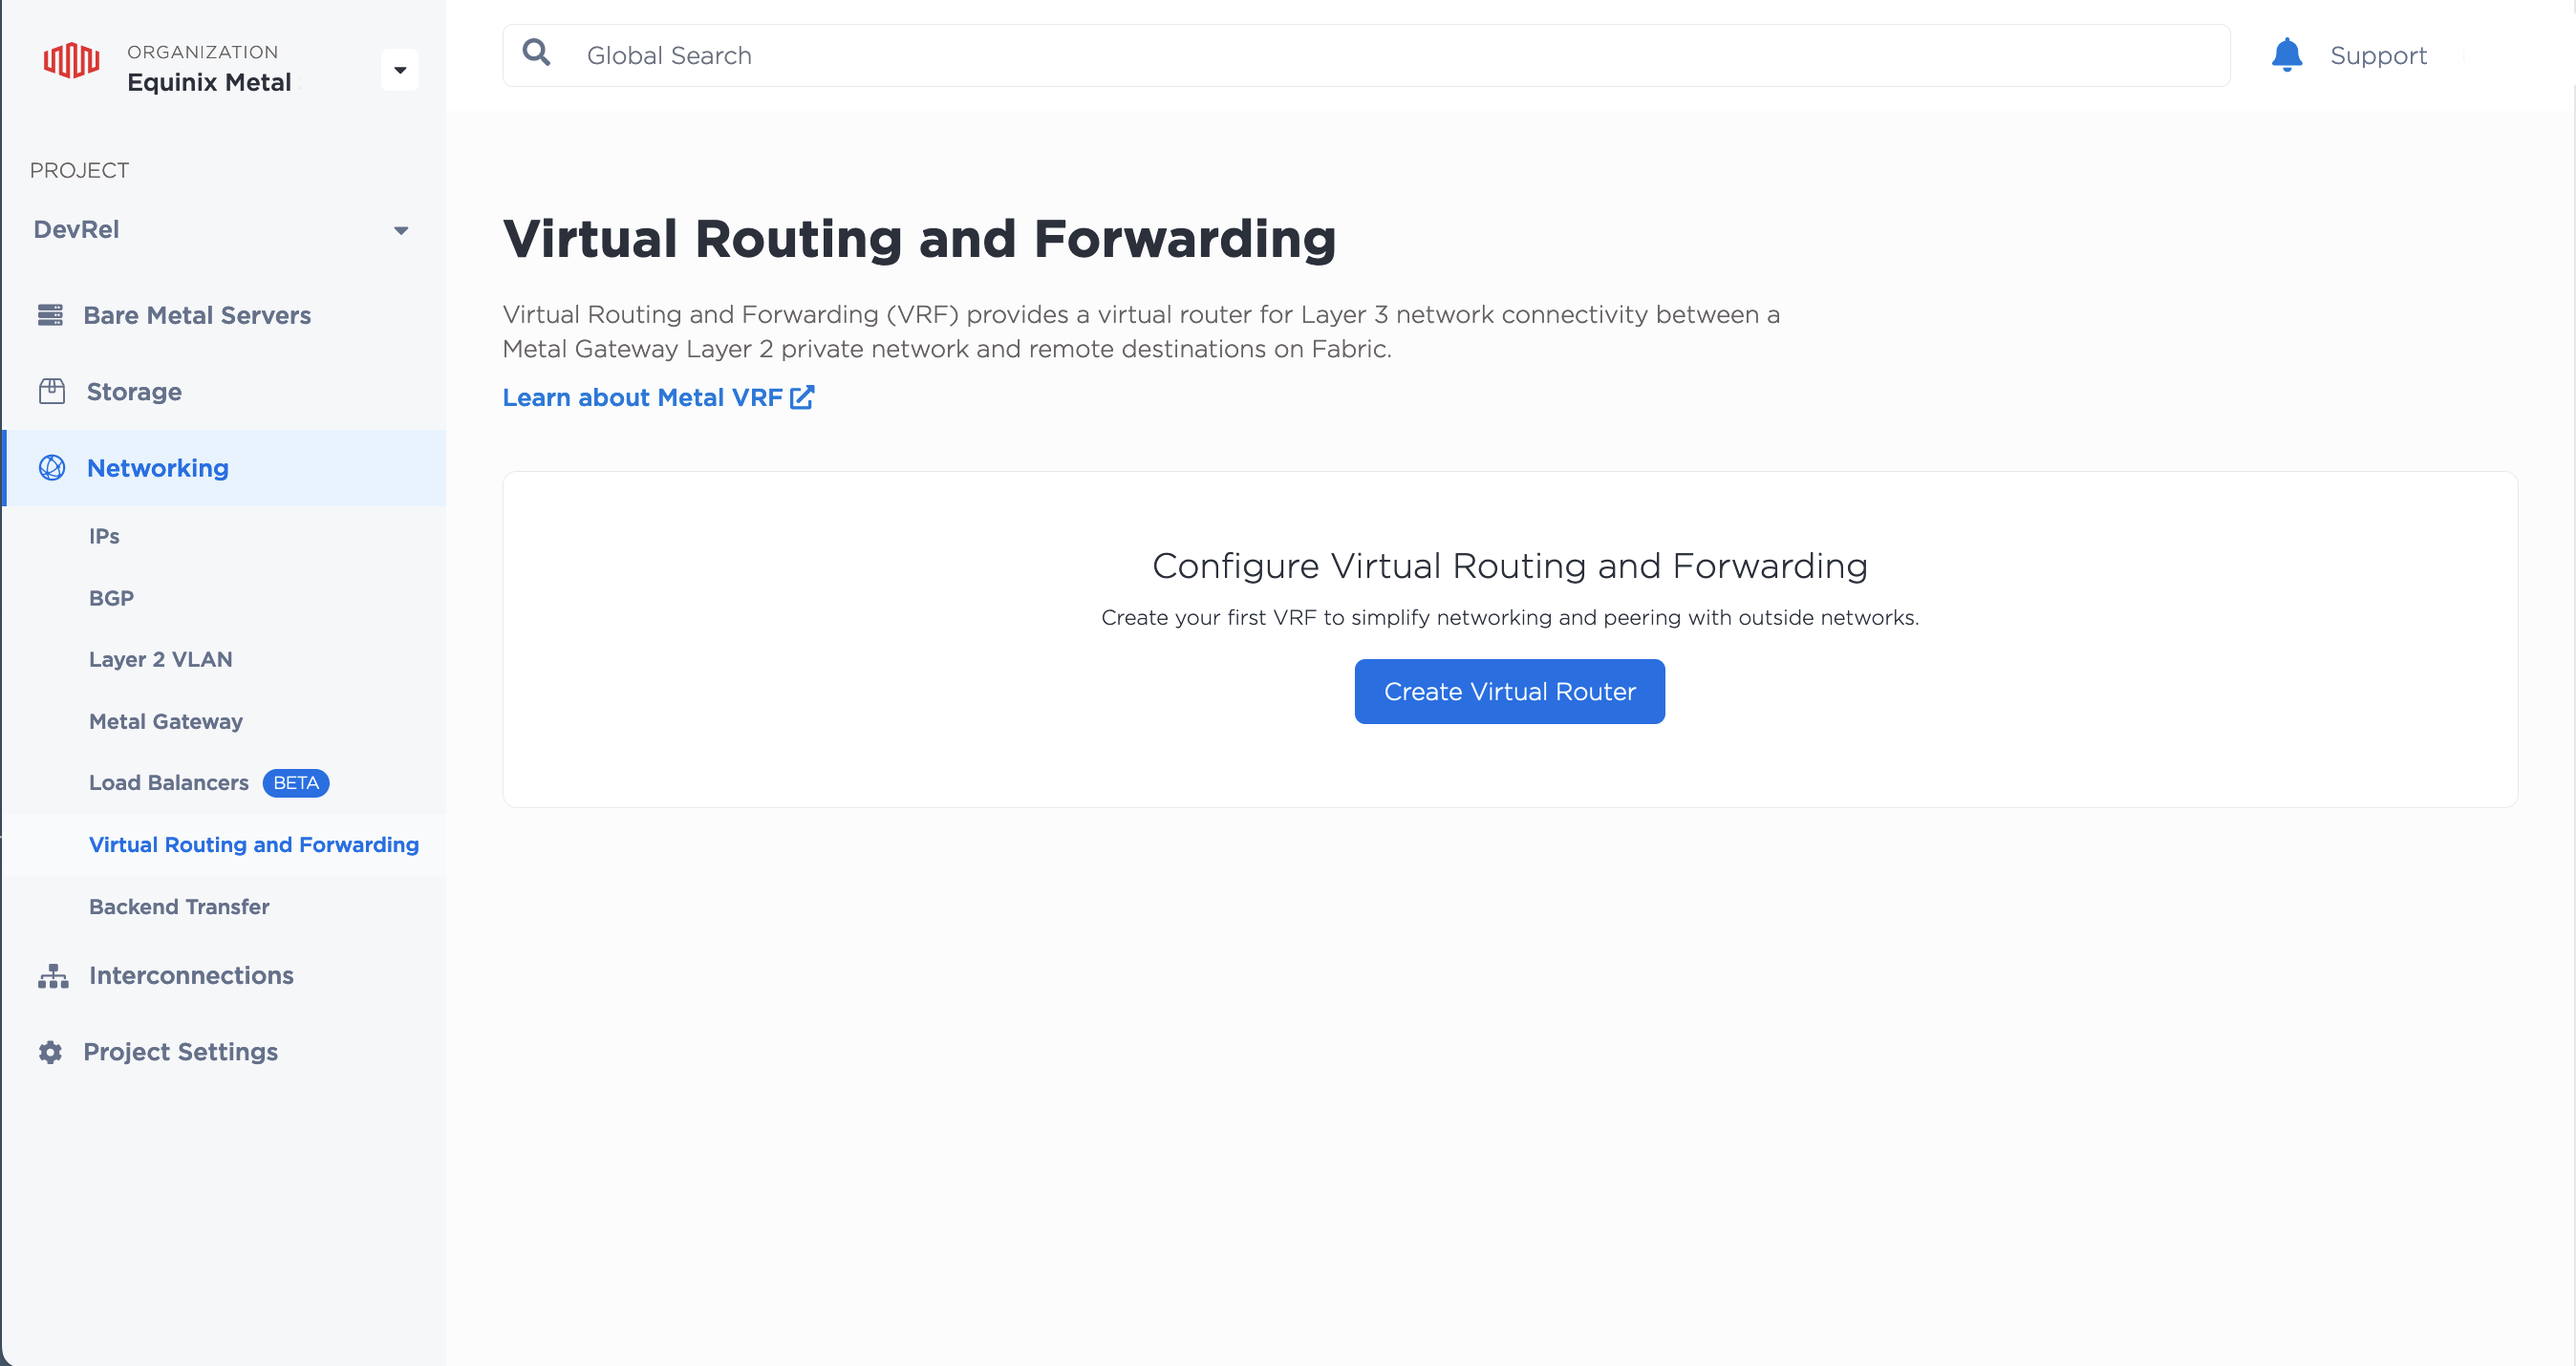
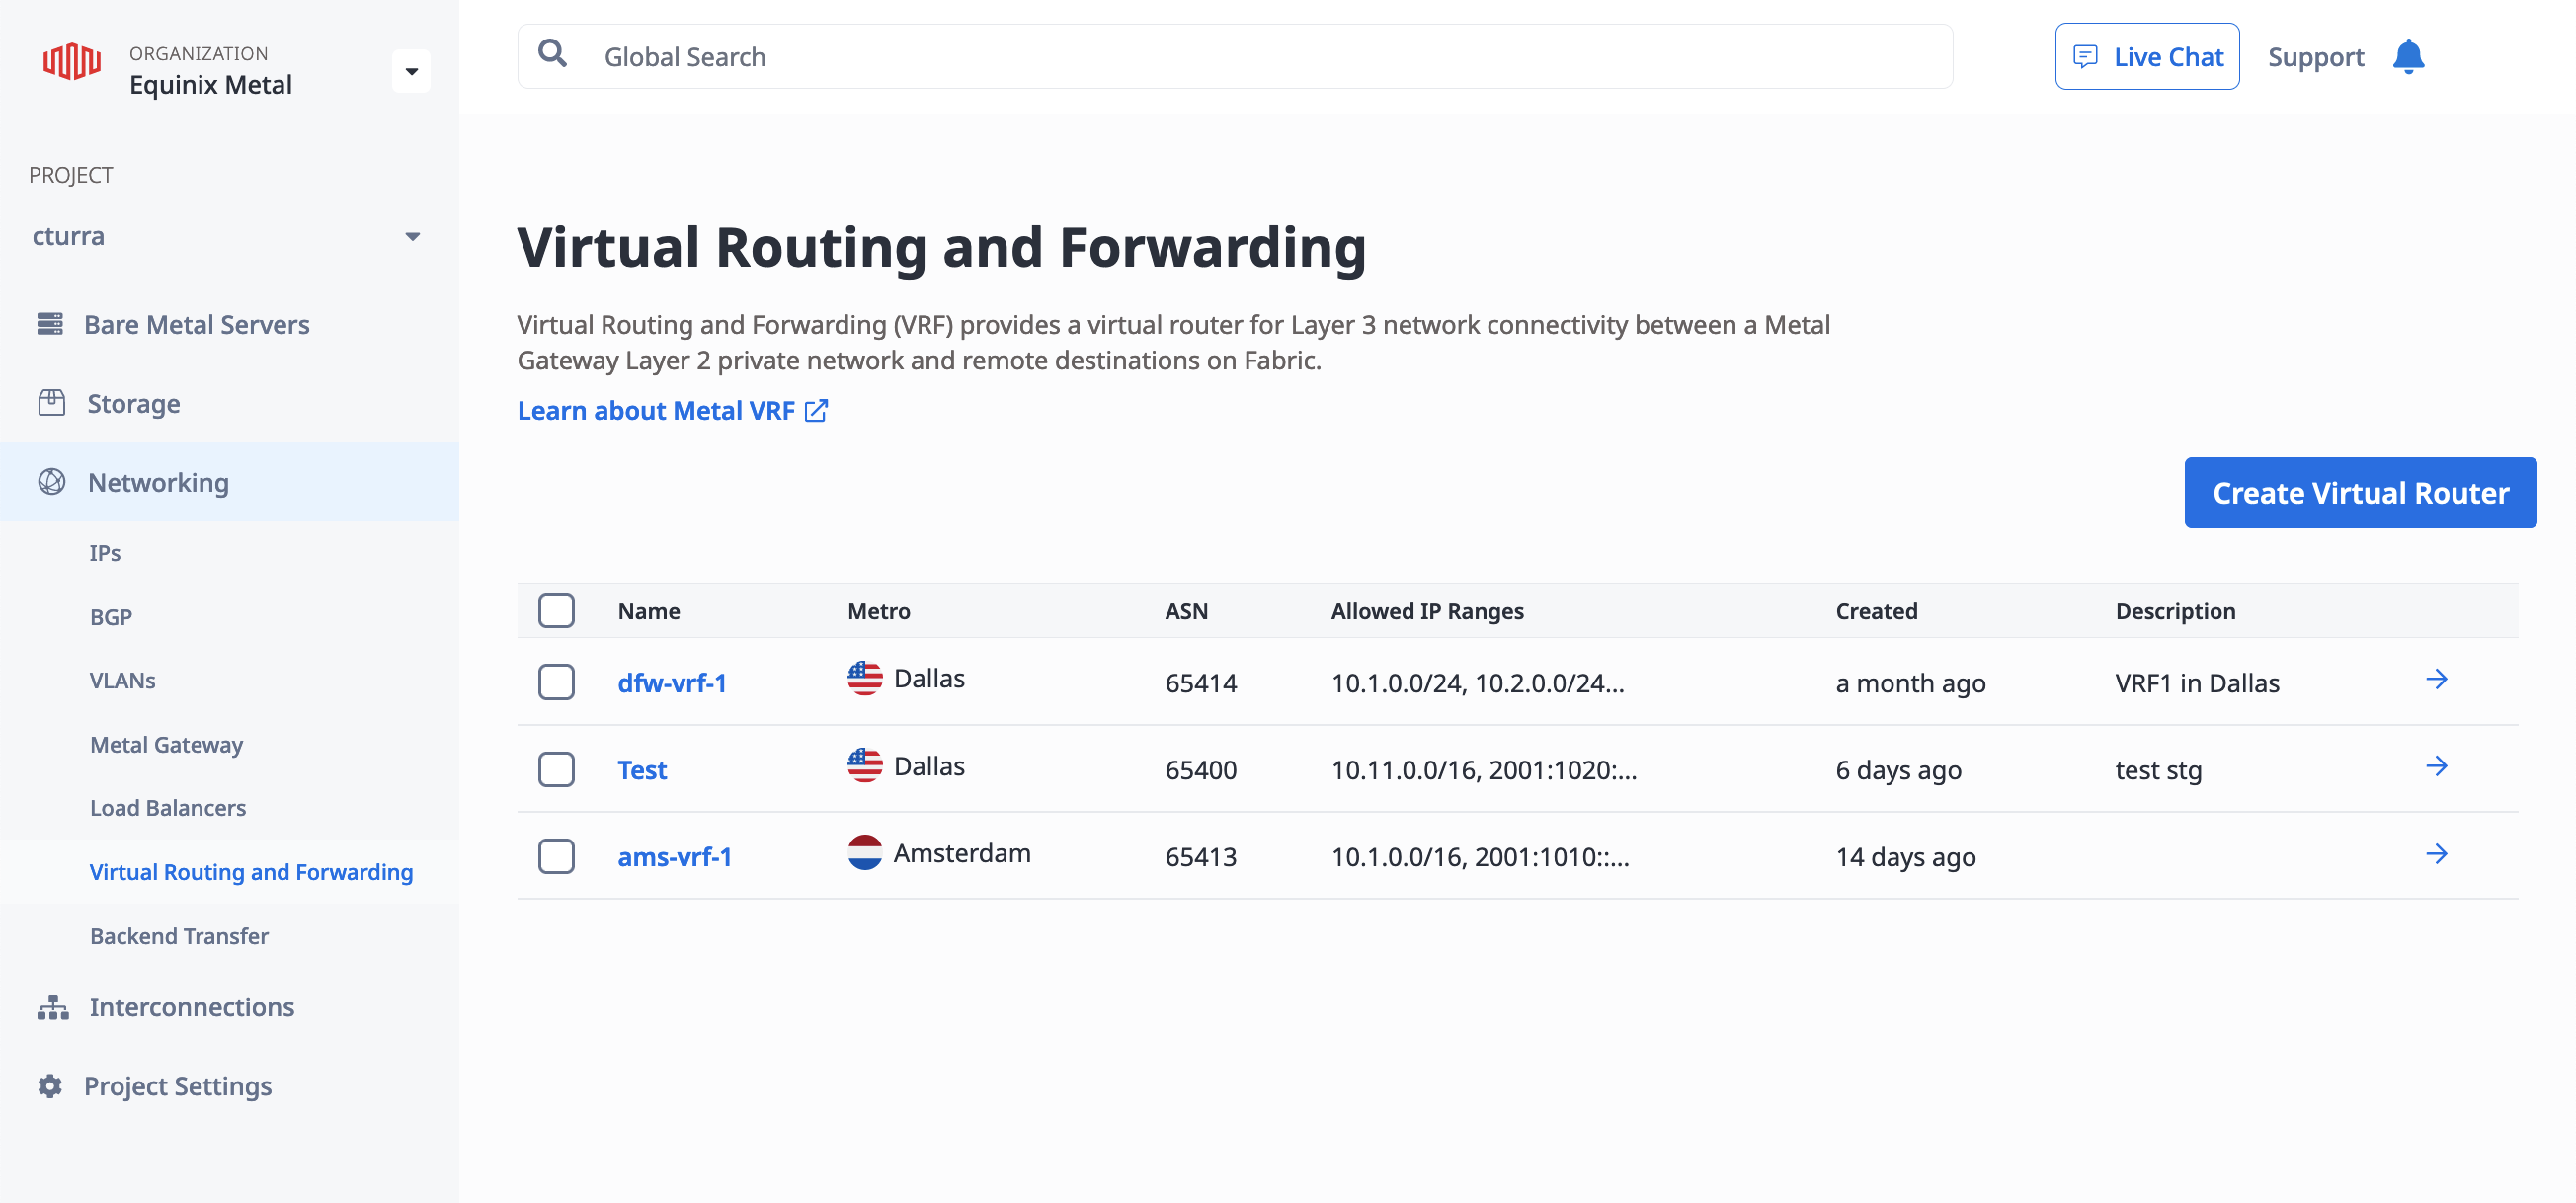
To create a VRF, open the Project's Virtual Routing and Forwarding page found in the Project's Networking section. Click Create Virtual Router.
In the Create Virtual Router pane, enter a name for your router and an optional description. Select the Metro where your servers, VLANs, the Metal Gateway, and this VRF are all located. All of these are required to be in the same Metro.
In the Allowed IP Ranges field, enter a list of CIDR network addresses. IPv4 address blocks must be between /8 and /29 in size. An IPv6 address block must be between /59 and /64 in size. You can also optionally specify a local ASN.
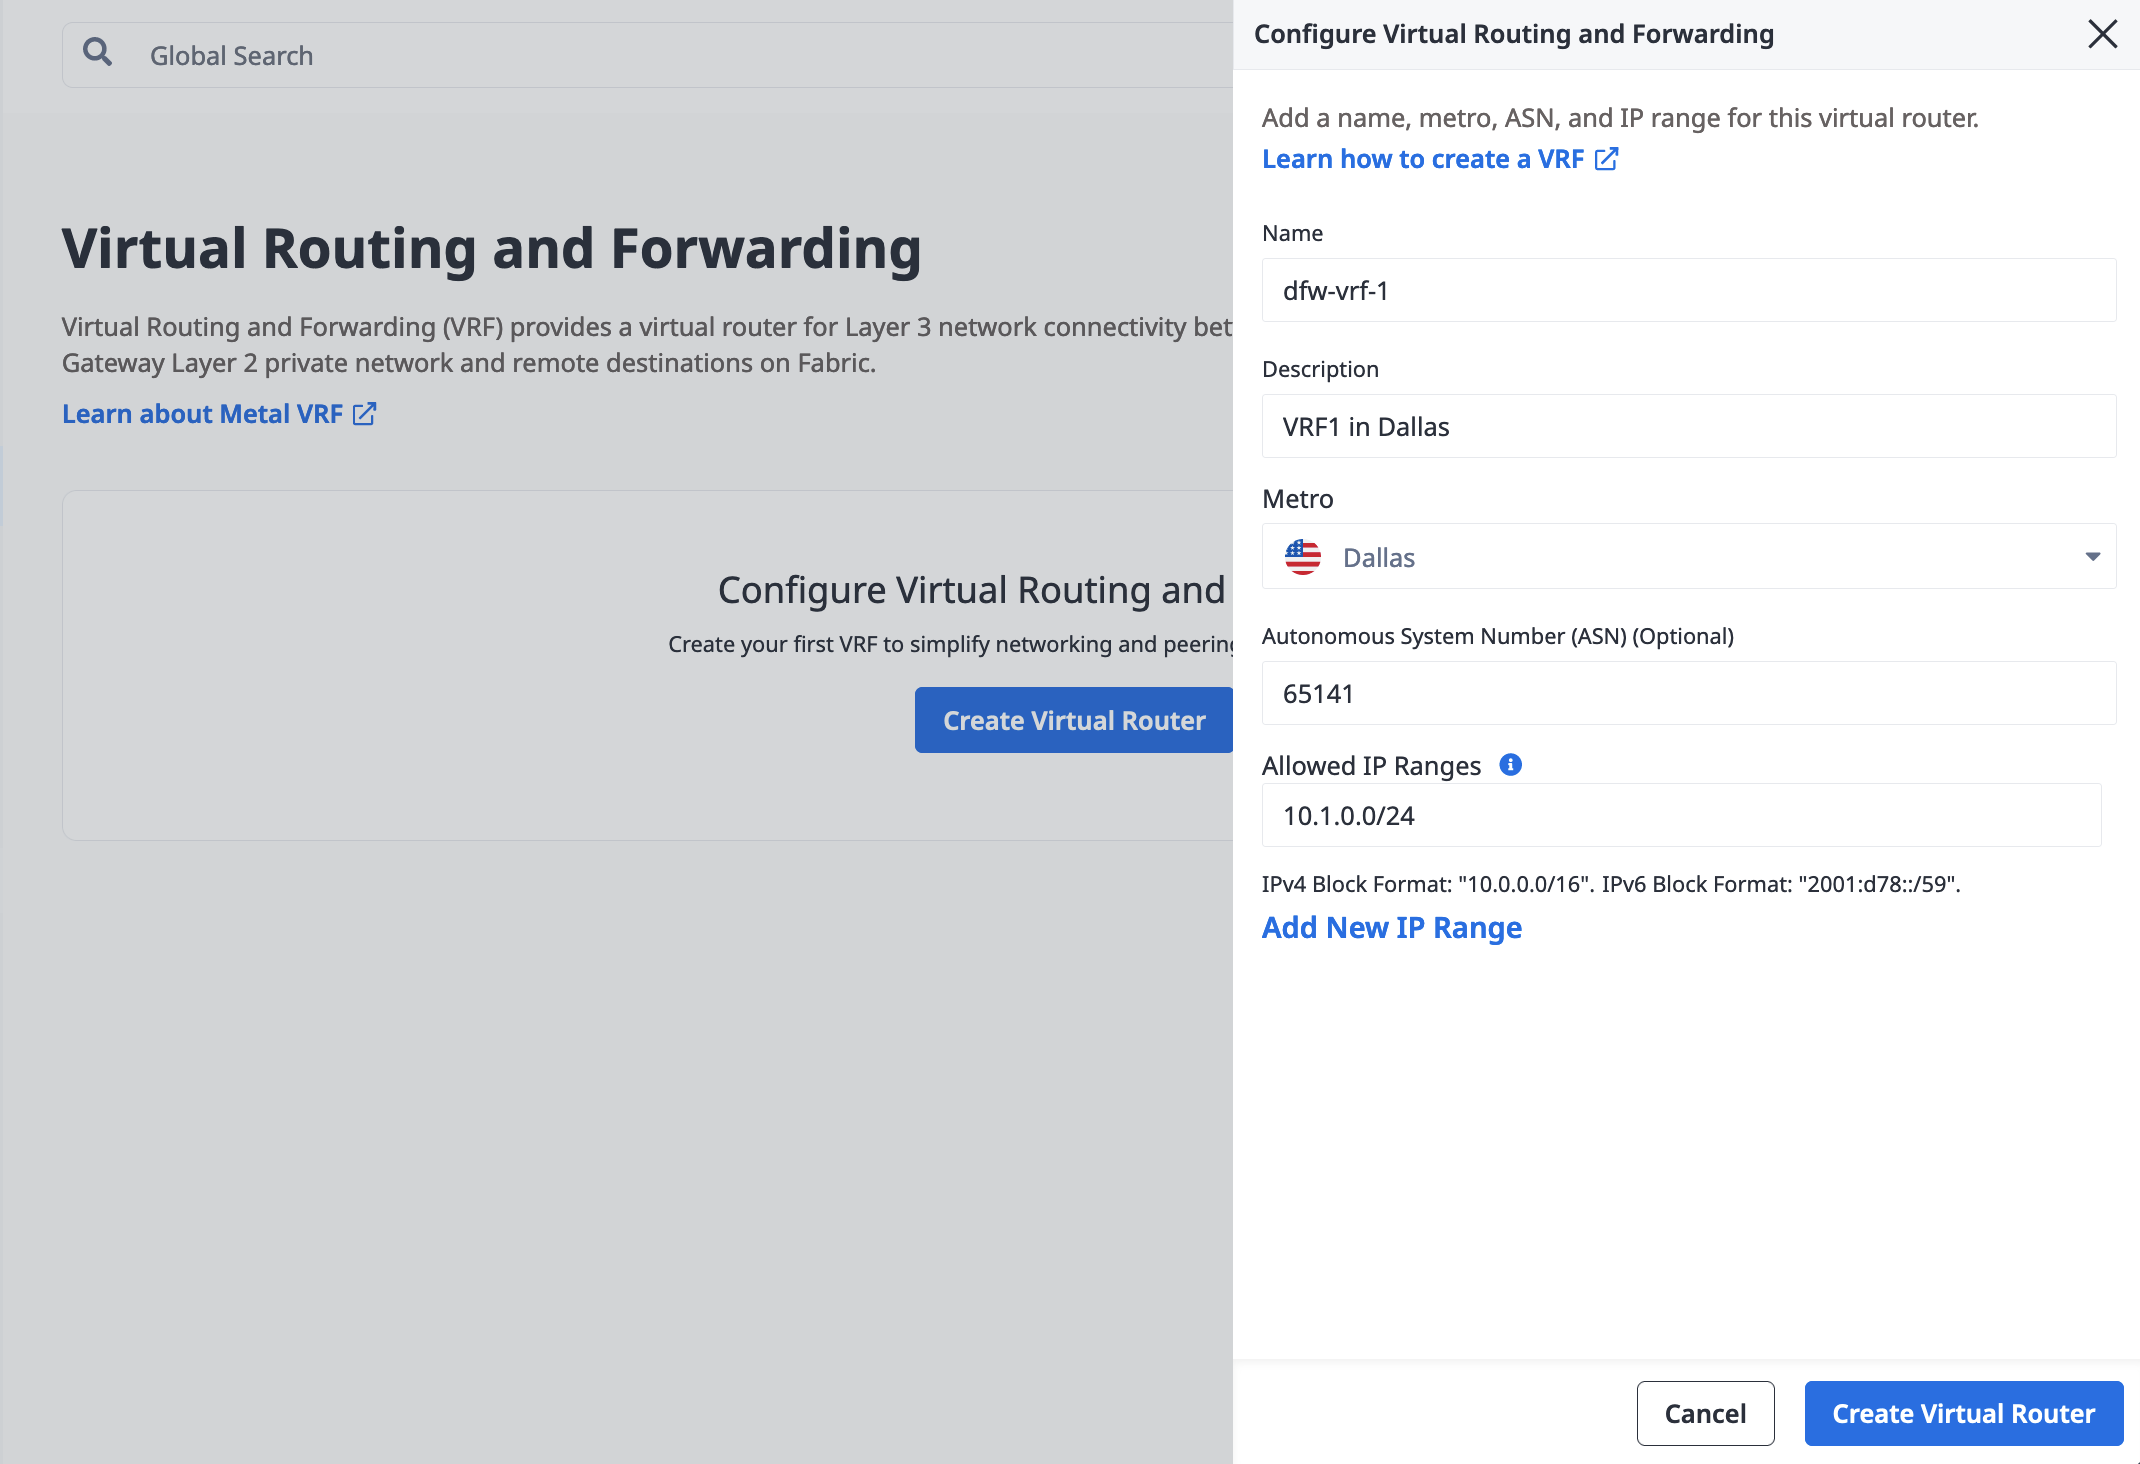
Click Create Virtual Router.
To create a VRF, send a POST request to the /projects/{id}/vrfs endpoint.
curl -X POST \
-H "Content-Type: application/json" \
-H "X-Auth-Token: <API_TOKEN>" \
"https://api.equinix.com/metal/v1/projects/{id}/vrfs" \
-d '{
    "name": "<string>",
    "description": "<string>",
    "metro": "<metro_slug>",
    "ip_ranges": [
        "<cidr_address>"
    ],
    "local_asn": <integer>
}'
Body Parameters:
"name"(required) - An easy to remember name for your VRF."description"- An optional description of the VRF."metro"(required) - The UUID or metro code for the Metro in which to create the VRF."ip_ranges"(required) - A list of CIDR network addresses. The IPv4 address blocks must be between/8and/29in size. An IPv6 address block must be between/59and/64in size. Examples: ["10.0.0.0/16","2001:d78::/59"]."local_asn"- Specify the Local ASN of the VRF as a 32-bit integer.
In the response, be sure to note the VRF's ID -- you will need this for creating your VRF-specific IP address reservations.
Creating a VRF IP Address Reservation
Next, create an IP address reservation specifically for your VRF that you will assign to your Metal Gateway. The subnet must be from a block that you specified in the Allowed IP Ranges (ip_ranges) when you created the VRF.
- Console
- API
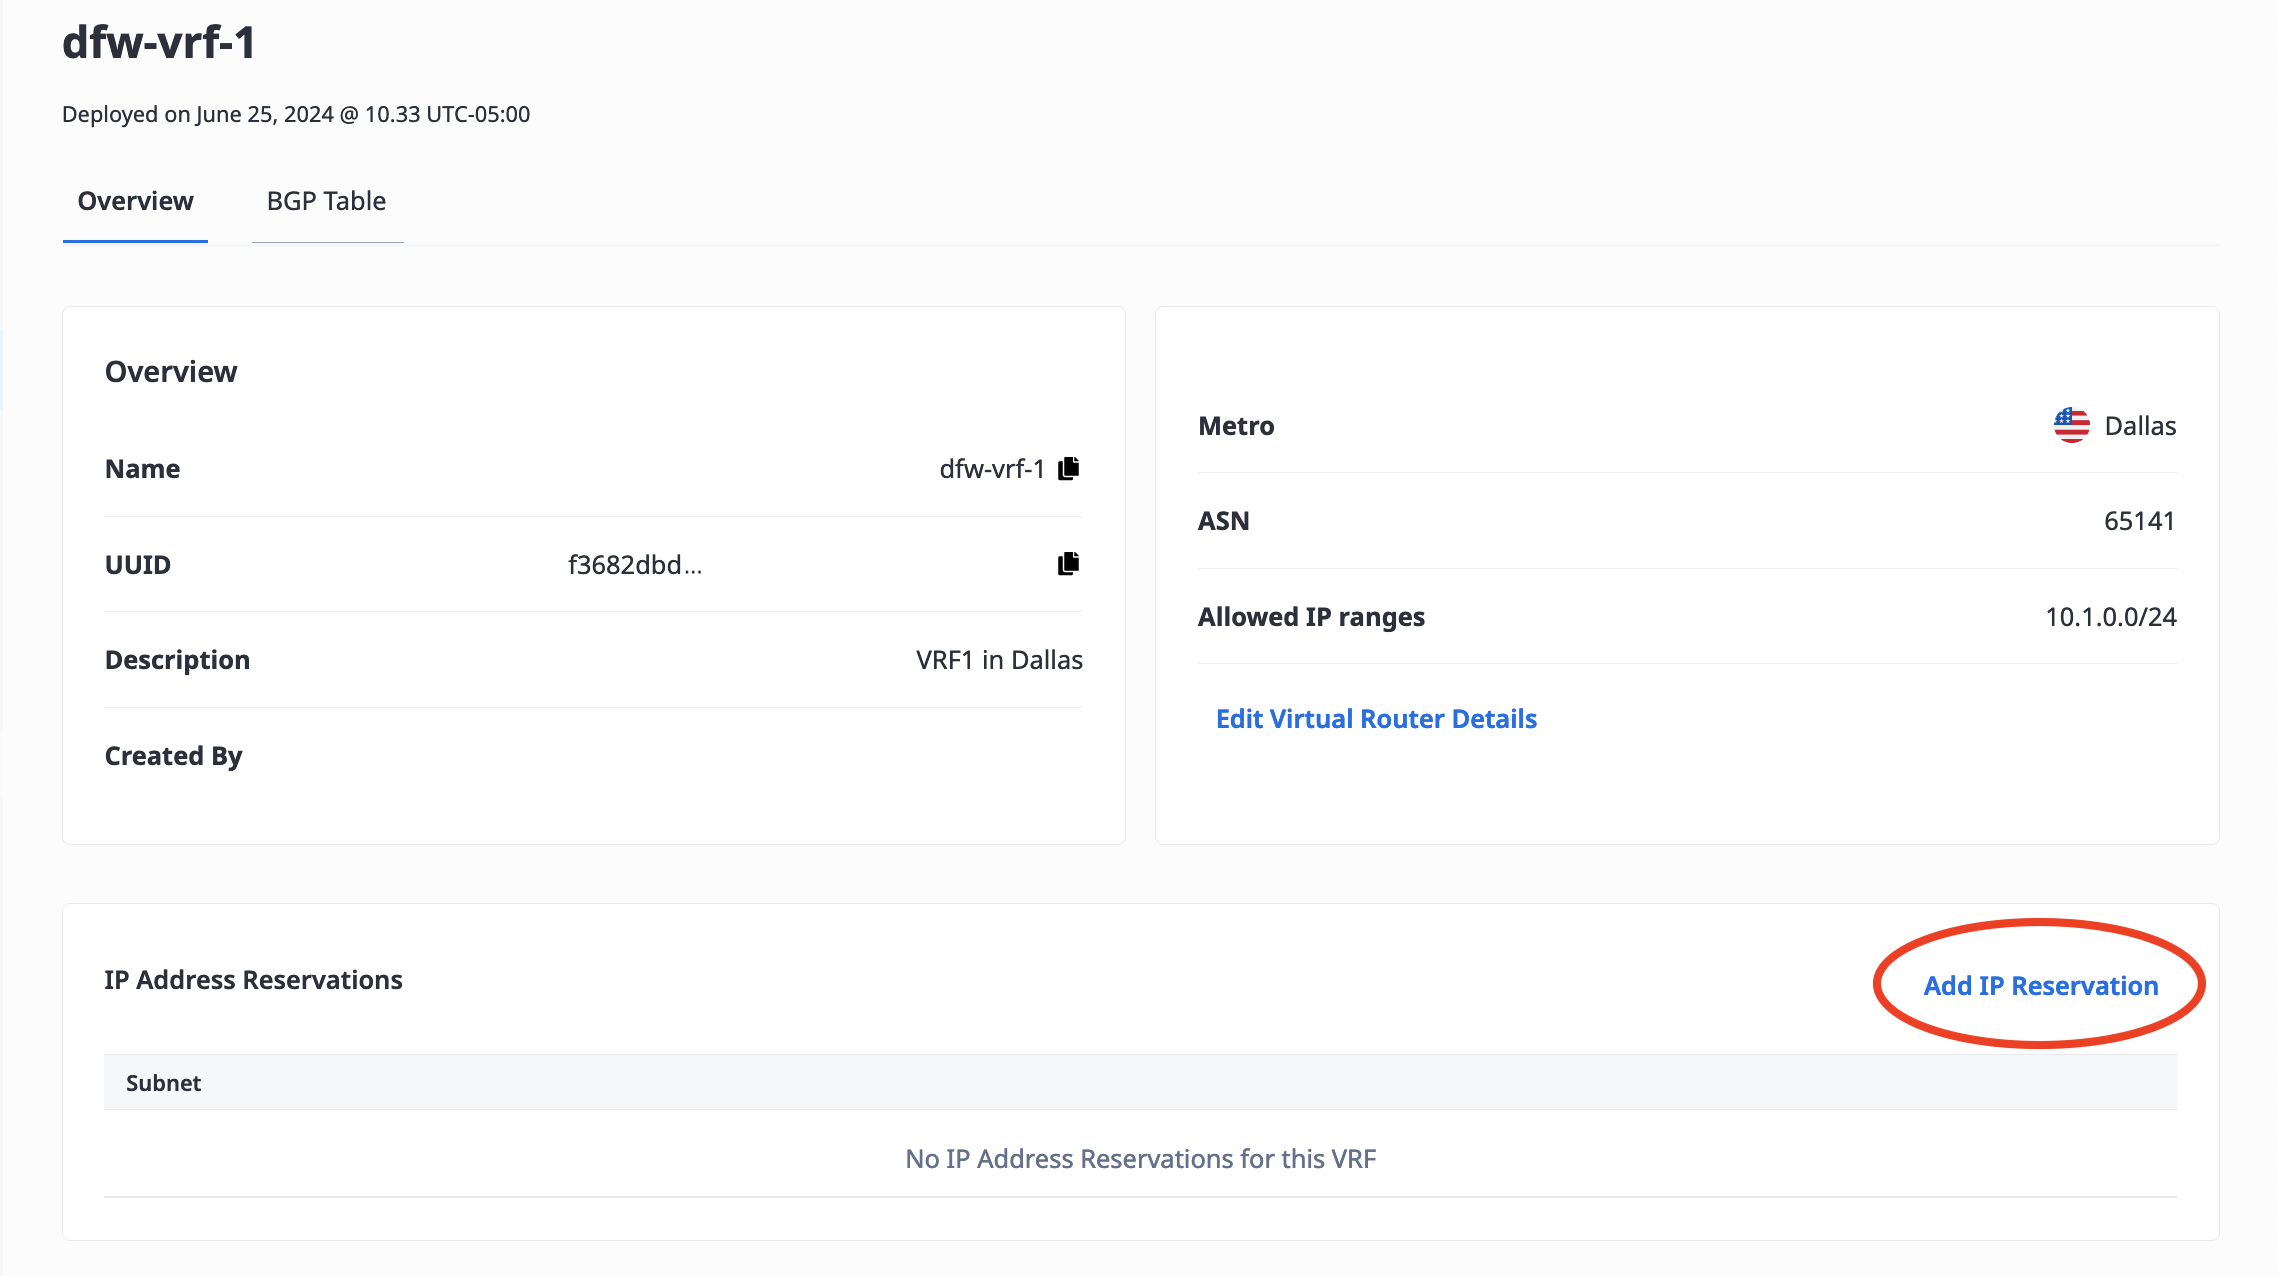
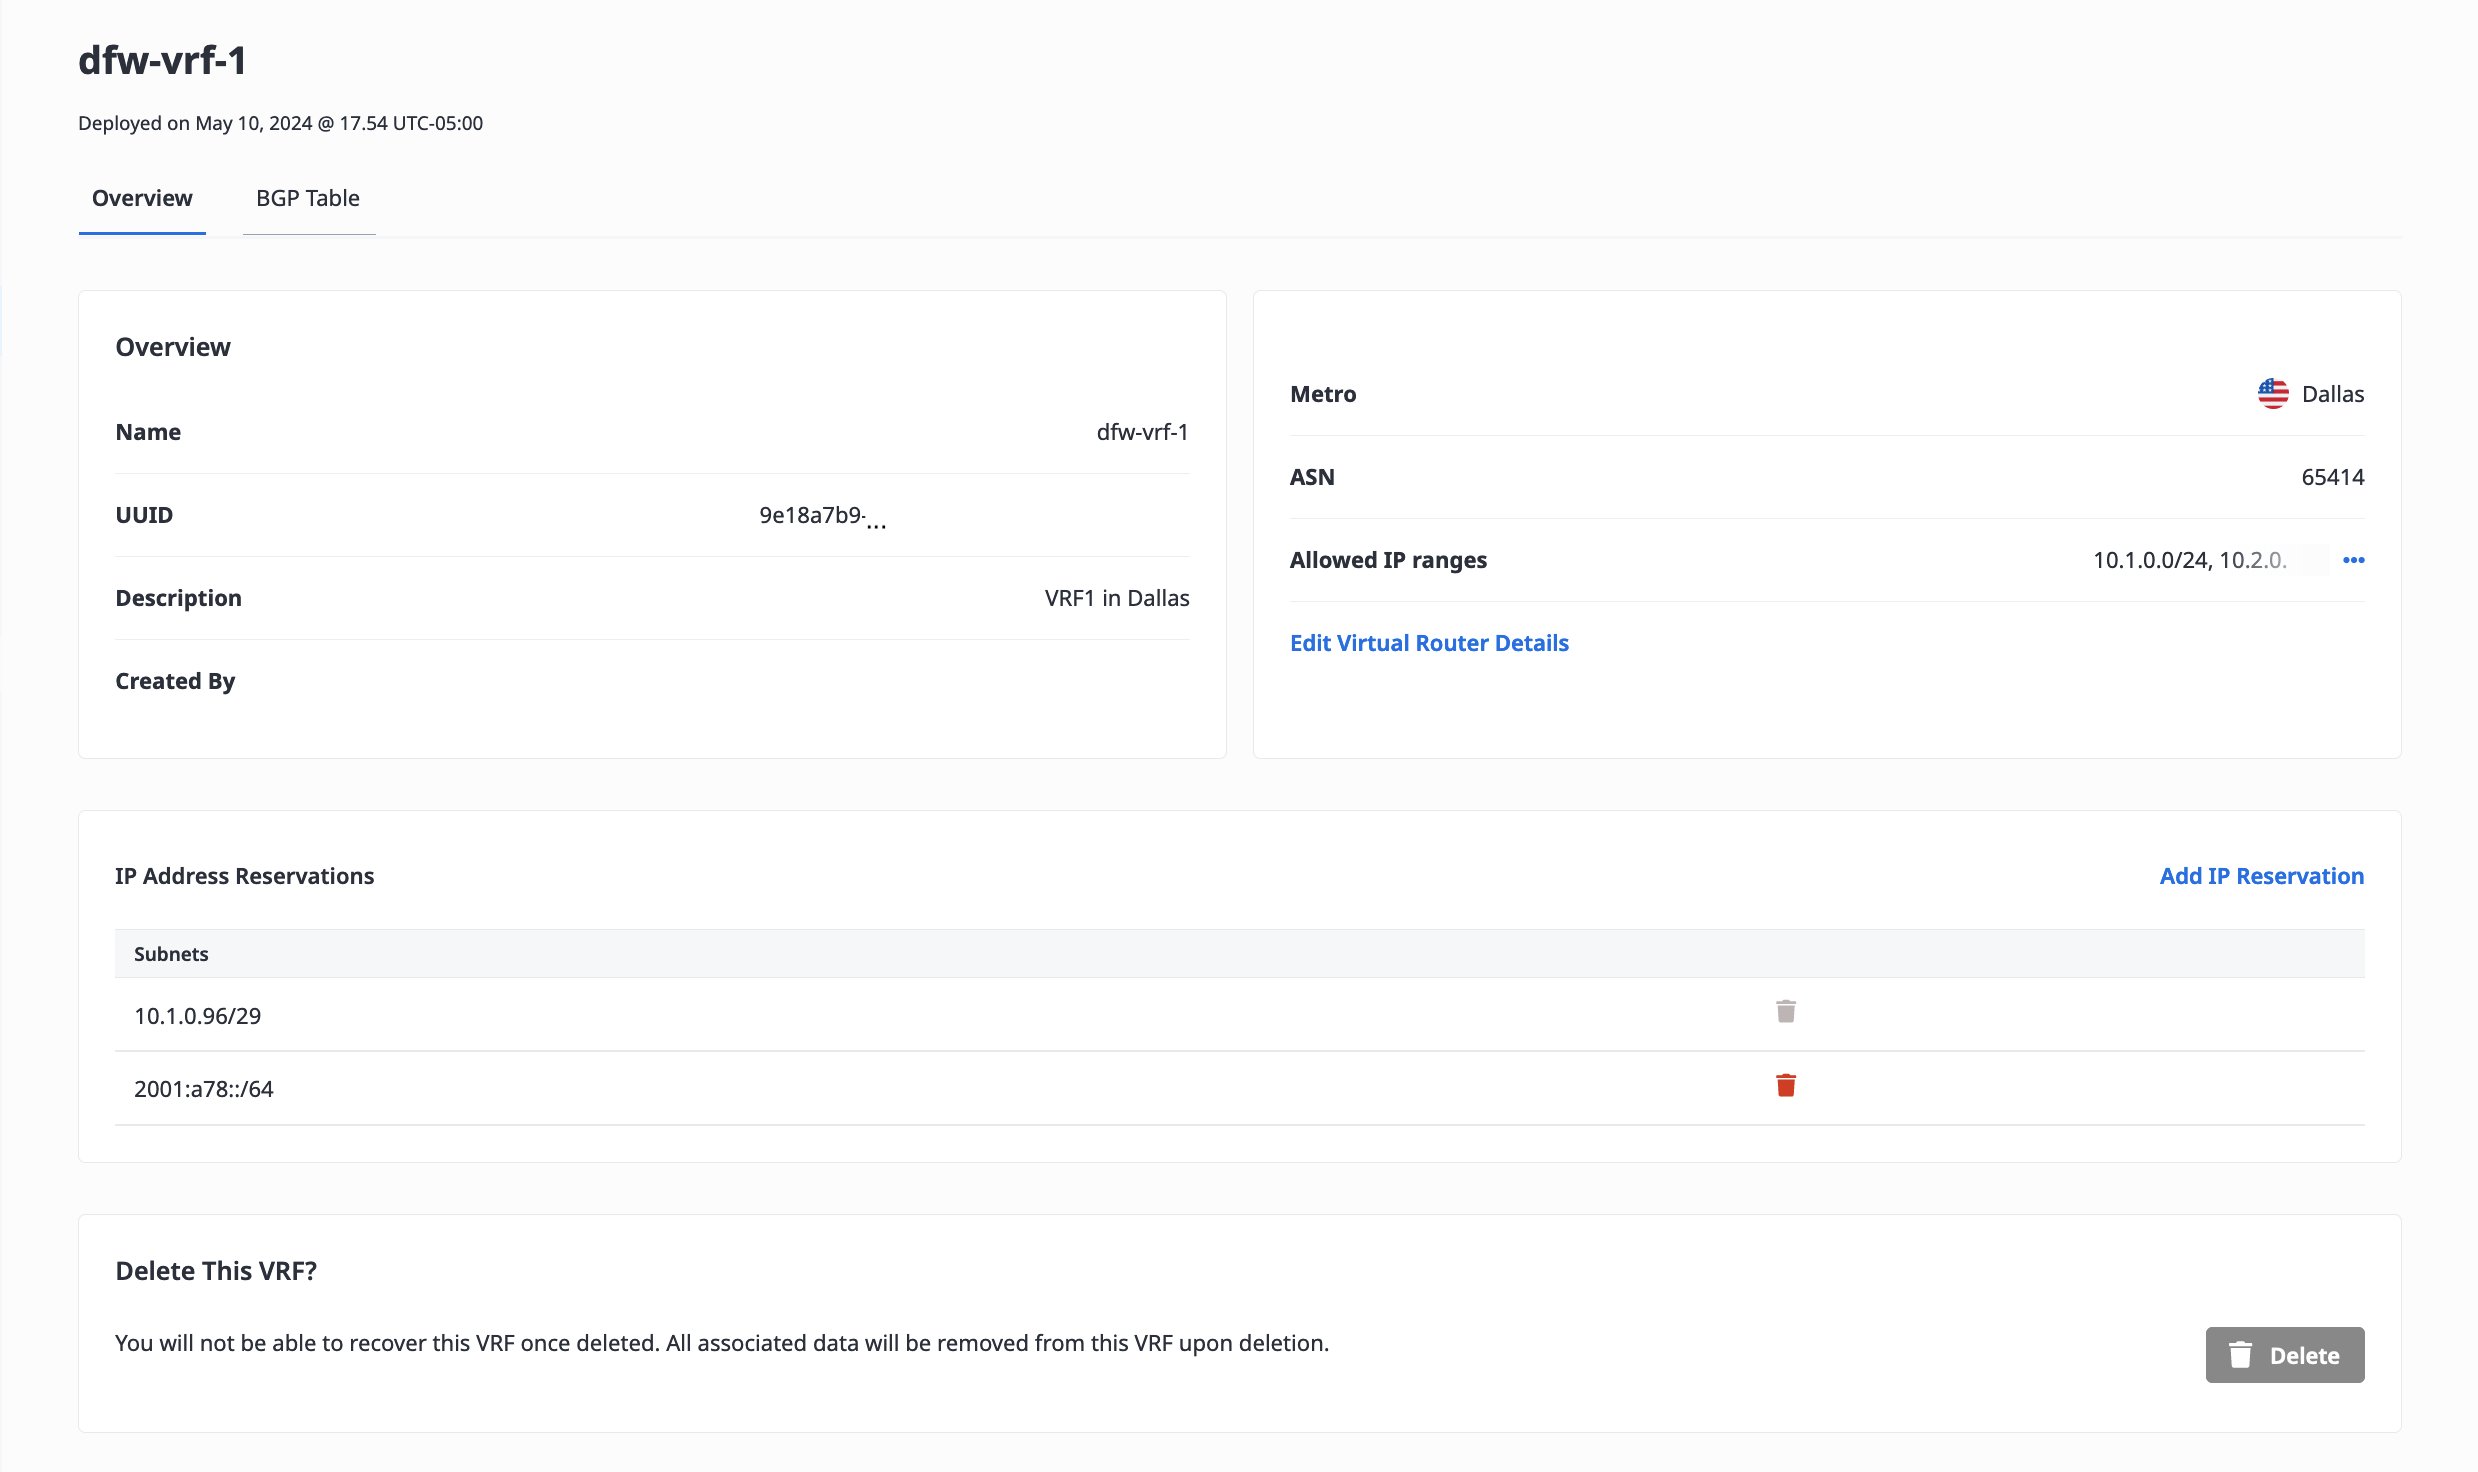
Click on the VRF you want to reserve IP addresses for. From the Overview tab, click Add IP Reservation.
In the panel, enter the subnet in CIDR notation. The maximum size IPv4 subnet is /22 and the minimum size subnet is /29. The only size IPv6 subnet is /64.
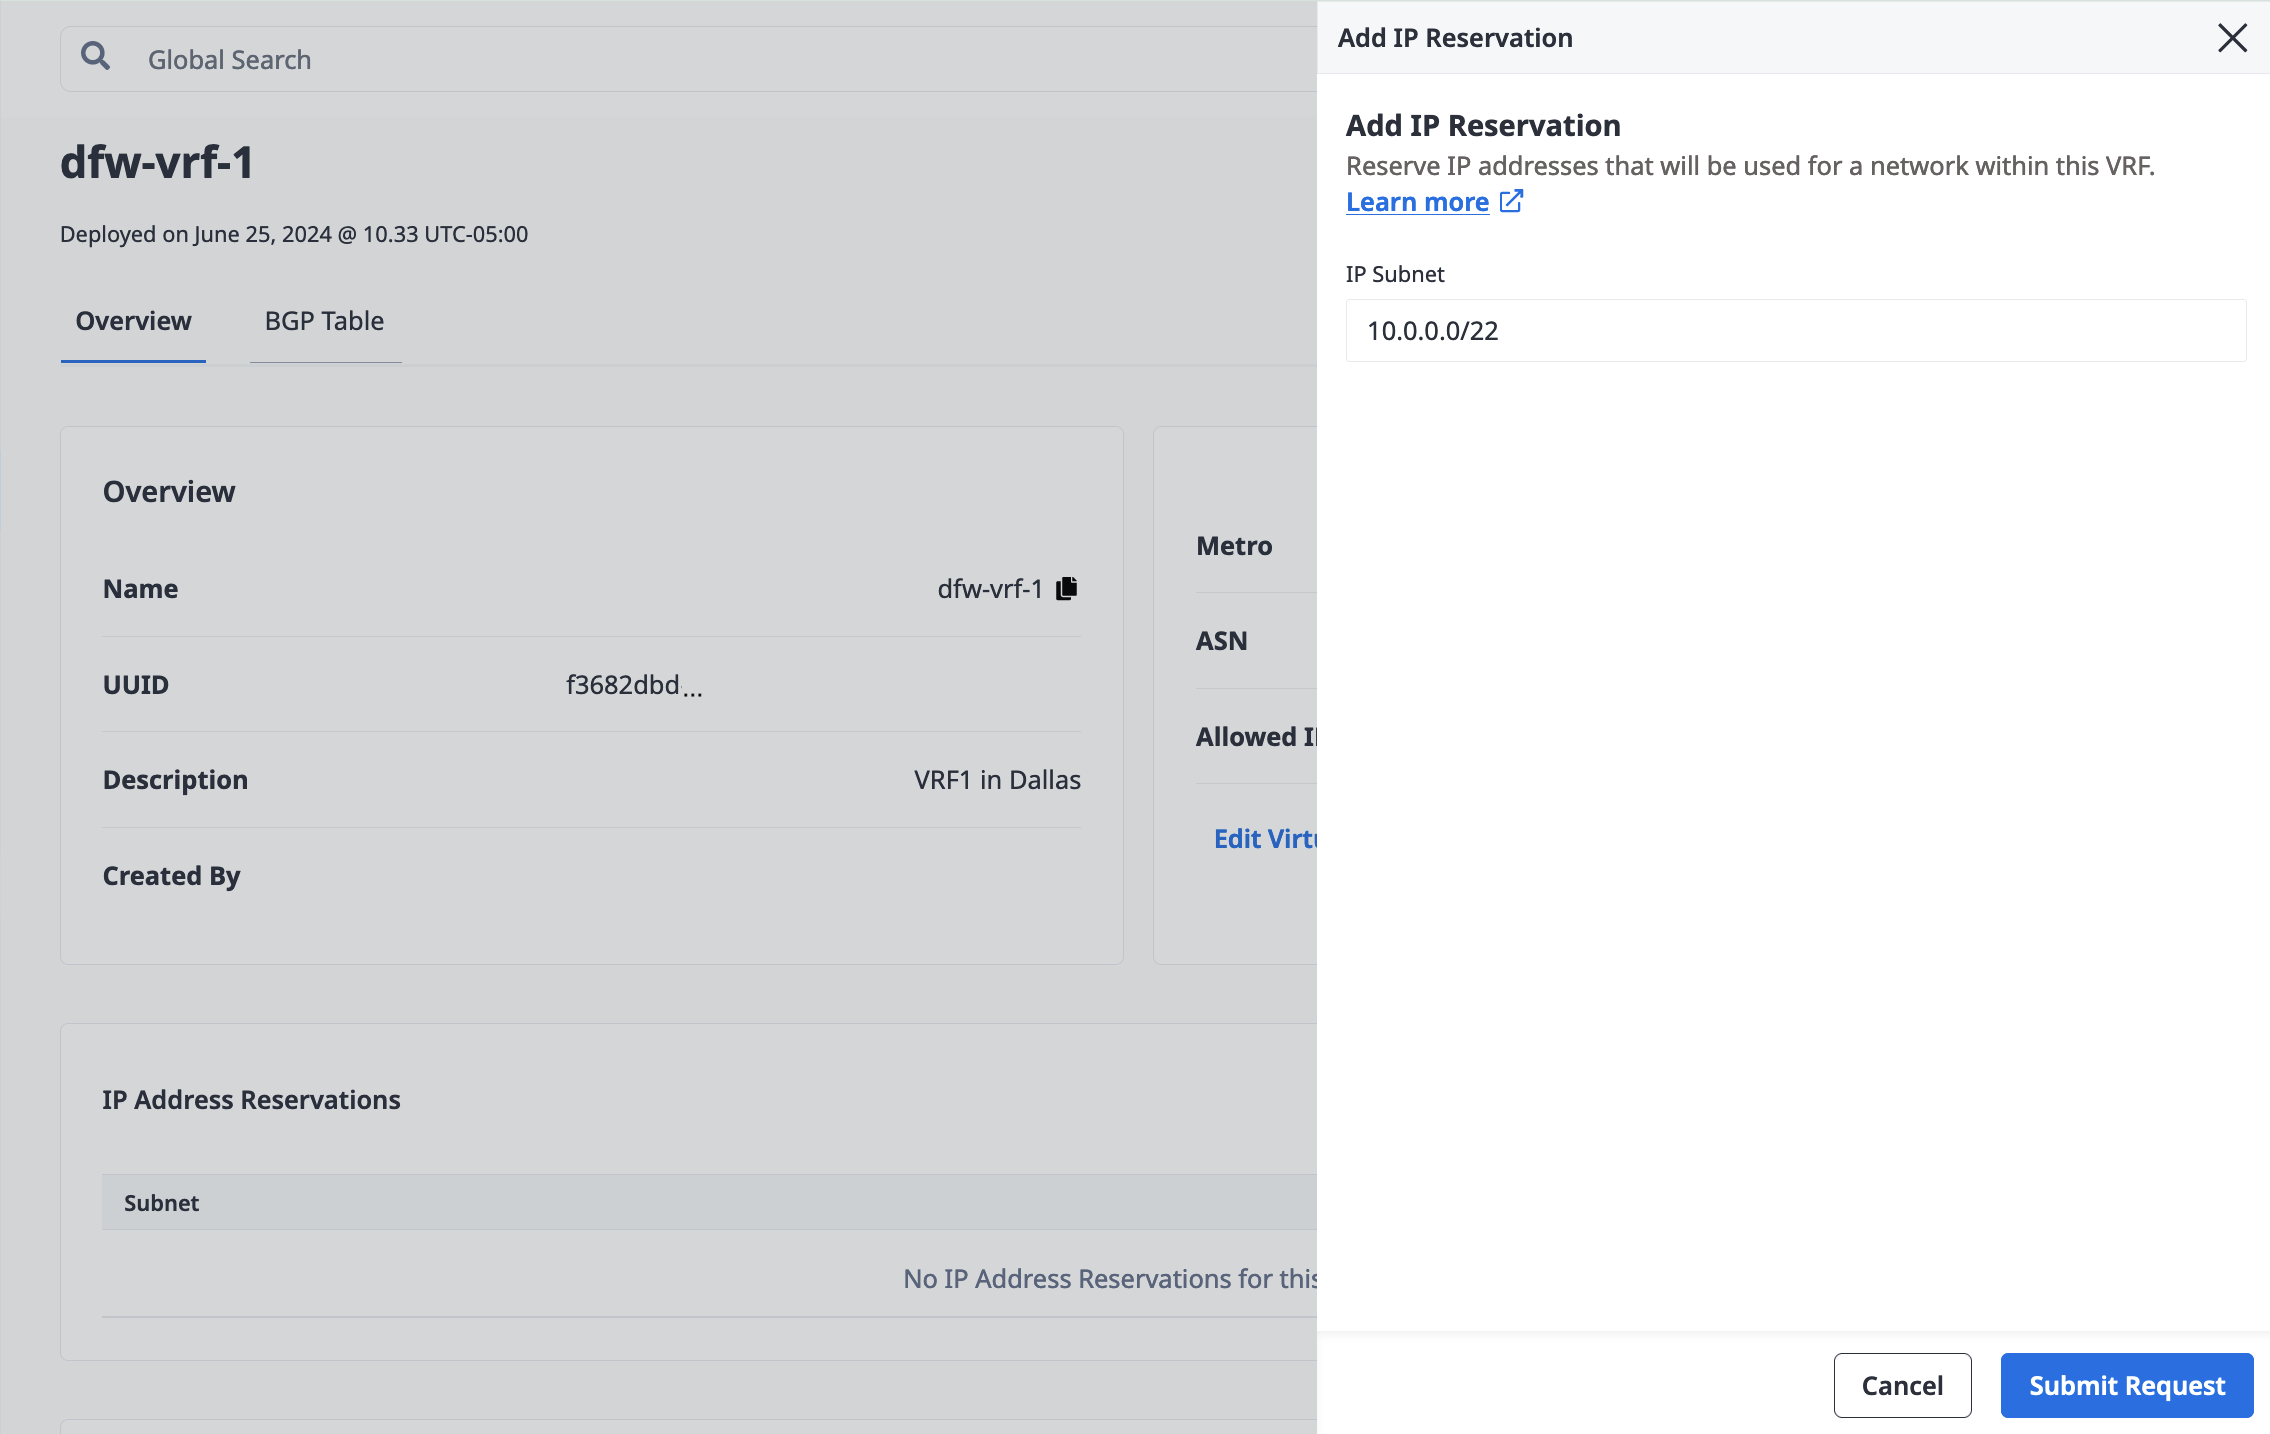
The Metro for the IP address reservation is inferred from the associated VRF. Click Submit Request.
As a result, you will get a subnet of reserved IP addresses in the same Metro as your VRF that is ready to be used by your VRF's Metal Gateway.
Send a POST request the the /projects/{id}/ips endpoint.
curl -X POST \
-H 'Content-Type: application/json' \
-H "X-Auth-Token: <API_TOKEN>" \
"https://api.equinix.com/metal/v1/projects/{id}/ips" \
-d '{
    "cidr": <integer>,
    "network": "<ip_address>",
    "type": "vrf",
    "vrf_id": "<UUID>"
}'
Body Parameters:
"cidr"(required) - The size of the VRF IP Reservation's subnet, expressed as an integer. IPv4 subnets have a maximum size of 22 and a minimum size of 29. An IPv6 subnet must be size 64."network"(required) - The starting IP address for this VRF IP Reservation's subnet."type"(required) - The type of IP address reservation. Must be set to"vrf"."vrf_id"(required) - The ID of the VRF in which this VRF IP Reservation is created. The VRF must have an existing IP Range that contains the requested subnet. This field may be aliased as just"vrf".
A full listing of body parameter fields and options is available in the API reference.
The Metro for the IP address reservation is inferred from the associated VRF. As a result, you will get a subnet of reserved IP addresses in the same Metro as your VRF that is ready to be used by your VRF's Metal Gateway. The response to your request will contain the IP address reservation's ID. You will need the ID to create your Metal Gateway.
Creating the VRF Metal Gateway
Note: If you have not already created one, you will need to create a VLAN in the same Metro as your VRF. This VLAN provides the Layer 2 Network between your VRF's Metal Gateway and your servers.
- Console
- API
Create a Metal Gateway in the same Metro as your VRF, selecting the VLAN you'll use to connect the gateway and your servers.
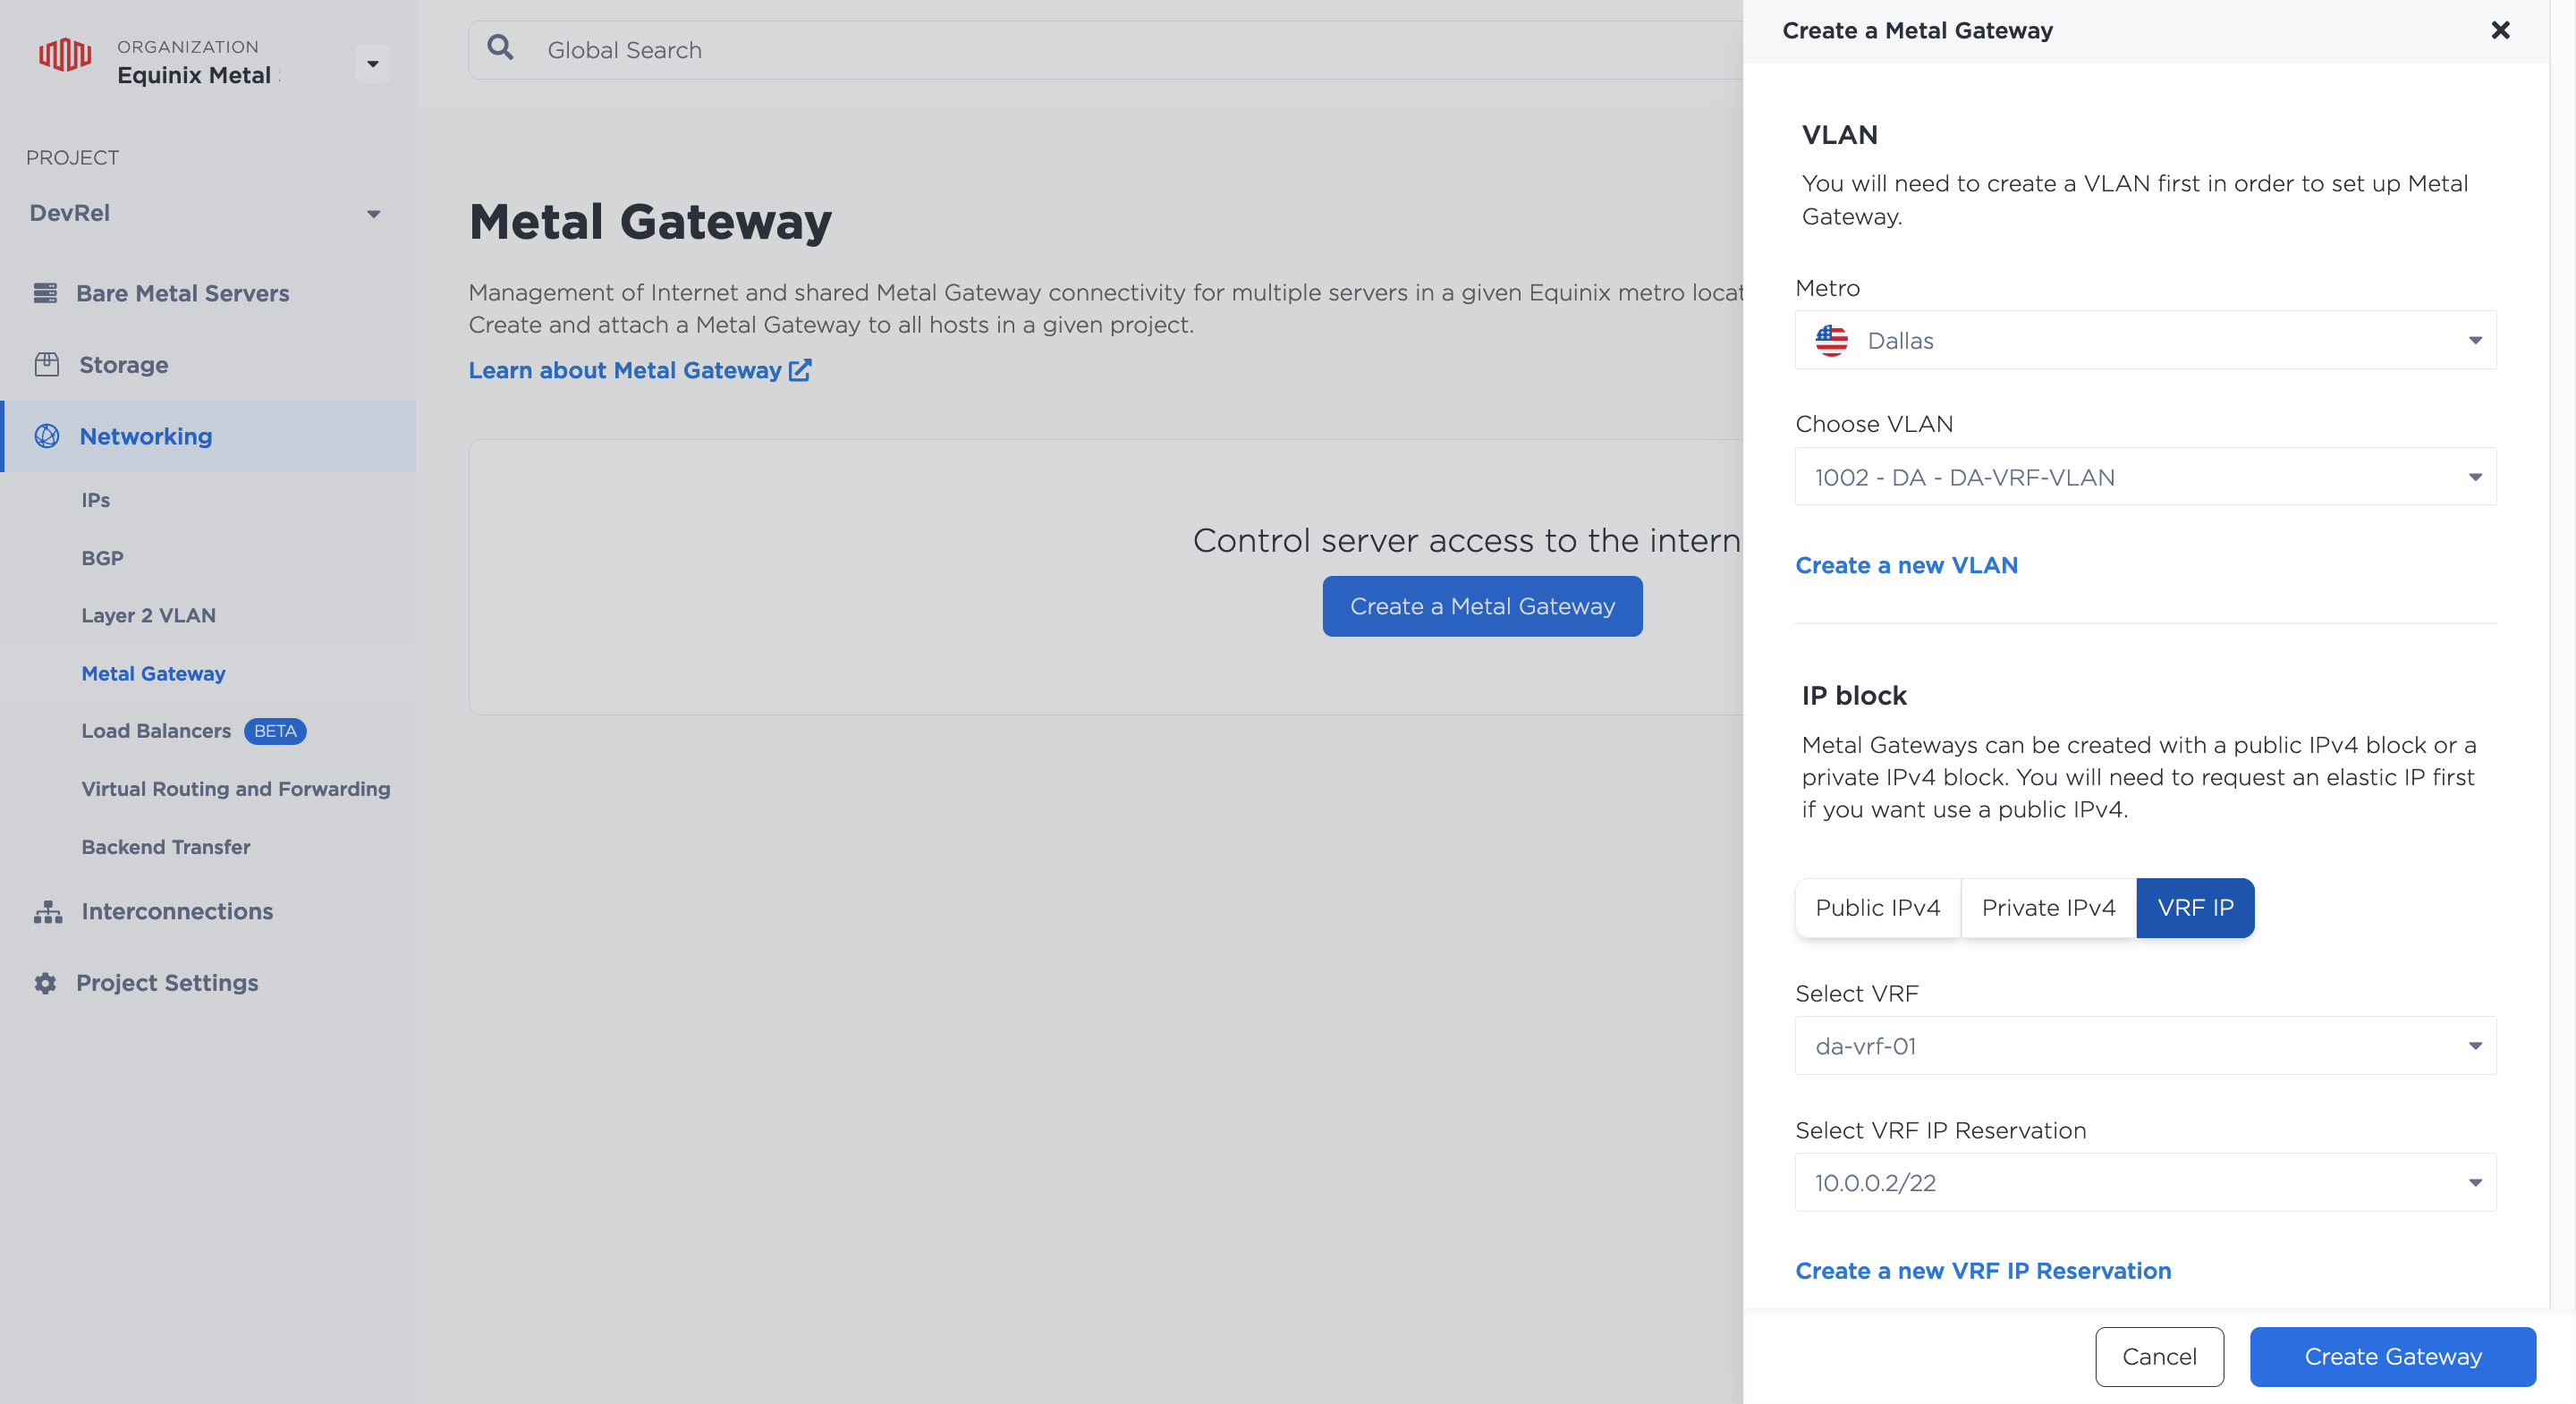
In the IP Block section, select VRF IP. Click the drop-downs to select the VRF and the VRF IP Address Reservation to associate with this Metal Gateway. Click Create Gateway.
As a result, you will get a Metal Gateway in the same Metro as your VRF, which uses the IP addresses in your VRF IP address reservation that you can assign to servers connected to the Metal Gateway's VLAN.
Now that you have your Network IP Address Blocks, create your VRF's Metal Gateways, using the IP address reservation's ID and your Metal Gateway's VLAN's ID. Send a POST request to the /projects/{project_id}/metal-gateways endpoint.
curl -X POST \
-H "Content-Type: application/json" \
-H "X-Auth-Token: <API_TOKEN>" \
"https://api.equinix.com/metal/v1/projects/{id}/metal-gateways" \
-d '{
"ip_reservation_id": "<UUID>",
"virtual_network_id": "<UUID>"
}'
Body Parameters:
"ip_reservation_id"(required) - The ID of a VRF IP Reservation that is in the same Project and Metro as the VRF, that will be used by the Metal Gateway."virtual_network_id"(required) - The ID of a VLAN in the same Project and Metro as the VRF, which will be used by the Metal Gateway
The Metro and VRF for the Metal Gateway is inferred during creation by the specified by the IP reservation and VLAN. As a result, you will get a Metal Gateway in the same Metro as your VRF, which uses the IP addresses in your VRF IP address reservation that you can assign to servers connected to the Metal Gateway's VLAN.
Connecting to Your VRF
To connect your VRF and Metal network to external peer networks, you also need to provision and configure one of the following:
-
- For example, use a Metal-billed Fabric VC to connect your VRF to a cloud service provider.
- Or a Fabric-billed Fabric VC to connect your VRF to a Network Edge device.
-
Or a new Virtual Circuit on a new or existing Dedicated Port.
Managing VRF
- Console
- API
Once your VRFs are provisioned, you can view them in your Project's Networking section, on the Virtual Routing and Forwarding page.
Click on a VRF to view its Overview.
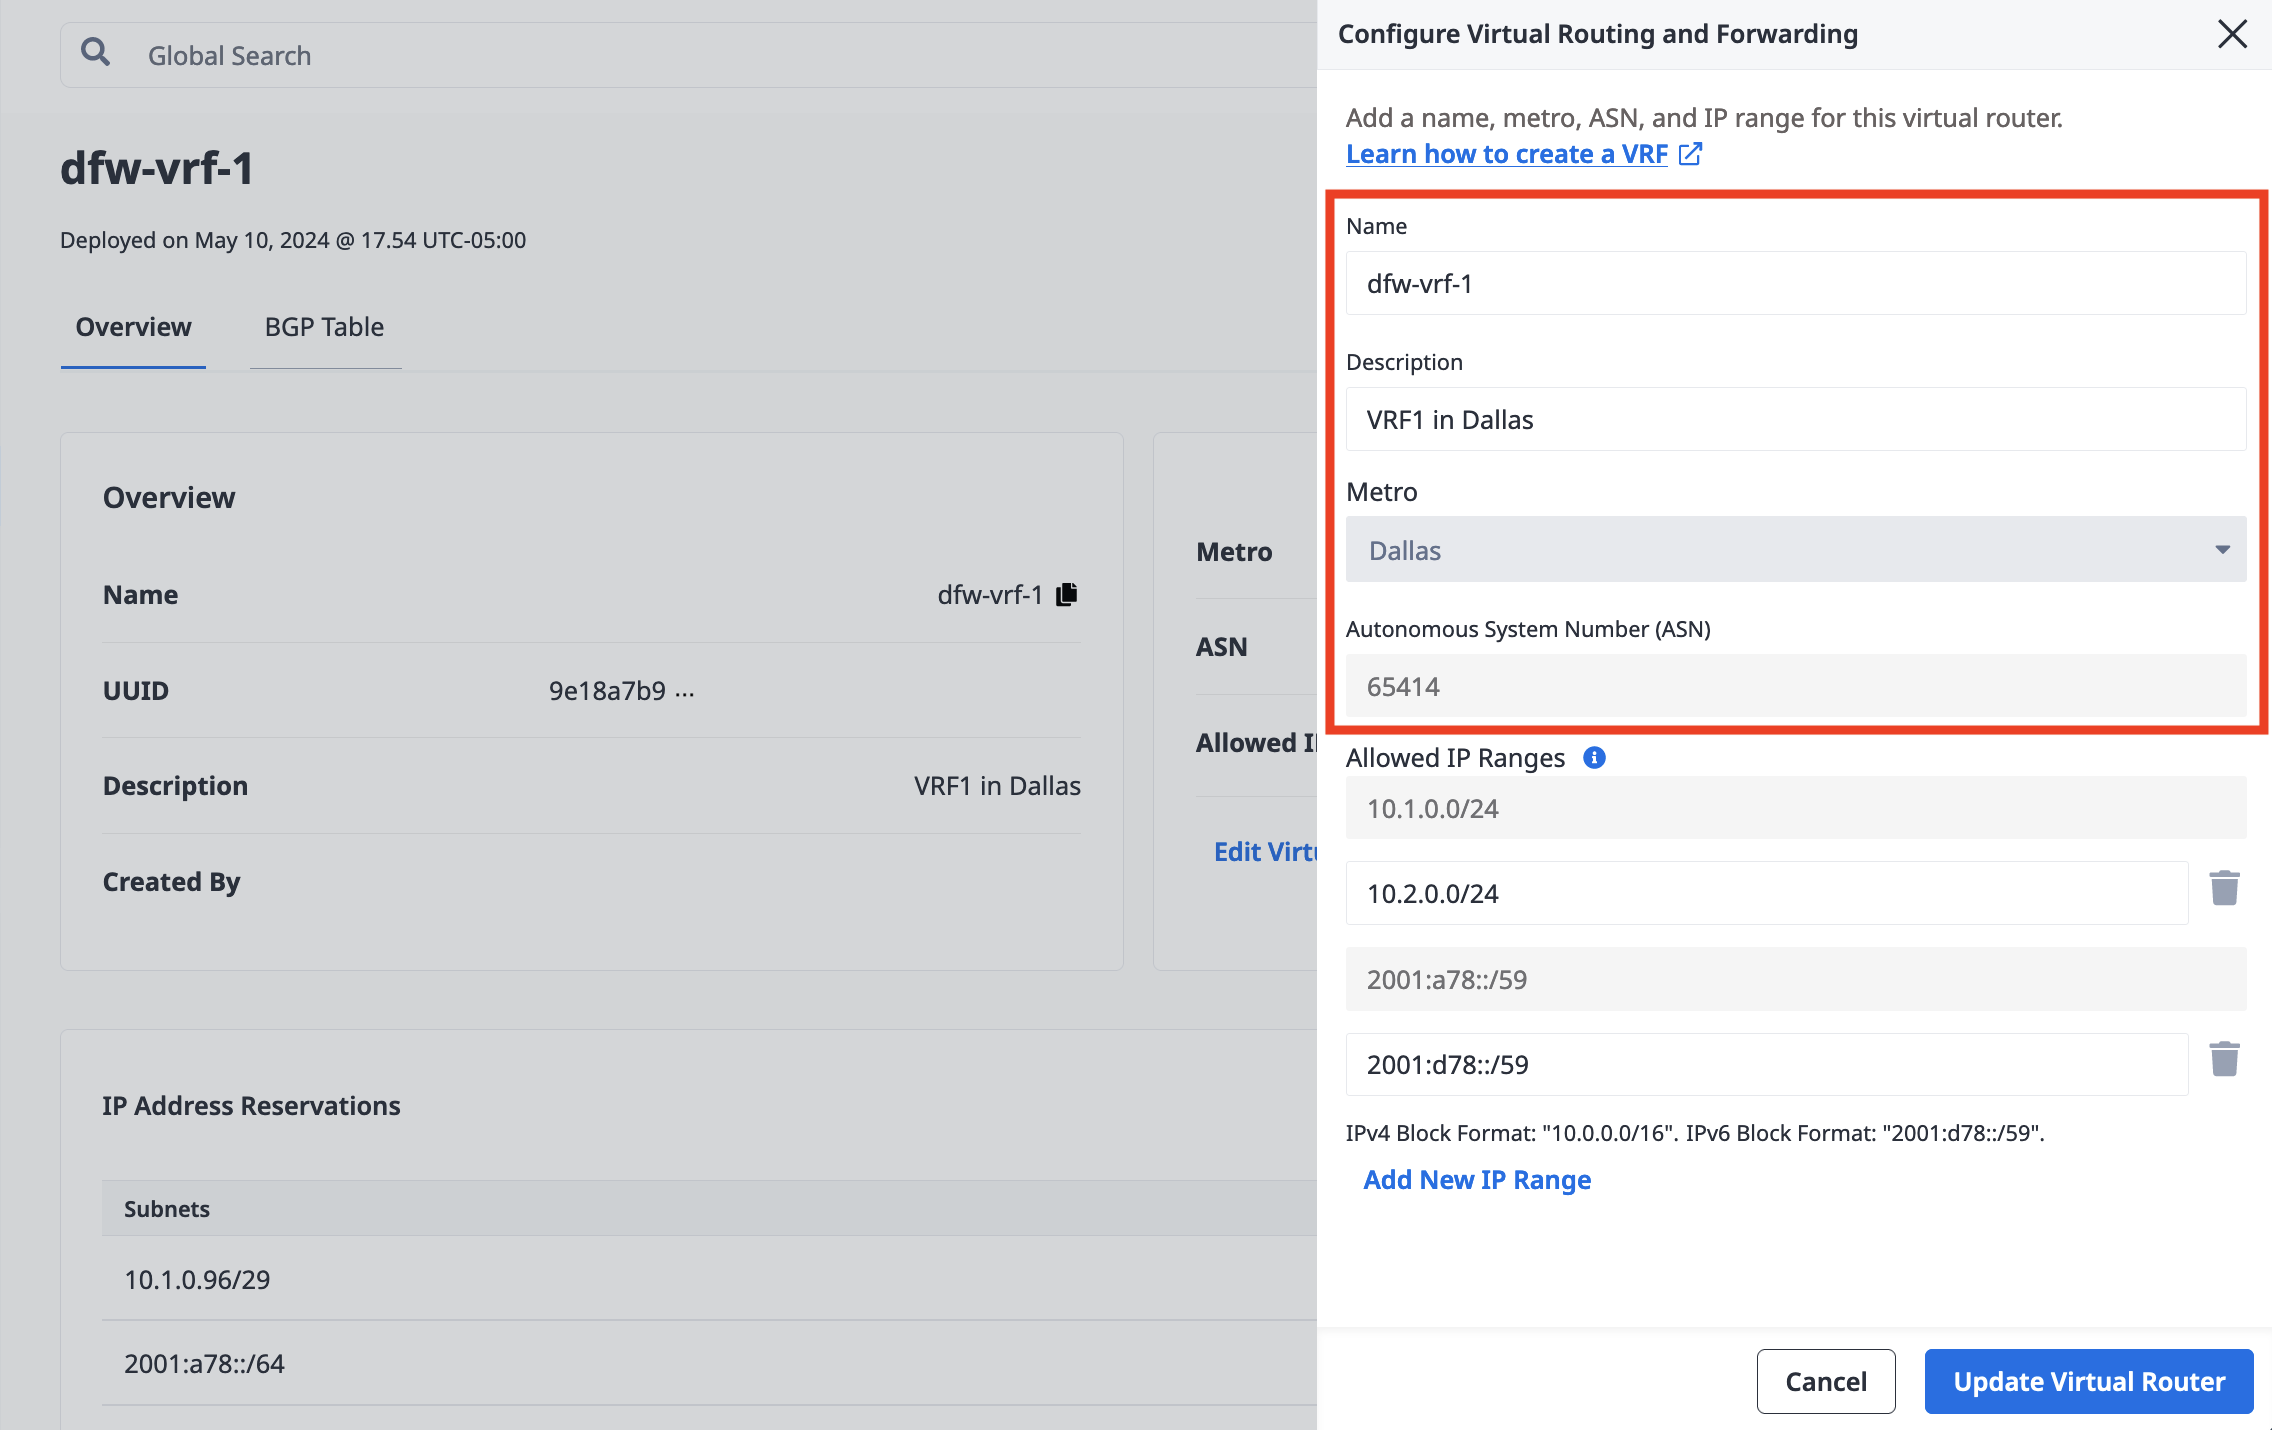
To update the VRF, click Edit Virtual Router Details.
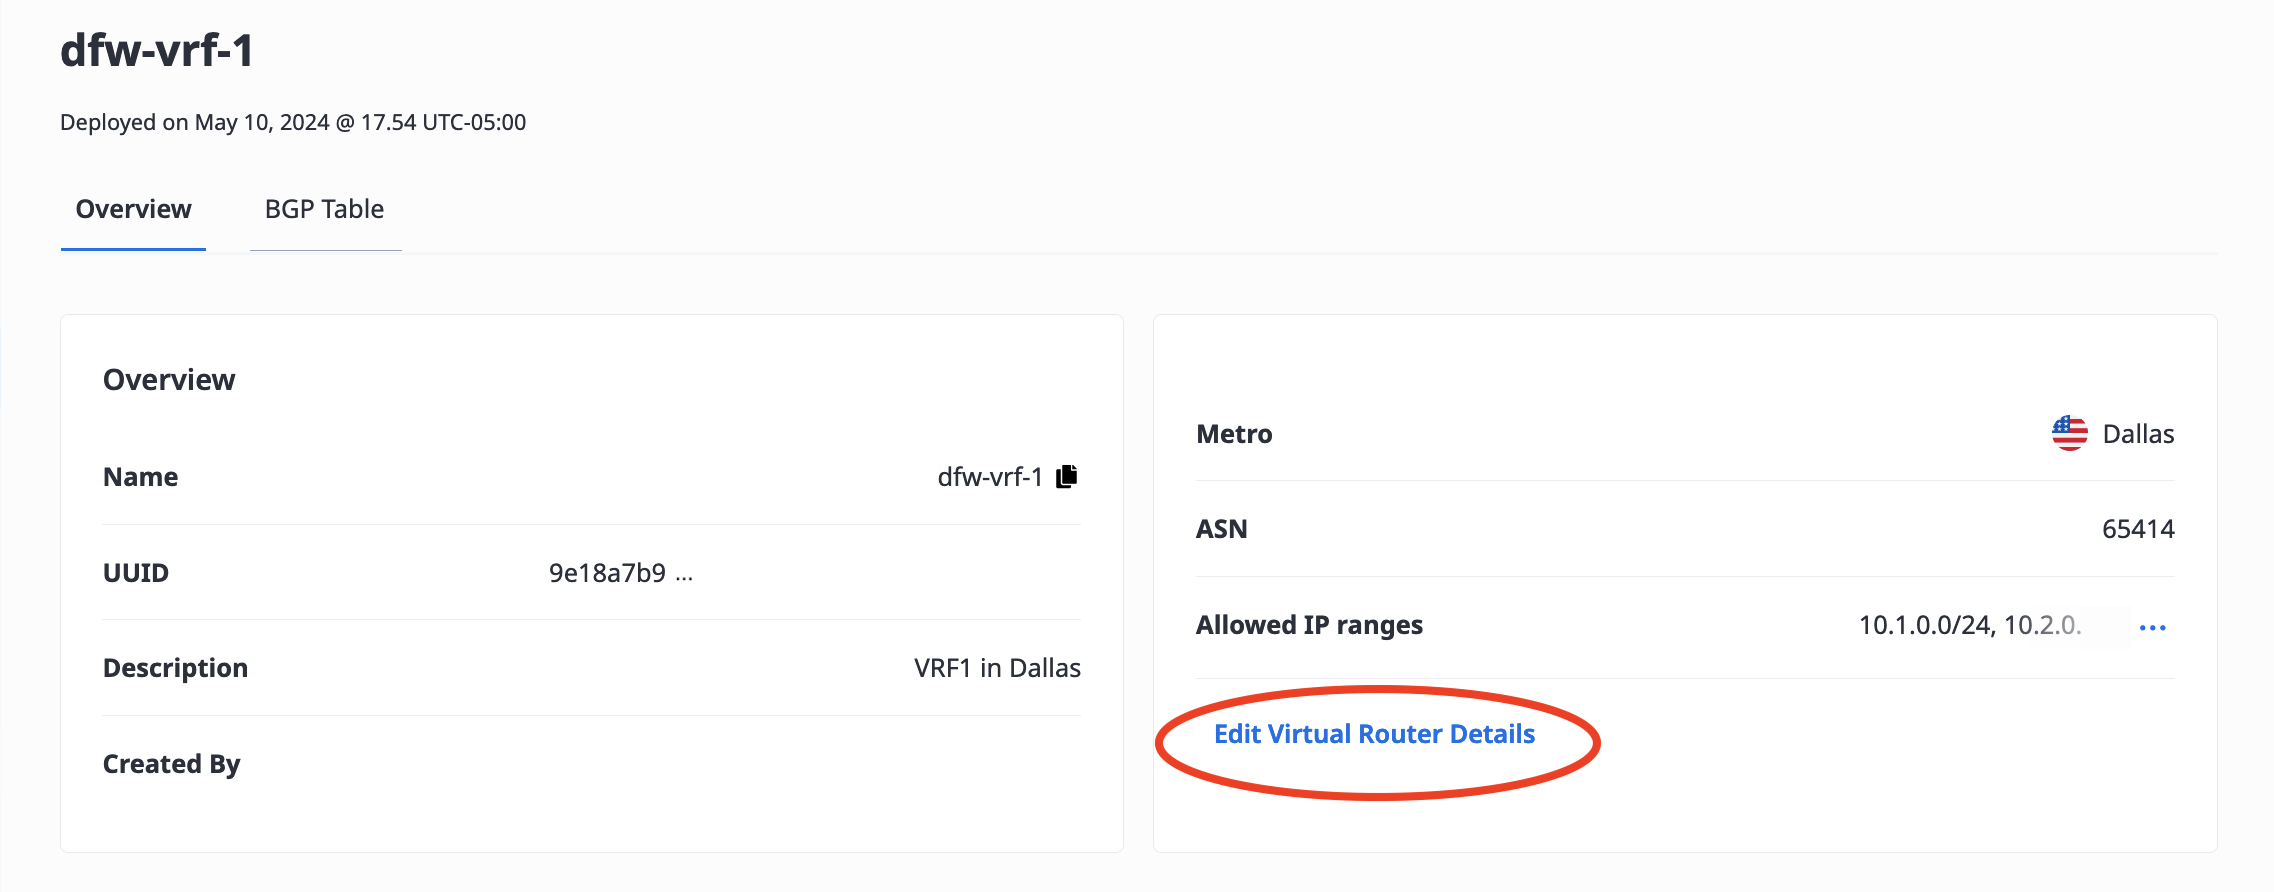
In the pane, you can update fields for Name and Description.
You can also update the ASN if the VRF is not currently in use. The ASN can not be updated if there are active Virtual Circuits associated with the VRF, or if any of the VLANs of the VRF's Metal Gateway are attached to servers.
This pane is also where you can add and remove Allowed IP Ranges.
To list all the VRFs in a Project send a GET request to the /projects/{id}/vrfs endpoint.
curl -X GET -H 'X-Auth-Token: <API_TOKEN>' https://api.equinix.com/metal/v1/projects/{id}/vrfs
To list a VRF's IP reservation blocks, send a GET request to the /vrfs/{id}/ips endpoint.
curl -X GET -H 'X-Auth-Token: <API_TOKEN>' https://api.equinix.com/metal/v1/vrfs/{id}/ips
To get the details of a specific IP reservation block in a VRF, send a GET request to the vrfs/{vrf_id}/ips/{id} endpoint.
curl -X GET -H 'X-Auth-Token: <API_TOKEN>' https://api.equinix.com/metal/v1/vrfs/{vrf_id}/ips/{id}
To update a VRF, send a PUT request to the /vrfs/{id} endpoint, using the fields you would like to update in the body of the request. All fields are optional so they can be updated independently.
curl -X POST \
-H "Content-Type: application/json" \
-H "X-Auth-Token: <API_TOKEN>" \
"https://api.equinix.com/metal/v1/vrfs/{id}" \
-d '{
    "name": "<string>",
    "description": "<string>",
    "ip_ranges": [
        "<cidr_address>"
    ],
    "local_asn": <integer>,
    "tags": [
        "<string>"
    ]
}'
Notable Body Parameters:
"local_asn"- The ASN can not be updated if there are active Virtual Circuits associated with the VRF, or if any of the VLANs of the VRF's Metal Gateway are attached to servers."ip_ranges"- Use this to add and remove Allowed IP Ranges. Warning: If you do not want to add or remove Allowed IP Ranges either include the full existing list of CIDR addresses in the update request, or do not include the"ip_ranges"field in the update request. Specifying a value of[]will remove all existing IP Ranges from the VRF.
The BGP Table
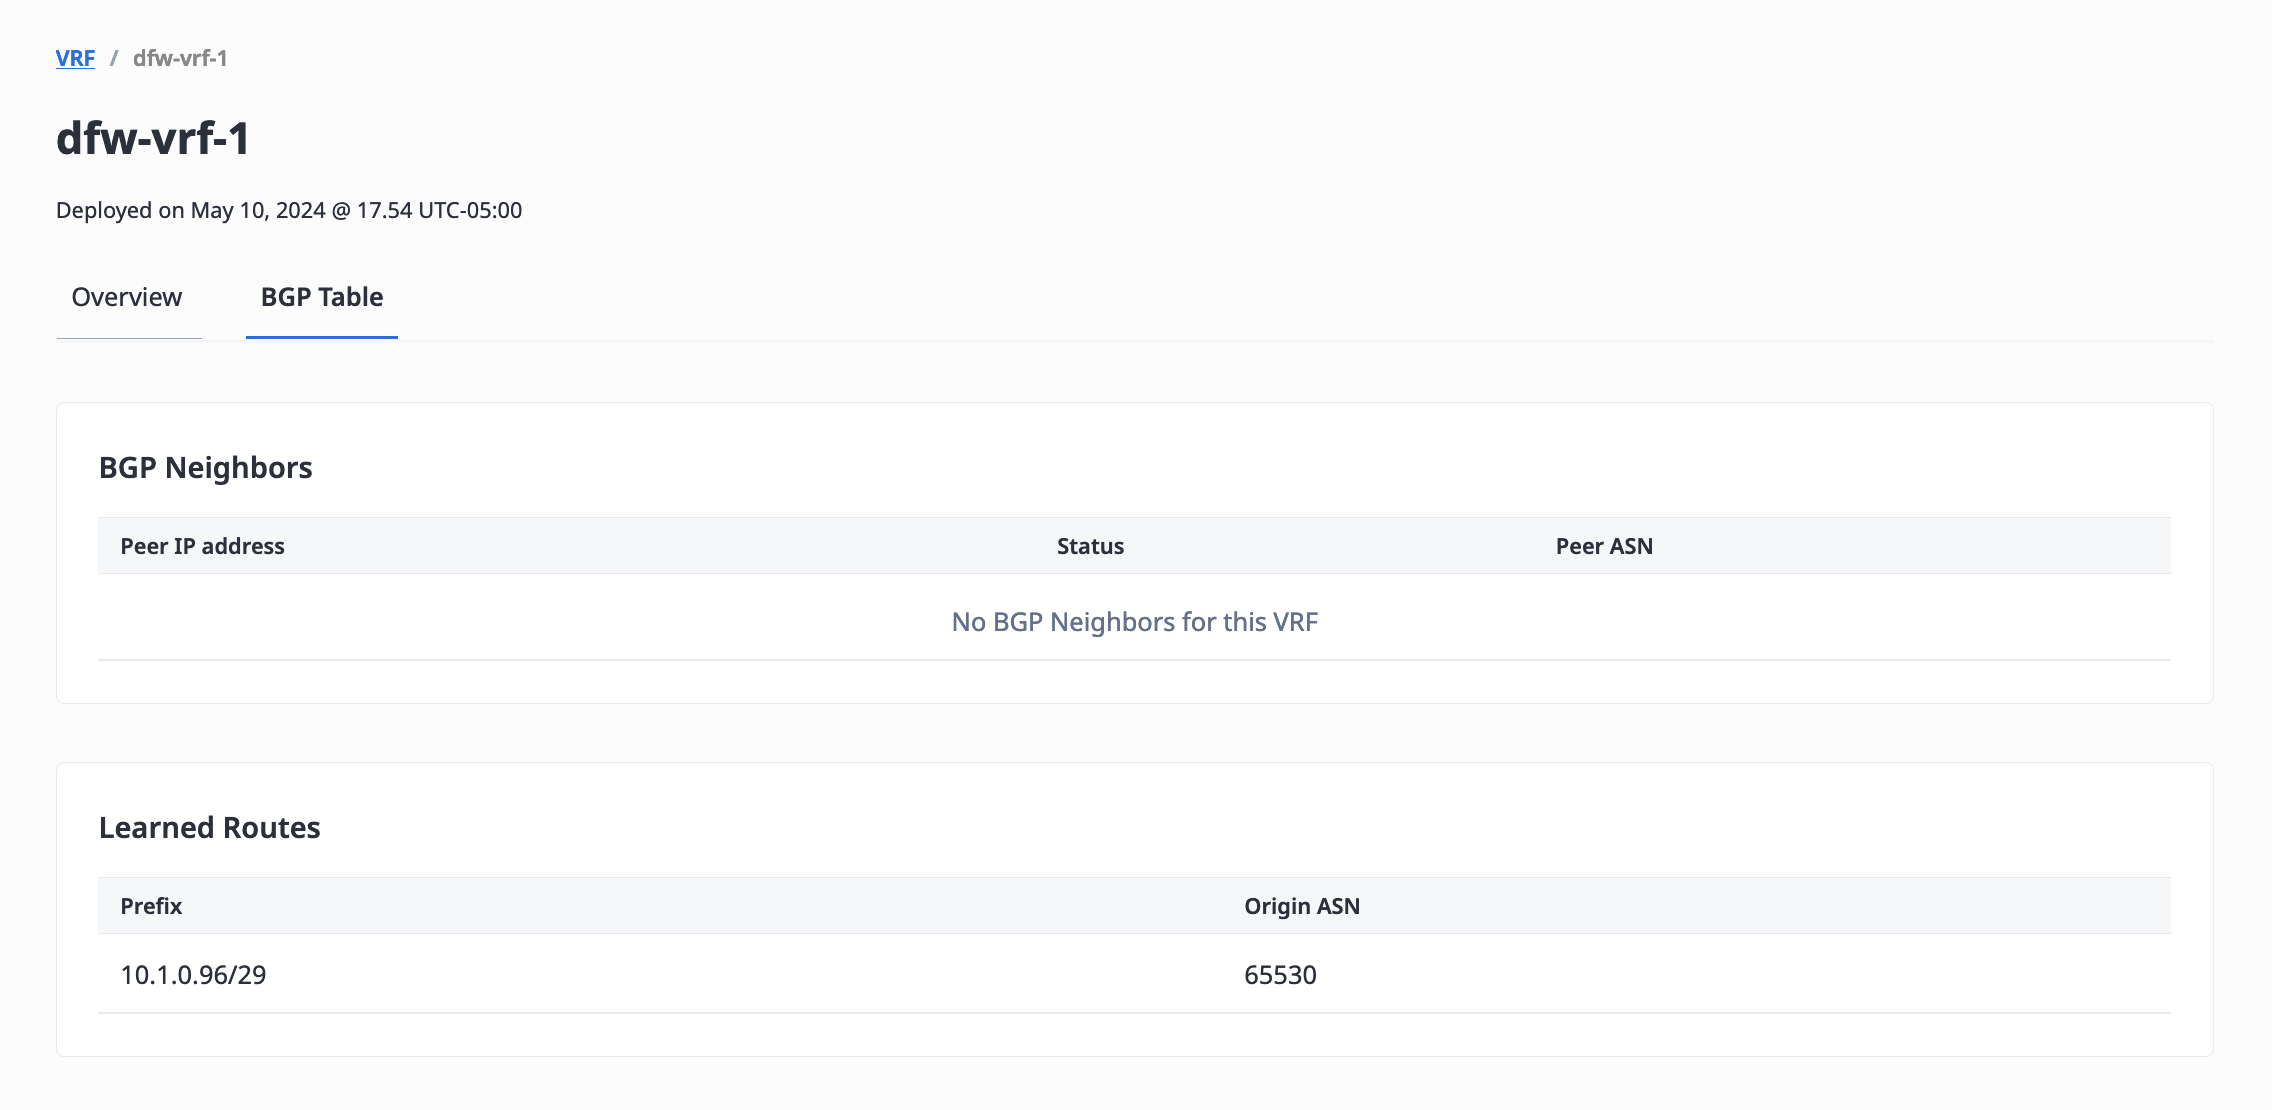
Once traffic is flowing and routing has started, you can monitor the BGP Neighbors and Learned Routes of your VRF. The BGP table displays all of the routes present in the VRF.
Note: Before monitoring, you must set up and enable all networking configurations. All the servers must be attached to the Metal Gateway's VLAN, and the Metal Gateway must display an "Active" status.
- Console
- API
The BGP Neighbors table displays the peer information and status of your VRF's BGP neighbors.
The Learned Routes table displays information about all the VRF's learned routes, which it has built through BGP and other routers in the network.
To retrieve peer information and status of your VRF's BGP neighbors, send a GET request to the /vrfs/{id}/bgp-neighbors endpoint.
curl -X GET -H 'X-Auth-Token: <API_TOKEN>' \
https://api.equinix.com/metal/v1/vrfs/{id}/bgp-neighbors
To retrieve all of the VRF's learned routes, send a GET request to the /vrfs/{id}/learned-routes endpoint.
curl -X GET -H 'X-Auth-Token: <API_TOKEN>' \
https://api.equinix.com/metal/v1/vrfs/{id}/learned-routes
Adding More IP Address Space to Your VRF
If needed, you can add IP Address space to your VRF after you have provisioned it.
Note: If you do not use all the initial IP address space allocated in the Allowed IP Range, you can make additional IP Address Reservations and Gateways using that IP Range. You do not have to create new Allowed IP Ranges if there is still space in your existing IP Range.
Adding More Allowed IP Ranges
- Console
- API
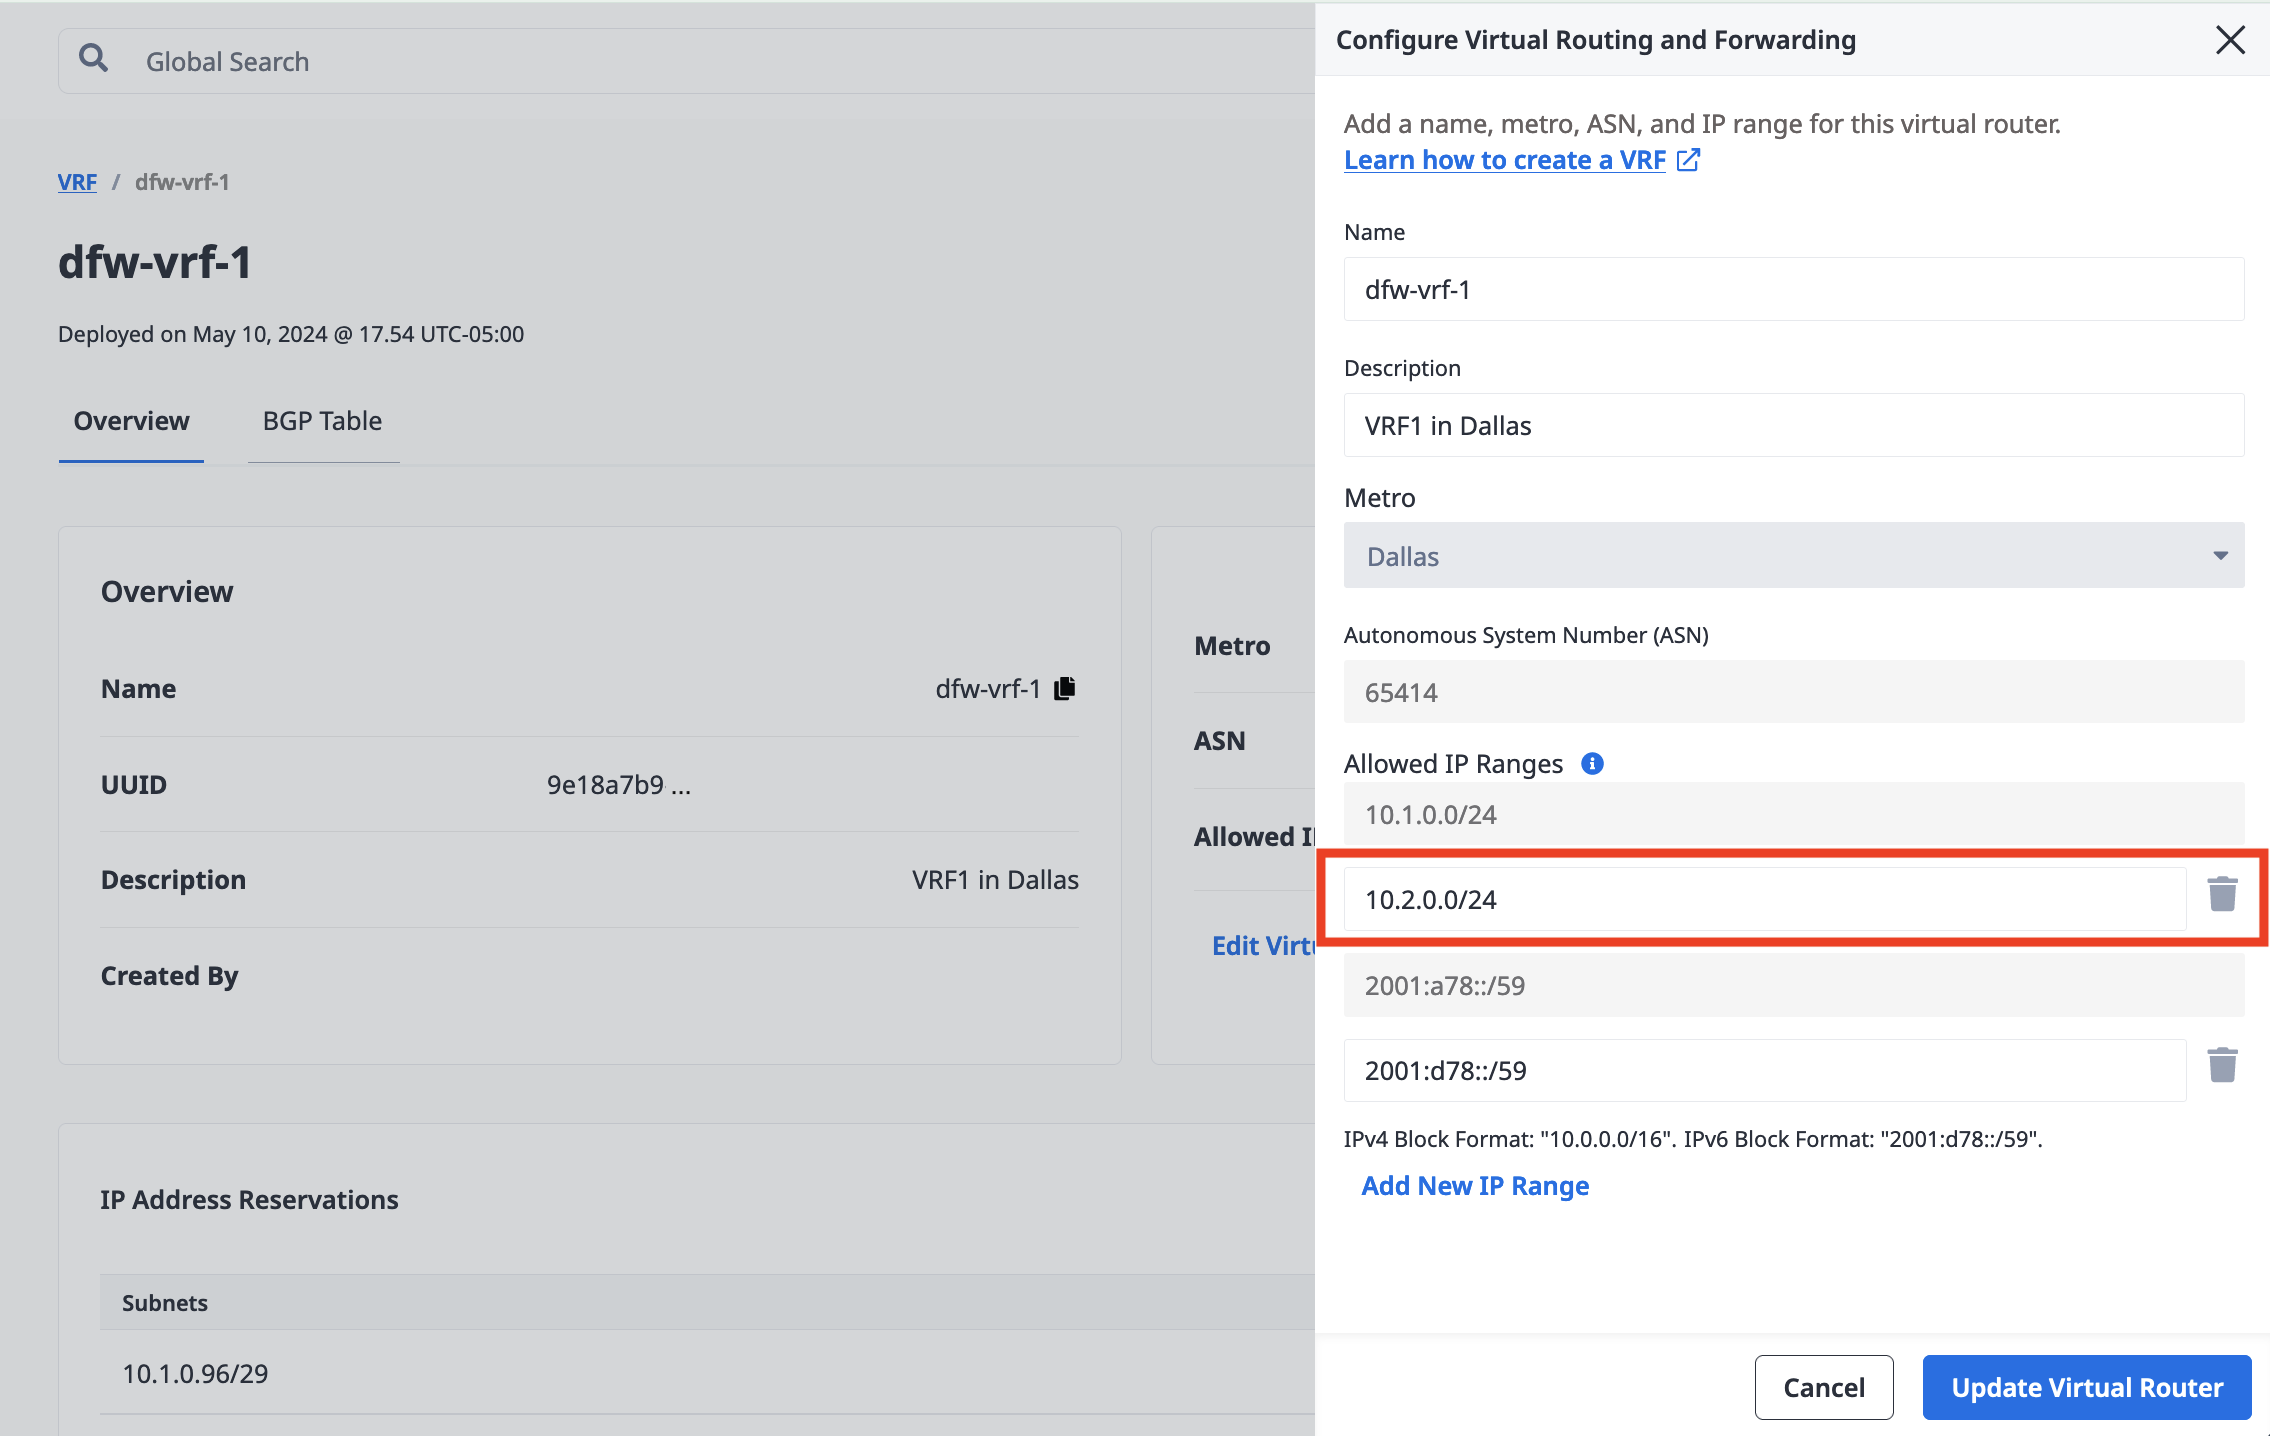
Under the current list of Allowed IP Ranges, click Edit Virtual Router Details.
In the Allowed IP Ranges section, click Add New IP Range, and enter the new CIDR network address into the field. The IPv4 address blocks must be between /8 and /29 in size. An IPv6 address block must be between /59 and /64 in size, and only one IPv6 block per VRF is allowed. Click Add New IP Range to add more than one IP range.
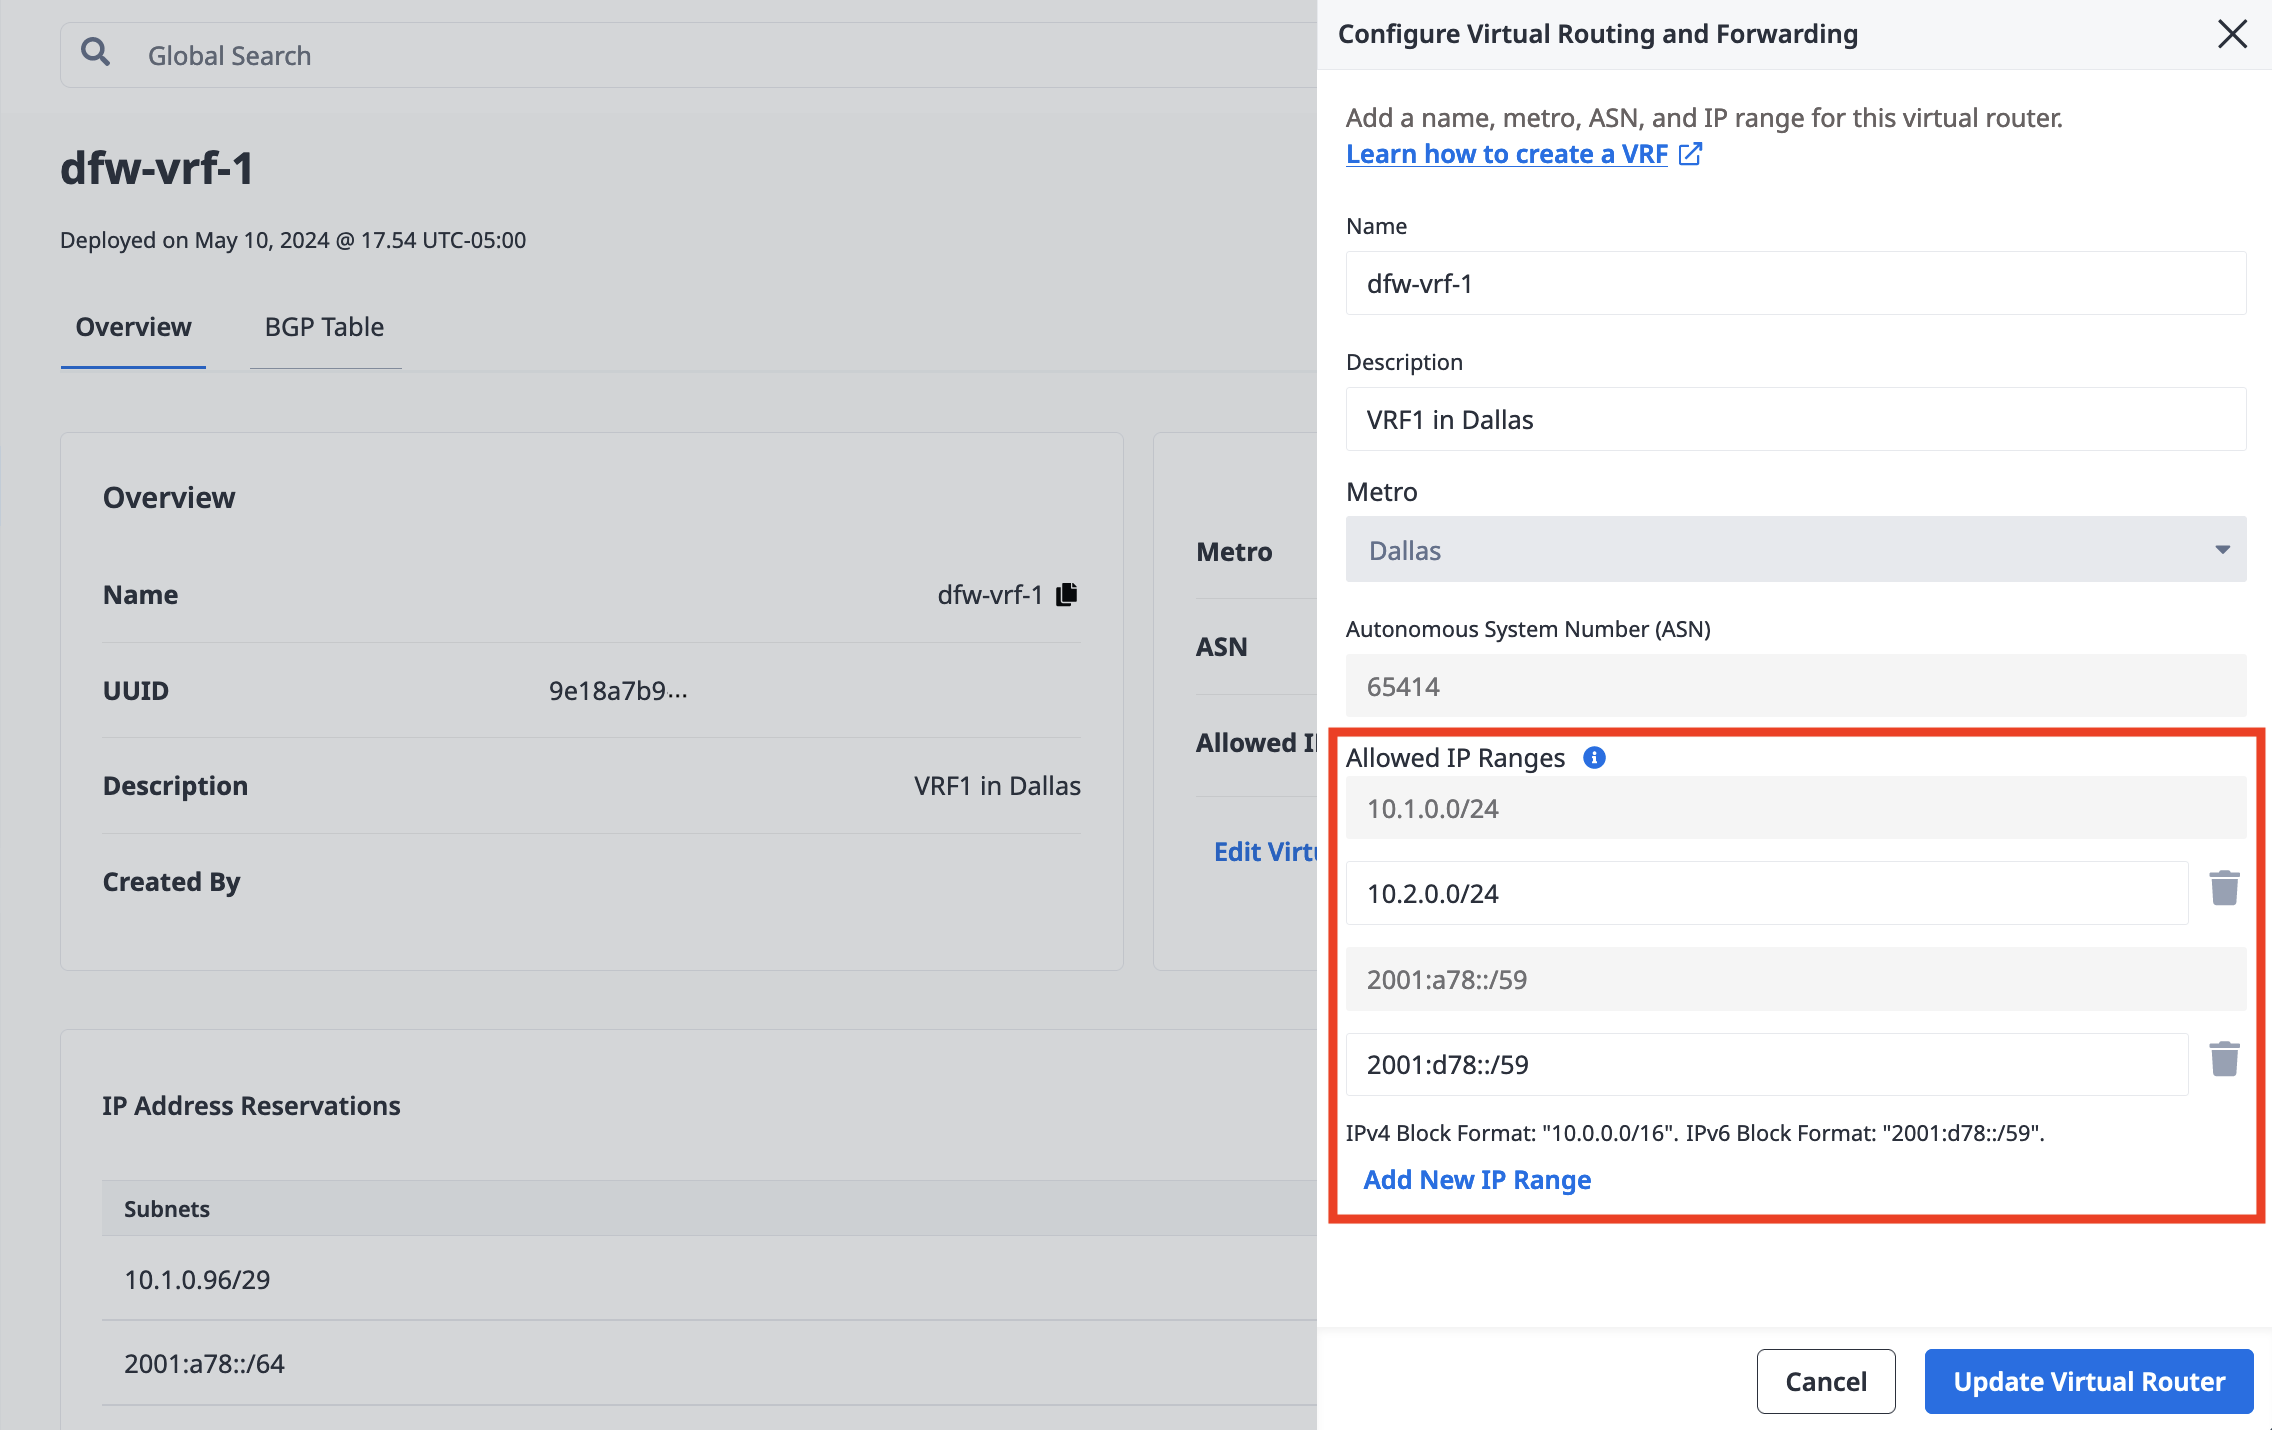
Click Update Virtual Router.
To add Allowed IP Ranges to a VRF in the API, send a PUT request to the /vrfs/{id} endpoint. Specify the new Allowed IP Ranges as a list of CIDR network addresses. The IPv4 address blocks must be between /8 and /29 in size. An IPv6 address block must be between /59 and /64 in size, and only one IPv6 block per VRF is allowed.
Note: Be sure to include the full existing list of IP Ranges in the update request. Adding a new CIDR address to the list creates a new Allowed IP Range for this VRF. Removal of an existing CIDR address from the list will result in the deletion of an existing Allowed IP Range for this VRF. Deleting an IP Range will result in the deletion of any VRF IP Reservations contained within the IP Range, as well as the VRF IP Reservation's associated Metal Gateways or Virtual Circuits.
curl -X PUT \
-H "Content-Type: application/json" \
-H "X-Auth-Token: <API_TOKEN>" \
"https://api.equinix.com/metal/v1/vrfs/{id}" \
-d '{
    "ip_ranges": [
        "<cidr_address>"
    ]
}'
Adding IP Address Reservations
- Console
- API
In the IP Address Reservation section of the VRF's Overview, you can add Click Add IP Reservation and fill in the IP Subnet field with the subnets in CIDR notation. The subnets you request must be from the ip_ranges block that is associated with your VRF. Click Submit Request.
To add IP Address Reservations to your VRF send a a POST request the the /projects/{id}/ips endpoint. The subnet you request must be from the ip_ranges block that is associated with your VRF.
curl -X POST \
-H 'Content-Type: application/json' \
-H "X-Auth-Token: <API_TOKEN>" \
"https://api.equinix.com/metal/v1/projects/{id}/ips" \
-d '{
    "cidr": <integer>,
    "network": "<ip_address>",
    "type": "vrf",
    "vrf_id": "<UUID>"
}'
Body Parameters:
"cidr"(required) - The size of the VRF IP Reservation's subnet, expressed as an integer. IPv4 subnets have a maximum size of 22 and a minimum size of 29. An IPv6 subnet must be size 64."network"(required) - The starting IP address for this VRF IP Reservation's subnet."type"(required) - The type of IP address reservation. Must be set to"vrf"."vrf_id"(required) - The ID of the VRF in which this VRF IP Reservation is created. The VRF must have an existing IP Range that contains the requested subnet. This field may be aliased as just"vrf".
Creating Additional Metal Gateways
Once you have made the IP address reservations, you can use them to create additional Metal Gateways for your virtual router. The procedure is the same as the initial Metal Gateway you created for the VRF.
- Console
- API
Create a Metal Gateway in the same Metro as your VRF. Select the VLAN you will use to connect the gateway and your servers.
In the IP Block section, select VRF IP. Click the drop-downs to select the VRF and the VRF IP Address Reservation to associate with this Metal Gateway. Note: If the Select VRF IP Reservation drop-down is unavailable, then there are no usable IP Address Reservations associated with the VRF. You will need to create at least one new IP address reservation for the gateway.
Once you have the VRF and an IP address reservation selected, click Create Gateway.
You will now get a Metal Gateway in the same Metro as your VRF. The Metal Gateway uses the IP addresses in your VRF's IP address reservation, allowing you to assign them to servers connected to the Metal Gateway's VLAN.
Send a POST request to the /projects/{project_id}/metal-gateways endpoint.
curl -X POST \
-H "Content-Type: application/json" \
-H "X-Auth-Token: <API_TOKEN>" \
"https://api.equinix.com/metal/v1/projects/{id}/metal-gateways" \
-d '{
"ip_reservation_id": "<UUID>",
"virtual_network_id": "<UUID>"
}'
Body Parameters:
"ip_reservation_id"(required) - The ID of a VRF IP Reservation that is in the same Project and Metro as the VRF, that will be used by the Metal Gateway."virtual_network_id"(required) - The ID of a VLAN in the same Project and Metro as the VRF, which will be used by the Metal Gateway
The Metro and VRF for the Metal Gateway is inferred during creation by the specified by the IP reservation and VLAN.
The Metro and the VRF for the Metal Gateway are inferred from the IP reservation and VLAN. As a result, you will get a Metal Gateway in the same Metro as your VRF, which uses the IP addresses in your VRF IP address reservation that you can assign to servers connected to the Metal Gateway's VLAN.
Removing Gateways, IP Address Reservations, and IP Ranges
You can remove IP address space and gateways from your VRF. Note: You cannot remove IP Address Reservations used by a gateway or an Allowed IP Range with an IP Address Reservation in it.
First, delete the Metal Gateway. You can delete the gateway at any time. Use caution as this will disrupt any traffic that was being routed through the gateway and your VRF.
Then you can delete the IP Address Reservation.
- Console
- API
To delete an IP Address Reservation, click the trash can icon next to the IP address you want to delete.
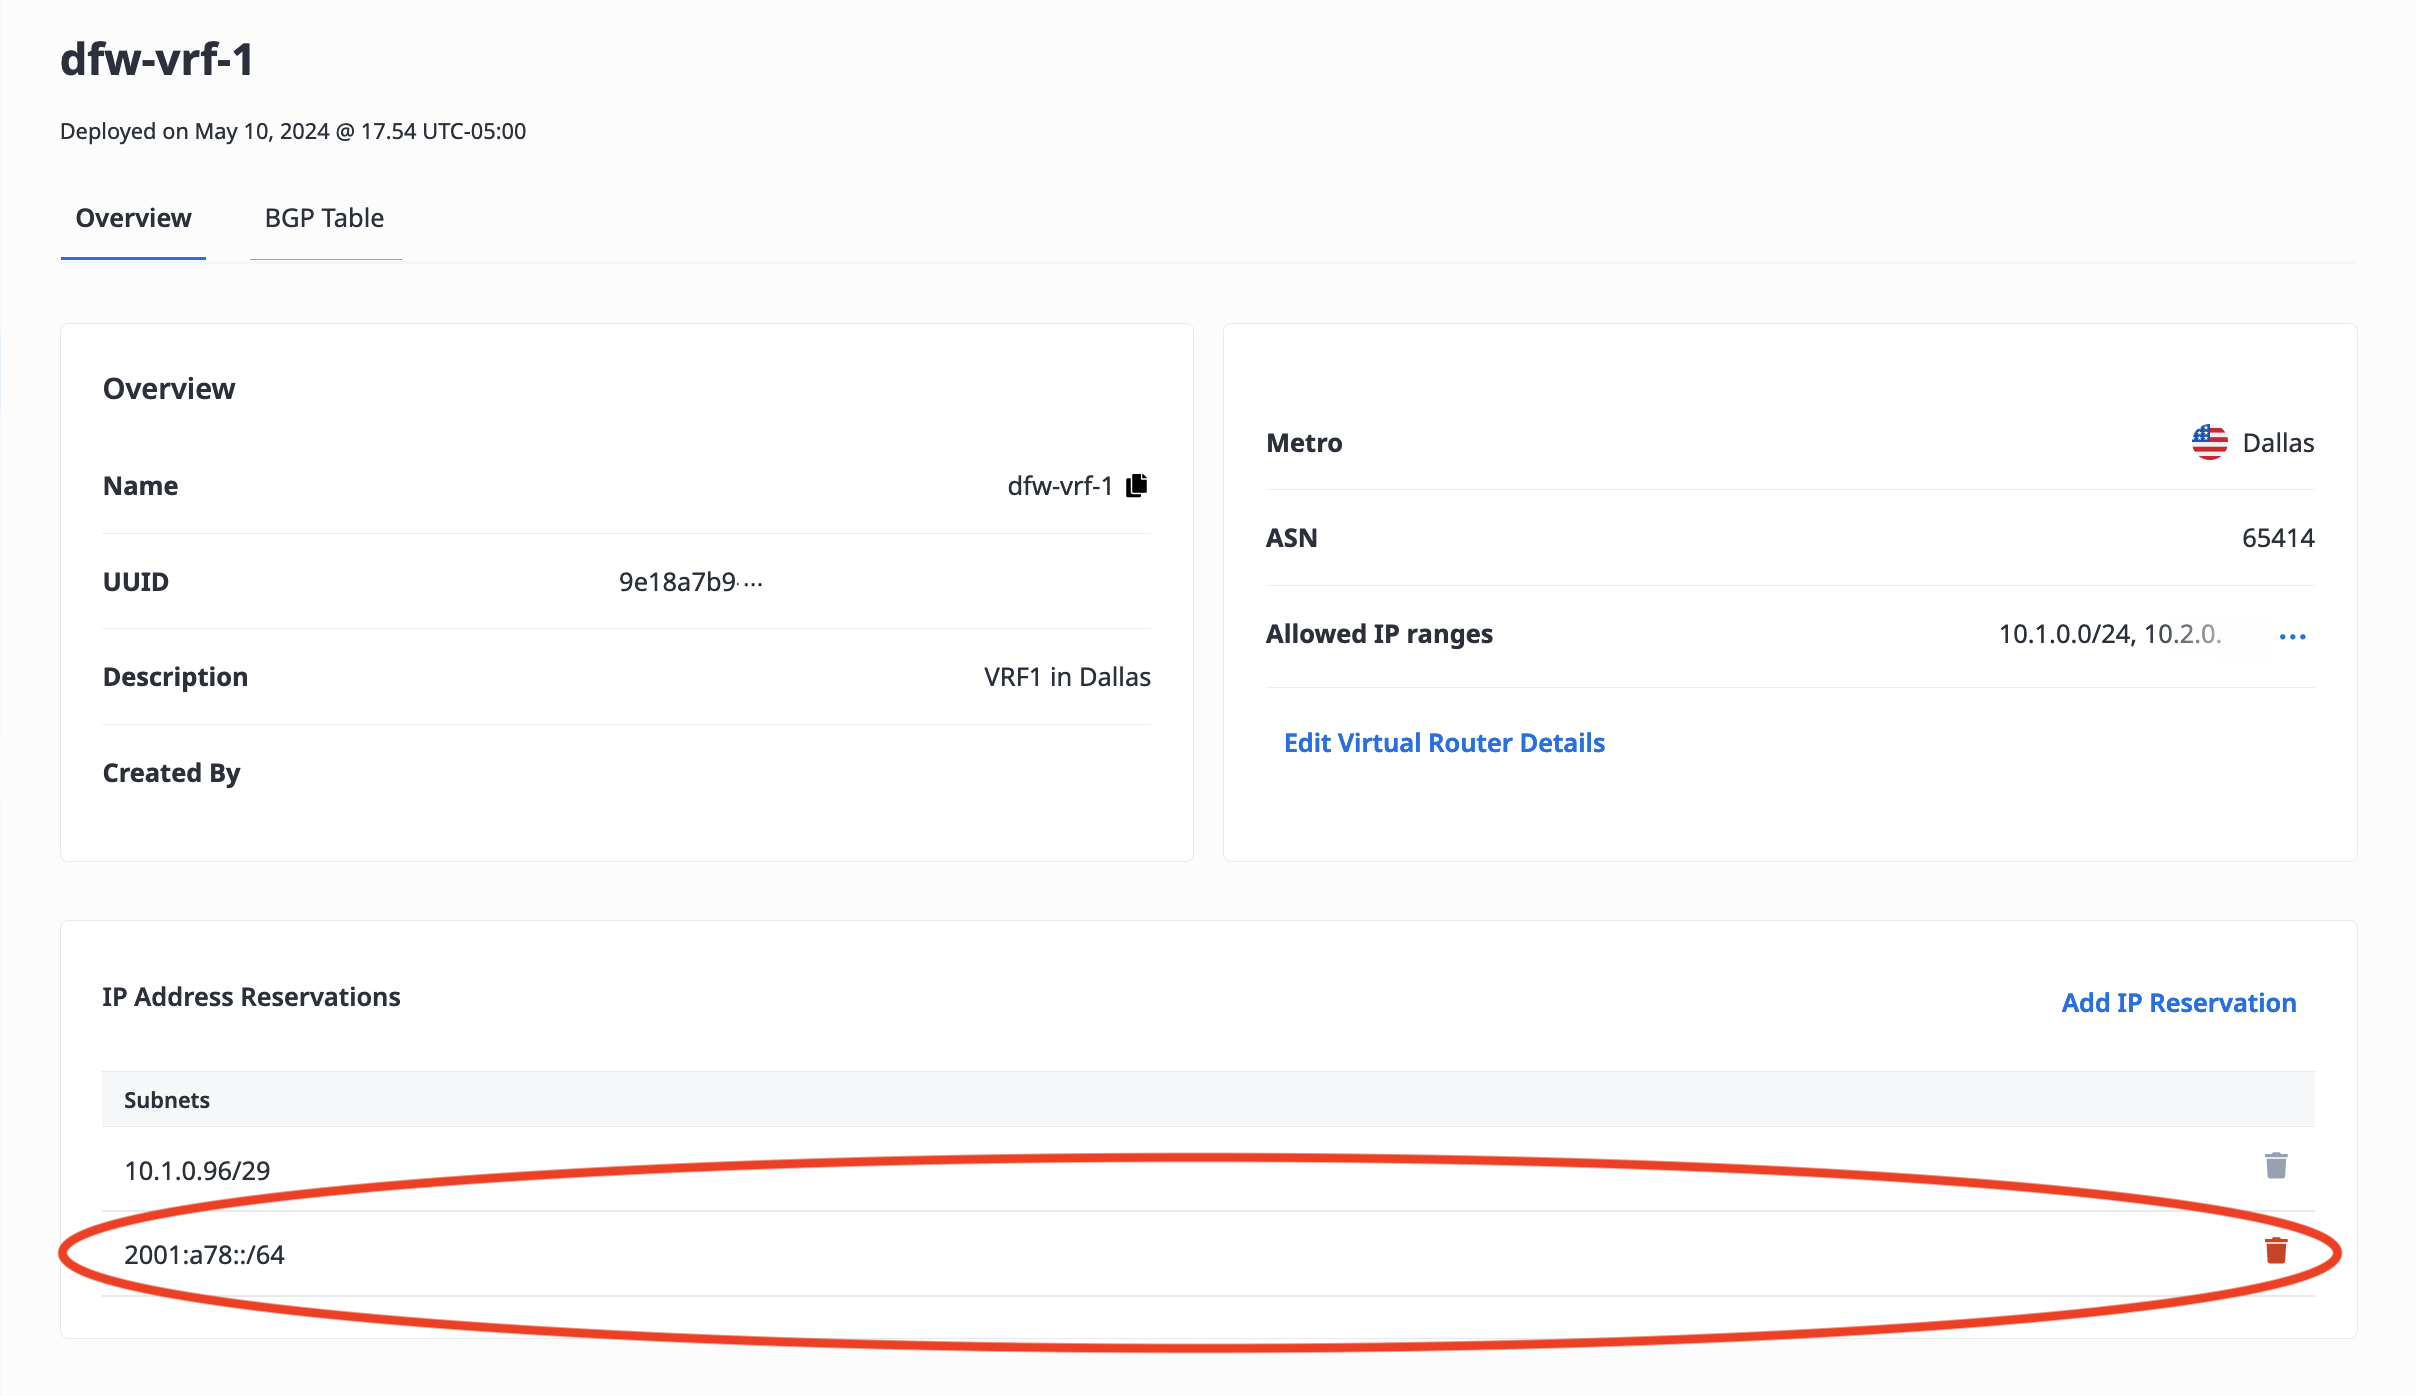
If the trash can icon is not available, then the IP Address is still associated with a gateway and can not be modified or deleted.
To remove an IP Address Reservation, send a DELETE request to the /ips/{id} endpoint. The id is the UUID of the reservation.
curl -X DELETE -H "Content-Type: application/json" \
    -H "X-Auth-Token: <API_TOKEN>" \
    "https://api.equinix.com/metal/v1/ips/{id}"
Once the Metal Gateway and all the IP Address Reservations in an Allowed IP Range are removed, you can delete an Allowed IP Range.
- Console
- API
Under the current list of Allowed IP Ranges, click Edit Virtual Router Details. In the Allowed IP Ranges section, click the trash can icon next to the IP range you want to delete.
If the trash can icon is not available, then the IP range still has IP Address Reservations associated with it and it can not be modified or deleted.
Click Update Virtual Router.
To remove an Allowed IP Range to a VRF in the API, send a PUT request to the /vrfs/{id} endpoint. Modify the ip_ranges list to not include the addresses you want to remove. Include in the list of CIDR addresses the ones you want to remain after making the request.
Note: Be sure to include the full list of IP Ranges you want to remain in the update request. Removal of an existing CIDR address from the list will result in the deletion of an existing Allowed IP Range for this VRF. Deleting an IP Range will result in the deletion of any VRF IP Reservations contained within the IP Range, as well as the VRF IP Reservation's associated Metal Gateways or Virtual Circuits.
curl -X PUT \
-H "Content-Type: application/json" \
-H "X-Auth-Token: <API_TOKEN>" \
"https://api.equinix.com/metal/v1/vrfs/{id}" \
-d '{
    "ip_ranges": [
        "<cidr_address>"
    ]
}'
Deleting VRFs
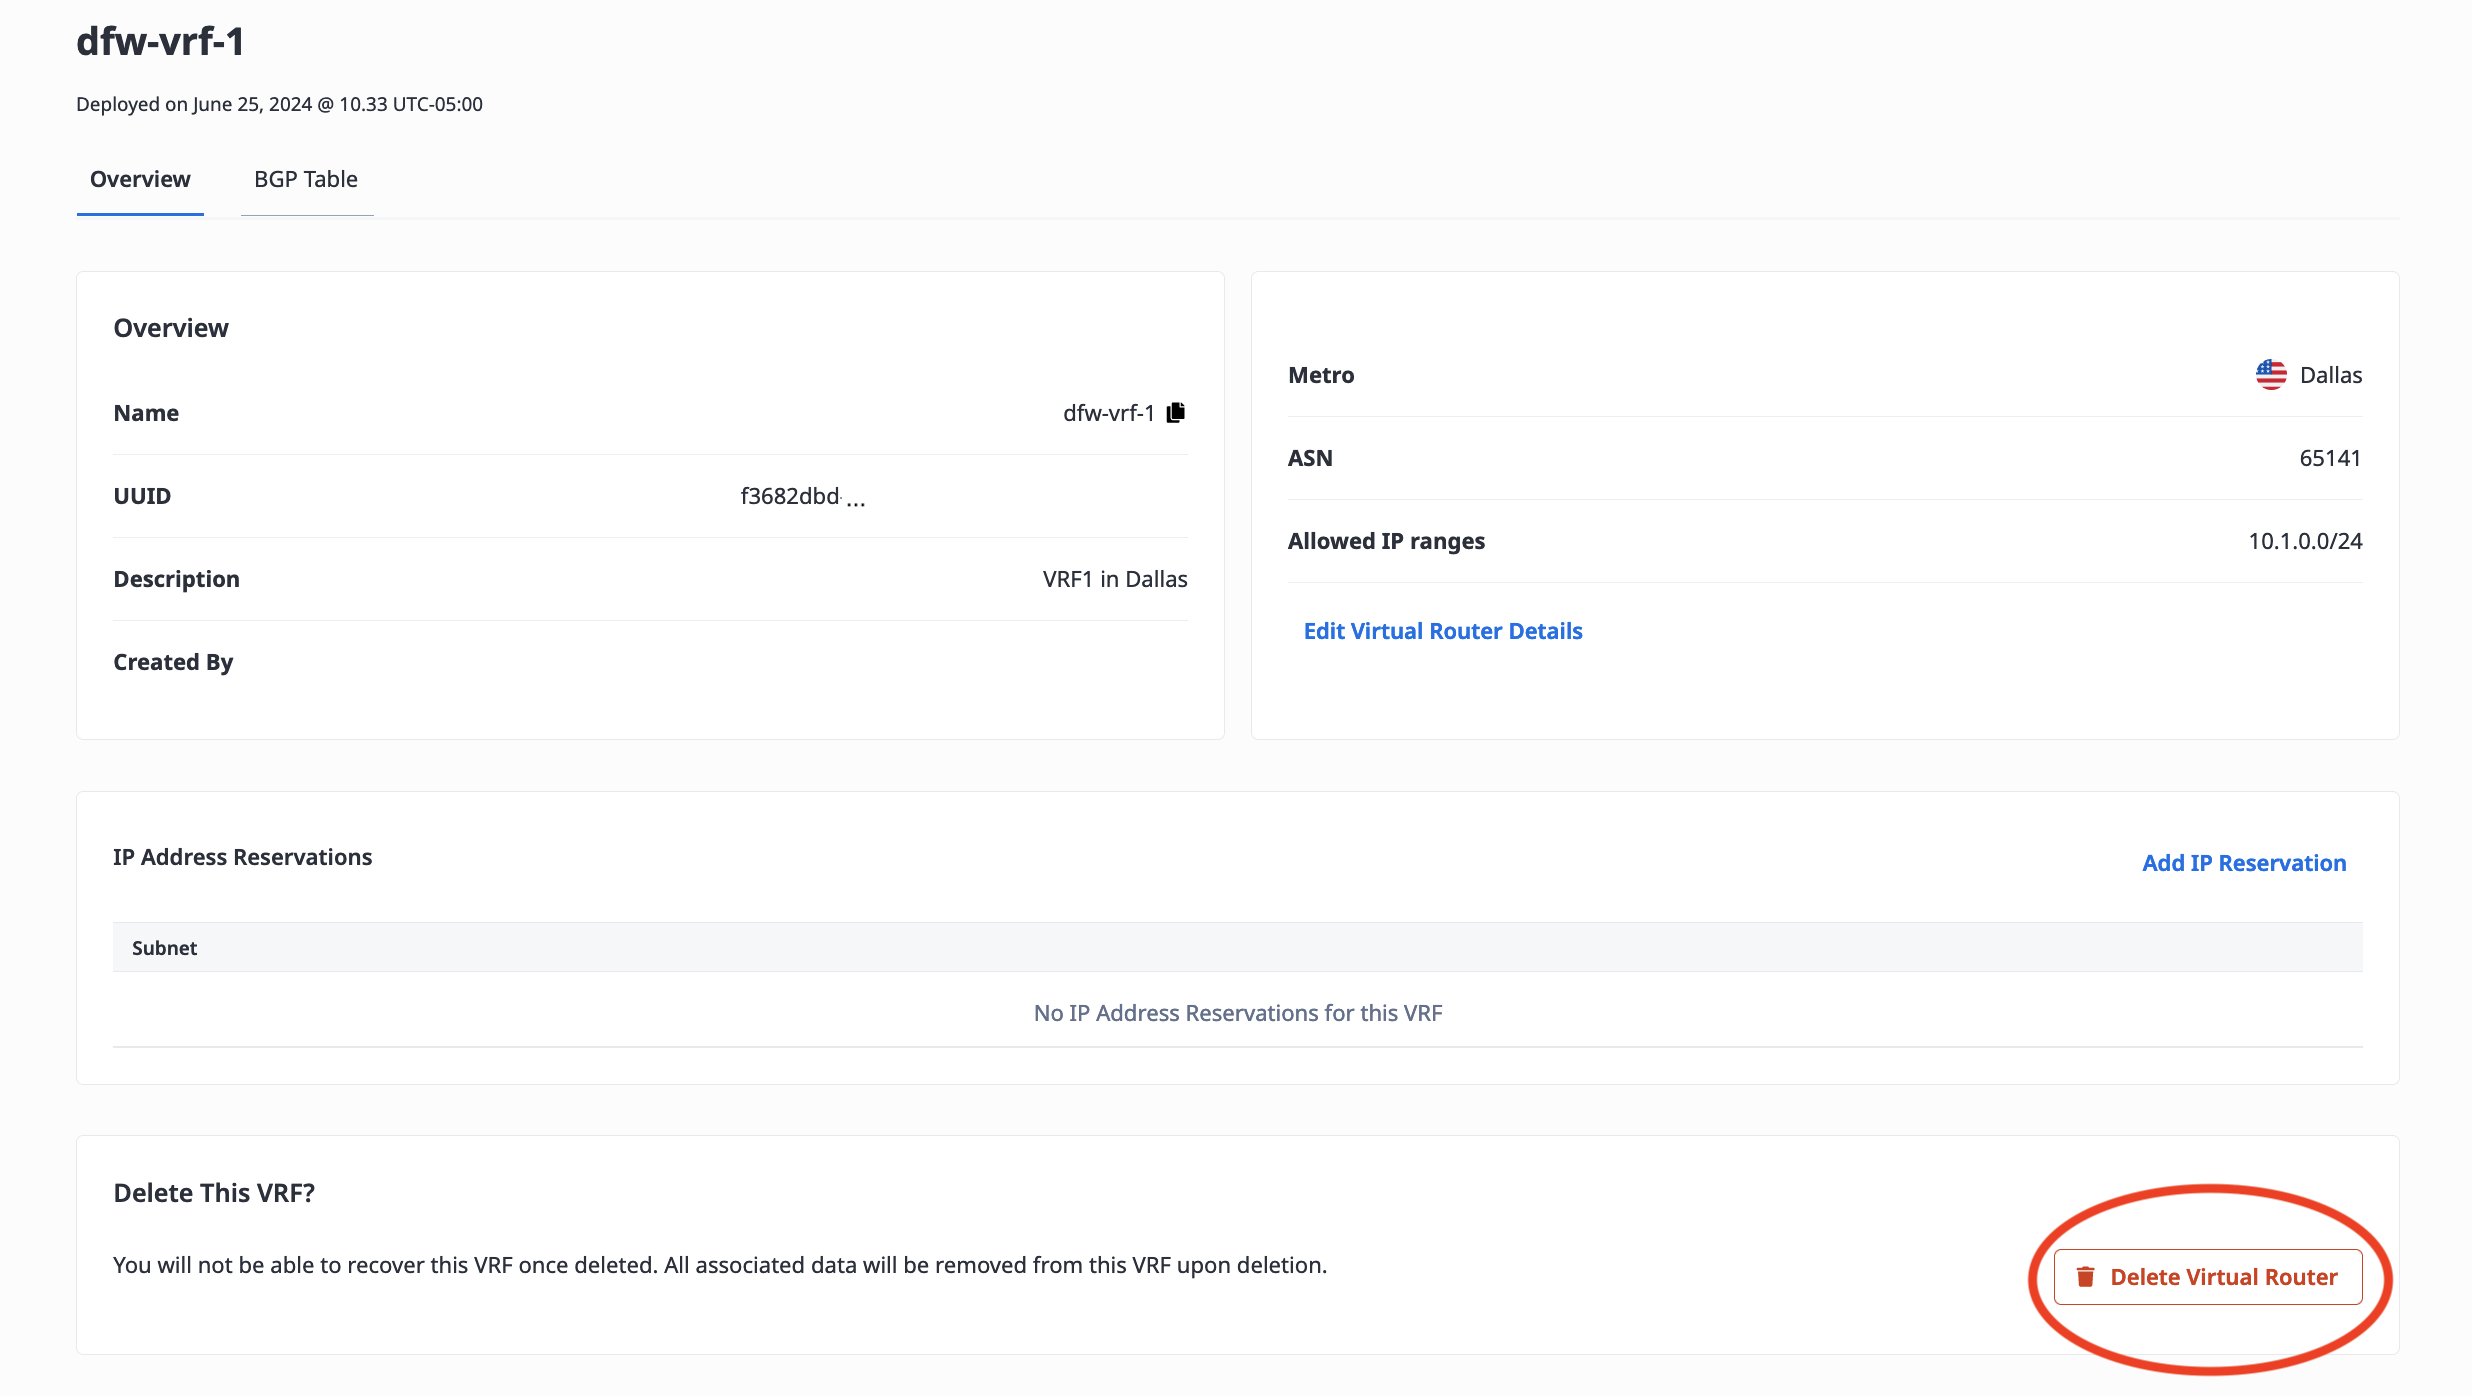
Deleting a VRF is permanent. You will not be able to recover this VRF once deleted.
All associated data will be removed from this VRF upon deletion, including the deletion of any VRF IP Reservations associated with the VRF, as well as the VRF's associated Metal Gateways and Virtual Circuits.
- Console
- API
From the VRF's Overview tab, click Delete Virtual Router.
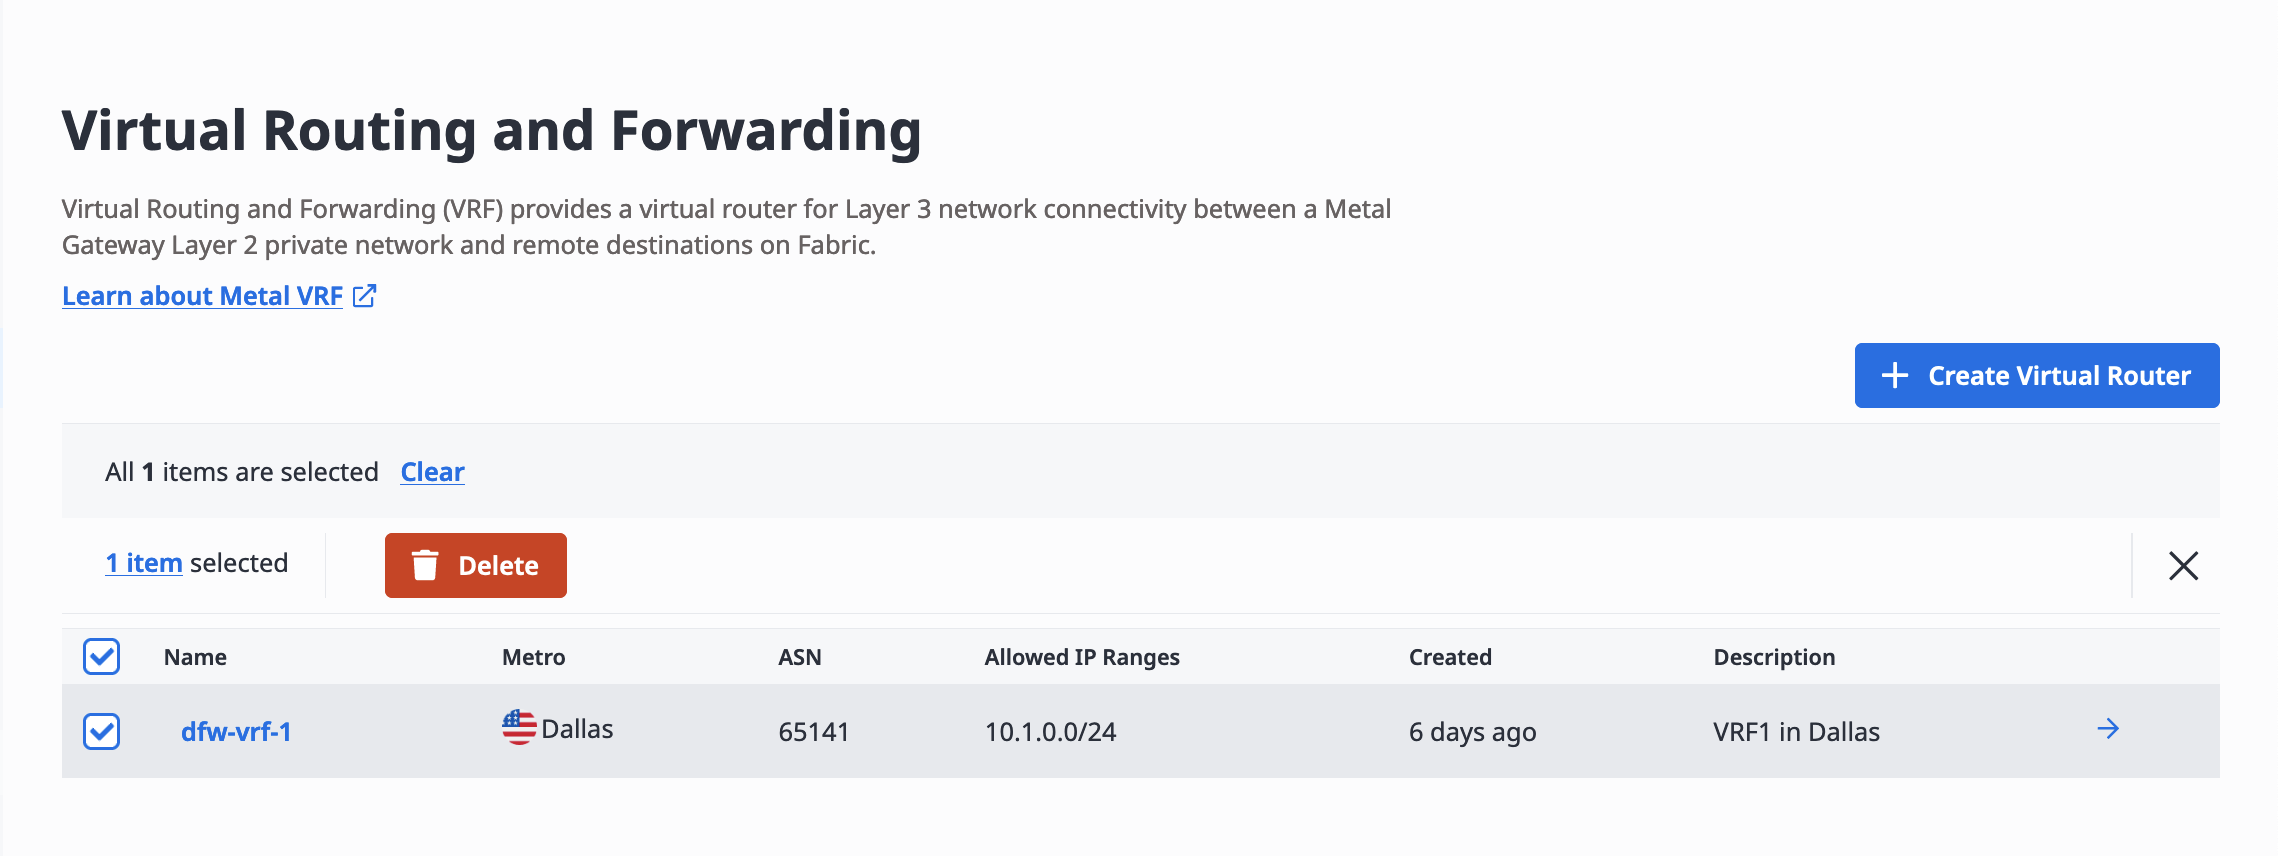
You can also delete the VRF or multiple VRFs from the list by selecting them, and clicking Delete.
Send a DELETE request to the /vrfs/{id} endpoint, specifying the VRF by ID in the request path.
curl -X DELETE -H 'X-Auth-Token: <API_TOKEN>' https://api.equinix.com/metal/v1/vrfs/{id}