Equinix Metal was sunset on June 30, 2026. The user documentation will be removed on September 30, 2026.
Layer 2 Only Bonded Mode
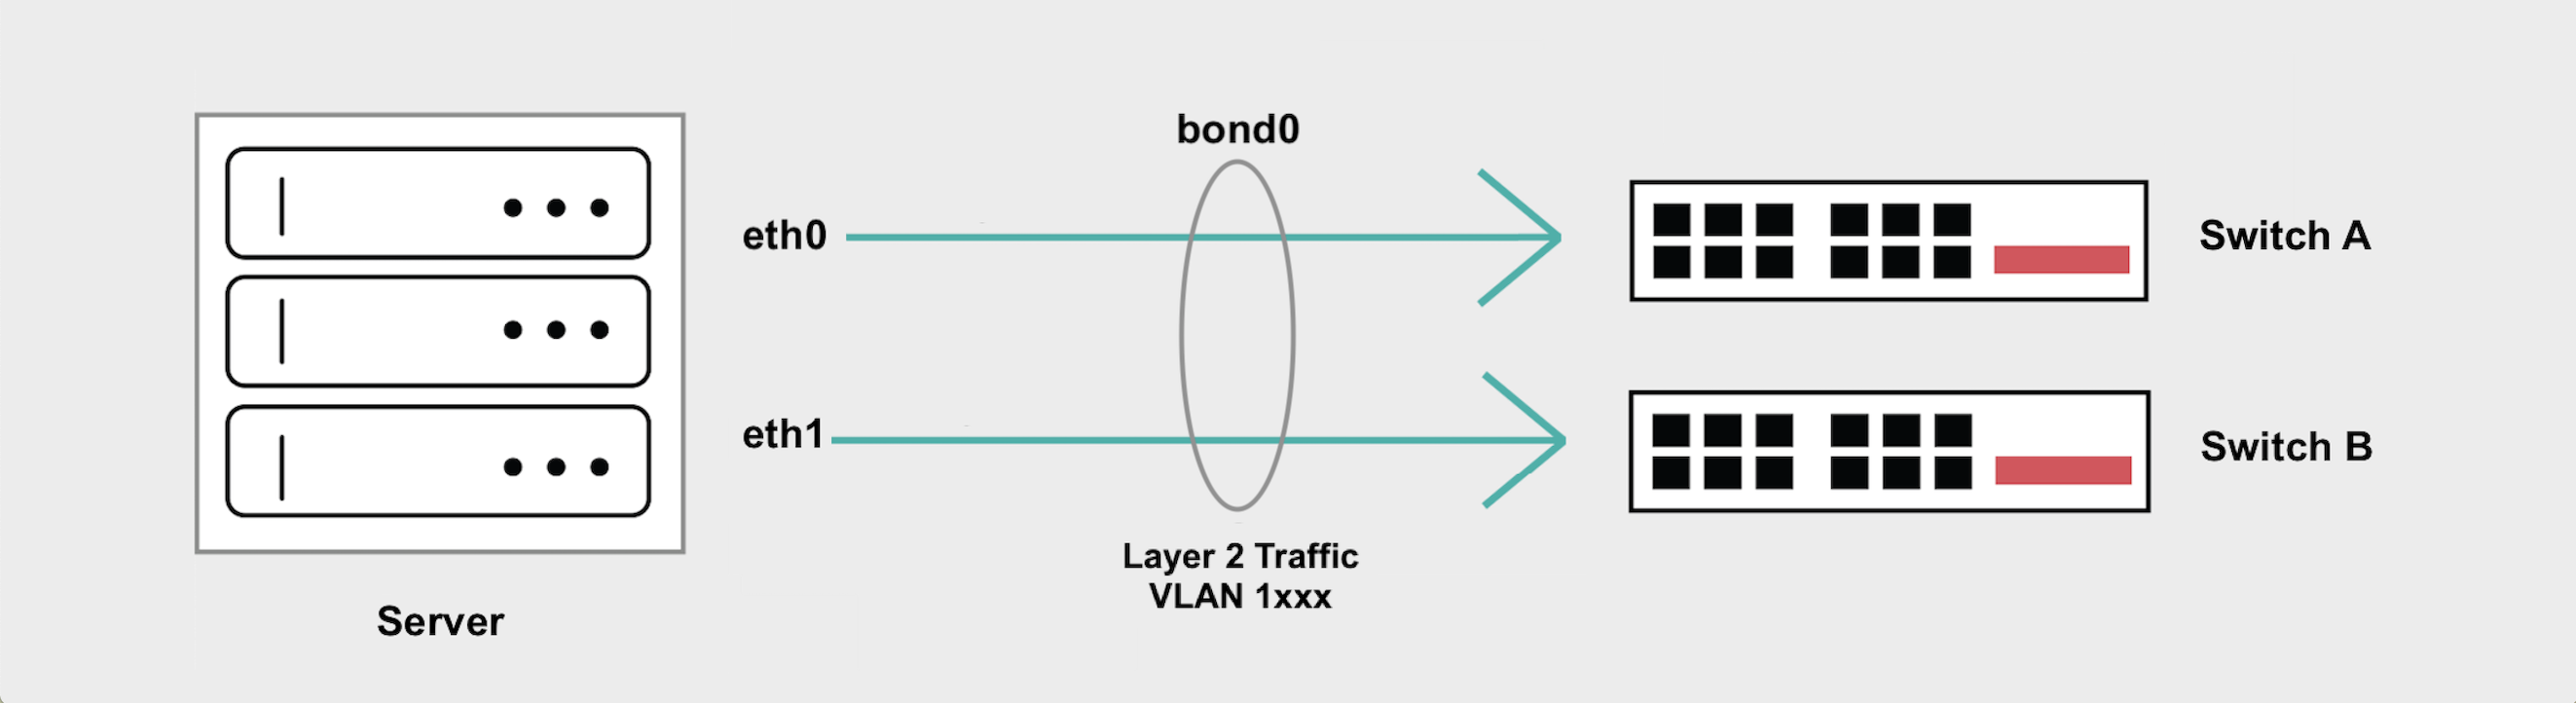
Equinix Metal™ allows users to change the networking mode of a server from the default Layer 3 Bonded mode to modes that only use Layer 2 networking over VLANs. This means all access to the public Internet is lost, and the host can only be reached by the Serial Over SSH (SOS) console or from other servers attached to the same VLAN.
Layer 2 Bonded mode preserves the bonded setup of two networking ports connected to the two top-of-rack switches, and you are able to attach VLANs to the bonded interface. This protects your networking from failure, maintenance, or other interruptions on one of the switches.
General Overview
- Layer 2 Bonded mode preserves the bond, preserving the redundancy and advantages of having traffic flow over both server ports and top-of-rack switches.
- You can then add VLANs to
bond0for your Layer 2 traffic. If you are only adding one VLAN tobond0, traffic can not be tagged. - If you are adding more than one VLAN to
bond0, you will need to create subinterfaces to handle tagged traffic for each VLAN and/or you have to set a Native VLAN to handle untagged traffic.
Converting to Layer 2 Bonded Mode
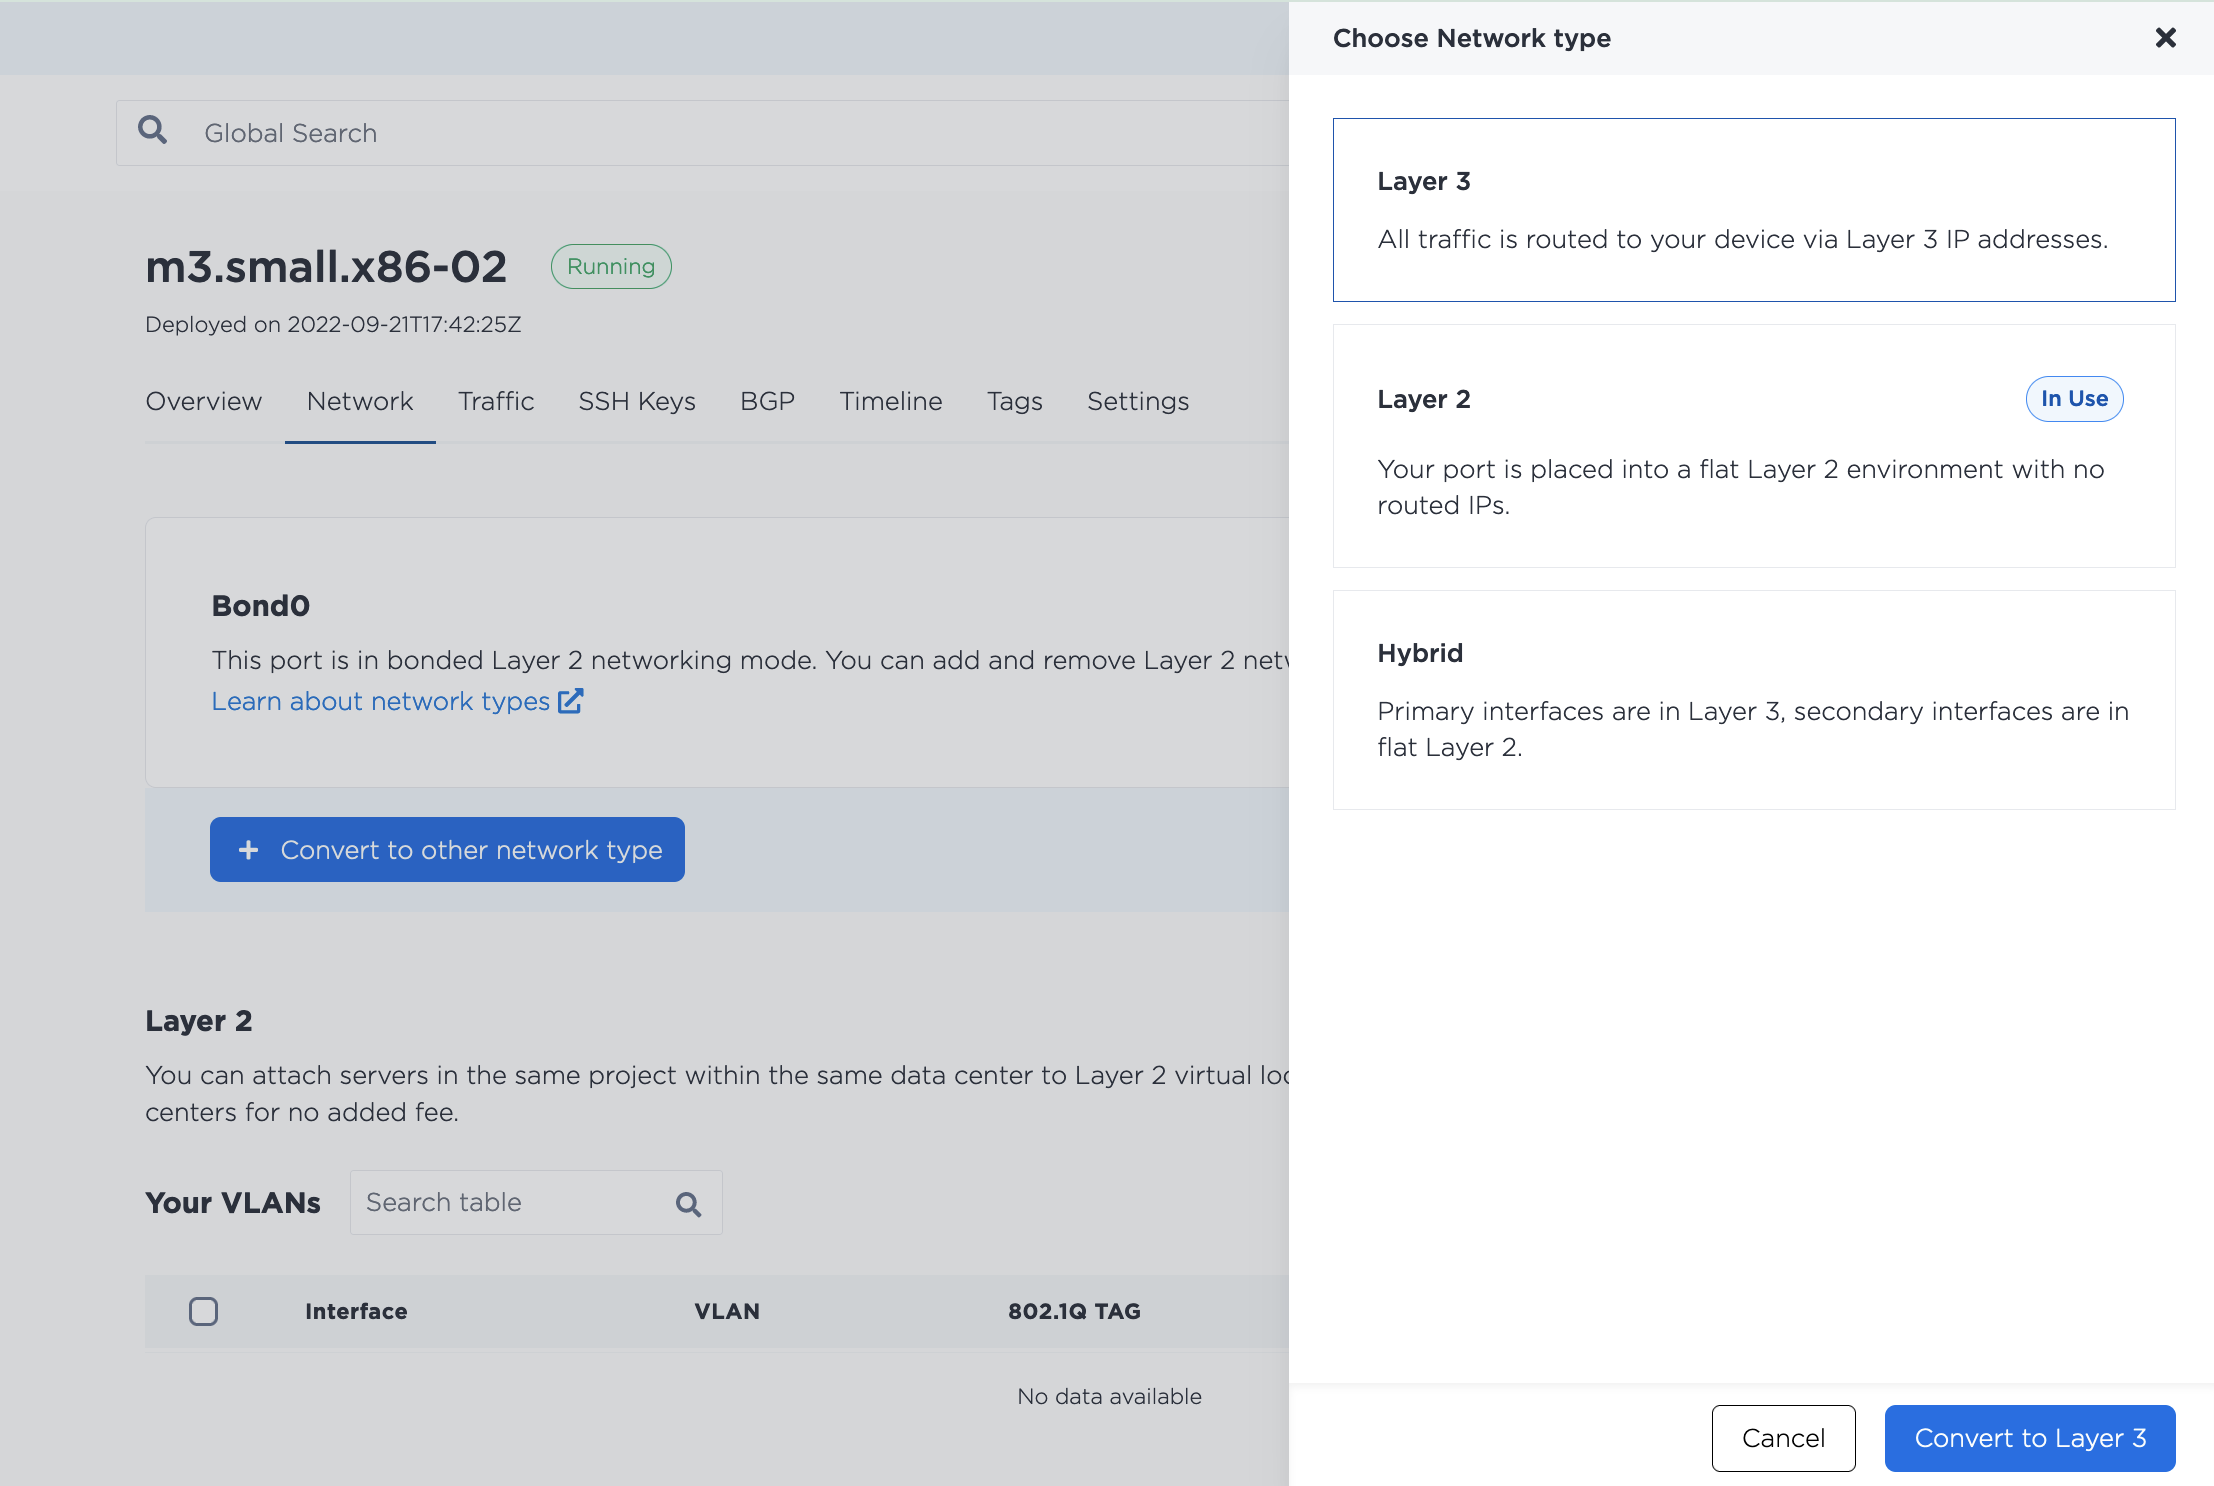
To use Bonded Layer 2 mode, you must first change your networking configuration to Layer 2. From the portal, navigate to the server's Network page, click Convert To Other Network Type and choose Layer 2.
- Console
- CLI
- API
In the Equinix Metal console, navigate to the server's Network page, click Convert To Other Network Type and choose Layer 2. Select the Bonded mode. Click Convert to Layer 2 to start the conversion.
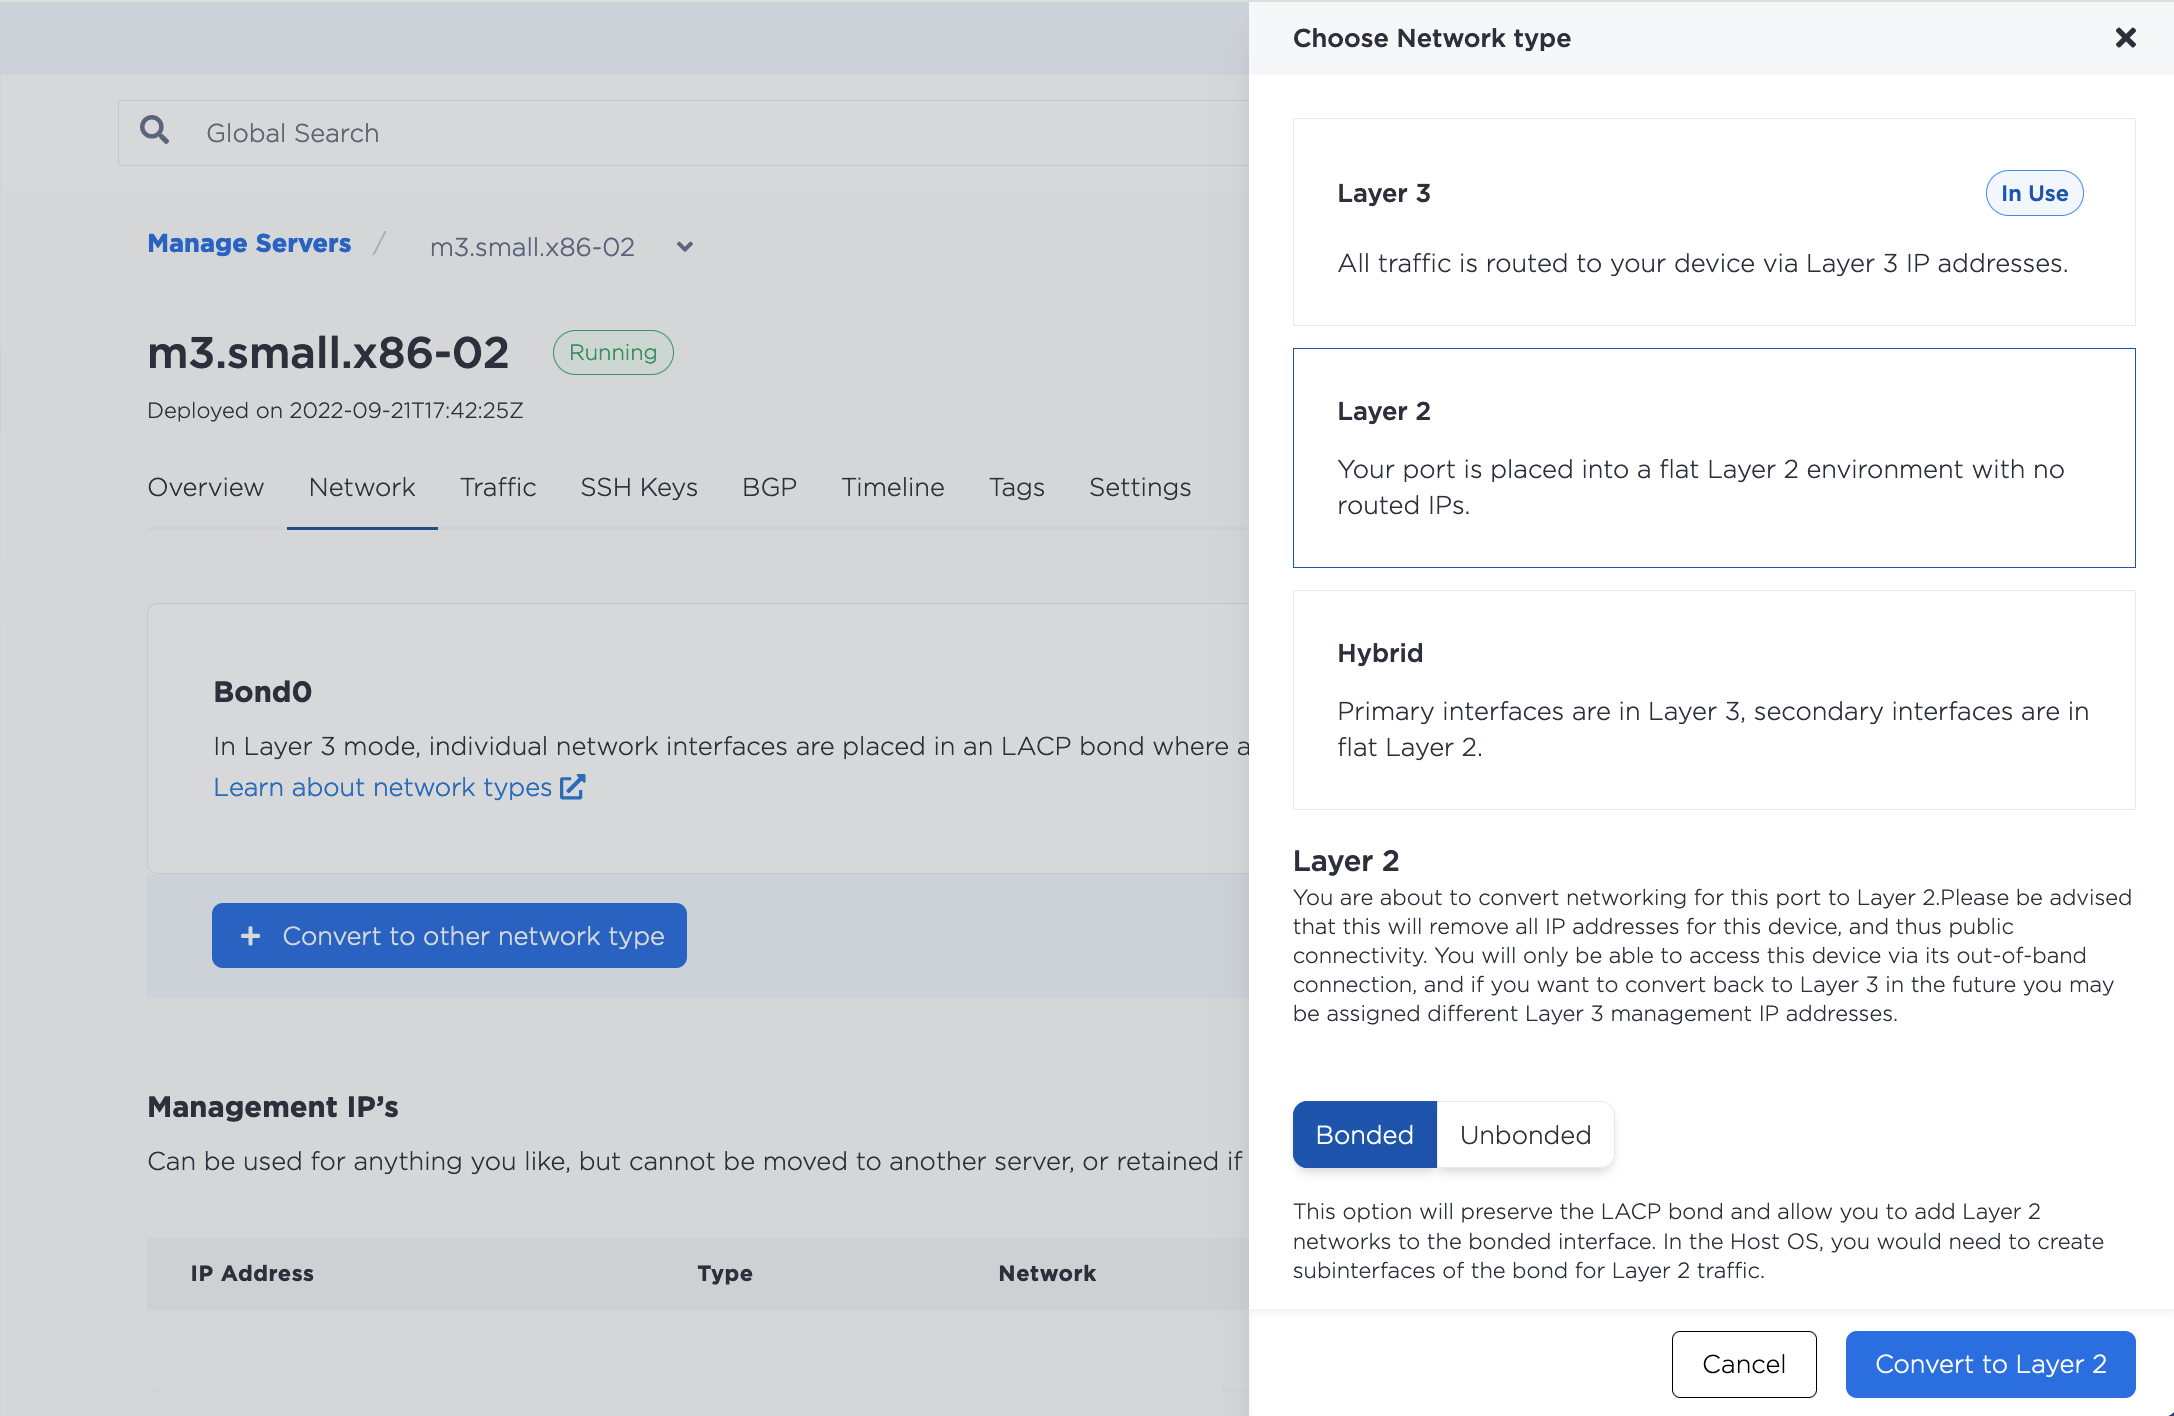
When it is finished, you will be back on the server's Network page.
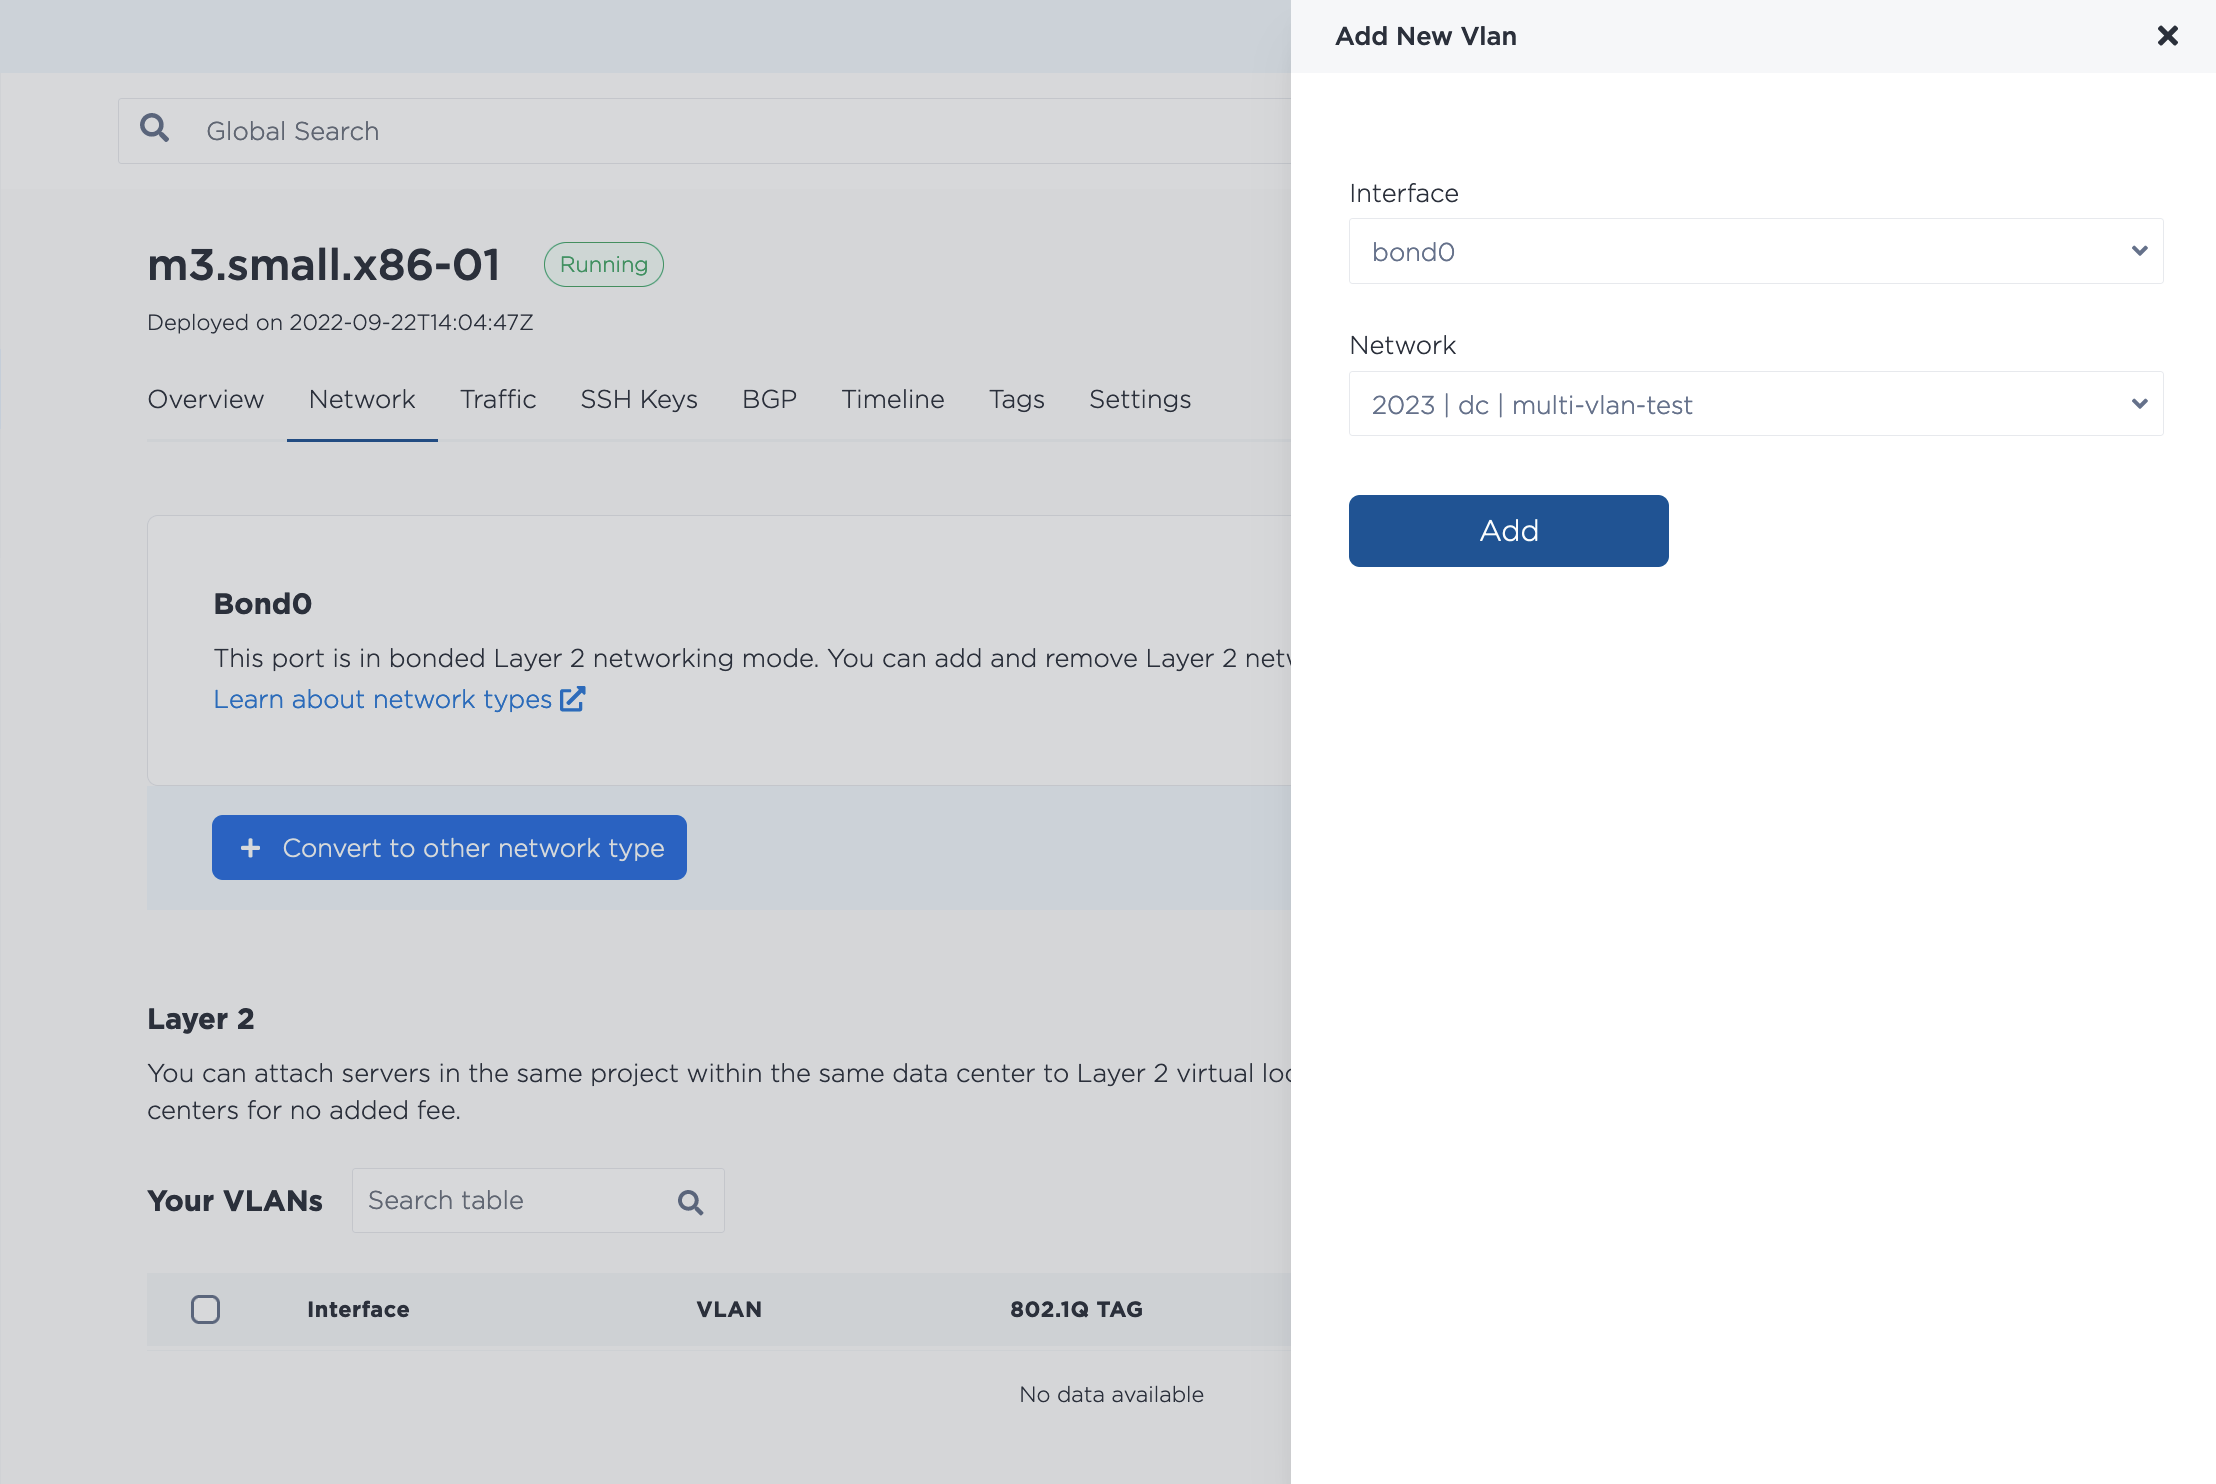
In the Layer 2 section, click Add New VLAN, which will allow you to assign a VLAN to the bond0 port. Click Add to start the changes.
Convert the bonded interface to Layer 2 with the metal port convert command, specifying the UUID of bond0 for the --port-id.
metal port convert --port-id <bond0_id> --layer2 --bonded
Then, assign a VLAN to bond0 with the metal port vlan command. Specify the UUID of bond0 for the --port-id and the VLAN that you are assigning to --assign.
metal ports vlan --port-id <bond0_id> --assign <VLAN_id>
In the API, you can convert the bonded interface to Layer 2 and assign the VLAN by submitting a POST request to the /ports/{id}/convert/layer-2 endpoint, with the port ID specified in the path. For Layer 2 Bonded mode, it needs to be the UUID for bond0 as returned by the /devices/{id} endpoint.
curl -X POST \
-H "Content-Type: application/json" \
-H "X-Auth-Token: <API_TOKEN>" \
"https://api.equinix.com/metal/v1/ports/{id}/convert/layer-2" \
-d '{
    "vnid": "<vlan_ID>"
    }'
The 'vnid' is the ID of the VLAN that is sent in the body of the request. The ID an be either the VLAN's UUID as returned by the /projects/{id}/virtual-networks endpoint, or the VLAN ID that is in the console.
Remember: once you have clicked Convert to Layer 2 in the console, or submitted the request to the API, the existing IP Addresses will be removed and the server will no longer be accessible through the Internet. You will still be able to use the SOS console to connect.
Attaching Multiple VLANs
Adding multiple VLANs to the bonded interface is supported. This does affect the server configuration as you will have to make sure there is a subinterface that will receive packets destined for each VLAN and/or you set a Native VLAN to handle untagged traffic.
- Console
- CLI
- API
To assign multiple VLANs to an interface, navigate to the server's Network page. In the Layer 2 section, click Add New VLAN, which will allow you to assign additional VLANs to the bond0 port.
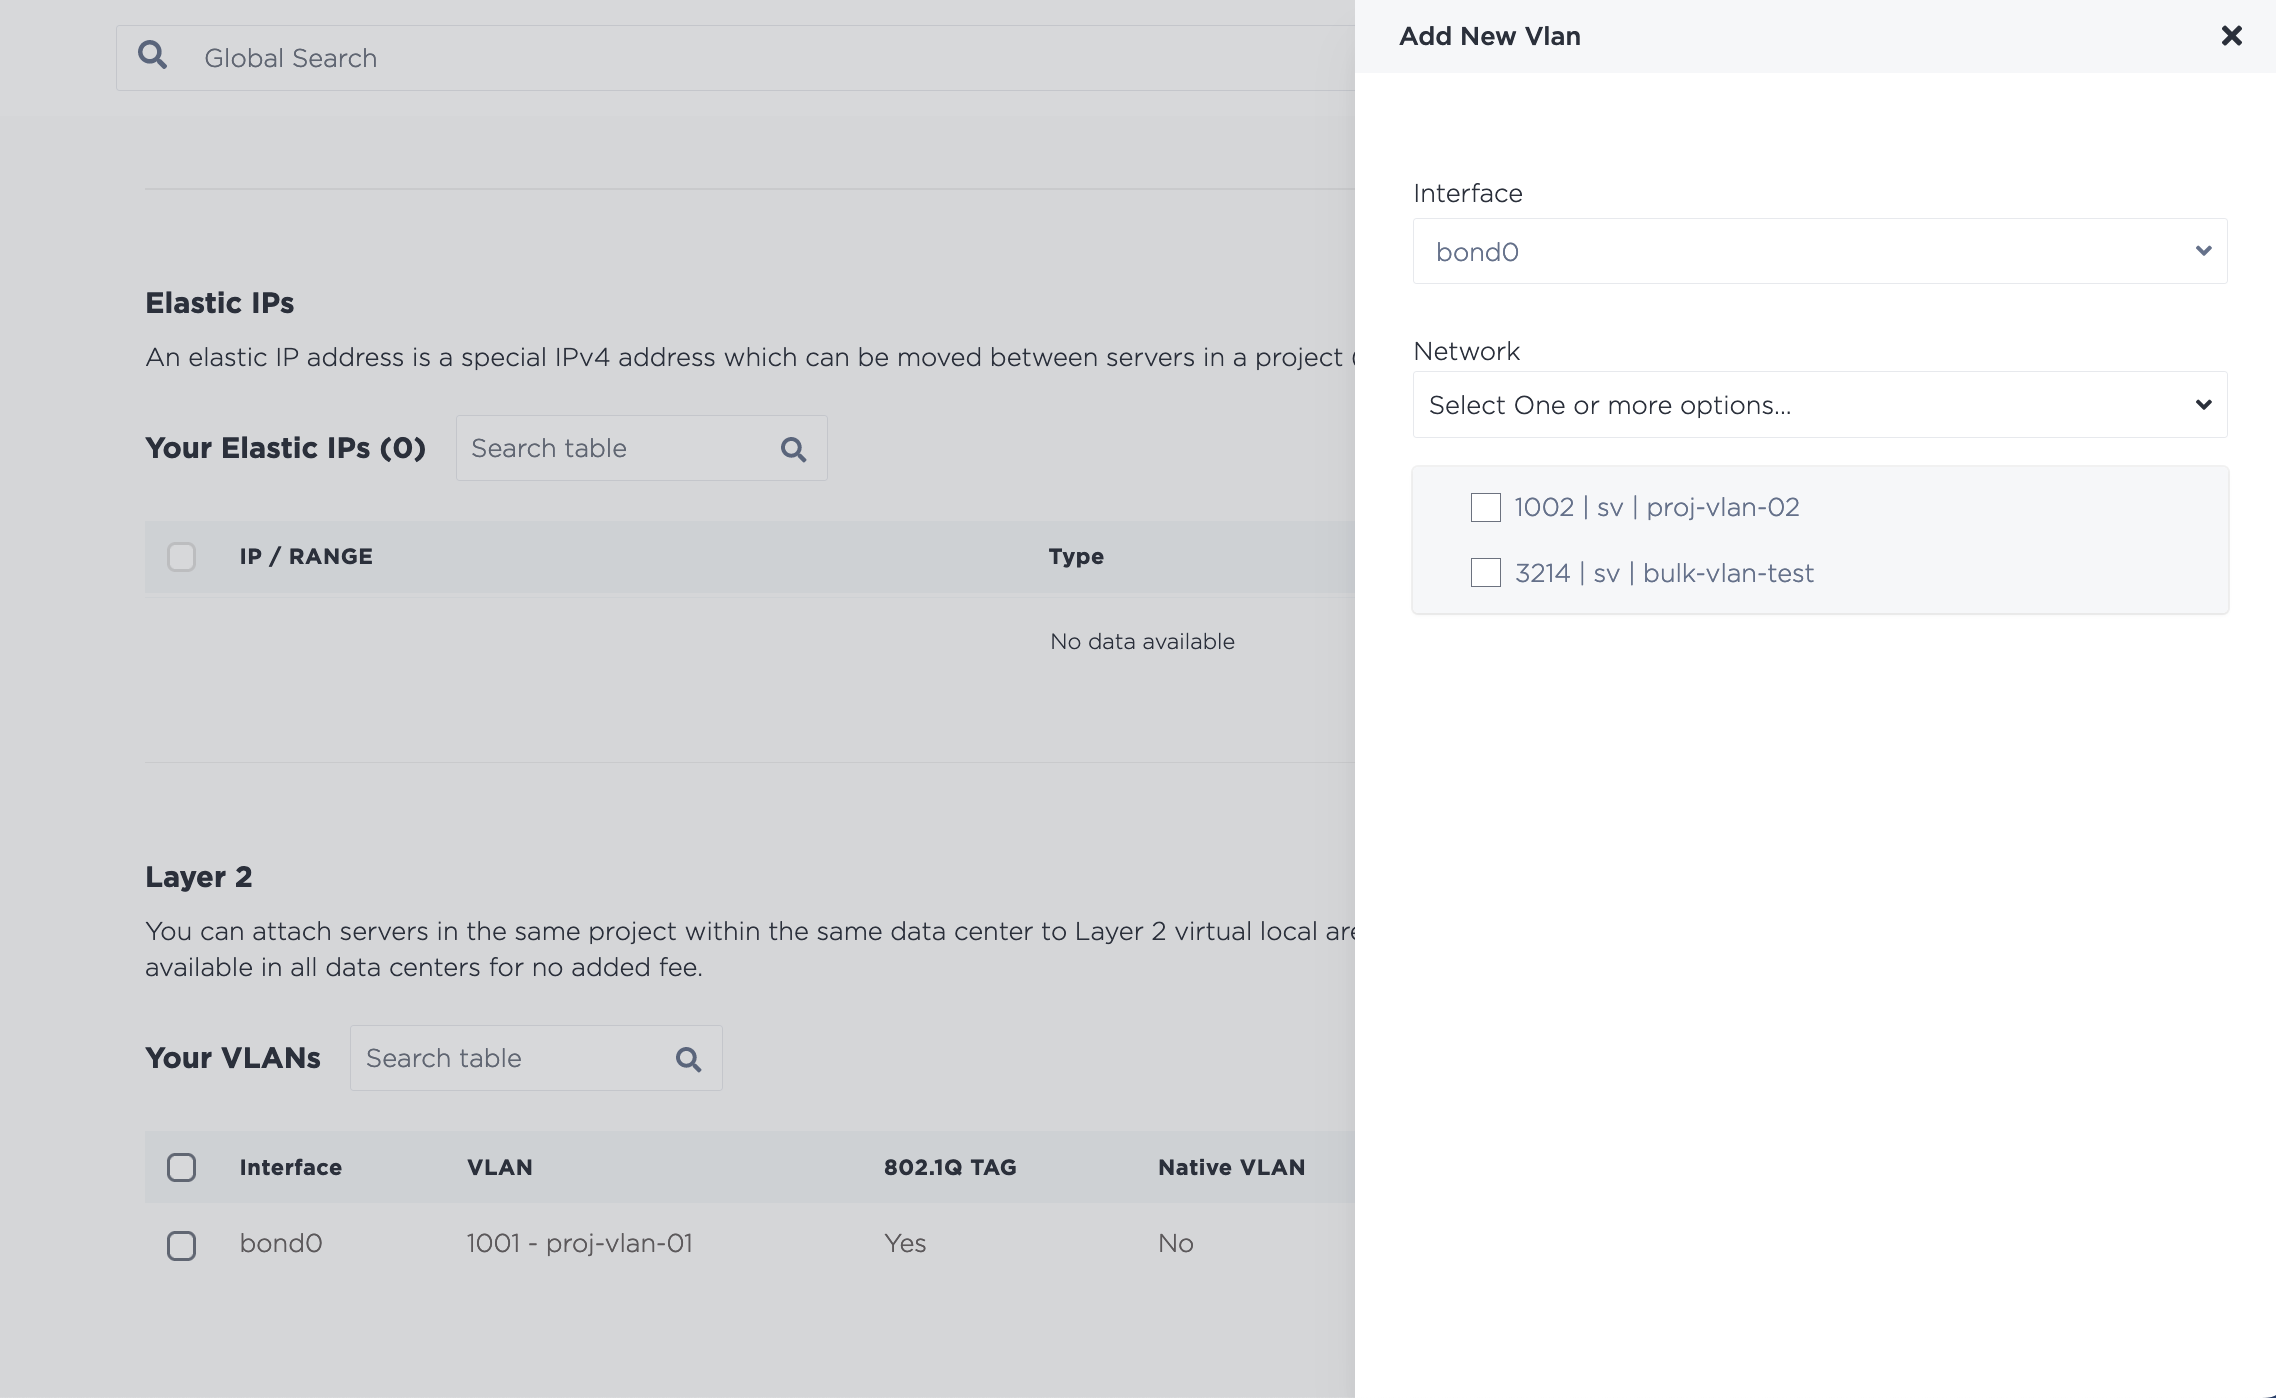
Click Add to start the changes. Note that if you assign multiple VLANs at once, they are added through an asynchronous batch process, which begins immediately, but may take some time to complete.
To assign another or multiple more VLANs, use the metal port vlan command, and specify each VLAN you are assigning to bond0.
metal port vlan --port-id <bond0_id> --assign <vlan> --assign <vlan>
The procedure for assigning a single additional VLAN to an interface in the API is the same as assigning the first VLAN. Send a POST request to the /ports/{id}/assign endpoint.
curl -X POST \
-H "Content-Type: application/json" \
-H "X-Auth-Token: <API_TOKEN> " \
"https://api.equinix.com/metal/v1/ports/{id}/assign" \
-d '{
    "vnid": "c4032b18-5494-451b-a779-a7d3c536bfd7"
    }'
It is also possible to assign VLANs to a port in bulk, as part of an asynchronous batch process. Send a POST request to the /ports/{id}/vlan-assignments/batches endpoint an array of VLAN assignments in the body of the request.
curl -X POST \
-H "Content-Type: application/json" \
-H "X-Auth-Token: <API_TOKEN> " \
"https://api.equinix.com/metal/v1/ports/{id}/vlan-assignments/batches" \
-d '{
    "vlan_assignments": [
        {
            "vlan": "string",
            "state": "assigned"
        },
        {
            "vlan": "string",
            "state": "assigned"
        },
    ]
}'
Configuring Your Servers for Layer 2 Bonded Mode
Once you have converted the server to Layer 2 Bonded mode and assigned the VLAN to bond0, you will need to configure the networking on the server's operating system and assign it an IP address on the VLAN.
Note - Since all Equinix Metal assigned IP addresses were removed when you converted this server to Layer 2, you are free to use whatever subnets you need, but you may have to remove any existing networking configuration in the server's operating system to prevent conflicts.
There are two example configurations, the first example is a configuration for assigning a single VLAN, and the second example is for assigning multiple VLANs.
Remember you will need to use the SOS/OOB Console to SSH into your server.
For a Single VLAN on bond0
If you have only one VLAN, do not tag the packets, and assign the VLAN IP Address directly to bond0.
- Ubuntu or Debian
-
Install and configure the prerequisites for VLANs.
modprobe 8021qecho "8021q" >> /etc/modules -
Configure
bond0with an IP address for the VLAN. The example uses IP address192.168.1.2/29.ip addr add 192.168.1.2/29 dev bond0To make the networking configuration permanent and survive server reboots, edit
bond0in the/etc/network/interfacesfile.auto bond0iface bond0 inet manualaddress 192.168.1.2netmask 255.255.255.248pre-up sleep 4
You will need to run through the same steps on all the servers that you want to attach to the VLAN, assigning a different IP address to each.
For Multiple VLANs on bond0
If you are using multiple VLANs on bond0, IP packets will have the to be tagged, and you will need to setup subinterfaces that will receive packets destined for each VLAN.
Note: If you need support for untagged packets, set the VLAN that handles the untagged traffic as the Native VLAN.
- Ubuntu or Debian
-
Install and configure the prerequisites for VLANs.
apt-get install vlanmodprobe 8021qecho "8021q" >> /etc/modules -
Add new subinterfaces on
bond0to handle tagged traffic, one for each VLAN, and assign them IP addresses. Use your VLAN IDs from the Equinix Metal VLAN as in theVLAN_IDfields. The example uses VLAN IDs1000and1001and IP addresses192.168.1.2/29and192.168.100.2/29.ip link add link bond0 name bond0.1000 type vlan id 1000ip addr add 192.168.1.2/29 dev bond0.1000ip link add link enp1s0f1 name bond0.1001 type vlan id 1001ip addr add 192.168.100.2/29 dev bond0.1001To make the networking configuration permanent and survive server reboots, add the new subinterfaces to the
/etc/network/interfacesfile.auto bond0.1000iface bond0.1000 inet staticaddress 192.168.1.2netmask 255.255.255.248vlan-raw-device bond0auto bond0.1001iface bond0.1001 inet staticaddress 192.168.100.2netmask 255.255.255.248vlan-raw-device bond0 -
Bring up the interfaces, and check that they came up.
ip link set dev bond0.1000 upip -d link show bond0.1000ip link set dev bond0.1001 upip -d link show bond0.1001
You will need to run through the same steps on all the servers that you want to attach to the VLANs, assigning different IP addresses to each.
Converting Back to Layer 3
If you are in Layer 2 Bonded mode and want to go back to Layer 3, you must first remove any attached VLANs.
To detach a VLAN in the console, navigate to the server's Network page. In the Layer 2 section, click Remove next to the VLAN you are detaching from the server. Confirm that you wish to remove it by clicking Yes.
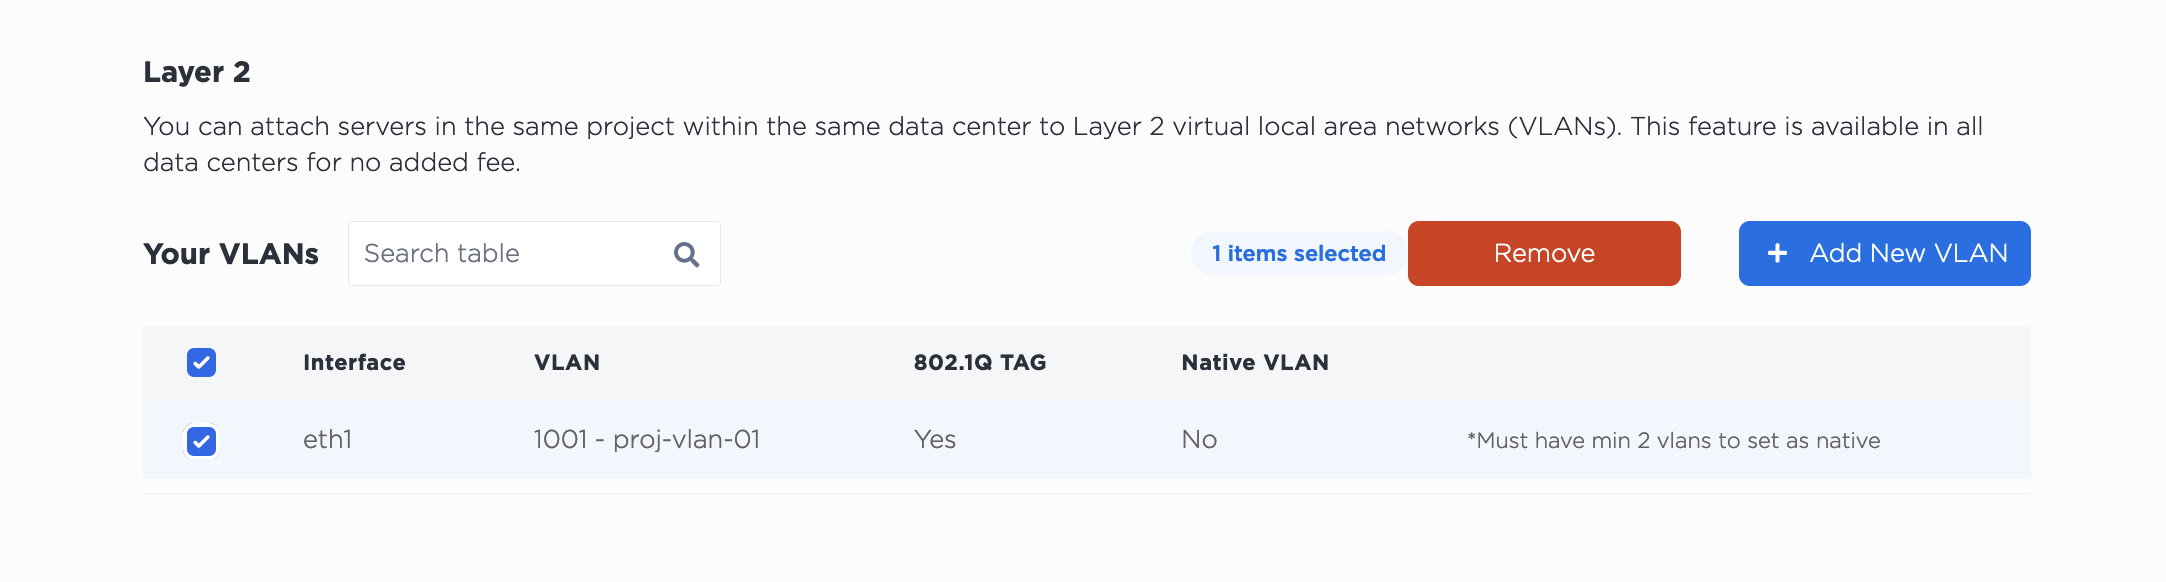
Detaching the VLAN from this server does NOT delete it from your project. The VLAN will continue to exist after detaching it from the server.
Then, to convert back to Layer 3, click Convert To Other Network Type, select Layer 3. Click Convert to Layer 3 to start the process.
Note - Being in Layer Bonded Mode removed the server's public IP addresses. If the server is later converted back to Layer 3, new public IP addresses are assigned and the server is accessible to the public Internet