Equinix Metal was sunset on June 30, 2026. The user documentation will be removed on September 30, 2026.
Using VRF with Interconnections
Equinix Metal™ Virtual Routing and Forwarding (VRF) provides a virtual router for Layer 3 network connectivity between a Metal Gateway Layer 2 private network and remote destinations on Fabric or in an Equinix IBX. VRF is supported on Metal-billed Fabric VCs, Fabric-billed Fabric VCs, and Dedicated Ports.
In order to use VRFs with your Interconnections, you will first have to provision your VRFs, Metal Gateways, and IP Reservations as described in the VRF documentation.
Requesting a Fabric VC with VRF
In order to use VRF with a Fabric VC, you have to request the Fabric VC after creating your VRF. You can not associate a VRF with an existing Fabric VC.
The process to request a Metal-billed or Fabric-billed Fabric VC is similar to requesting a non-VRF one.
- Console
- API
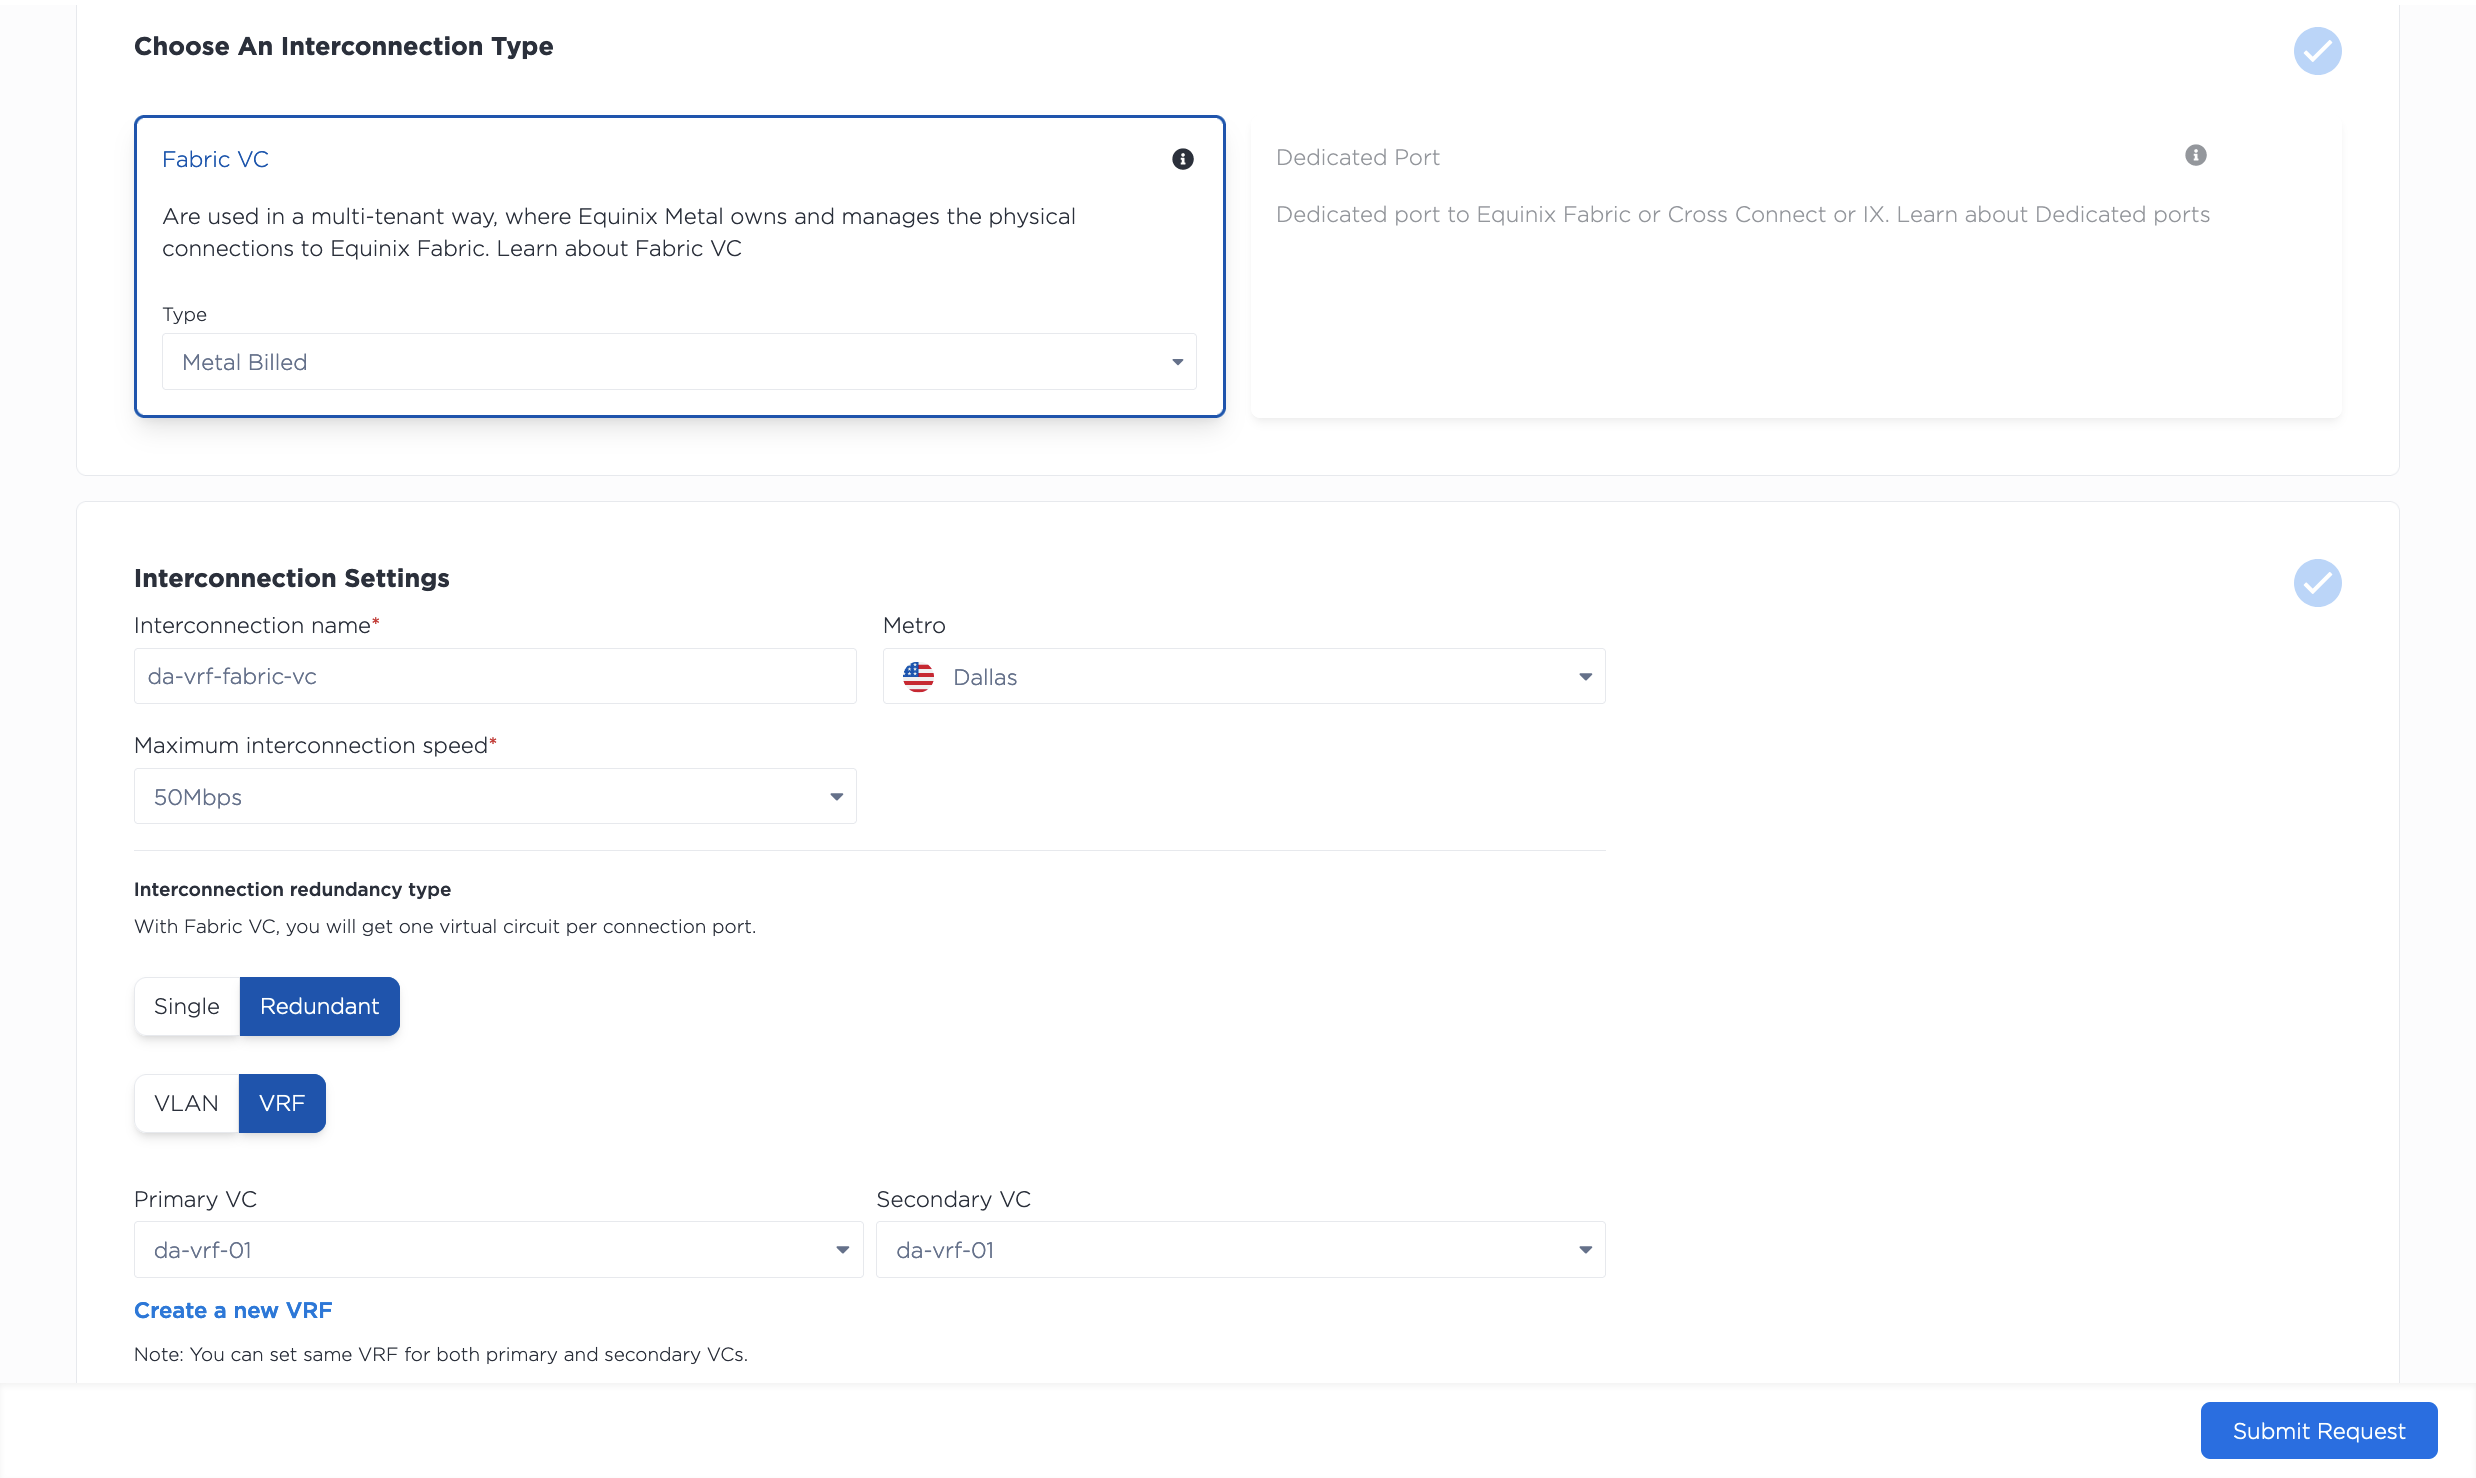
To request a Fabric Virtual Connection, open the Project's Interconnections page. Click + Request New Interconnection. In the Interconnection Type section, click the drop-down under Fabric VC, and select Metal Billed or Fabric Billed.

- Select the location for the new connection from the drop-down. You will want to select the metro where both your Equinix Metal infrastructure lives and the metro where the CSP you are connecting to on Fabric is: these interconnections are metro-bound.
- Give a name to your connection.
- Choose whether you want a set of redundant ports. Redundant ports are highly recommended. Selecting a single port may result in significant downtime due to planned and unplanned outages.
- Set the connection speed by selecting it from the drop-down. Note: the speed cannot be changed after a service token is issued. A new request and service token is required to change the speed.
Next, select VRF to associate your Virtual Router with the Fabric VC. If you choose redundant ports, there will be a dropdown to select a Virtual Router for both the Primary and Secondary ports.
Review the summary of your request. Click Submit Request to receive your service tokens. You should then complete the process for redeeming your service token and setting up the connection in the Fabric portal.
Once the Interconnection is established between Fabric and Equinix Metal, it will appear on your Project's Interconnections page, in the Fabric VC section. Click on the Fabric VC to view its Overview page, which contains a detail view as well as a summary of the primary port and secondary port configurations.
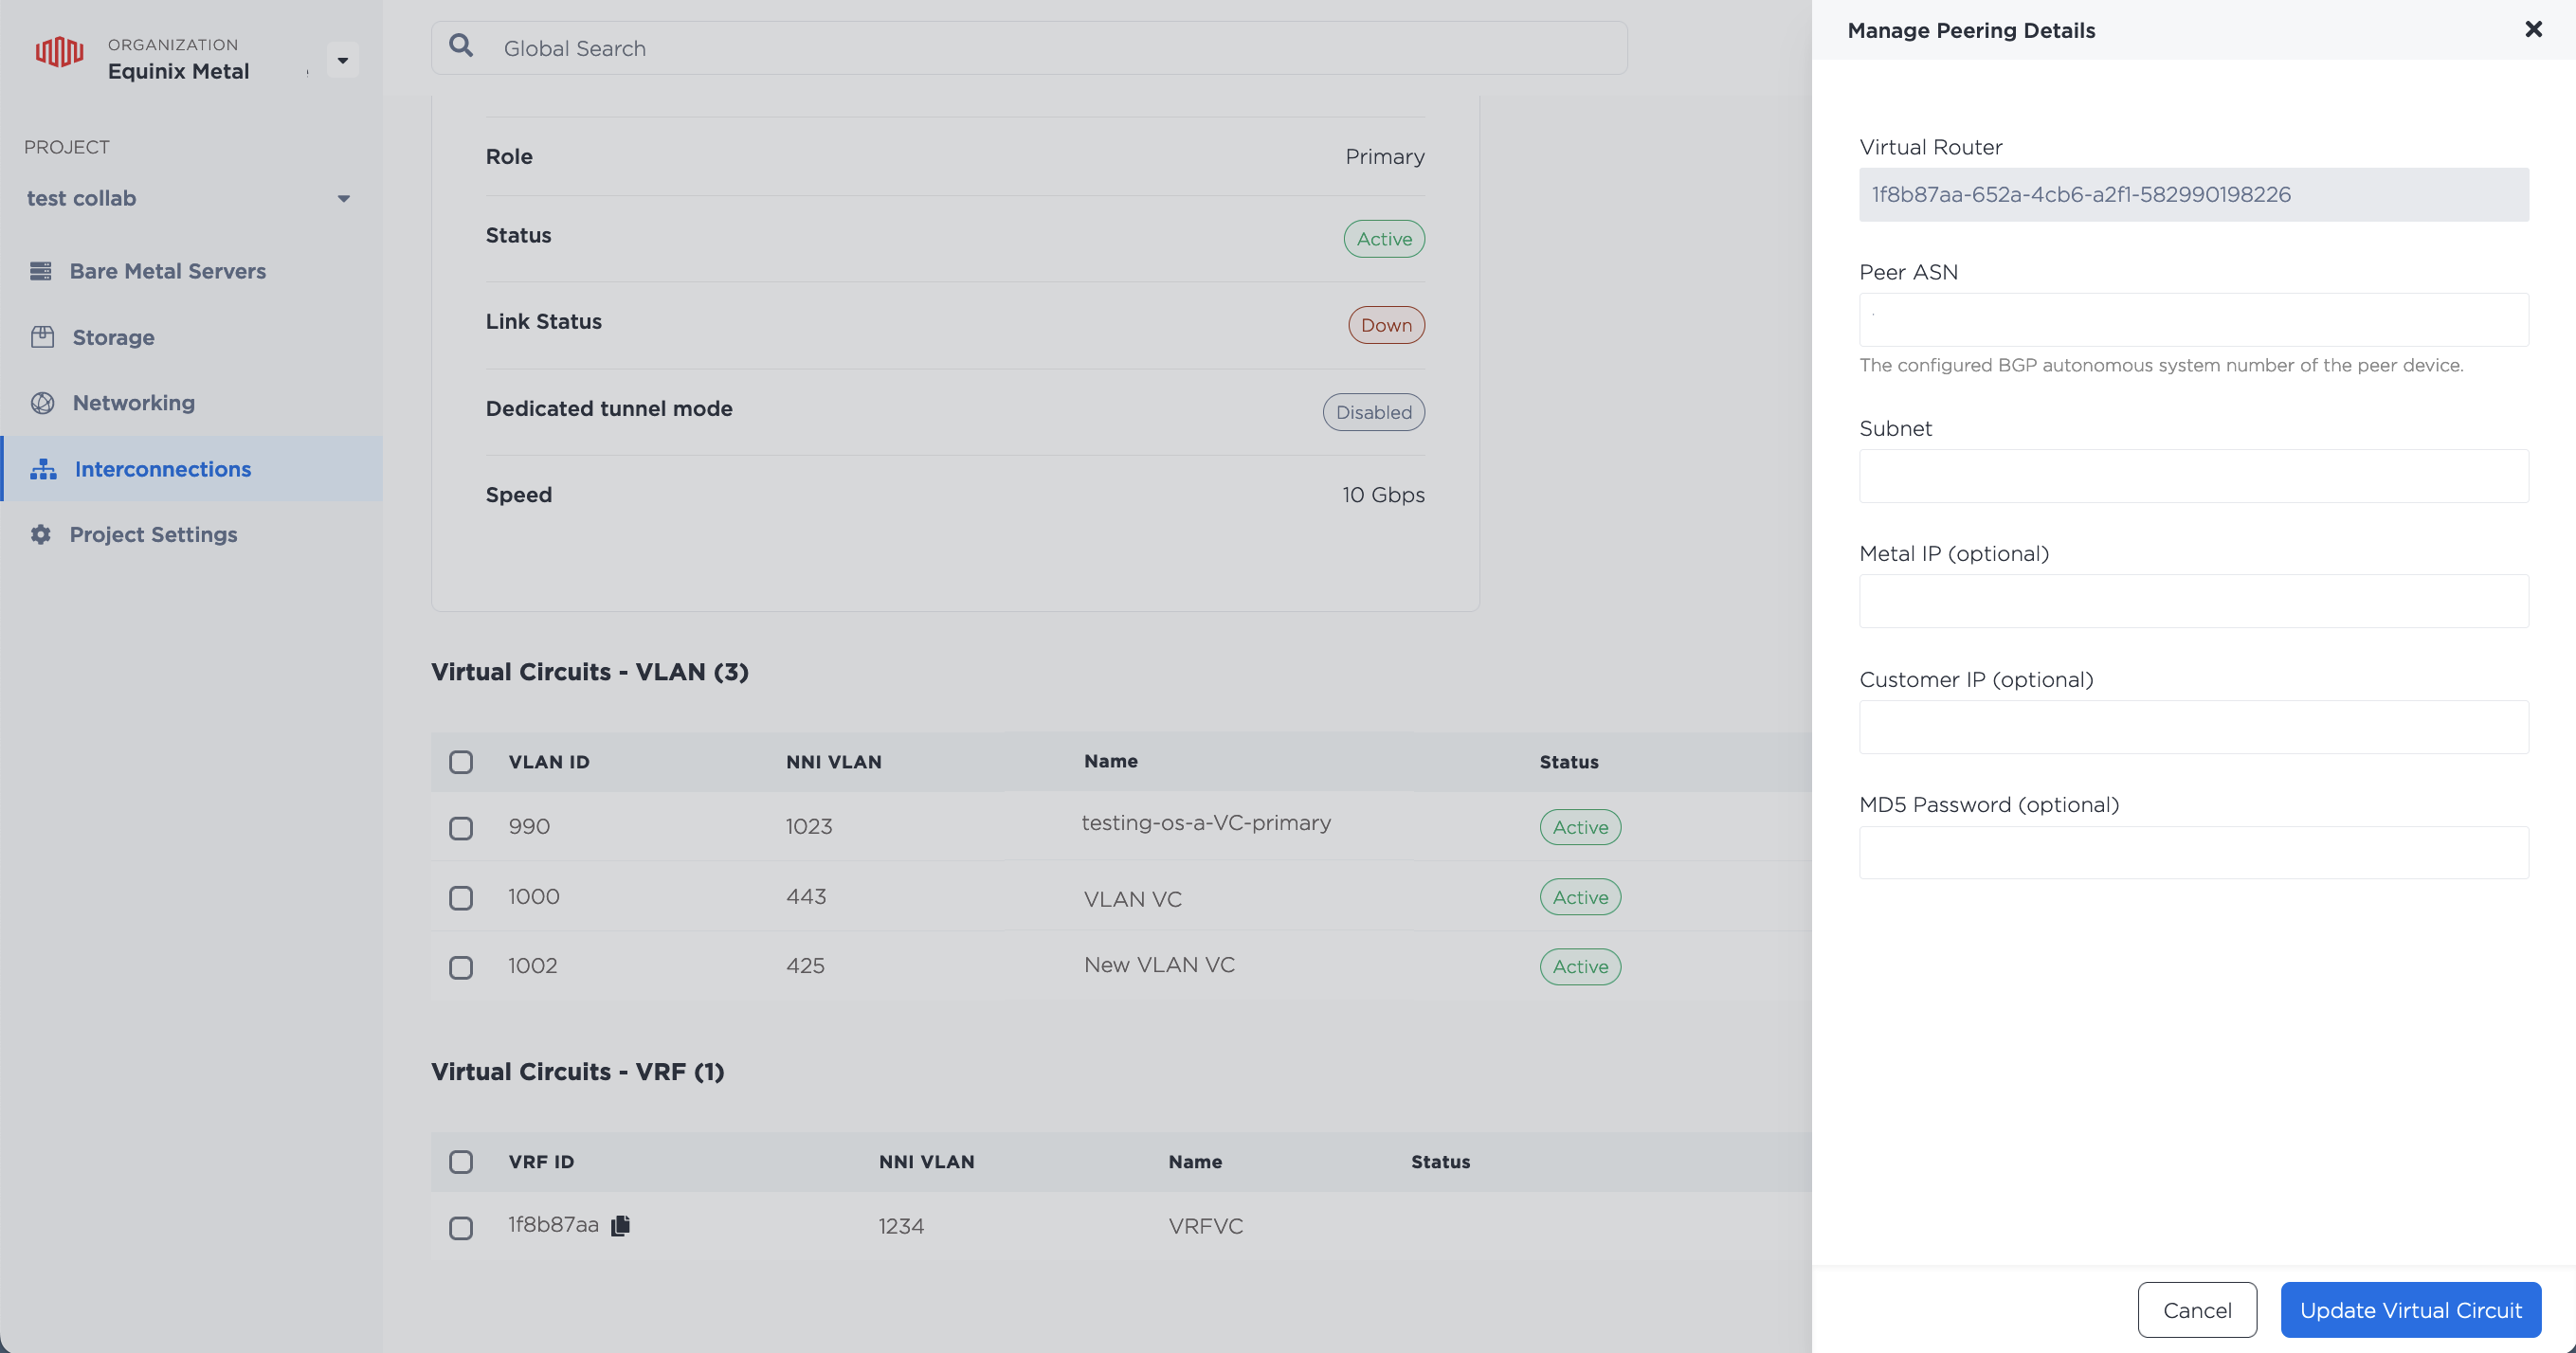
Clicking either Primary Port or Secondary Port pulls up the port's status and configuration. Your VRF is listed in the Virtual Circuits - VRF section of a port's page with the status waiting on peering details.

Click on the three-bar menu to open the Manage Peering Details pane. This is where you specify the subnet from the VRF IP address range that will be used to address the VRF and the remote side of the virtual circuit. The IP address reservation for this subnet will be created automatically.
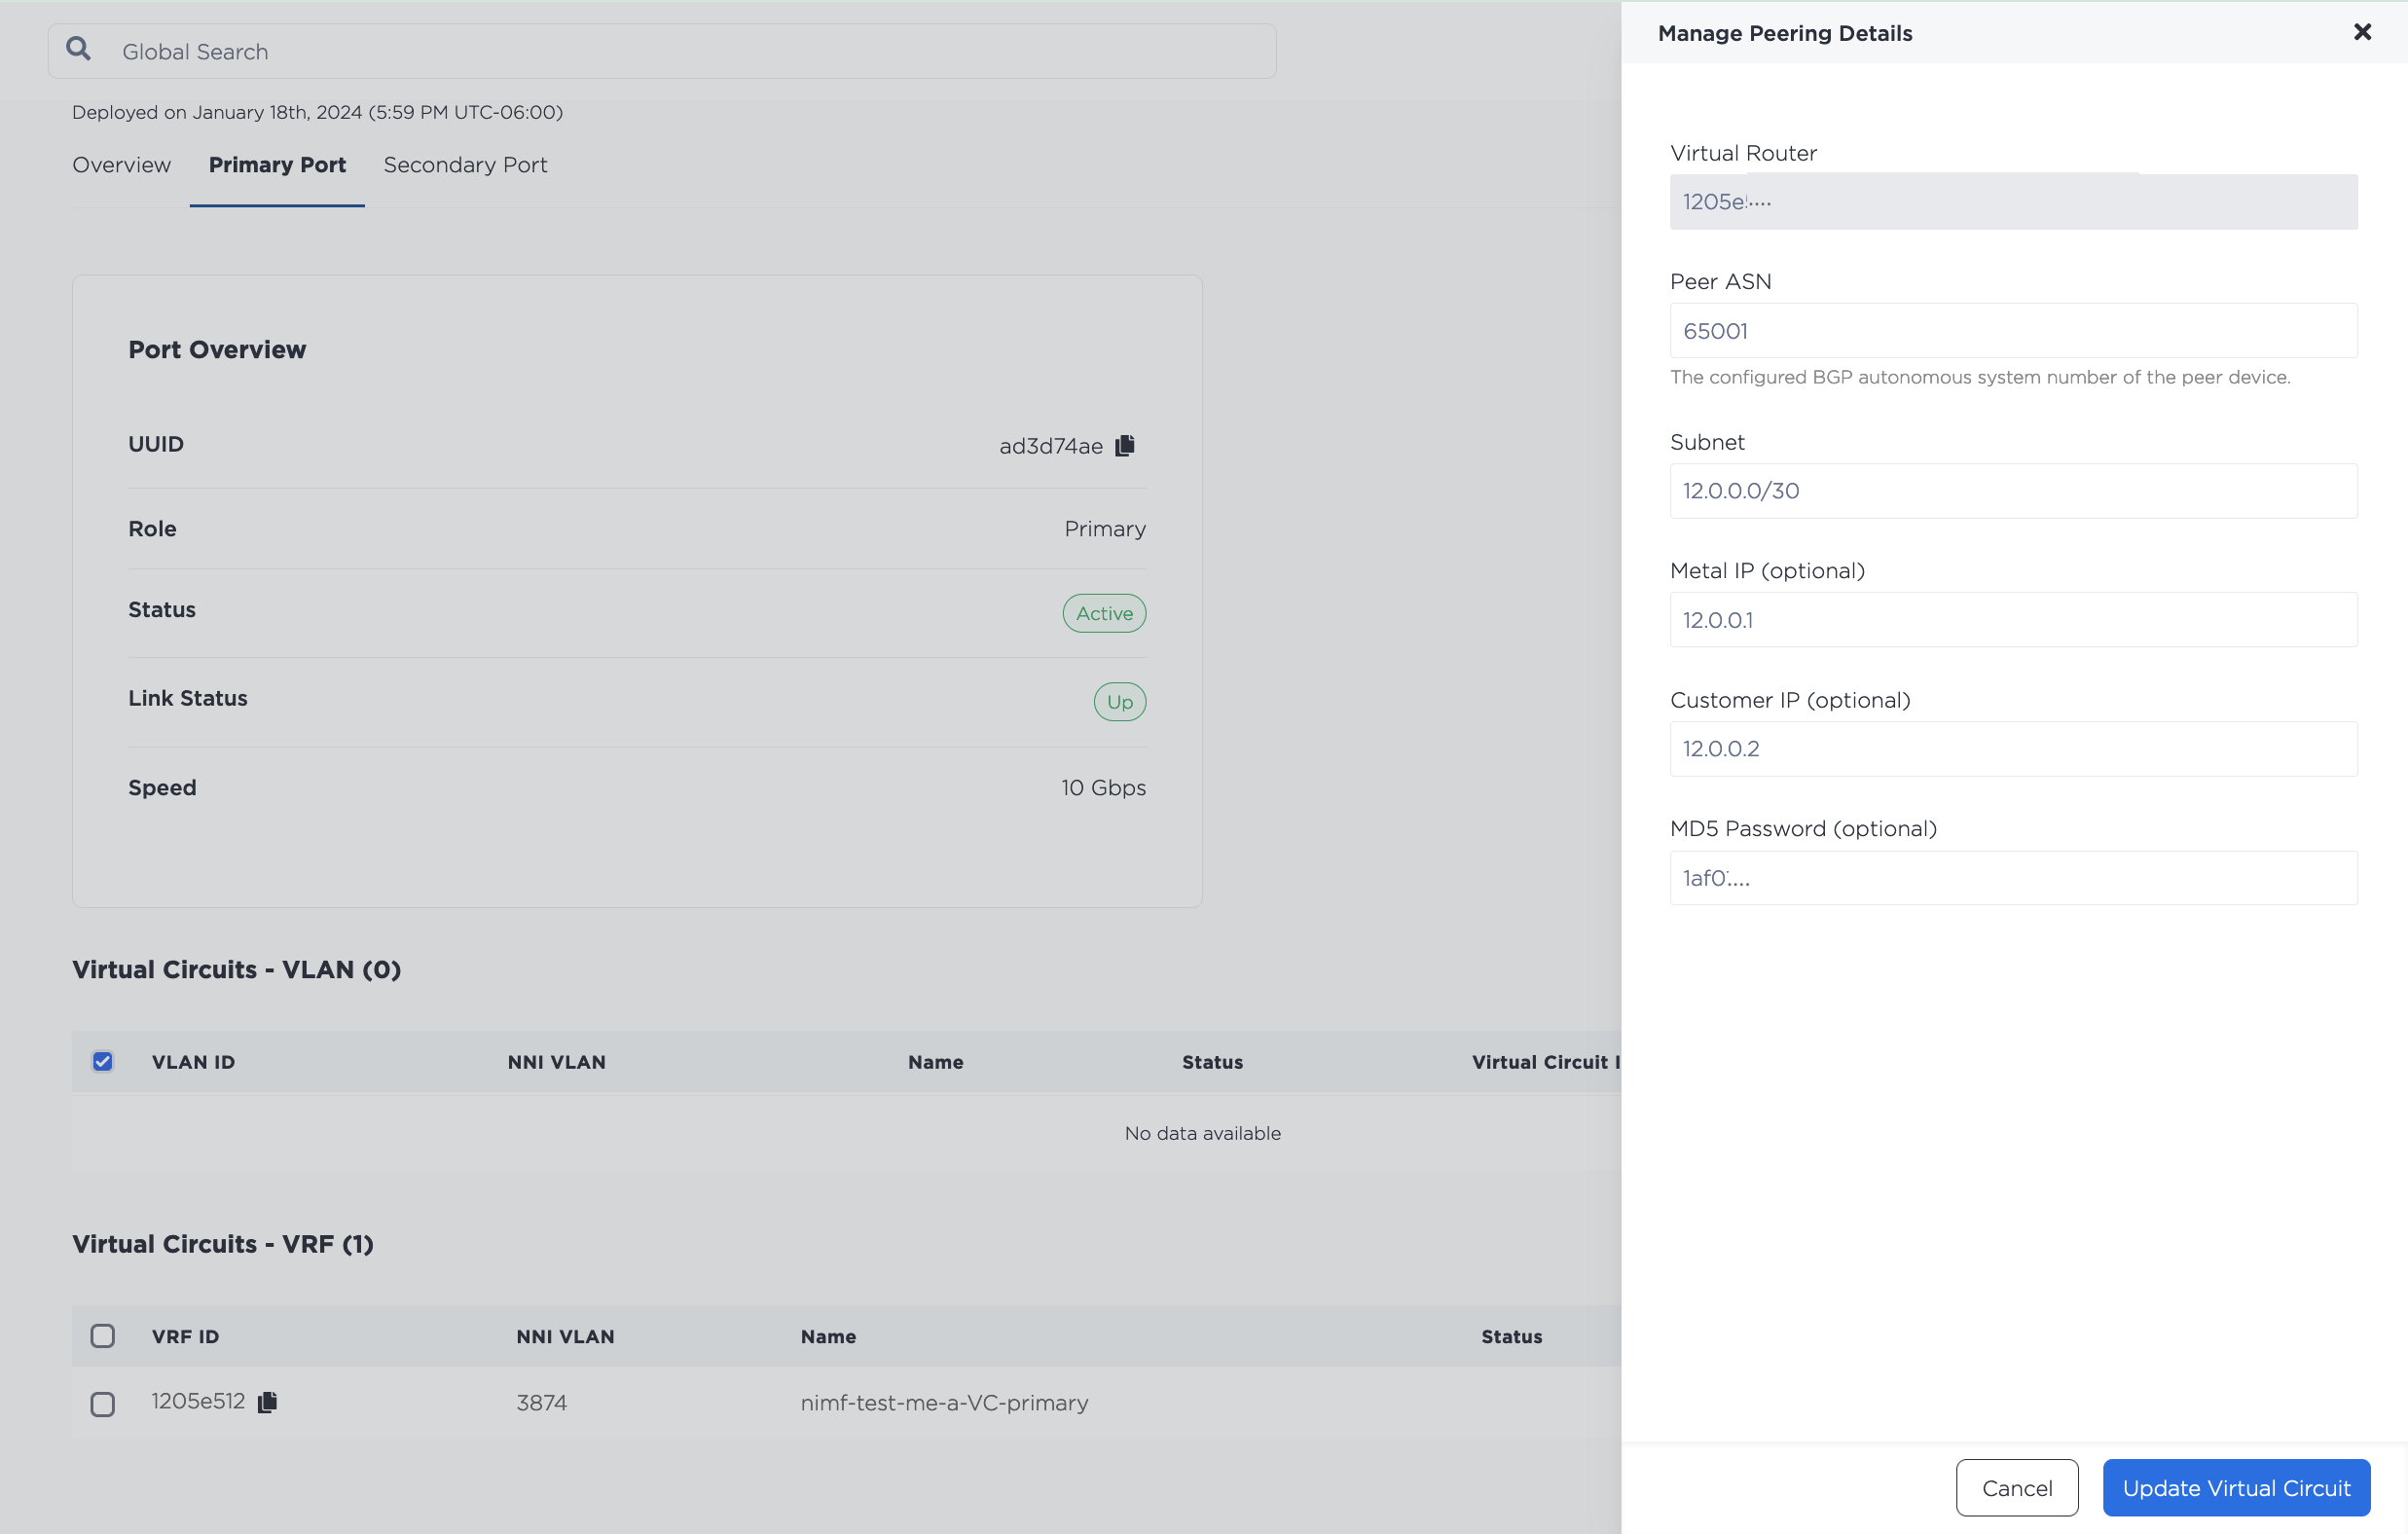
Fill in the fields with the requested information.
- Peer ASN (required) - The ASN that will be used with the VRF and the remote side of the connection on the Virtual Circuit.
- Subnet (required)
- For IPv4 subnets, the
/30or/31subnet from one of the VRF IP Blocks that is used to address the VRF and the remote side of the Virtual Circuit. The Metal IP and Customer IP are IP addresses from this subnet that you can optionally specify. If not specified, the Metal IP is the last usable IP address in the subnet, and Customer IP is the first usable IP address in the subnet. For/30subnets, the network and broadcast IP addresses cannot be used as the Metal IP or Customer IP. - For IPv6 subnets, the
/126or/127subnet from one of the VRF IP Blocks that is used to address the VRF and the remote side of the Virtual Circuit. The Metal IP and Customer IP are IP addresses from this subnet that you can optionally specify. If not specified, the Metal IP is the last usable IP address in the subnet, and Customer IP is the first usable IP address in the subnet. For/126subnets, the network and broadcast IP addresses cannot be used as the Metal IP or Customer IP.
- For IPv4 subnets, the
- MD5 Password (optional) - Set an optional string MD5 password for the BGP peering in plaintext.
Click Update Virtual Circuit.
If you have redundant ports, repeat this process on the Secondary Port.
Send a POST request to the /projects/{project_id}/connections endpoint, and specify the VRF (or VRFs for redundant VCs) with the "vrfs" object.
Remember that the Fabric VC must be in the same Metro as the VRF.
curl -X POST \
-H "Content-Type: application/json" \
-H "X-Auth-Token: <API_TOKEN>" \
"https://api.equinix.com/metal/v1/projects/{project_id}/connections" \
-d '{
    "name": "<string>",
    "description": "<string>",
    "contact_email": "<string>",
    "metro": "<metro_slug>",
    "type": "shared",
    "service_token_type": "<string>",
    "redundancy": "redundant",
    "speed": "<string>",
    "vrfs": ["<UUID>", "<UUID>"]
}'
Body Parameters to note for VRF:
"vrfs"(required) - Array of VRF IDs that will be set automatically on the virtual circuits on creation, and can hold up to two UUIDs. Two IDs are required when requesting redundant Fabric VCs. The first ID will be set on the primary virtual circuit, while the second UUID will be set on the secondary. The two IDs can be the same if both the primary and secondary virtual circuits will be in the same VRF.
You should then complete the process for redeeming your service token and setting up the connection in the Fabric portal.
Once your Fabric VC is showing as Active, and is waiting on peering details, you can update it with the peering details for your VRF. Send a PUT request to the /virtual-circuits/{vrf_virtual_circuit_id} endpoint.
This is where you specify the subnet from the VRF IP address range that will be used to address the VRF and the remote side of the virtual circuit. The IP address reservation for this subnet will be created automatically.
If you are using IPv4 subnets, use the "subnet", "metal_ip", and "customer_ip" body parameters.
curl -X PUT \
-H "Content-Type: application/json" \
-H "X-Auth-Token: <API_TOKEN>" \
"https://api.equinix.com/metal/v1/virtual-circuits/{vrf_virtual_circuit_id}" \
-d '{
    "peer_asn": <integer>,
    "subnet": "<subnet>",
    "metal_ip": "<ip_address>",
    "customer_ip": "<ip_address>”,
    "md5": "<string>"
}'
Body Parameters:
"peer_asn"- The peer ASN that will be used with the VRF on the Virtual Circuit."subnet"- The/30or/31subnet of one of the VRF IP Blocks that will be used with the VRF for the Virtual Circuit. Themetal_ipandcustomer_ipmust be IP addresses from this subnet. For/30subnets, the network and broadcast IP addresses cannot be used as themetal_iporcustomer_ip."customer_ip"(optional) - An IP address from the subnet that will be used on the remote side of the connection. This parameter is optional, but if supplied, we will use the other usable IP address in the subnet as themetal_ip. By default, the last usable IP address in the subnet will be used."metal_ip"(optional) - An IP address from the subnet that will be used for the VRF on the Metal side. This parameter is optional, but if supplied, we will use the other usable IP address in the subnet as thecustomer_ip. By default, the first usable IP address in the subnet will be used."md5"- Optional string or null MD5 password for the BGP peering in plaintext.
If you are using IPv6 subnets, use the "subnet_ipv6", "metal_ipv6", and "customer_ipv6" body parameters.
curl -X PUT \
-H "Content-Type: application/json" \
-H "X-Auth-Token: <API_TOKEN>" \
"https://api.equinix.com/metal/v1/virtual-circuits/{vrf_virtual_circuit_id}" \
-d '{
    "peer_asn": <integer>,
    "subnet_ipv6": "<subnet>",
    "metal_ipv6": "<ip_address>",
    "customer_ipv6": "<ip_address>”,
    "md5": "<string>"
}'
Body Parameters:
"peer_asn"- The peer ASN that will be used with the VRF on the Virtual Circuit."subnet"- The/126or/127IPv6 subnet from a VRF IP Block that will be used with the VRF for the Virtual Circuit. Themetal_ipv6andcustomer_ipv6must be IP addresses from this subnet. For/126subnets, the network and broadcast IP addresses cannot be used as themetal_ipv6orcustomer_ipv6."customer_ipv6"(optional) - An IP address from the subnet that will be used on the remote side of the connection. This parameter is optional, but if supplied, we will use the other usable IP address in the subnet as themetal_ipv6. By default, the last usable IP address in the subnet will be used."metal_ipv6"(optional) - An IP address from the subnet that will be used for the VRF on the Metal side. This parameter is optional, but if supplied, we will use the other usable IP address in the subnet as thecustomer_ipv6. By default, the first usable IP address in the subnet will be used."md5"- Optional string or null MD5 password for the BGP peering in plaintext.
A complete list of the updatable components for a virtual circuit is available in the API Reference.
To check on the status and peering details of your Fabric VC send a GET request to the /connections/{id} endpoint.
curl -X GET -H 'X-Auth-Token: <API_TOKEN>' https://api.equinix.com/metal/v1/connections/{id}
Using VRF with Dedicated Ports
Note: VRF is not compatible with Dedicated Tunnel mode.
VRF is available on new and existing Dedicated Ports. So if you haven't already, you can request a new Dedicated Port, get a LOA, and once you have confirmation that the work order for setting up your port has been completed, you can create Virtual Circuits with VRF.
If you already have a Dedicated Port, you are able to create a new Virtual Circuit on an existing Dedicated Port with VRF.
- Console
- API
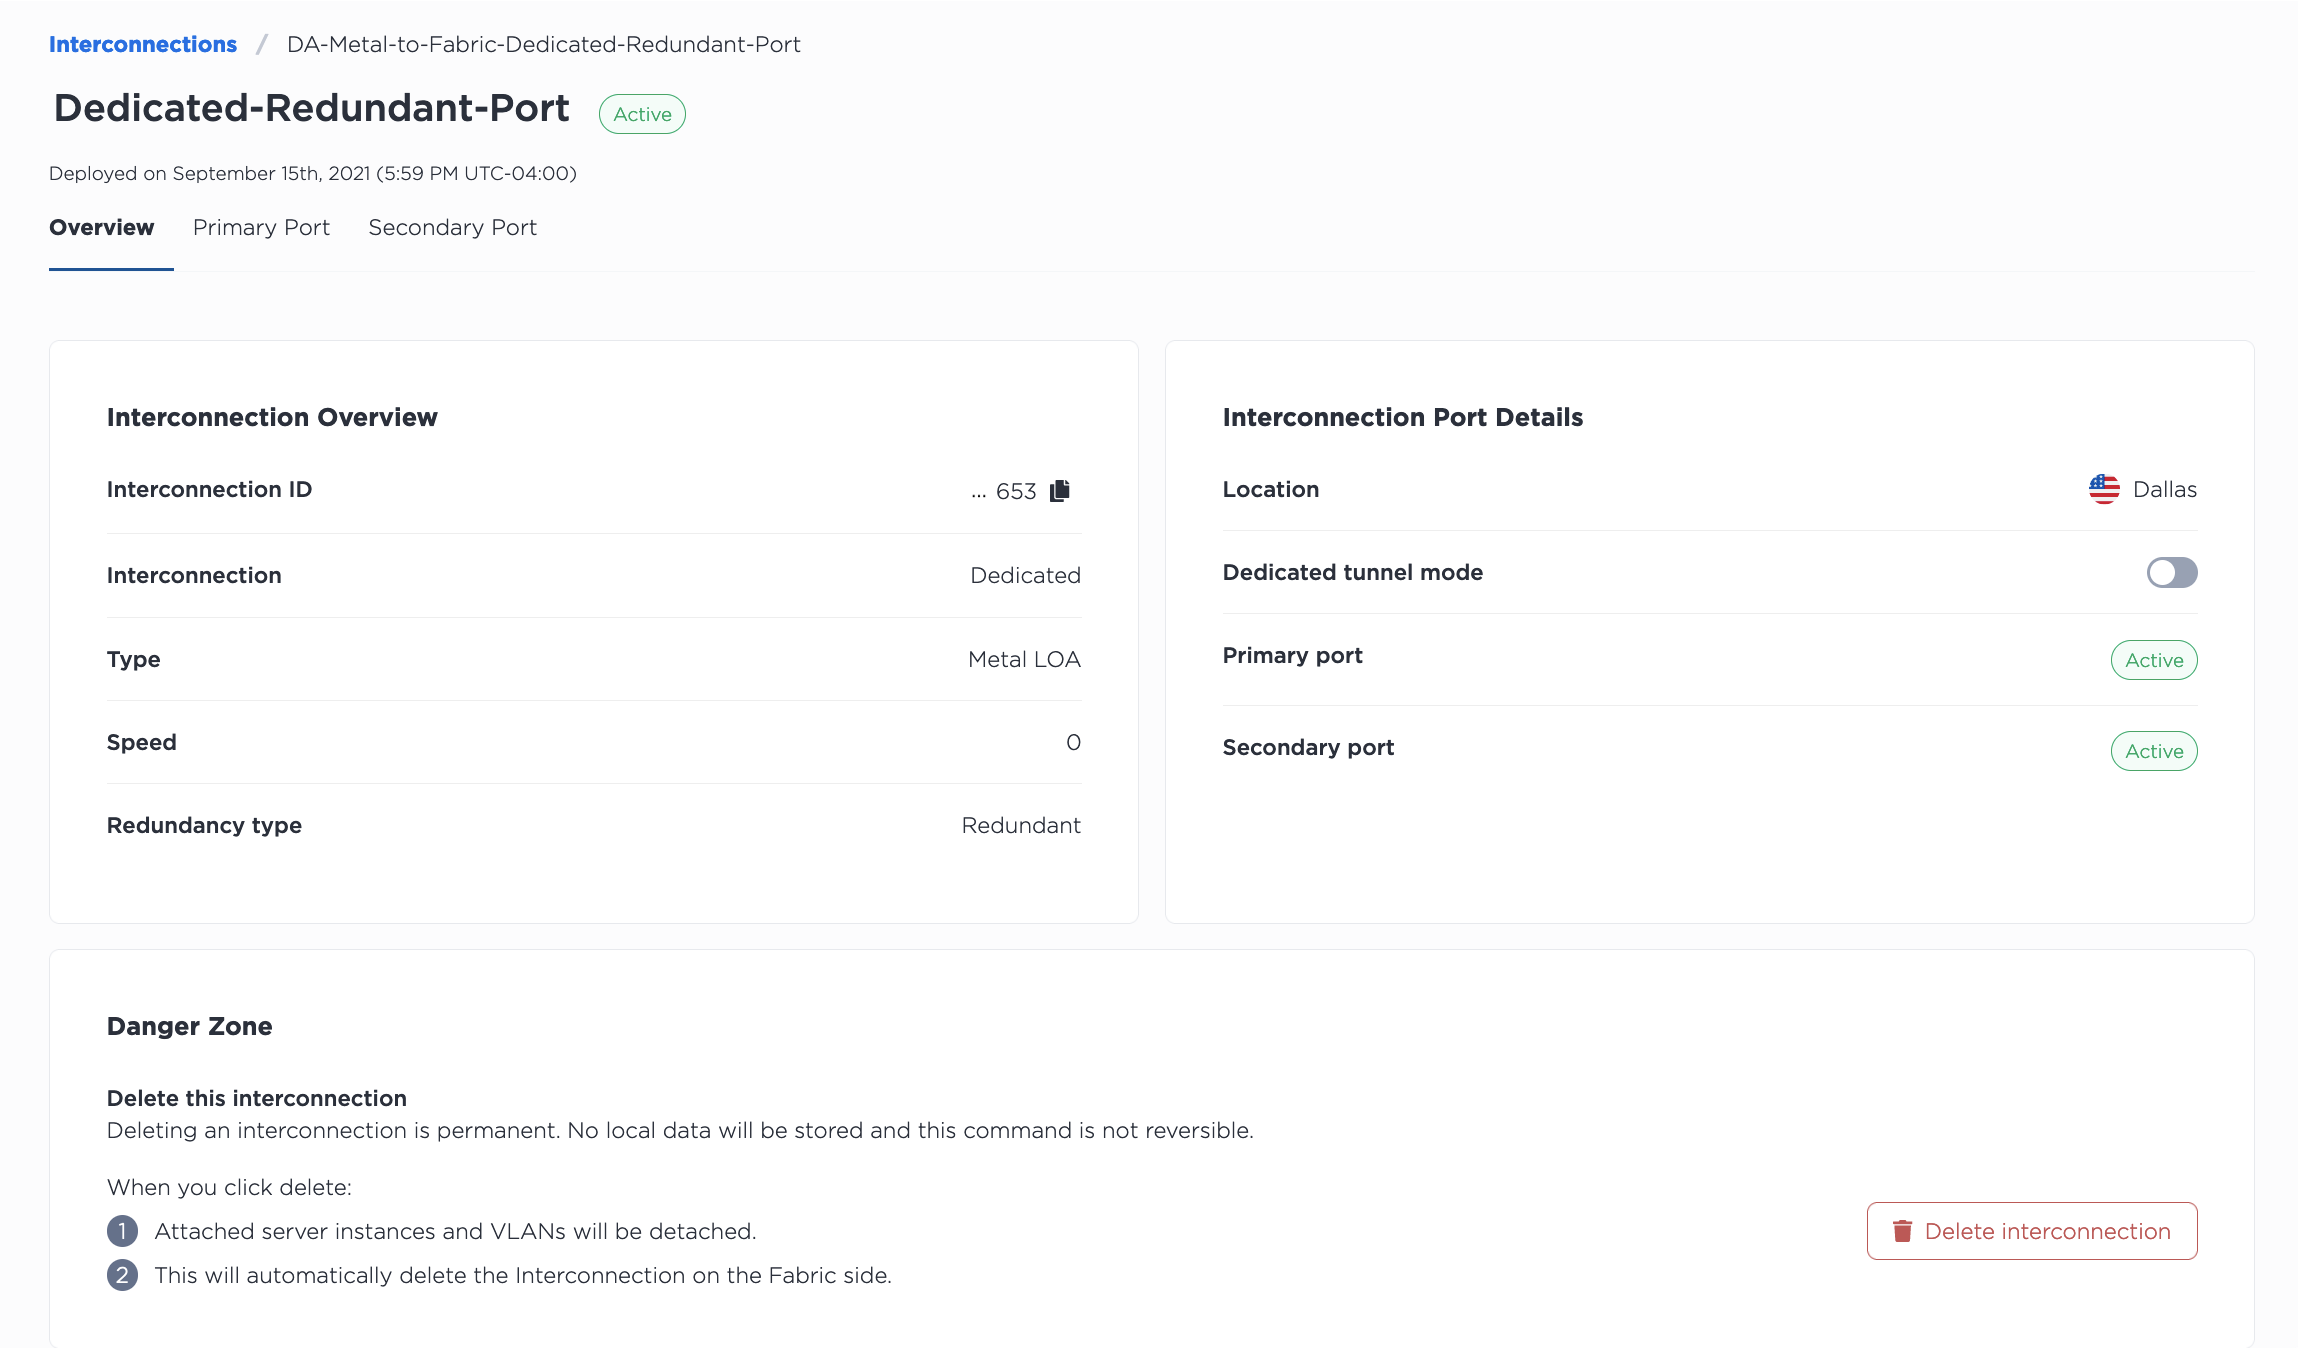
Clicking on a Dedicated Port brings you to its Overview page, which contains a detail view as well as a summary of the primary port and secondary port configurations. A detailed view of the ports is available by clicking the Primary Port and Secondary Port tabs.
From the Primary Port tab, click +Add Virtual Circuit to create a virtual circuit to attach your VRF to. In the Add Virtual Circuit pane, first give it a name, and specify the NNI VLAN ID. Remember, if you are connecting to a destination on Fabric the NNI VLAN has to match the Fabric side.
Next, select VRF.
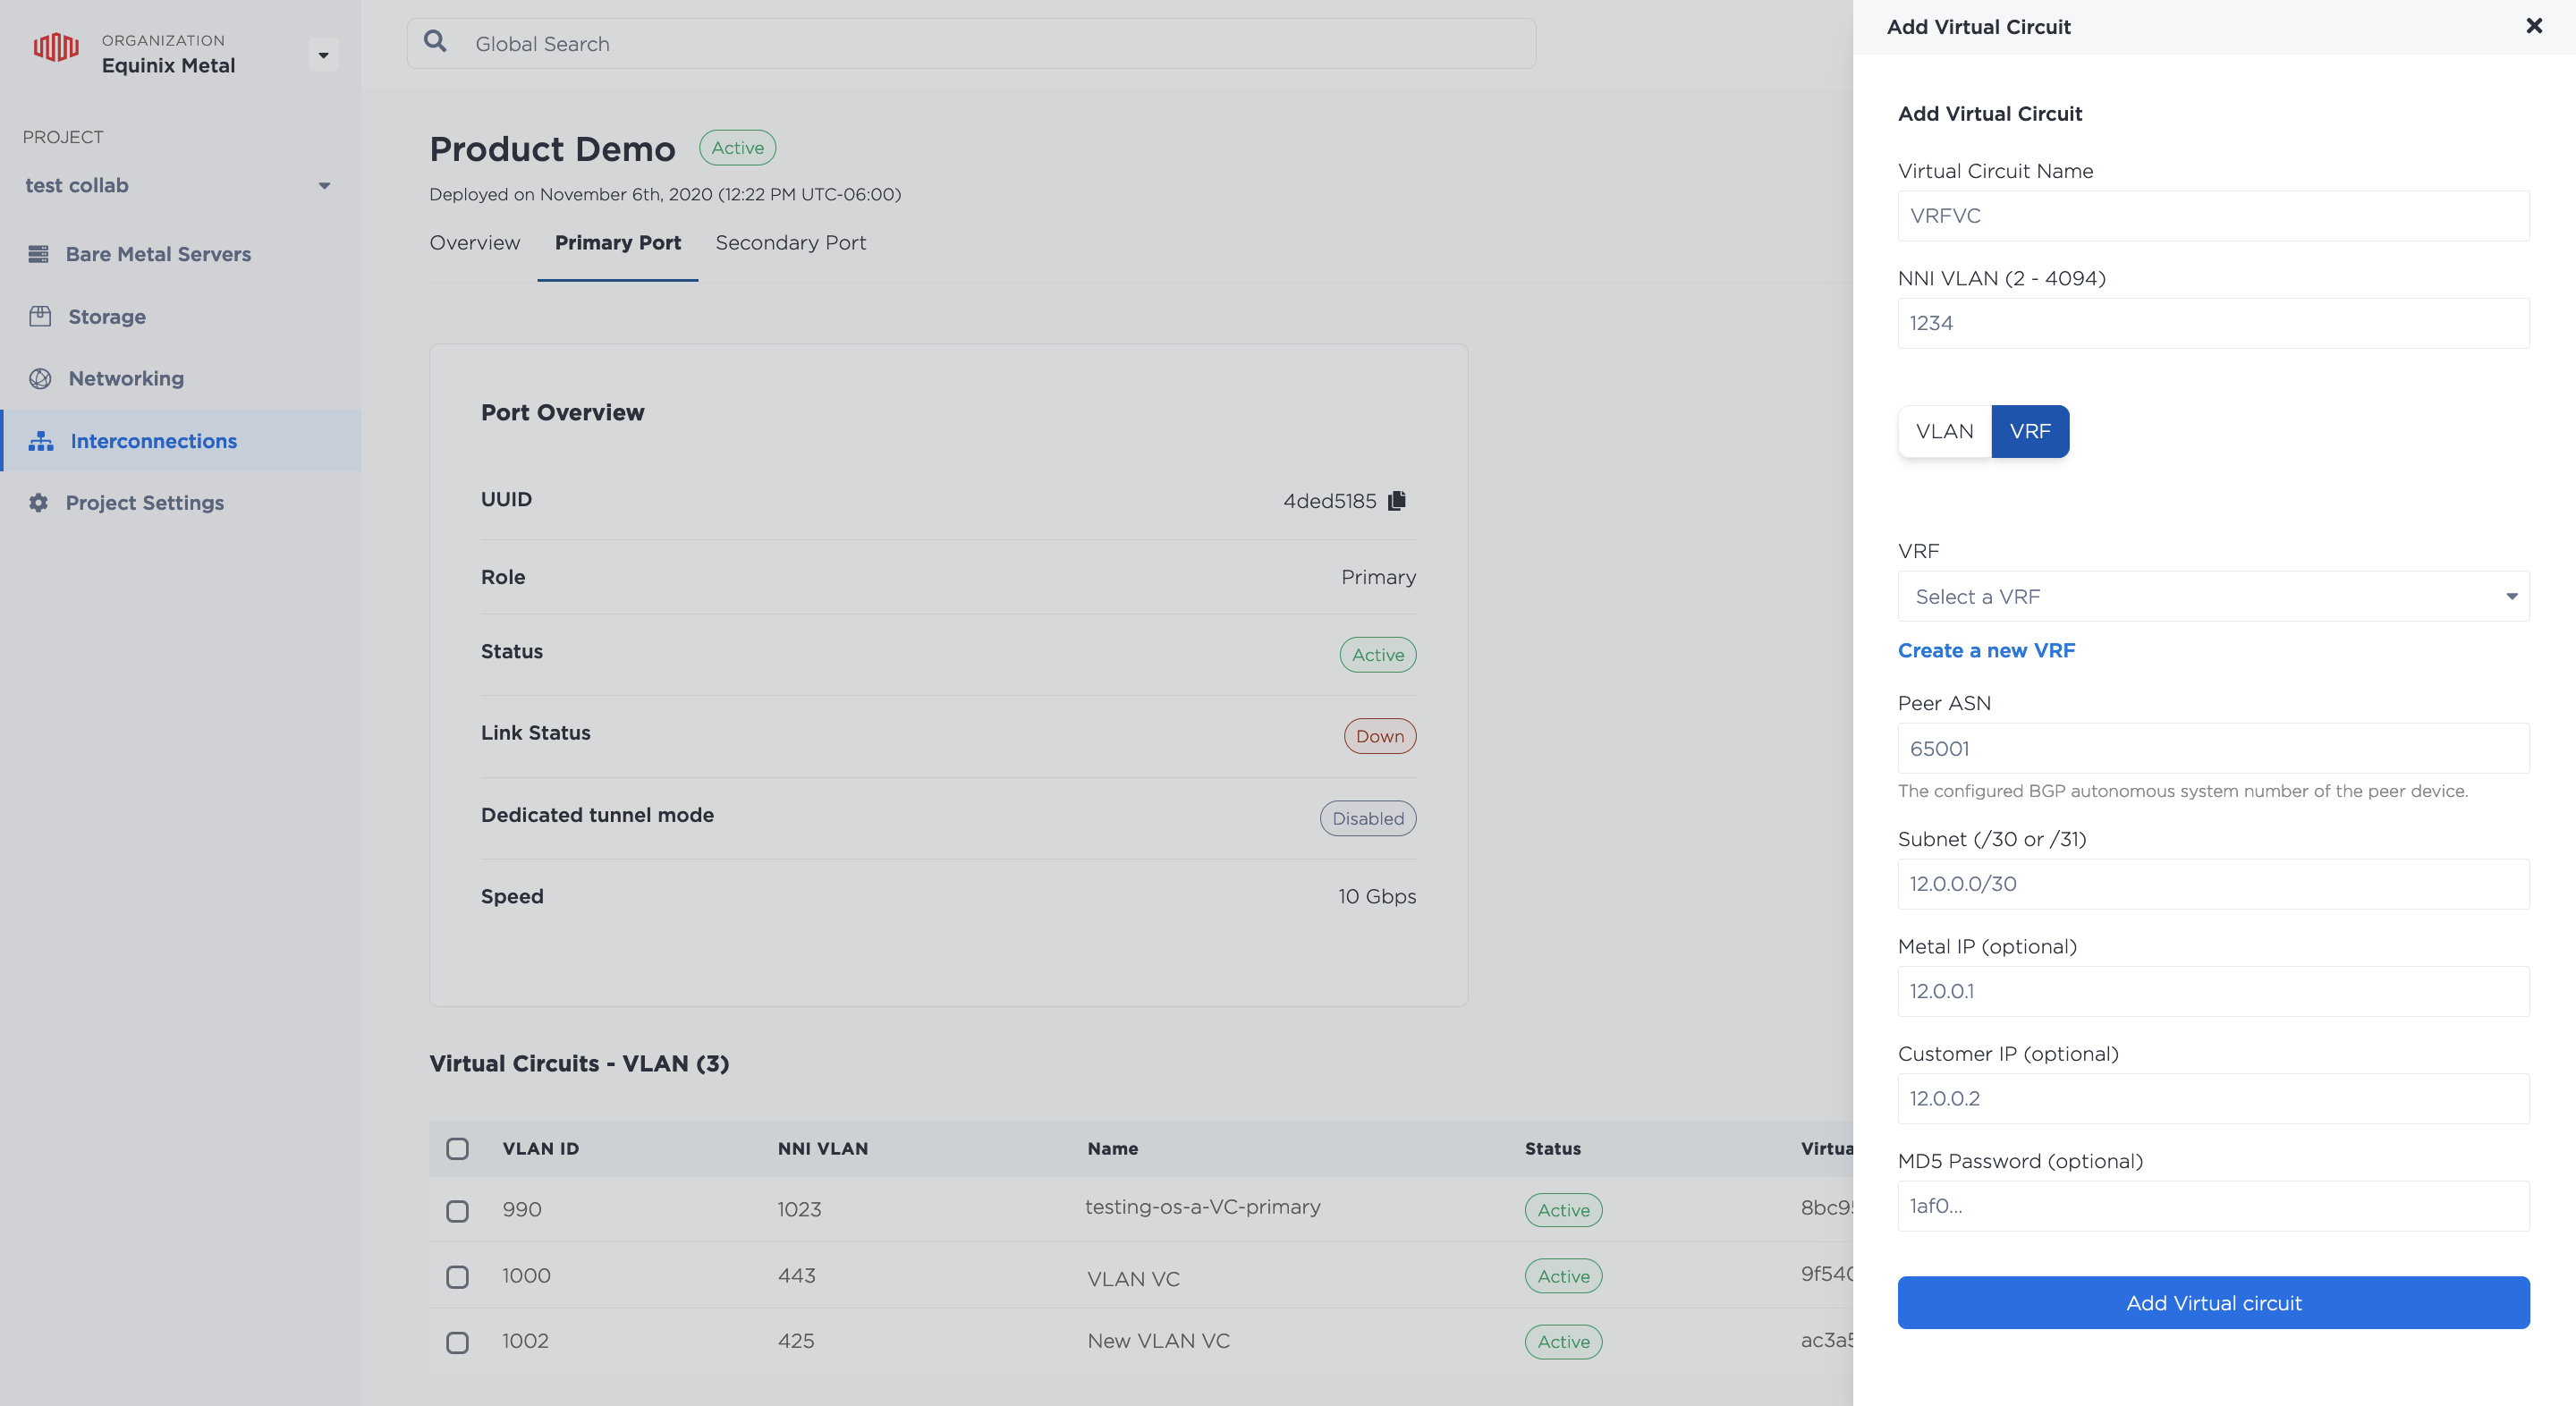
Select the VRF from the dropdown menu to attach to this Virtual Connection, and fill in the requested peering information.
- Peer ASN (required) - The ASN that will be used with the VRF and the remote side of the connection on the Virtual Circuit.
- Subnet (required)
- For IPv4 subnets, the
/30or/31subnet from one of the VRF IP Blocks that is used to address the VRF and the remote side of the Virtual Circuit. The Metal IP and Customer IP are IP addresses from this subnet that you can optionally specify. If not specified, the Metal IP is the last usable IP address in the subnet, and Customer IP is the first usable IP address in the subnet. For/30subnets, the network and broadcast IP addresses cannot be used as the Metal IP or Customer IP. - For IPv6 subnets, the
/126or/127subnet from one of the VRF IP Blocks that is used to address the VRF and the remote side of the Virtual Circuit. The Metal IP and Customer IP are IP addresses from this subnet that you can optionally specify. If not specified, the Metal IP is the last usable IP address in the subnet, and Customer IP is the first usable IP address in the subnet. For/126subnets, the network and broadcast IP addresses cannot be used as the Metal IP or Customer IP.
- For IPv4 subnets, the
- MD5 Password (optional) - Set an optional string MD5 password for the BGP peering in plaintext.
Click Add Virtual Circuit.
If you have redundant ports, repeat this process on the Secondary Port.
To create a new Virtual Circuit with the VRF, Send a POST request to the/connections/{connection_id}/ports/{port_id}/virtual-circuits endpoint, specifying the VRF in the body of the request.
This is where you specify the peering information -- the subnet from the VRF IP address range that will be used to address the VRF and the remote side of the virtual circuit. The IP address reservation for this subnet will be created automatically.
If you are using IPv4 subnets, use the "subnet", "metal_ip", and "customer_ip" body parameters
curl -X POST \
-H "Content-Type: application/json" \
-H "X-Auth-Token: <API_TOKEN>" \
"https://api.equinix.com/metal/v1/connections/{connection_id}/ports/{port_id}/virtual-circuits" \
-d '{
    "project_id": "<UUID>",
    "name": "<string>",
    "description": "<string>",
    "subnet": "<subnet>",
    "customer_ip": "<ip_address>",
    "metal_ip": "<ip_address>",
    "nni_vlan": <integer>,
    "peer_asn": <integer>,
    "md5": "<string>",
    "vrf": "<UUID>"
}'
Body Parameters:
"project_id"(required) - The Project ID where the Dedicated Port and this Virtual Circuit lives."name"- A name for this Virtual Circuit."description"- An optional friendly description of the Virtual Circuit."subnet"(required) - A/30or/31subnet from a VRF IP address range that will be used with the VRF for the Virtual Circuit. If specified,metal_ipandcustomer_ipmust be from this subnet. For/30subnets, the network and broadcast IPs cannot be used as themetal_iporcustomer_ip. The subnet specified must be contained within an already-defined IP Range for the VRF."customer_ip"(optional) - An IP address from the subnet that will be used on the remote side of the connection. This parameter is optional, but if supplied, we will use the other usable IP address in the subnet as the Metal IP. By default, the last usable IP address in the subnet will be used."metal_ip"(optional) - An IP address from the subnet that will be used for the VRF on the Metal side. This parameter is optional, but if supplied, we will use the other usable IP address in the subnet as the Customer IP. By default, the first usable IP address in the subnet will be used."nni_vlan"(required) - [ 2 .. 4094 ]. Remember if you are connecting to a destination on Fabric the NNI VLAN has to match the Fabric side."peer_asn"(required) - integer - The peer ASN that will be used with the VRF on the Virtual Circuit."md5"- Optional string or null MD5 password for the BGP peering in plaintext."vrf"(required) - The UUID of the VRF that will be associated with the Virtual Circuit.
If you are using IPv6 subnets, use the "subnet_ipv6", "metal_ipv6", and "customer_ipv6" body parameters
curl -X POST \
-H "Content-Type: application/json" \
-H "X-Auth-Token: <API_TOKEN>" \
"https://api.equinix.com/metal/v1/connections/{connection_id}/ports/{port_id}/virtual-circuits" \
-d '{
    "project_id": "<UUID>",
    "name": "<string>",
    "description": "<string>",
    "subnet_ipv6": "<subnet>",
    "customer_ipv6": "<ip_address>",
    "metal_ipv6": "<ip_address>",
    "nni_vlan": <integer>,
    "peer_asn": <integer>,
    "md5": "<string>",
    "vrf": "<UUID>"
}'
Body Parameters:
"project_id"(required) - The Project ID where the Dedicated Port and this Virtual Circuit lives."name"- A name for this Virtual Circuit."description"- An optional friendly description of the Virtual Circuit."subnet"- The/126or/127IPv6 subnet from a VRF IP Block that will be used with the VRF for the Virtual Circuit. Themetal_ipv6andcustomer_ipv6must be IP addresses from this subnet. For/126subnets, the network and broadcast IP addresses cannot be used as themetal_ipv6orcustomer_ipv6."customer_ipv6"(optional) - An IP address from the subnet that will be used on the remote side of the connection. This parameter is optional, but if supplied, we will use the other usable IP address in the subnet as themetal_ipv6. By default, the last usable IP address in the subnet will be used."metal_ipv6"(optional) - An IP address from the subnet that will be used for the VRF on the Metal side. This parameter is optional, but if supplied, we will use the other usable IP address in the subnet as thecustomer_ipv6. By default, the first usable IP address in the subnet will be used."nni_vlan"(required) - [ 2 .. 4094 ]. Remember if you are connecting to a destination on Fabric the NNI VLAN has to match the Fabric side."peer_asn"(required) - integer - The peer ASN that will be used with the VRF on the Virtual Circuit."md5"- Optional string or null MD5 password for the BGP peering in plaintext."vrf"(required) - The UUID of the VRF that will be associated with the Virtual Circuit.
A complete list of the components for a virtual circuit is available in the API Reference.
Unlike when you create a virtual circuit that is not associated with VRFs, you do not have to go back to associate a virtual network to the virtual circuit; the one connected to the VRF's Metal Gateway will be associated automatically.
Once the configuration of the VC is complete, the status of the virtual circuit turns to Active.
Managing VRF on an Interconnection
- Console
- API
You can manage a VRF's peering details on a Fabric VCs or a Dedicated Port VC from the VC's Primary Port or Secondary Port tabs. VRFs are listed in the Virtual Circuits - VRF section. Click on the three-bar menu to open the Manage Peering Details pane.
Fill in the fields with the new peering information and click Update Virtual Circuit.
To update a VRF's peering details on a Fabric VCs or a Dedicated Port VC, send a PUT request to the /virtual-circuits/{id} endpoint. Use the fields you would like to update in the body of the request. All fields are optional, so they can be updated independently.
curl -X PUT \
-H "Content-Type: application/json" \
-H "X-Auth-Token: <API_TOKEN>" \
"https://api.equinix.com/metal/v1/virtual-circuits/{id}" \
-d '{
    "name": "<string>",
    "description": "<string>",
    "subnet": "<subnet>",
    "customer_ip": "<ip_address>",
    "metal_ip": "<ip_address>",
    "peer_asn": <integer>,
    "md5": "<string>"
}'