vApps & VMs
A vApp can be defined as a set of virtual machines of a certain application of environment, facilitating the management and operation of VMs and rules required for their management.
Create a vAPP
-
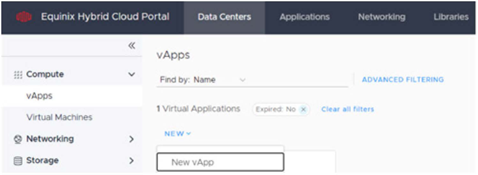
On the main screen, select the desired virtual Data Center: Dedicated, Flex, or On-Demand.
-
On the next screen, open vApps and select New -> New vApp.
-
Enter a name for the new vApp. You can also add a description, and select Power On.
VMs can also be created at this point.
-
Click Create.
The newly created vApp is now shown in the list of vApps.

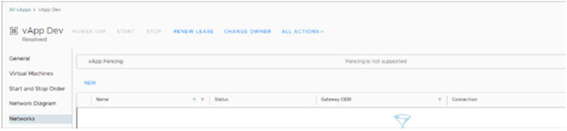
Associate a Network with the vAPP
-
Access the created vAPP, and click the submenu Networks.
-
On the dashboard to the right, click New.
-
On the new window, select OrgVDC Network, choose the desired network, and click ADD.

Network Interface Cards (NICs)
To add new interfaces to a virtual machine, follow the detailed steps below:
In the vAPP:
Make sure the new network is associated with the vAPP where the virtual machine is allocated. If in doubt, refer to the section “Associating a new network to the vAPP” as described in this manual.
In the VM:
- Navigate to “Applications” → “Virtual Machines” and click on the VM related to the vAPP where the new network was added.
- In the properties of the selected VM, go to the submenu “Hardware” → “NICs” and, in the right panel, click “Edit”.
- In the “Edit NICs for VM-Name” window, click the “NEW” button and select the properties of the new interface and the network associated with the vAPP for use.
- Click “SAVE” and wait for the new NIC to be added.
- Preferably select the network adapter type “VMXNET3”, ensuring throughput of up to 10Gbps for the new network connection.
- There is a limit of 10 interfaces per VM.
Create a VM Instance
When choosing an image, note that the catalog includes the current OS version and two previous versions.
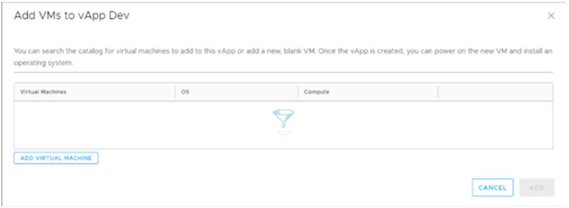
In the vApp example vApp Dev, open Virtual Machines.
-
On the dashboard to the right, click ALL ACTIONS -> Add -> Add VM.
-
Click ADD VIRTUAL MACHINE.
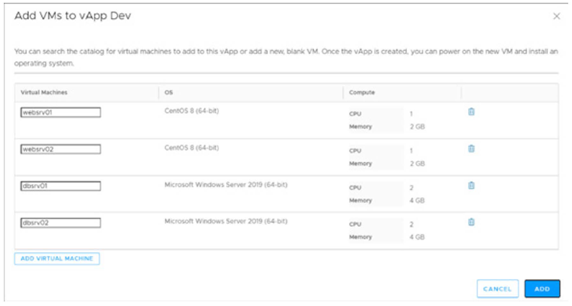
NEW VM Name Enter the name of the virtual machine. Compute Name Enter the Hostname to be configured in the Guest O.S. upon deployment. Description Optional. Type Select From Template. The New option allows configuring custom templates. However, Equinix is not responsible for its use and does not support virtual machines customized by customers, where unsupported size options and legacy operating systems may be selected. Templates Select the desired template to deploy the new VM. New templates can be created based on the templates provided by Equinix or based on VMs already in production by the user. However, the user must enable and provide a private local catalog through its storage quota. Storage Storage Policy The VM O.S. disk is provided through the EHC-$VDC-VHD policy by default, since this is the standard storage to deliver the boot disk of virtual machines within the Hybrid Cloud structure. Operating system disk size limit
The operating system disk of a virtual machine can be expanded through the Equinix Hybrid Cloud Portal up to a maximum supported size of 120 GB. For storage requirements beyond this limit, attach additional data volumes using the Managed Storage service.
noteDefault OS disk sizes: 100 GB for Windows and 60 GB for Linux. These are the minimum sizes required by our management guidelines.
NICS NicO Select the Connected option. Preferably select the VMXNET3 adapter type to ensure a throughput of up to 10Gbps. Network – Select the desired network. IP Mode – Use the “Static IP Pool” option. Compute Placement Policy This defines where the user’s workload will run. It is available only in the Dedicated VDC, where the user’s virtual machines run in exclusive compute nodes. Sizing Policy This is also known as Flavors, defined according to the type of cluster selected to meet the user’s workload. It controls the delivery of capabilities, and the relationship with the Hybrid Cloud Infrastructure. -
After adding the VMs, select ADD and await the deployment. We recommend using up to 5 VMs at a time.
List VM Instances
To view the list of virtual machines, select Applications -> Virtual Machines.
A list of all VM Instances created will appear. Select one to view its details.
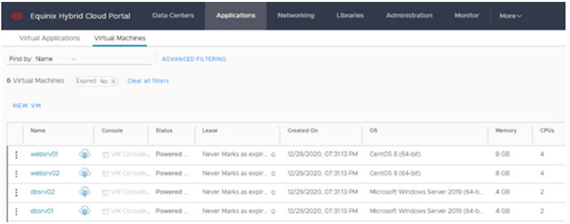
Virtual Applications enables viewing vApps, and lists a set of the virtual machines used by a certain application or environment.
Delete a VM Instance
-
Access Applications -> Virtual Machines.
-
In the list of virtual machines, select the desired VM, and click the menu ALL ACTIONS -> Delete.

Tip: To select multiple VMs to delete, use Multiselect / Select all.
Important: The Delete process is irreversible. Before deleting, confirm the removal process and check if there is a backup of information and its integrity.
Customize the Guest Operating System
After creating the virtual machines, the next step is to customize the Guest OS, entering a password for the administrator user, host-name and other settings that are supported according to the current system during the first boot.
The user is root for Linux operating systems and administrator for Windows.
The default password for both cases can be generated as detailed below:
-
Ensure the VM is turned off.
-
Open the VM properties.
-
Select the submenu Guest OS Customization and click EDIT on the panel to the right.
-
In the Edit Guest Properties window, select Allow local administrator password to enter a temporary password, or use the password randomly generated through Auto generate password.
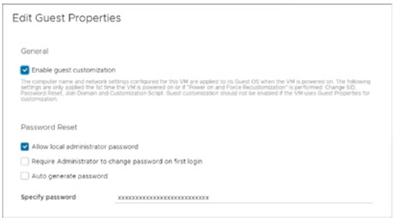
-
Click SAVE.
-
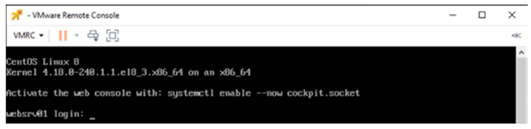
Start the virtual machine and validate the new password on the console.
During the first startup of a virtual machine, access to the operating system console may take approximately three minutes. This delay is expected while automated customization scripts run to apply initial configuration settings, including the operating system hostname and the root or administrator password. Console access becomes available after these initialization tasks are completed.
If customization does not complete successfully or the virtual machine becomes unsynchronized, you can use the Power On, Force Recustomization option from All Actions -> Power to rerun the customization process.
Access the Console
There are two options in the EHC portal to access a VM’s console. The first is based on the Web Console format, with basic features and no installation prerequisites. The second option requires the installation of the Remote Console software from VMware, providing additional features when using the console.
Follow the steps below to access the console:
-
Ensure the VM is turned on.
-
Open the VM properties.
-
Click the desired option LAUNCH WEB CONSOLE or LAUNCH REMOTE CONSOLE.

The VMware Remote console software can be downloaded through the link available in the menu All Actions -> VM Console -> Download VMware Remote Console.
Note: In some specific situations or browsers, the web console may halt when opened for the second time. It is recommended to clean the cache by pressing Shift+F5 or using the remote console.
Customize Virtual Hardware
- To customize the hardware of a VM, go to Applications -> Virtual Machines, and select the desired VM to open the properties.
- On the Hardware menu to the left, go to the submenus.
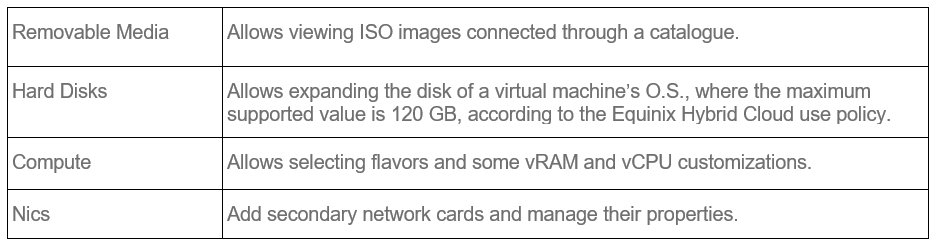
Note: Some customizations can only be made while the virtual machine is off (Power Off).
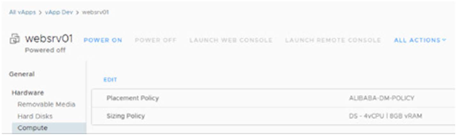
Compute
These steps detail how to change flavors in virtual machines. However, due to a limitation in the permissions policy of the Equinix Hybrid Cloud Portal, this action can only be performed by the Equinix support team upon request via ticket.
-
To change the sizing of a VM, go to Applications -> Virtual Machines, and select the desired VM to open the properties.
-
Make sure the virtual machine is in Power off status.
-
Go to the submenu Hardware -> Compute and select Edit.
-
In the next window, identify the new flavor of Sizing Policy and click DISCARD.
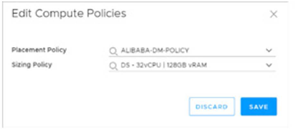
Note: The sizes (flavors) available may vary according to the contracted product.
-
Next, request the change to the Equinix support team via ticket, informing the name of the VM and the desired sizing.
Network Interface Cards (NICs)
Follow the steps below to add new interfaces to a virtual machine.
In vAPP:
Ensure the new network is associated with the vAPP where the virtual machine is allocated.
In VM:
-
Go to Applications -> Virtual Machines and click the VM associated to the vAPP where the new network has been added.
-
In the new VM’s properties, open the submenu Hardware -> NICs and click Edit on the panel to the right.
-
In the window Edit NICs for VM-Name, click NEW and select the properties of the new interface and network associated with the vAPP to be used.
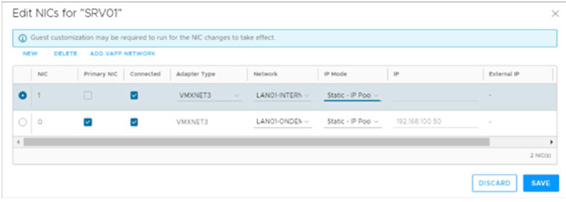
Note: Preferably select the VMXNET3 network adapter type, ensuring a throughput of up to 10 Gbps for the new network connection.
-
Click SAVE and wait for the new NIC to be added.