Data Volumes
To handle data volumes, go to the Dedicated, Flex, or On-Demand VDC from the main menu of Data Centers, and select the submenu Storage, Named Disks.

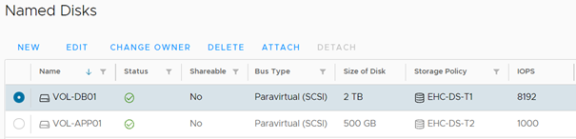
The next screen shows all existing volumes for the selected VDC.
Managing Data Volumes
To manage data volumes, navigate to the Dedicated, Flex, or On-Demand VDC through the main menu “Data Centers”, and select the submenu “Storage, Named Disks”. On the screen that opens, you can view all existing volumes of the previously selected VDC.
Storage Policies
The submenu Storage -> Storage Policies shows the storage policies that determine the space quota available, and the assured IOPS delivery based on the contracted Tier, which may vary between I, II, and III.
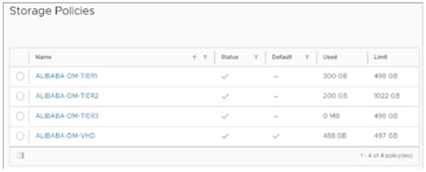
Storage policies define where the operating system disk and/or data volumes are stored and the performance they deliver (IOPS), based on the Managed Storage Tier I, II, or III contracted for your environment.
Maximum supported limits (per disk/volume):
- VHD (OS boot, snapshots, local catalog) – up to 100 GiB (recommended for OS disks)
- Managed Storage Tier I – up to 8 TiB
- Managed Storage Tier II – up to 8 TiB
- Managed Storage Tier III – up to 8 TiB
| Product | Storage Policy | Usage Recommendation | Solution Technology | IOPS per GB Ratio | Maximum Disk Size |
|---|---|---|---|---|---|
| VHD | EHC‑VDC‑Type‑vHD | OS Disk (Boot), Snapshots, Local Image/Template Catalog | SSD/HDD (Auto‑tier) | Auto Tier | 100 GiB |
| Managed Storage Tier I | EHC‑VDC‑Type‑T1 | Databases and performance‑sensitive apps | NVMe | Up to 9 | 8 TiB |
| Managed Storage Tier II | EHC‑VDC‑Type‑T2 | Databases and general apps | SSD | Up to 4 | 8 TiB |
| Managed Storage Tier III | EHC‑VDC‑Type‑T3 | Archive & Backup | HDD | Up to 1 | 8 TiB |
Respect the maximum values above to ensure proper functionality. Exceeding these limits is unsupported. For definitions and contractual limits, see Service Specifications.
Expanding storage beyond the operating system disk
For storage requirements that exceed the operating system disk limits, attach additional high‑performance data volumes using the Equinix Hybrid Cloud Managed Storage solution. Managed Storage supports Tier I, Tier II, and Tier III storage policies. Each data volume can be provisioned up to 8 TB, subject to your contracted storage quota.
Create and Attach Volume
-
In the submenu Storage, Named Disks, click NEW.

Create Named Disk Name Enter the name of the new volume (for example, vol01-app-data). Description (Optional) Enter a description. Storage Policy Defines the storage policy. IOPS The IOPS quota will be defined according to the Tier selected for the new volume based on the contracted storage policy. Size of Disk Enter the size for the new volume, with the maximum limit being the storage policy quota or the Equinix Hybrid Cloud operating limit, stipulated at 8TB per volume. Bus Type SCSI is the default option. Other options must only be used in extreme cases, for legacy operating systems. Bus Sub-Type Preferably select the SCSI Paravirtual option, following the recommendations used to obtain performance levels based on the contracted storage policy. -
Review the information and click SAVE.
-
Wait for the new volume addition task to be completed in Recent Tasks.

-
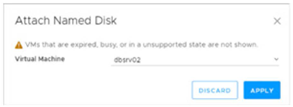
Select the new volume and click ATTACH. In the next window, select the desired virtual machine and click APPLY.
After completing the ATTACH process, follow the required steps in the Guest OS to format and access the new volume.
Detach and Delete Cloud Volume
The process of detaching the data volume can be performed at any time online. However, it is recommended to detach the data volume within the Guest OS to avoid reading and writing operations, and to prevent any data from being damaged.
Detach Cloud Volume
-
Ensure disk accesses are interrupted through the Guest OS or, in extreme cases, turn off the virtual machine to avoid I/O operations.
-
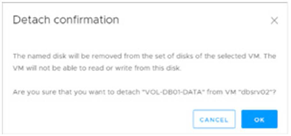
In the submenu Storage, Named Disks, select the desired volume and click Detach. In the displayed window, click OK.
Delete Cloud Volume
Ensure the correct volume is selected and detached, and then click DELETE.
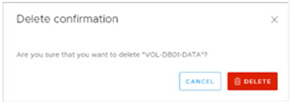
The Delete process is irreversible. Before confirming, affirm the removal process and verify that there is a backup of information and its integrity.