Managing Projects
Your organization’s assets are grouped into projects to give you visibility and control. Selecting a project is a feature of using Equinix Platform (IAM).
Projects store and organize your assets such as virtual devices and connections into logical groups making management of large sets of assets more convenient. When you create a connection or order a device, these new assets will be assigned under that project.
Here are some important definitions:
Project
A project is an entity within the resource hierarchy used to group and manage multiple digital assets. A project is the second last node in the resource hierarchy and is the parent of all digital assets.
Default Project
A default project is created by the system whenever you create a new first level organization. It belongs under the first level organization and can’t be deleted, renamed, or moved anywhere else in the resource hierarchy.
Example Project
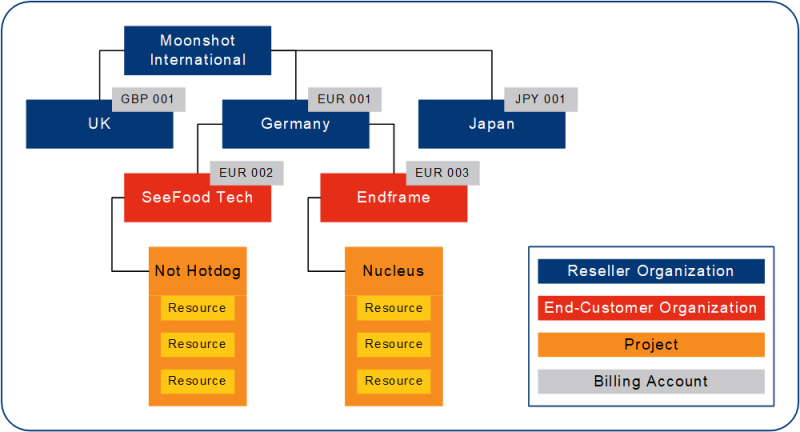
In this example, the reseller has created separate organizations and projects for their end-customers. Each project contains a set of product-specific assets required to carry out a given end-customer commitment.
Creating a Project
To create a project:
- Sign in to the Identity & Access Management portal as a Project Admin user.
- Click Resources.
- Locate the Organization that will host the new organization. From the options menu, select Create Project.
- Enter the Project Name and click Done.
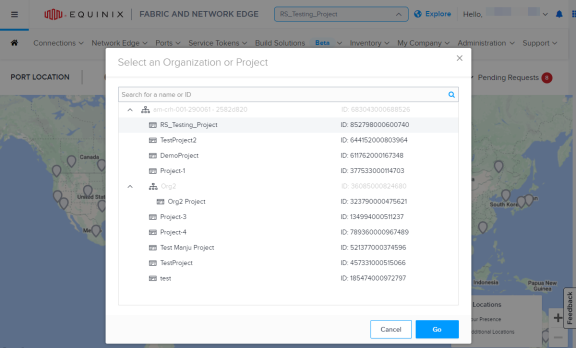
Switching Between Projects
Project switching is available to customers onboarded to Equinix Identity and Access Management.
To switch between projects:
-
Click the Context Switcher drop-down list.
-
Select an organization or a project, then click Go.
To create or edit a project, you must have the correct permissions. If you need help, contact your organization’s Primary Admin, Organization Admin, or Project Admin.
Edit a Project
Update project's name to reflect changes in the project scope or its goals.
To edit a project:
- Sign in to the Identity and Access Management portal as a Project Admin user.
- Click Resources.
- Locate the desired project and from the options menu, select Edit Project.
- Edit the project's name and click Save.
Move a Project
Move projects to reorganize your resource hierarchy structure.
When you move organizations or projects from a source organization to a destination organization, keep in mind that:
- Users and roles assigned directly to the organization or project being moved still have access to it.
- Users and roles inherited from the source organization above the hierarchy no longer have access to it, while users from the destination organizations acquire access and roles through inheritance.
- Billing accounts from the source organization cannot be used to make new orders once the organization or project is moved. New orders can be made using the billing accounts inherited from the destination organization.
- Changing organization or project billing account assignments during the move doesn't affect the invoicing of existing assets.
To move a project:
- Sign in to the Identity and Access Management portal as a Project Admin user.
- Click Resources.
- Locate the desired project and from the options menu, and select Move Project.
- Select the new parent organization and click Done.
Deleting Projects
Delete projects that are no longer relevant and reduce the number of entities in your resource hierarchy structure.
You must move or delete assets assigned to the project before you can delete it.
To delete a project:
- Sign in to the Identity & Access Management portal as a Project Admin user.
- Click Resources.
- Locate the desired project and from the options menu, select Delete Project.
- Click Delete to proceed.