Provisioning with SCIM
System for Cross-domain Identity Management (SCIM) enables automated, secure, and scalable user lifecycle management. By leveraging standardized SCIM APIs, identity providers (IdPs) can create, update, and remove Equinix user accounts, eliminating manual provisioning and ensuring consistent, up-to-date access across systems.
When enabled, SCIM-based provisioning replaces manual user profile management via Federated SSO with standardized API automation. Identity providers (IdPs) automatically create, update, and remove Equinix user accounts using SCIM APIs. Authentication continues to be handled by the IdP via SAML or OIDC.
SCIM Provisioning Flow
To enable user provisioning via SCIM API calls:
-
In the Customer Portal, go to the Administration menu and select Account and Security Management.
noteThe Administration menu is visible only to Administrators.
-
Click Federated Single Sign-On to view the Federation details screen. Alternatively, you can go to https://federation.equinix.com/.
-
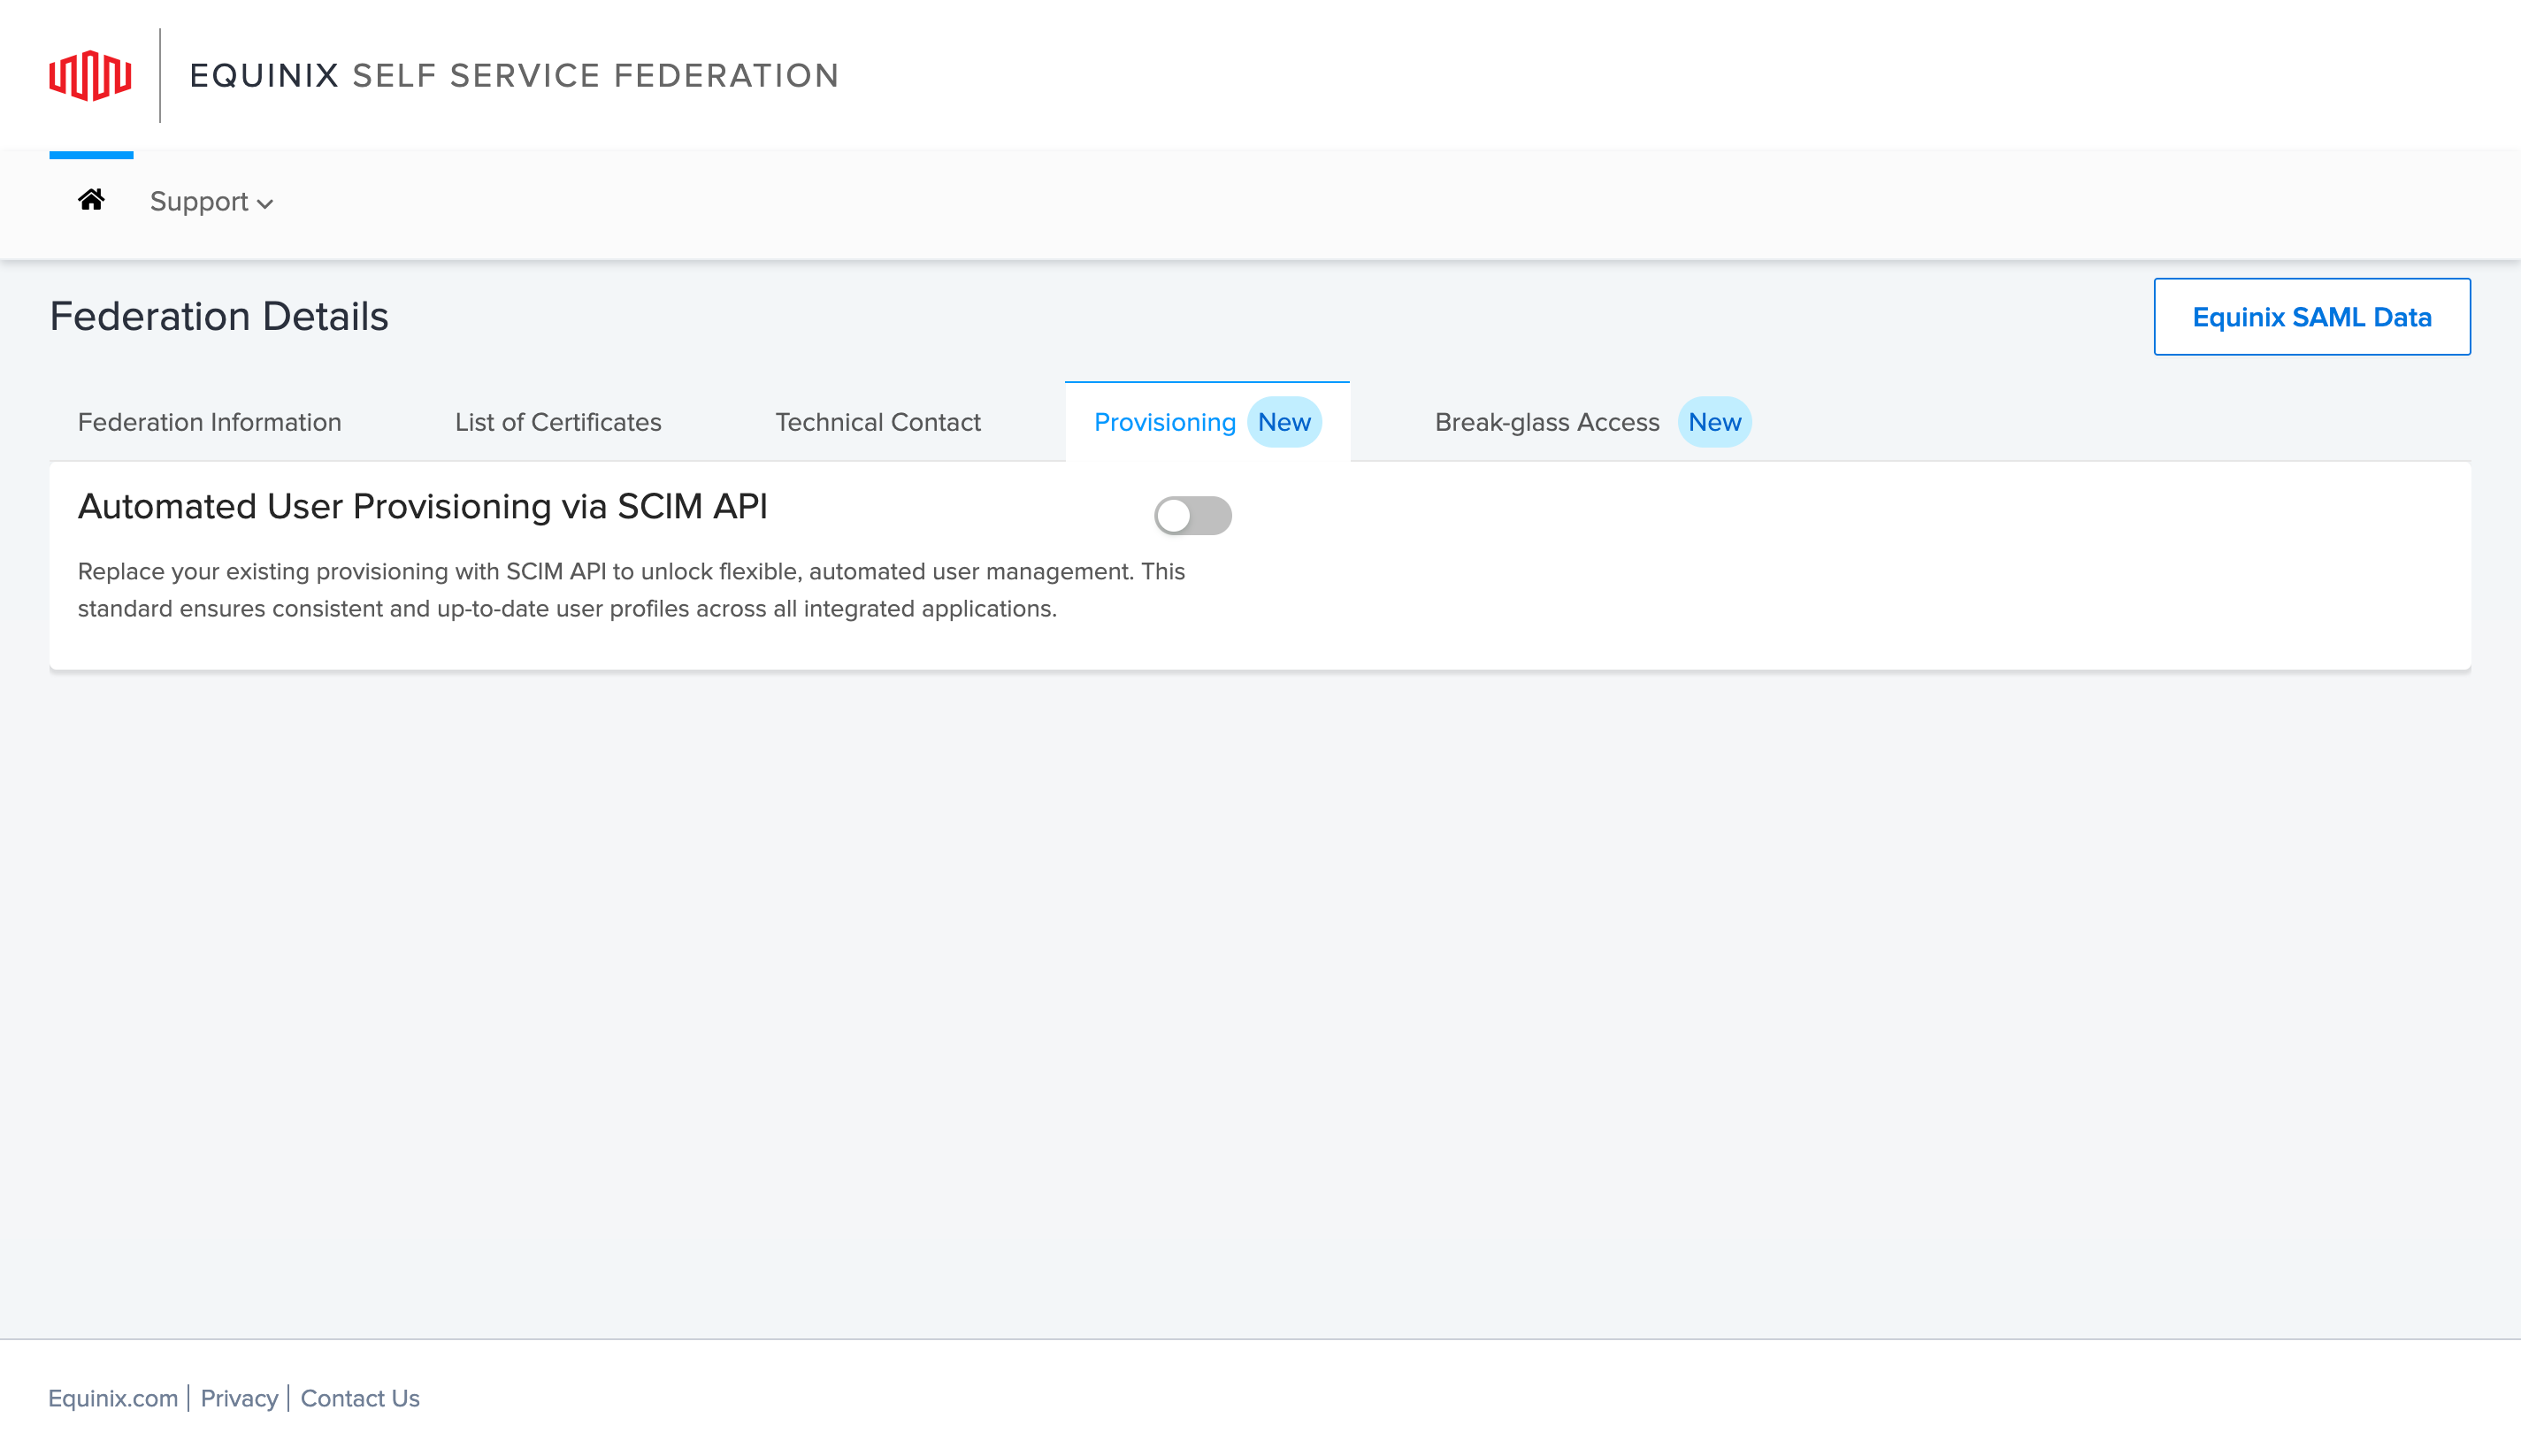
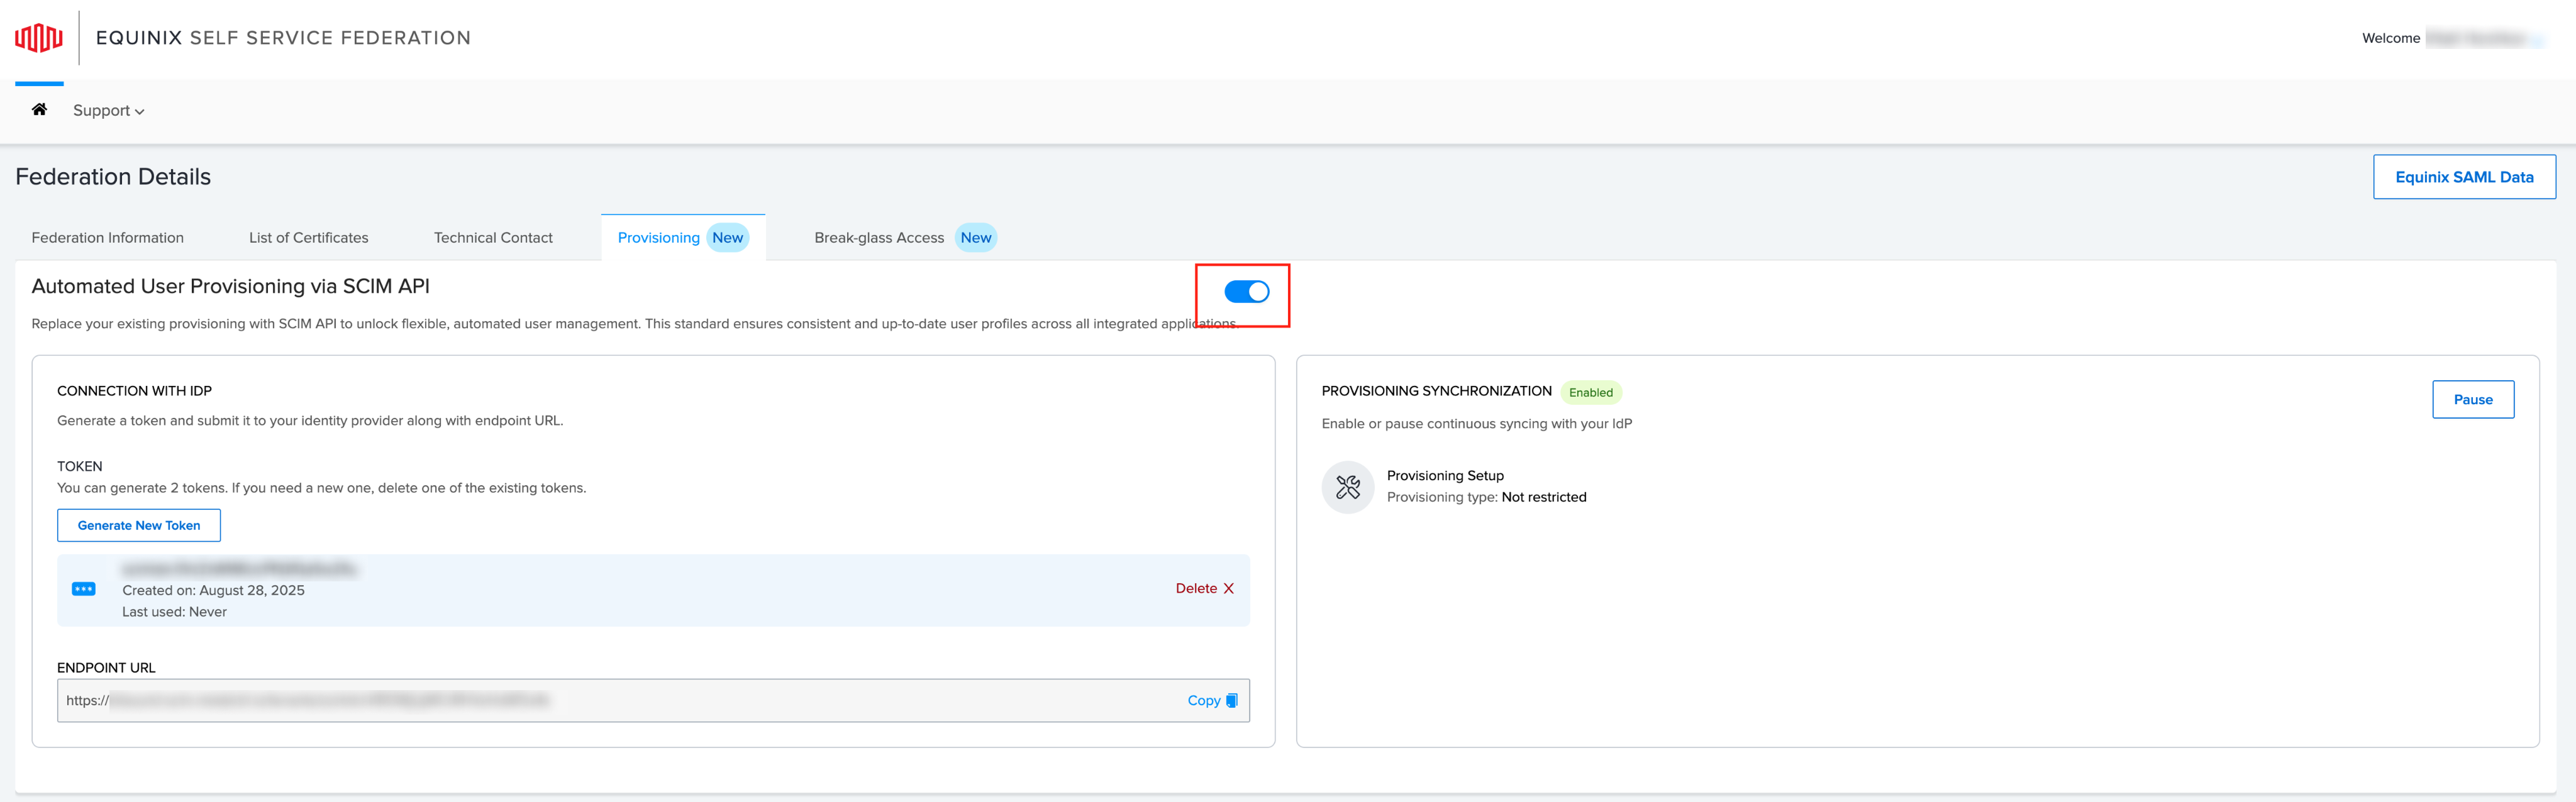
Select the Provisioning tab. This option will be available if you have successfully set up a federated connection and logged in using federated authentication.
-
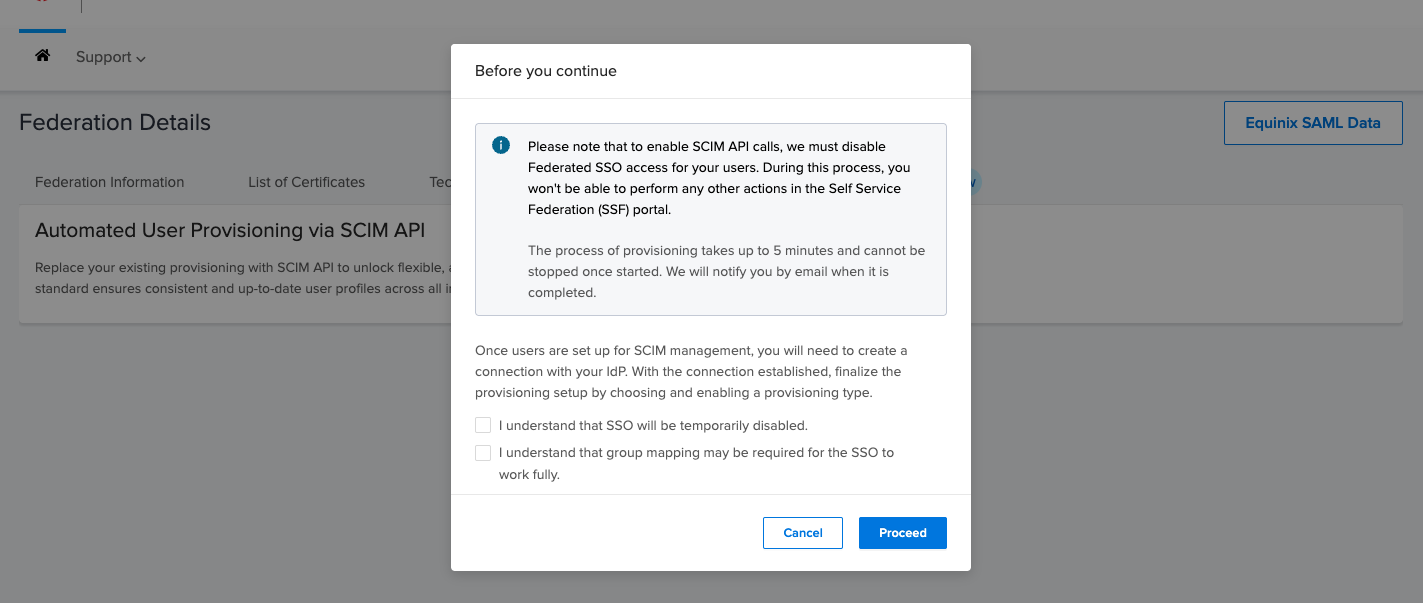
Click the toggle to enable SCIM API for provisioning user profiles. Enabling SCIM API calls will disable Federated SSO access for your users. During this process, no other actions can be performed in the Self-Service Federation (SSF) portal.
-
The processing time may take up to 5 minutes, depending on the number of users in your organization. Once automatic provisioning is successfully enabled, you can proceed to set up the SCIM API.
-
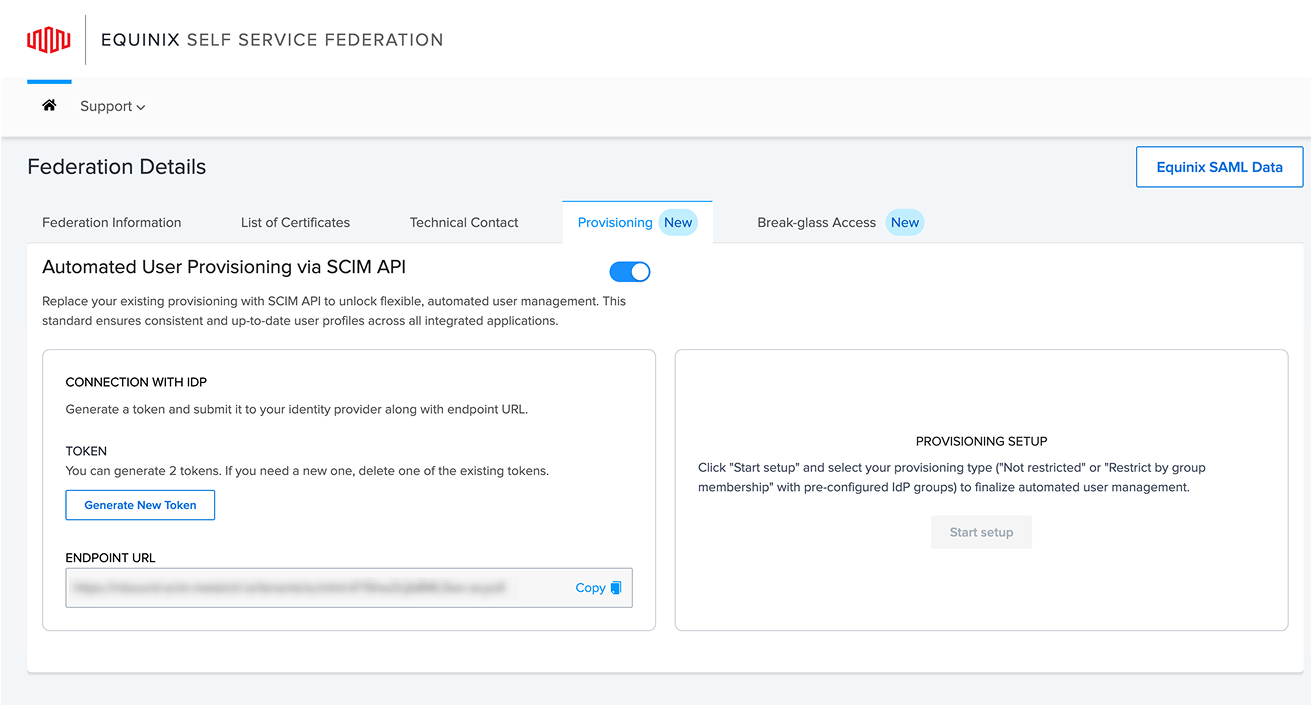
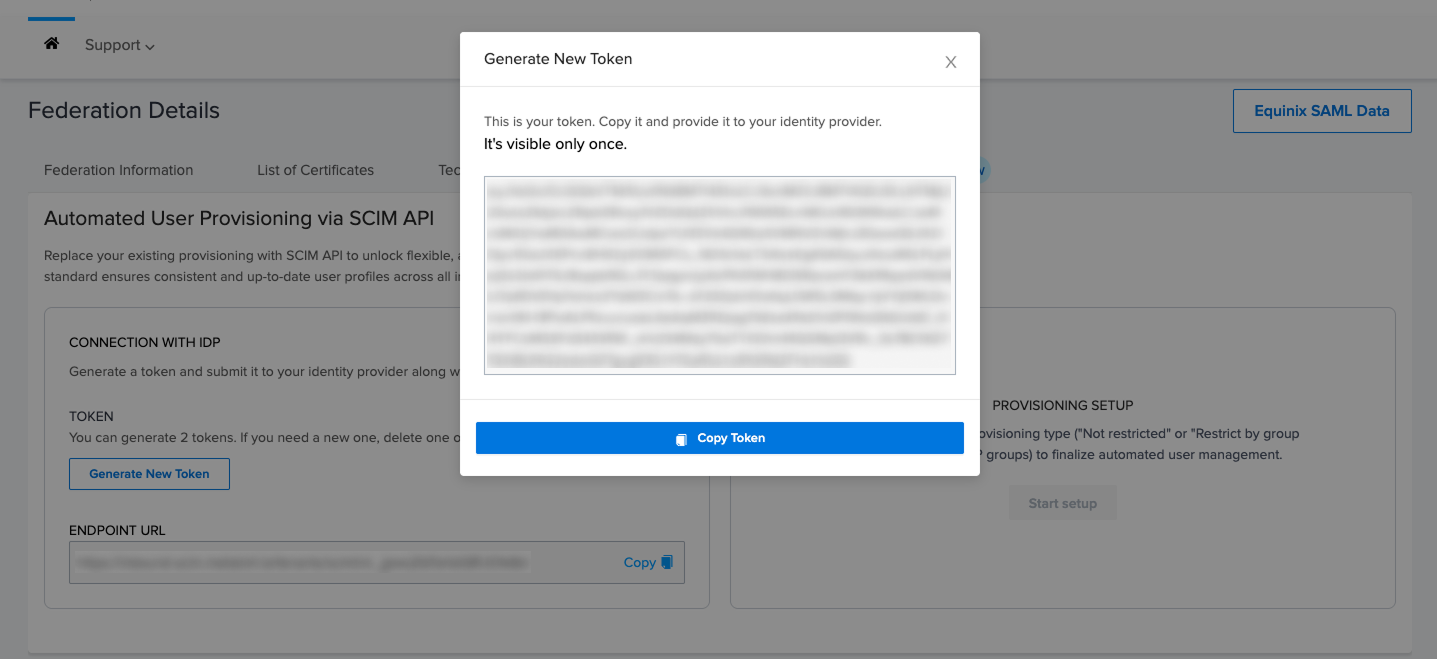
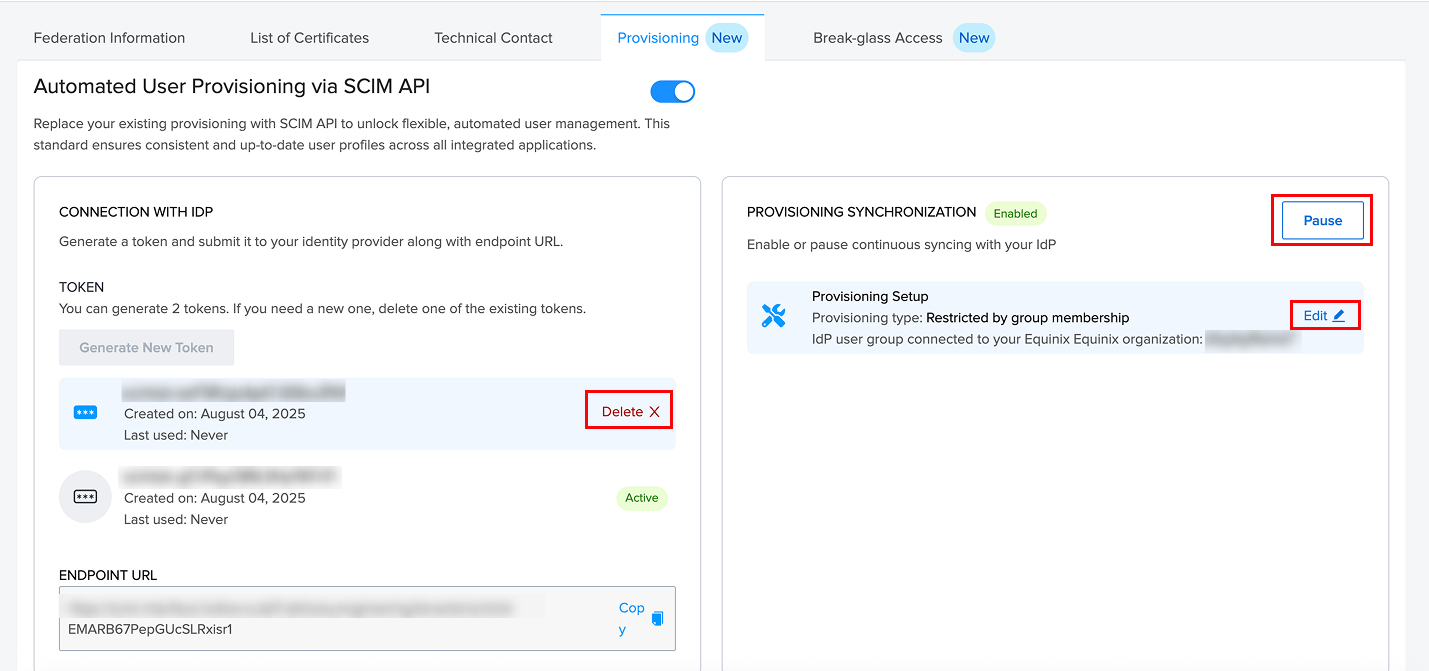
To generate a token for SCIM API access, click Generate New Token. You can have up to two tokens at a time. If you need a new one, delete an existing token first. Submit the generated token along with the Endpoint URL to your identity provider (IdP) to establish the connection.
-
Token details will be displayed. Copy and save the token in a secure location. You will need the token in order access the API endpoint.
 note
noteThis is the only time token details will be displayed. If you lose the token, you will need to delete an existing token and regenerate a new one.
-
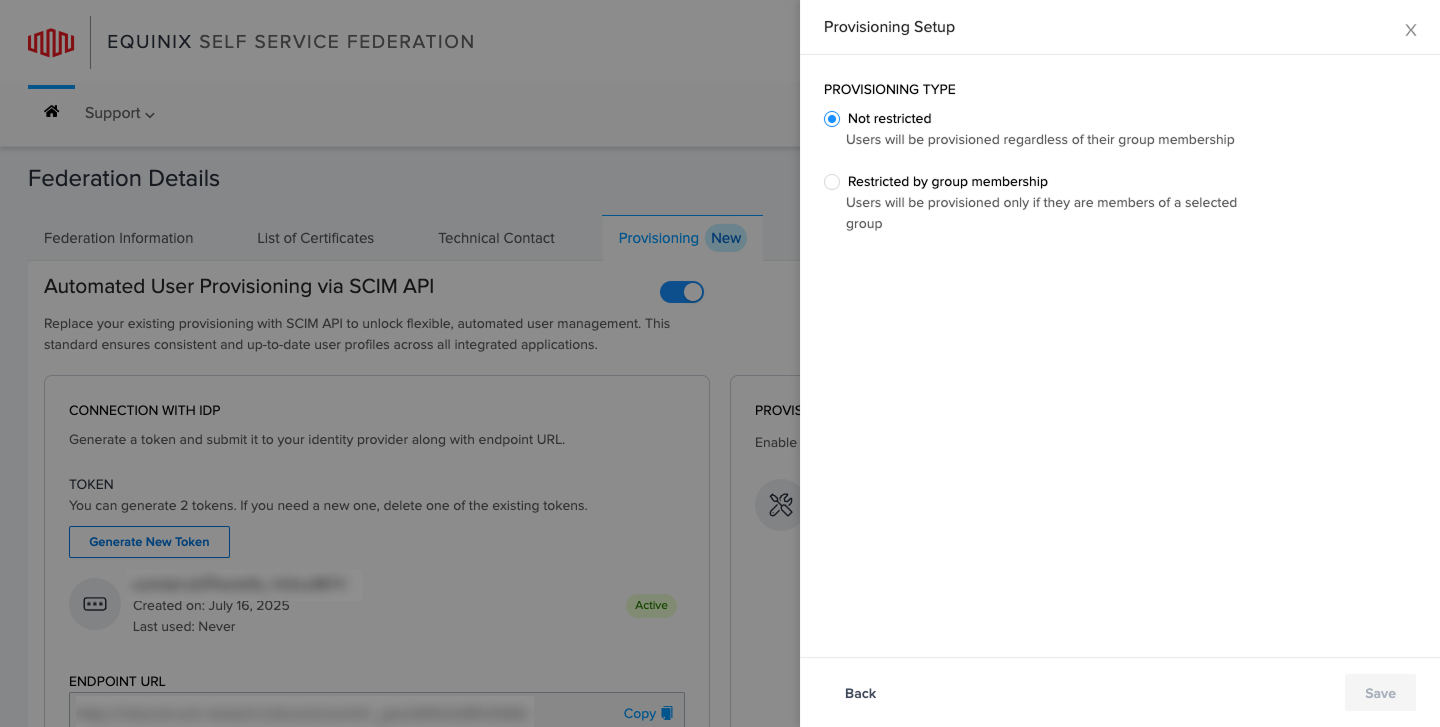
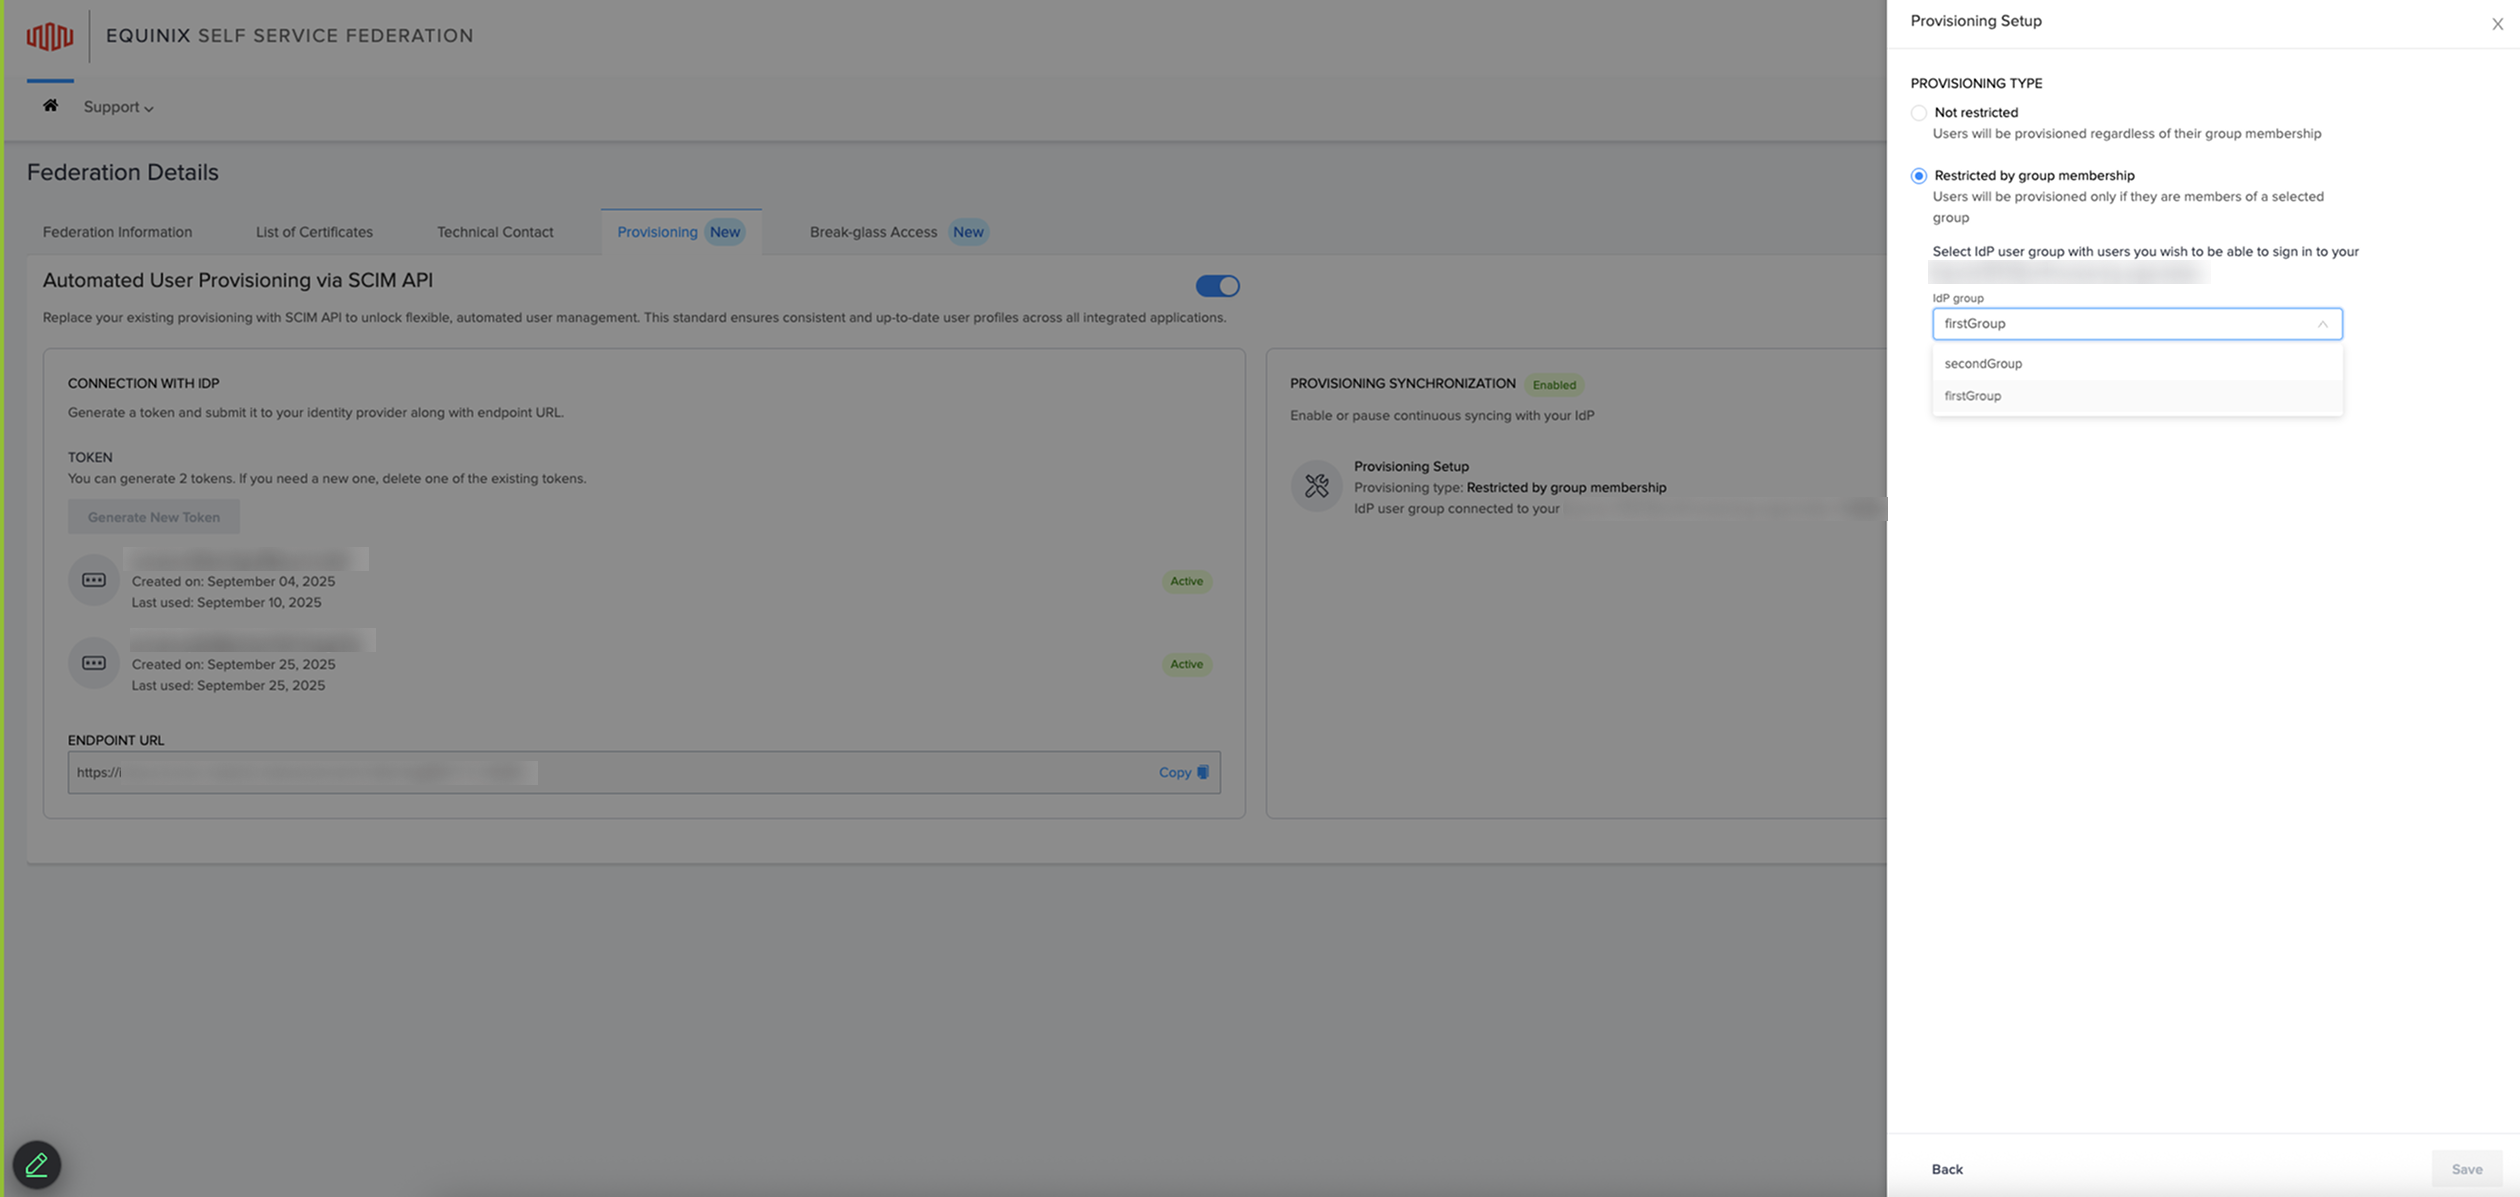
To begin provisioning setup, roll over Provisioning Setup to choose your provisioning type.
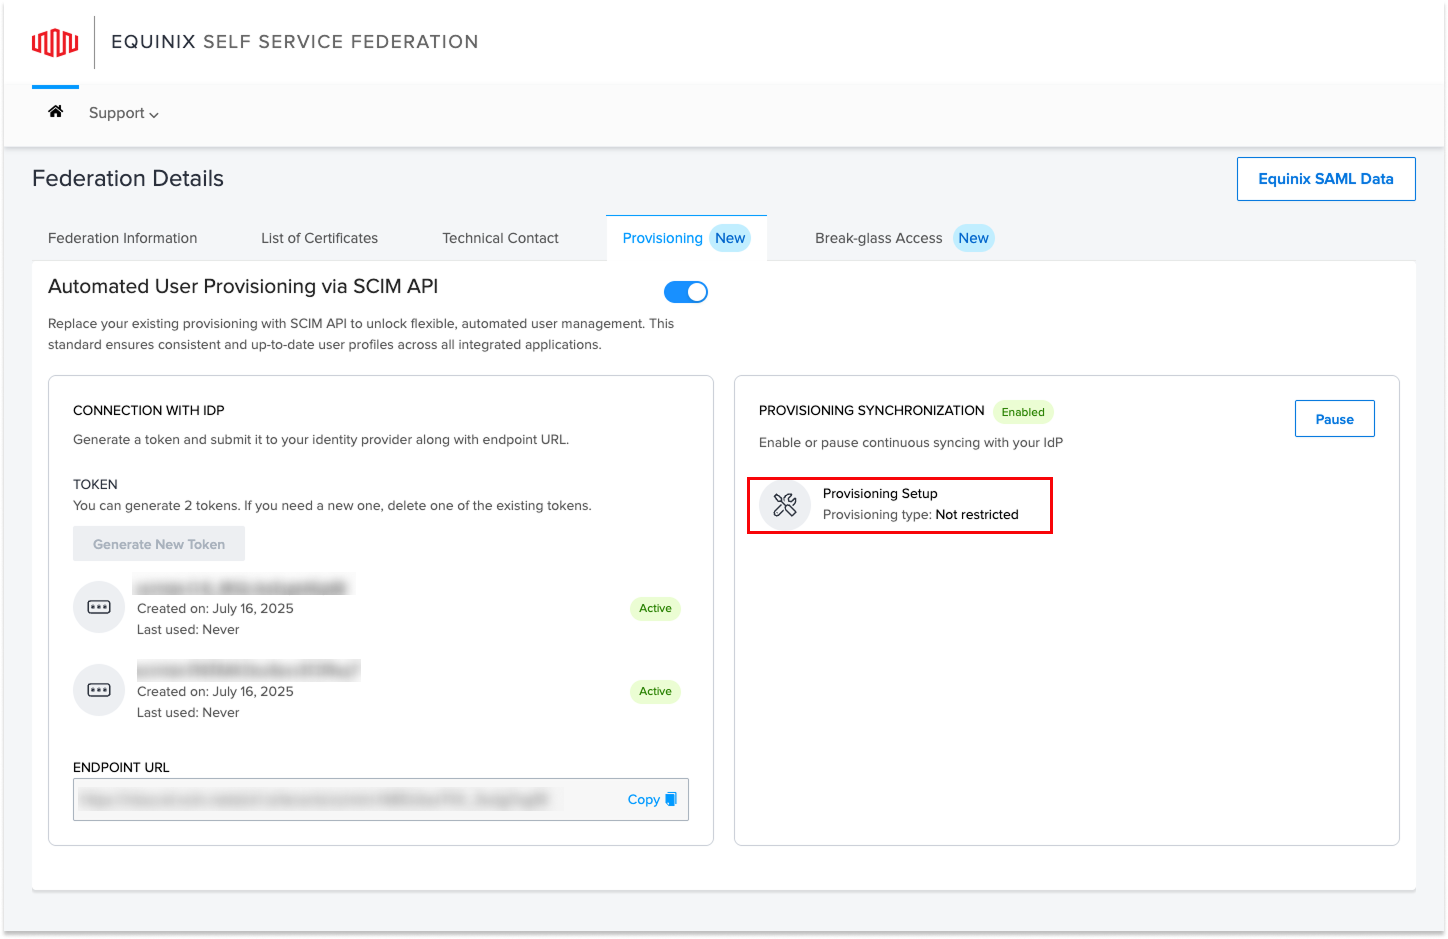
- Select Not restricted to provision all users, or Restrict by group membership to limit provisioning to specific IdP groups. This finalizes automated user management for your environment.
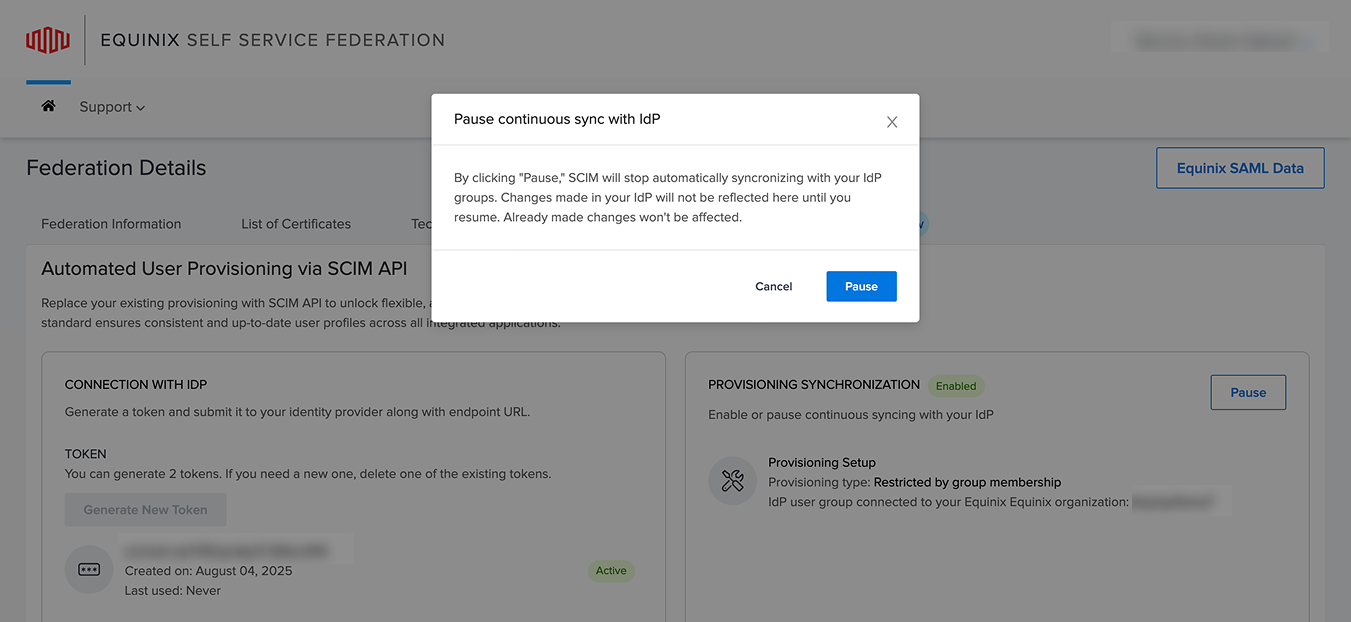
- Hover over a section to edit or delete it, or click Pause to stop syncing. You can click Enable at any time to resume syncing.
Configuring Group-Based Provisioning
Equinix supports restricted provisioning using SCIM by allowing organizations to limit user provisioning to specific identity provider (IdP) groups. This setup is ideal for customers who want finer control over which users are provisioned into Equinix systems.
When enabling SCIM provisioning, you can choose between the following:
- Not restricted – All users from the IdP are provisioned.
- Restricted by group membership – Only users belonging to specified groups are provisioned.
To configure this, follow these steps:
- Under the Provisioning Synchronization section, select the appropriate provisioning setup.
- Complete the Provisioning Setup.

SCIM provisioning can be toggled on or off at any time. Turning off SCIM provisioning fully resets the configuration. Use this option only if you intend to fully reset or discontinue SCIM-based provisioning.
SCIM Group Management for Federated Customers
Equinix supports SCIM-based group provisioning for federated Identity Providers (IdPs), allowing customers to manage access using their existing group structures. This enables role assignment, access scoping, and audit logging aligned with organizational hierarchies.
For customers with multiple organizations under a single federated connection, SCIM group management enables:
- Group-Based Role Assignment: Assign roles to Identity Provider groups (IdP groups) so that all group members inherit permissions automatically.
- Nested Group Support: Equinix resolves nested memberships, allowing child-group members to inherit parent-group permissions.
- Org-Level Access Inheritance: Roles assigned to groups at a parent organization level can automatically apply to child organizations and their associated resources.
- Scoped Access: Group assignments can be scoped to specific organizations or projects, ensuring access boundaries align with your internal structure and preventing cross-organization access.
- Preservation of Individual Roles: Users removed from a group retain any individually assigned roles.
- Audit Logging: All group lifecycle events and membership changes are logged for compliance.
- Multi-Org Endpoint Support: A single SCIM endpoint can manage multiple organizations using metadata.
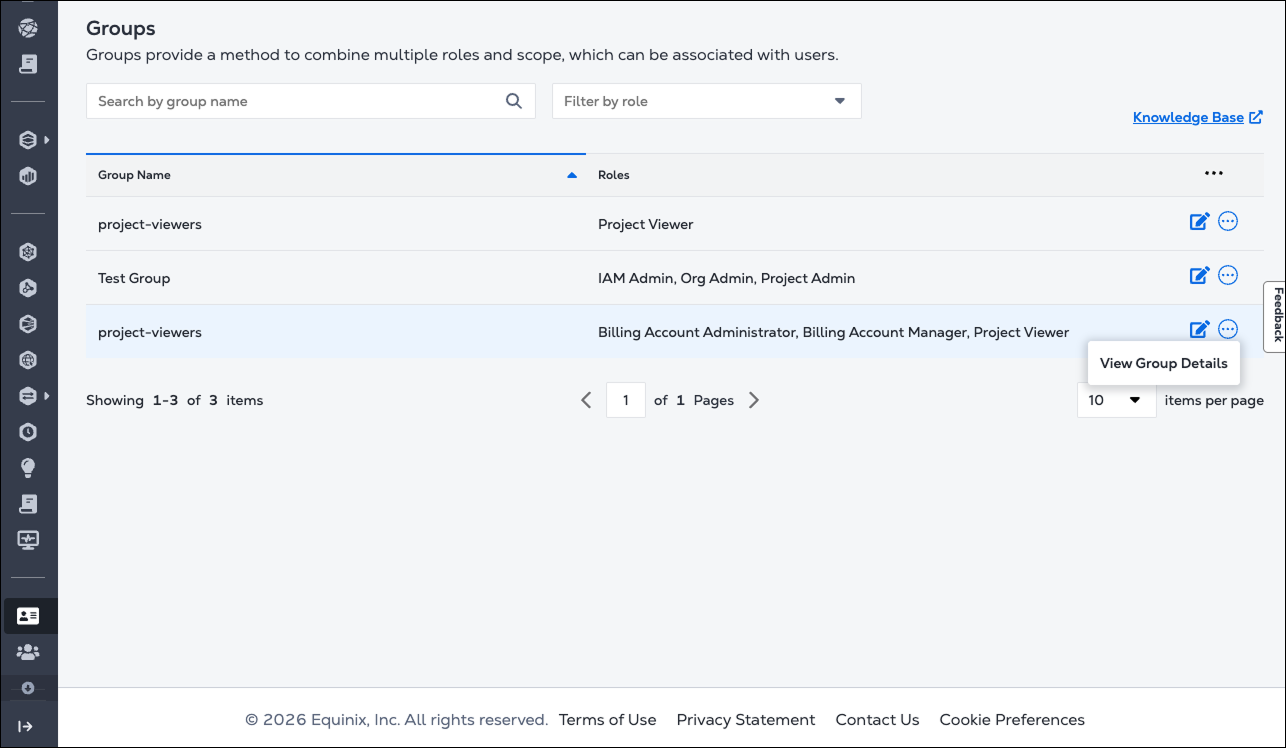
Edit Groups and Roles
-
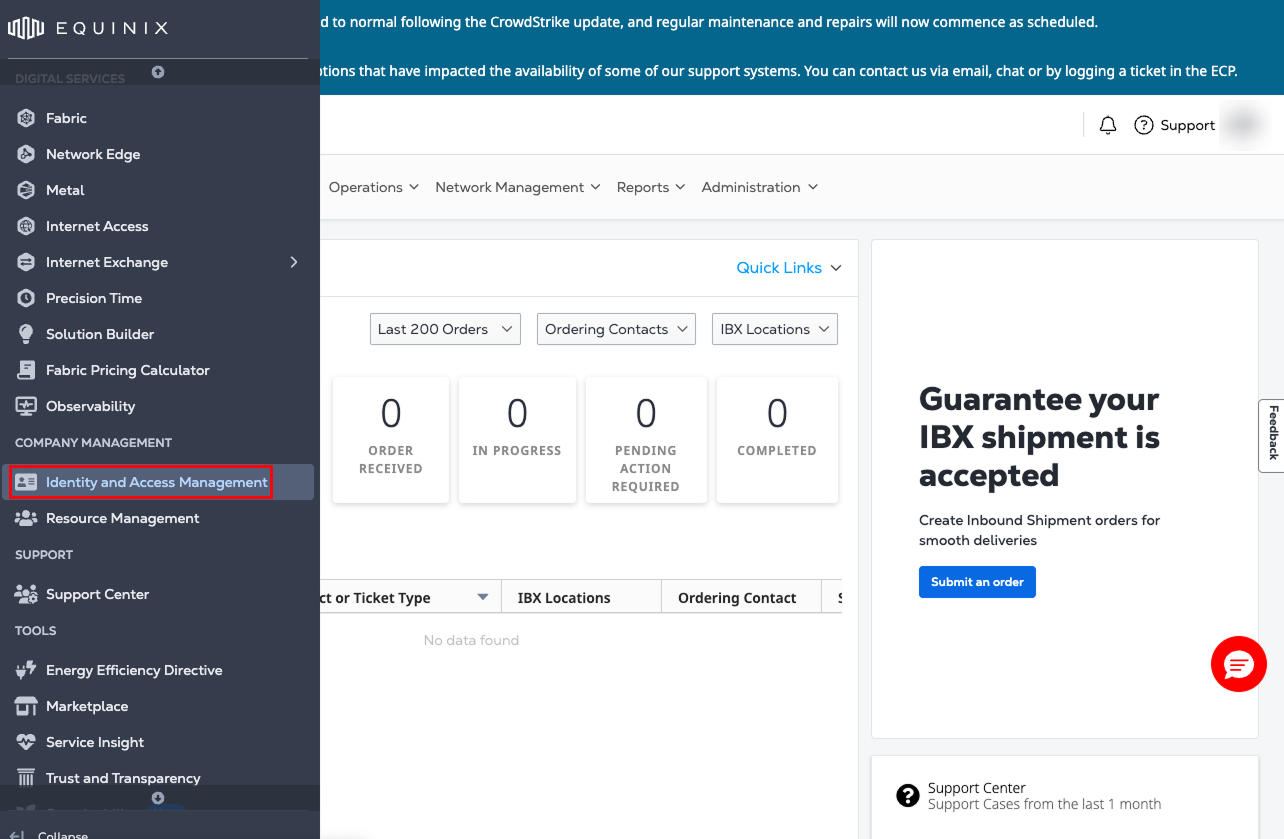
Go to the Customer Portal and select Identity and Access Management from the left-hand menu.
-
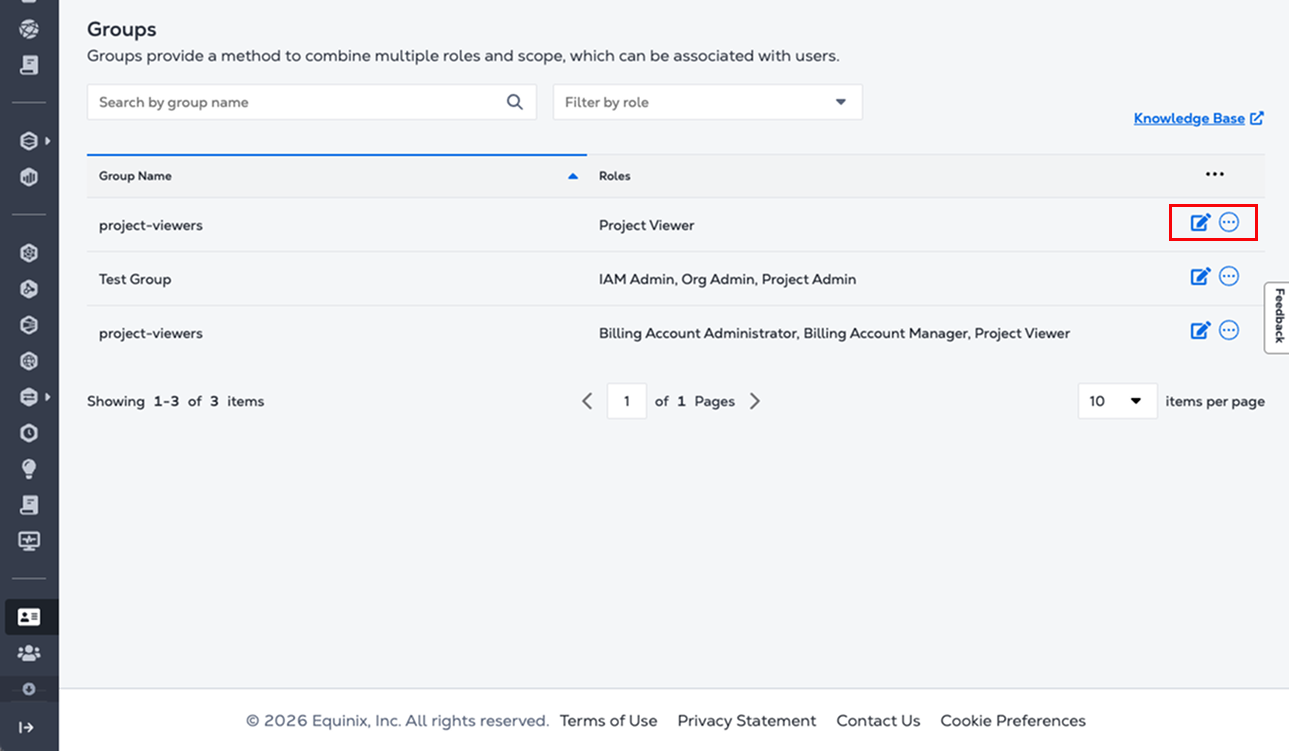
In the Identity and Access Management page, choose Groups from the top navigation bar.
-
Locate the group to manage. On the right side of the group row, click the actions menu to view or edit the group details.
-
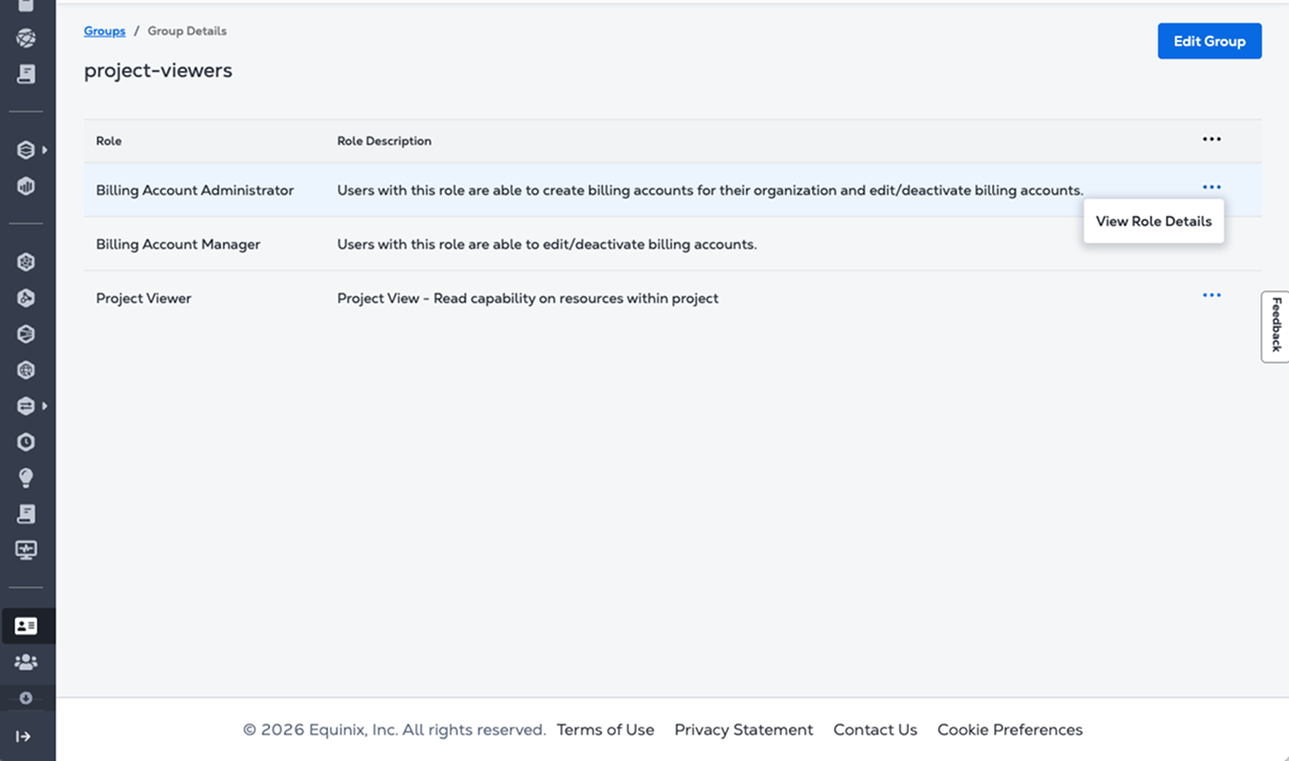
Click View Group Details to open the Group Details page.
-
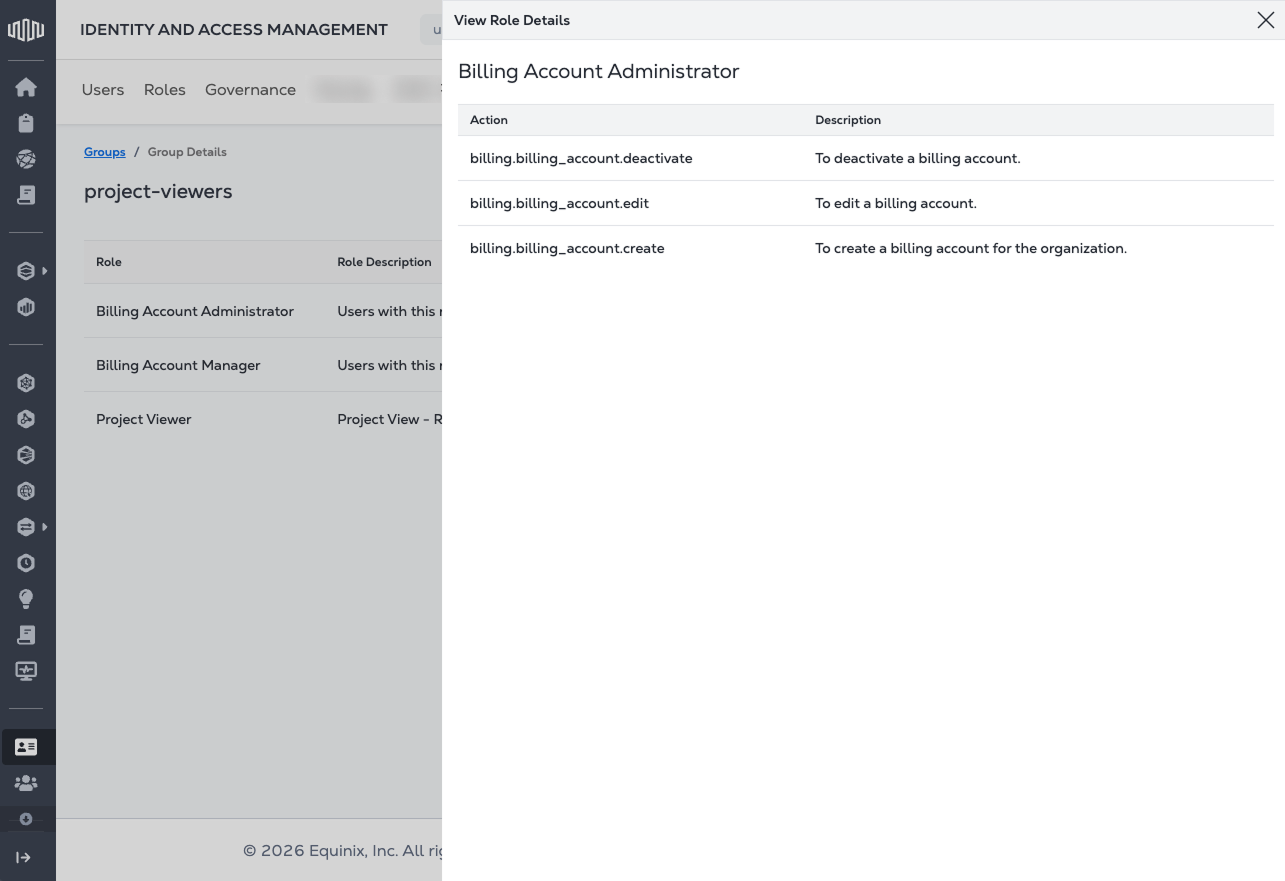
On the right side of the group row, click View Role Details to see the role information. Click Edit Group to review and edit the list of available roles.
-
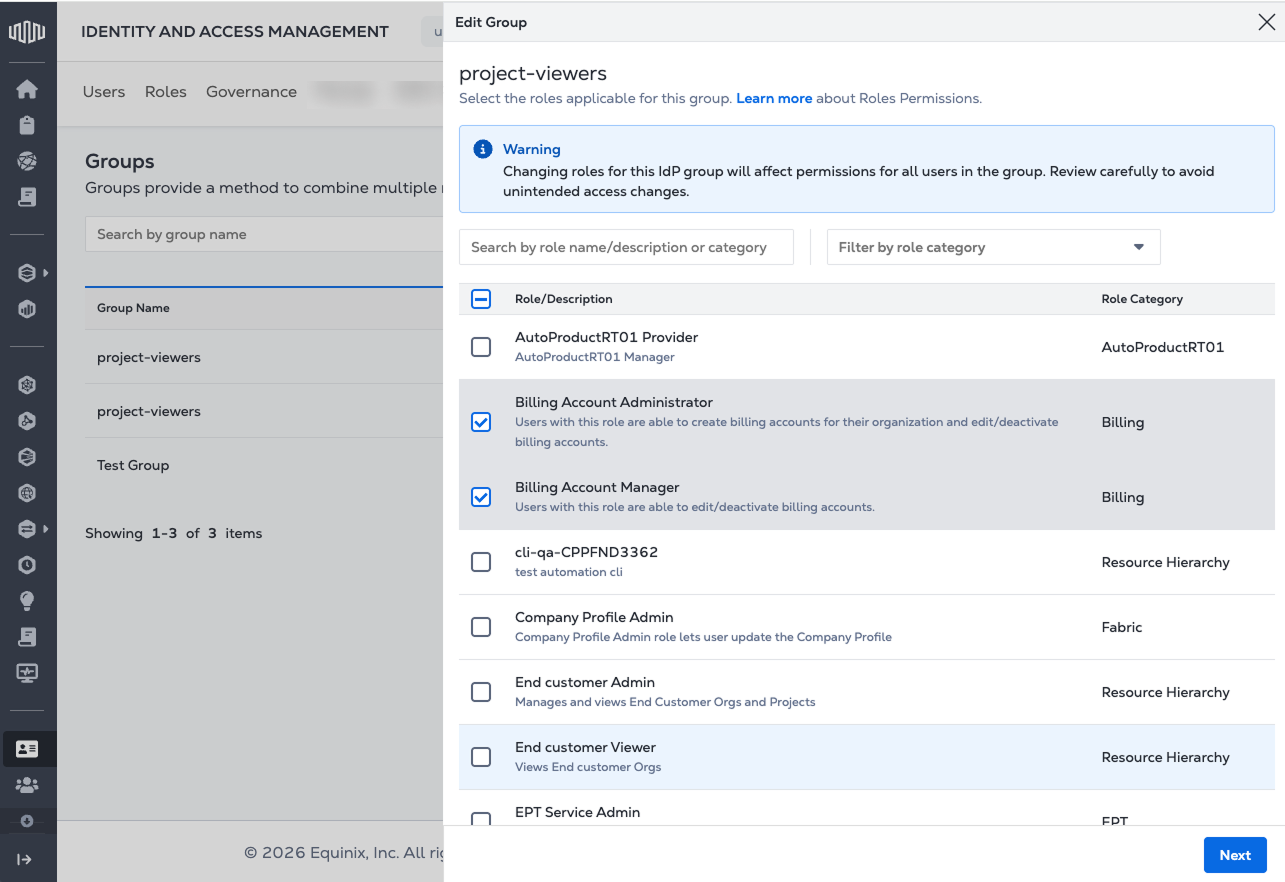
Click Edit Group to open the Edit Group page and review the available roles. Use the Search field or Filter by role category to narrow the list.
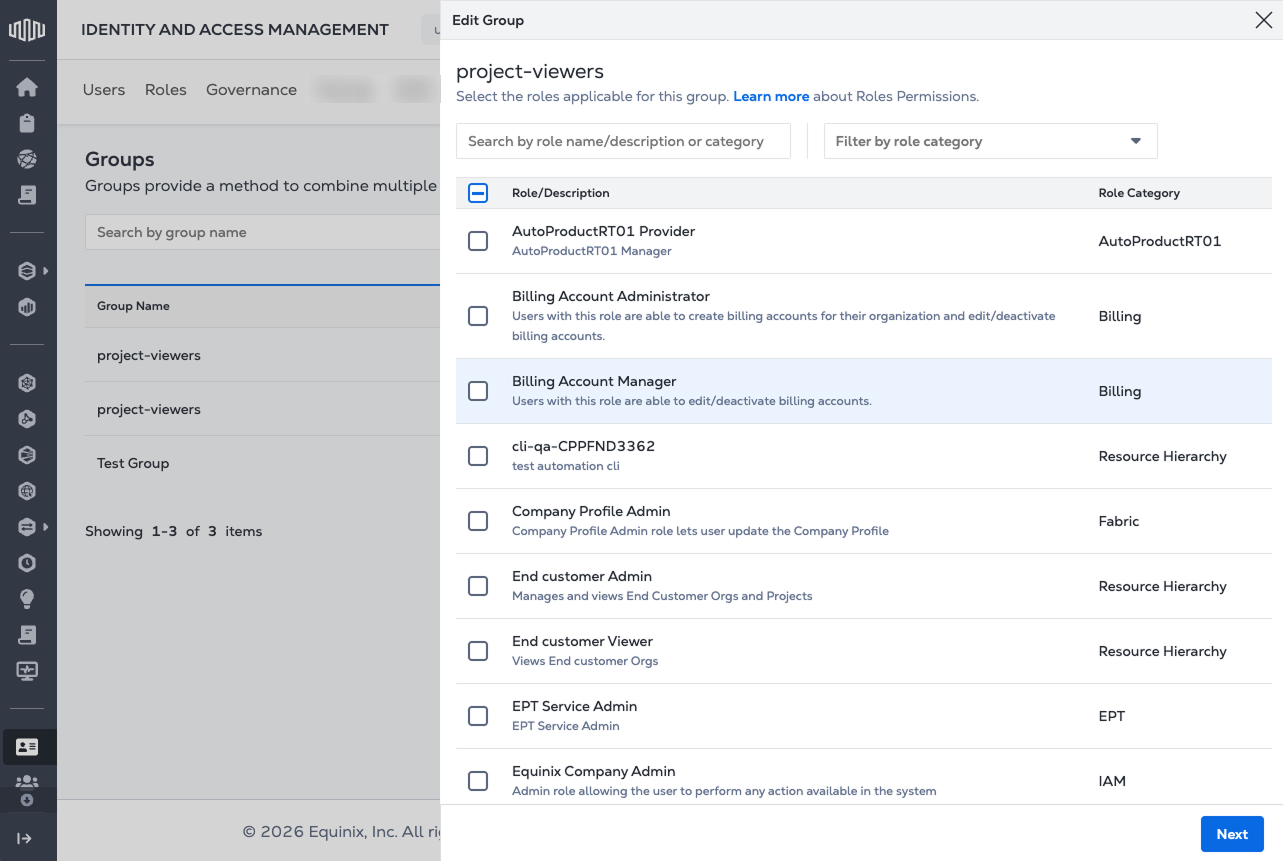
-
Select the roles to add to the group by checking their boxes. Click Next.
-
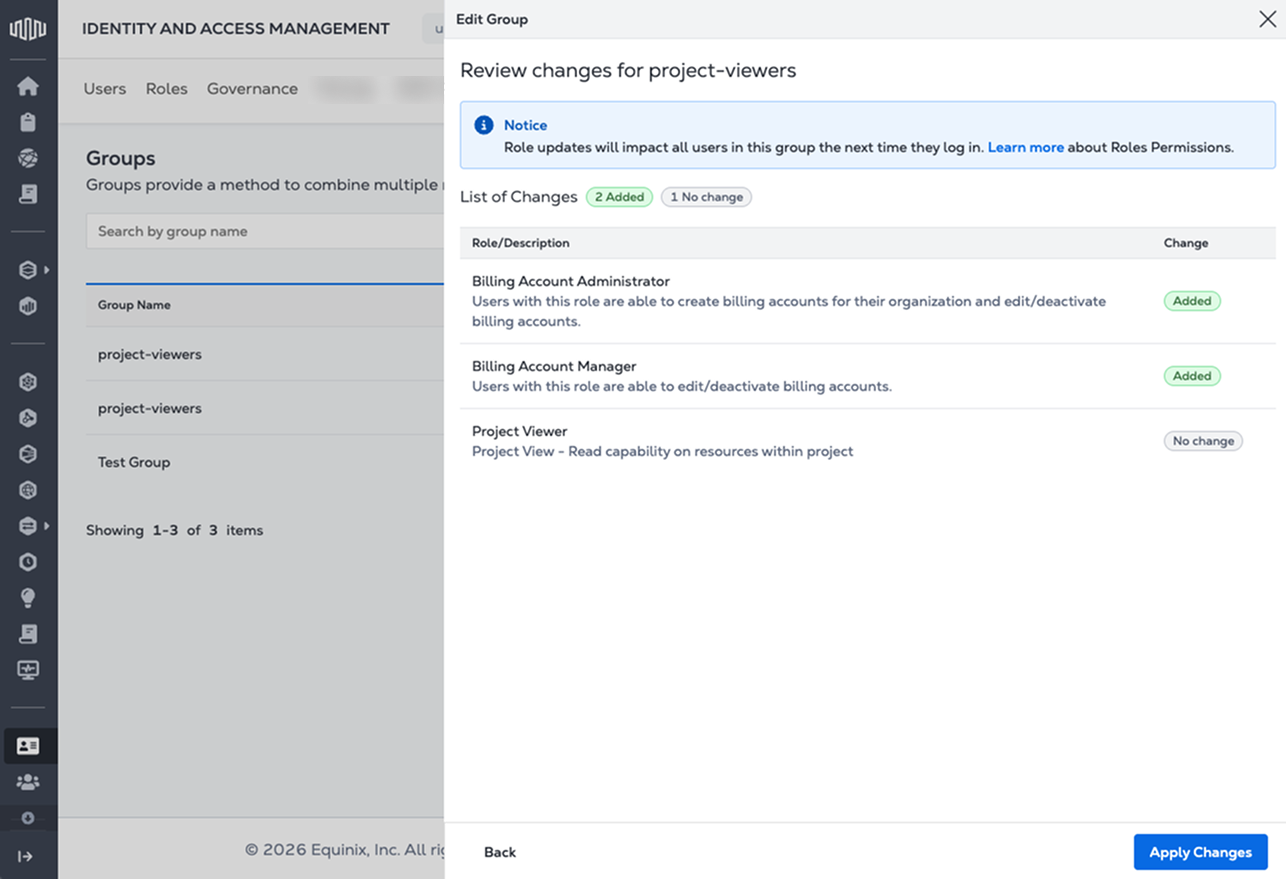
Review and confirm your selection. Role changes affect permissions for all users in the group. Click Apply Changes.
Configuring EntraID and Okta
To find out how to configure EntraID and Okta, refer to: