Ajouter la redondance à un seul dispositif virtuel
Ajoutez un périphérique secondaire à un périphérique virtuel actif pour créer une paire redondante. L'ajout de redondance à un périphérique existant évite d'avoir à recommencer avec deux nouveaux périphériques.
Certains attributs du dispositif secondaire doivent être identiques à ceux du dispositif principal, notamment:
- La configuration de l'appareil
- Licences
- Ressources de l'appareil
- Logiciel
- débit de licences
Si les deux appareils appartiennent au même compte, la durée d'engagement de l'appareil secondaire doit être identique à celle de l'appareil principal.
Vous pouvez personnaliser les attributs suivants du périphérique secondaire:
- Version
- Nom d'hôte
- Liste de notifications
- Liste des utilisateurs SSH
- Adresses IP d'accès
- Bande passante supplémentaire
Conditions préalables
- Un seul périphérique virtuel Network Edge non redondant.
- Le rôle
Network Edge Device Manager.
- Portal
- API
-
Connectez-vous au Equinix Customer Portal et accédez à Network Edge.
-
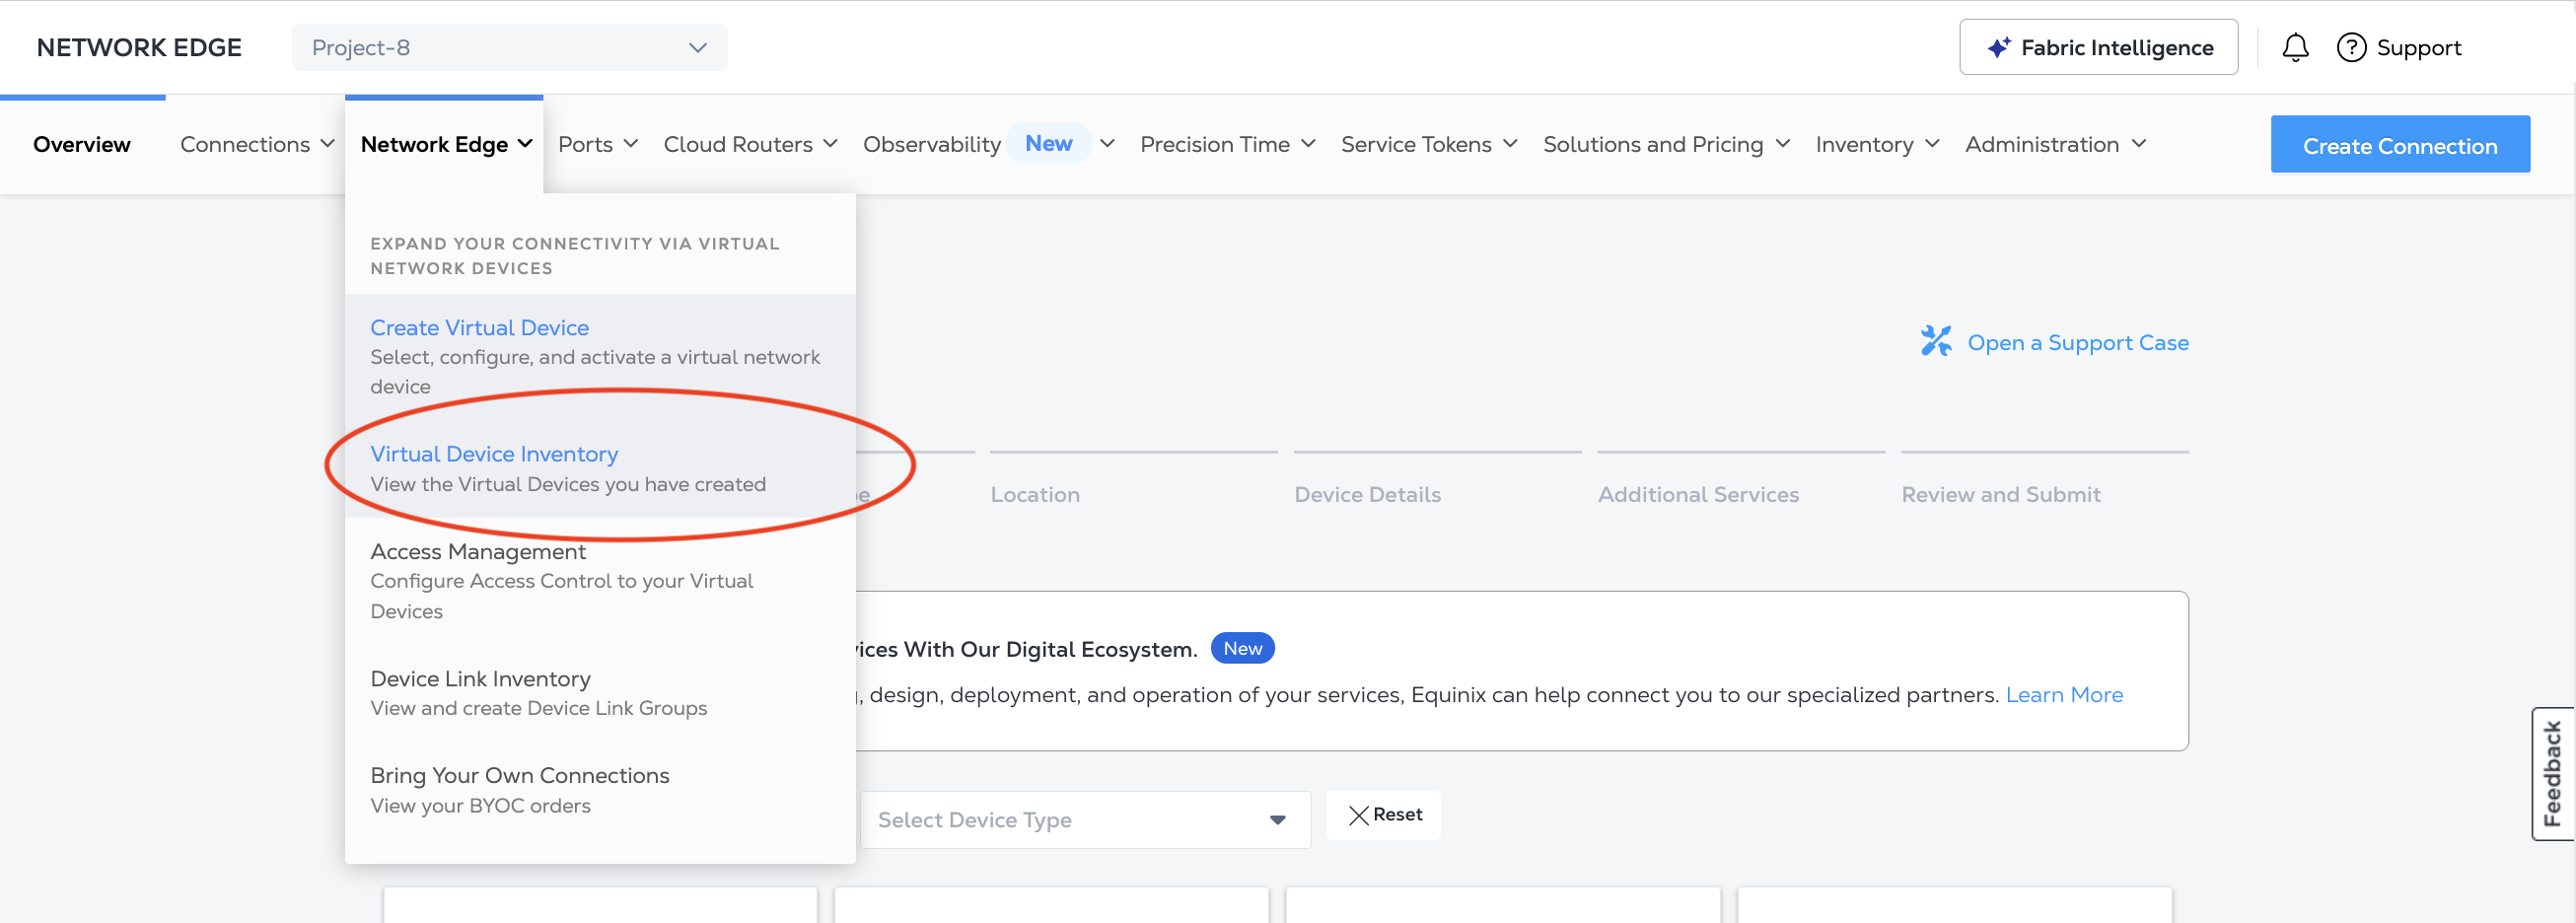
Dans le menu Network Edge, sélectionnez Inventaire des périphériques virtuels.
-
Cliquez sur le dispositif que vous souhaitez modifier. Les détails du dispositif virtuel s'affichent.
-
Authentification: soumettez vos identifiants utilisateur, votre identifiant client et votre clé secrète pour l’authentification OAuth2. Consultez la documentation relative à l’authentification API (Authentification API) pour savoir comment appeler l’API OAuth afin de valider et d’authentifier vos identifiants.
-
Obtenez les informations de l'appareil principal. Envoyez une requête
GETau point de terminaison/ne/v1/devicespour lister vos périphériques virtuels. Identifiez le périphérique auquel vous ajoutez un périphérique secondaire et envoyez une requêteGETpour accéder au point de terminaison/ne/v1/devices/{uuid}et obtenir les attributs du périphérique principal.
Ajout de l'appareil virtuel secondaire
- Portal
- API
-
Dans votre Inventaire des périphériques virtuels, cliquez sur le nom de l'appareil virtuel pour afficher ses Détails du périphérique virtuel.
-
Cliquez sur Ajouter un périphérique secondaire.

-
Le forfait fournisseur est configuré automatiquement pour être identique à celui de votre appareil principal. Vous n'avez pas besoin de sélectionner ou de configurer le paquet fournisseur pour l'appareil secondaire.
-
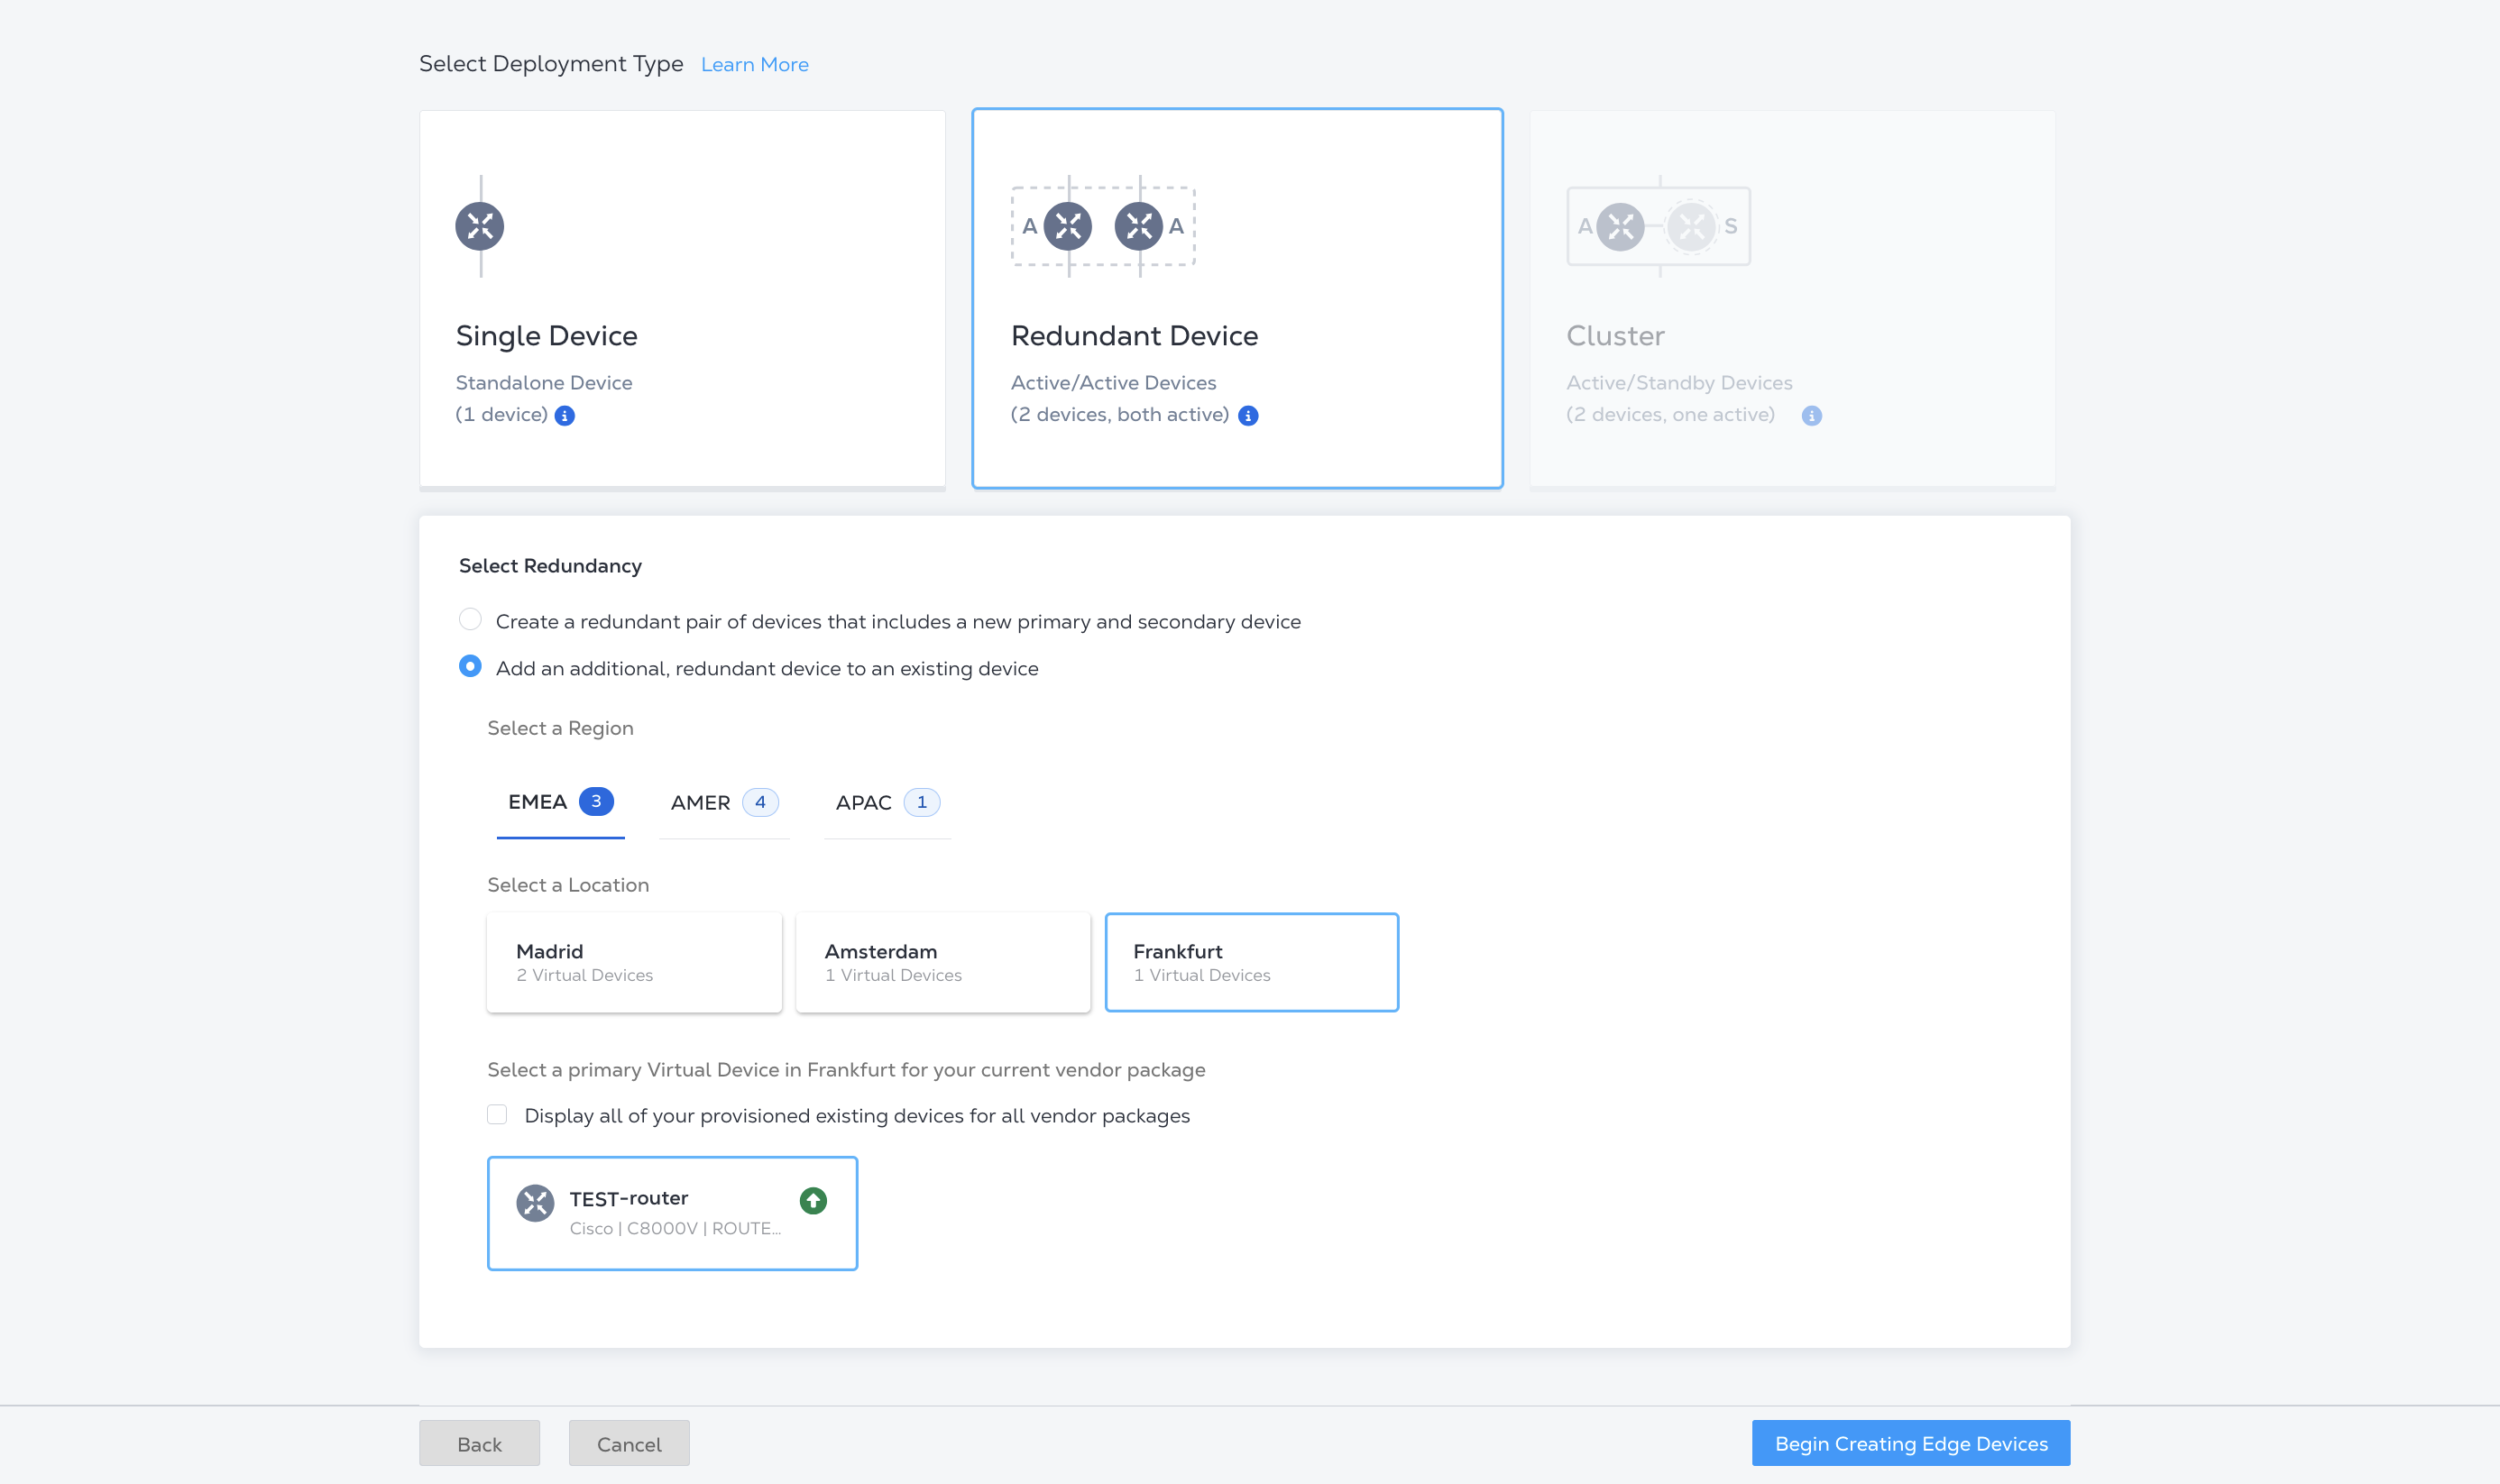
Pour Sélectionnez le type de déploiement, les options suivantes sont configurées automatiquement:
- Dispositif redondant
- Ajouter un appareil supplémentaire et redondant à un appareil existant
- L'emplacement et l'appareil virtuel principal
-
Cliquez sur Commencer la création d'appareils Edge.
-
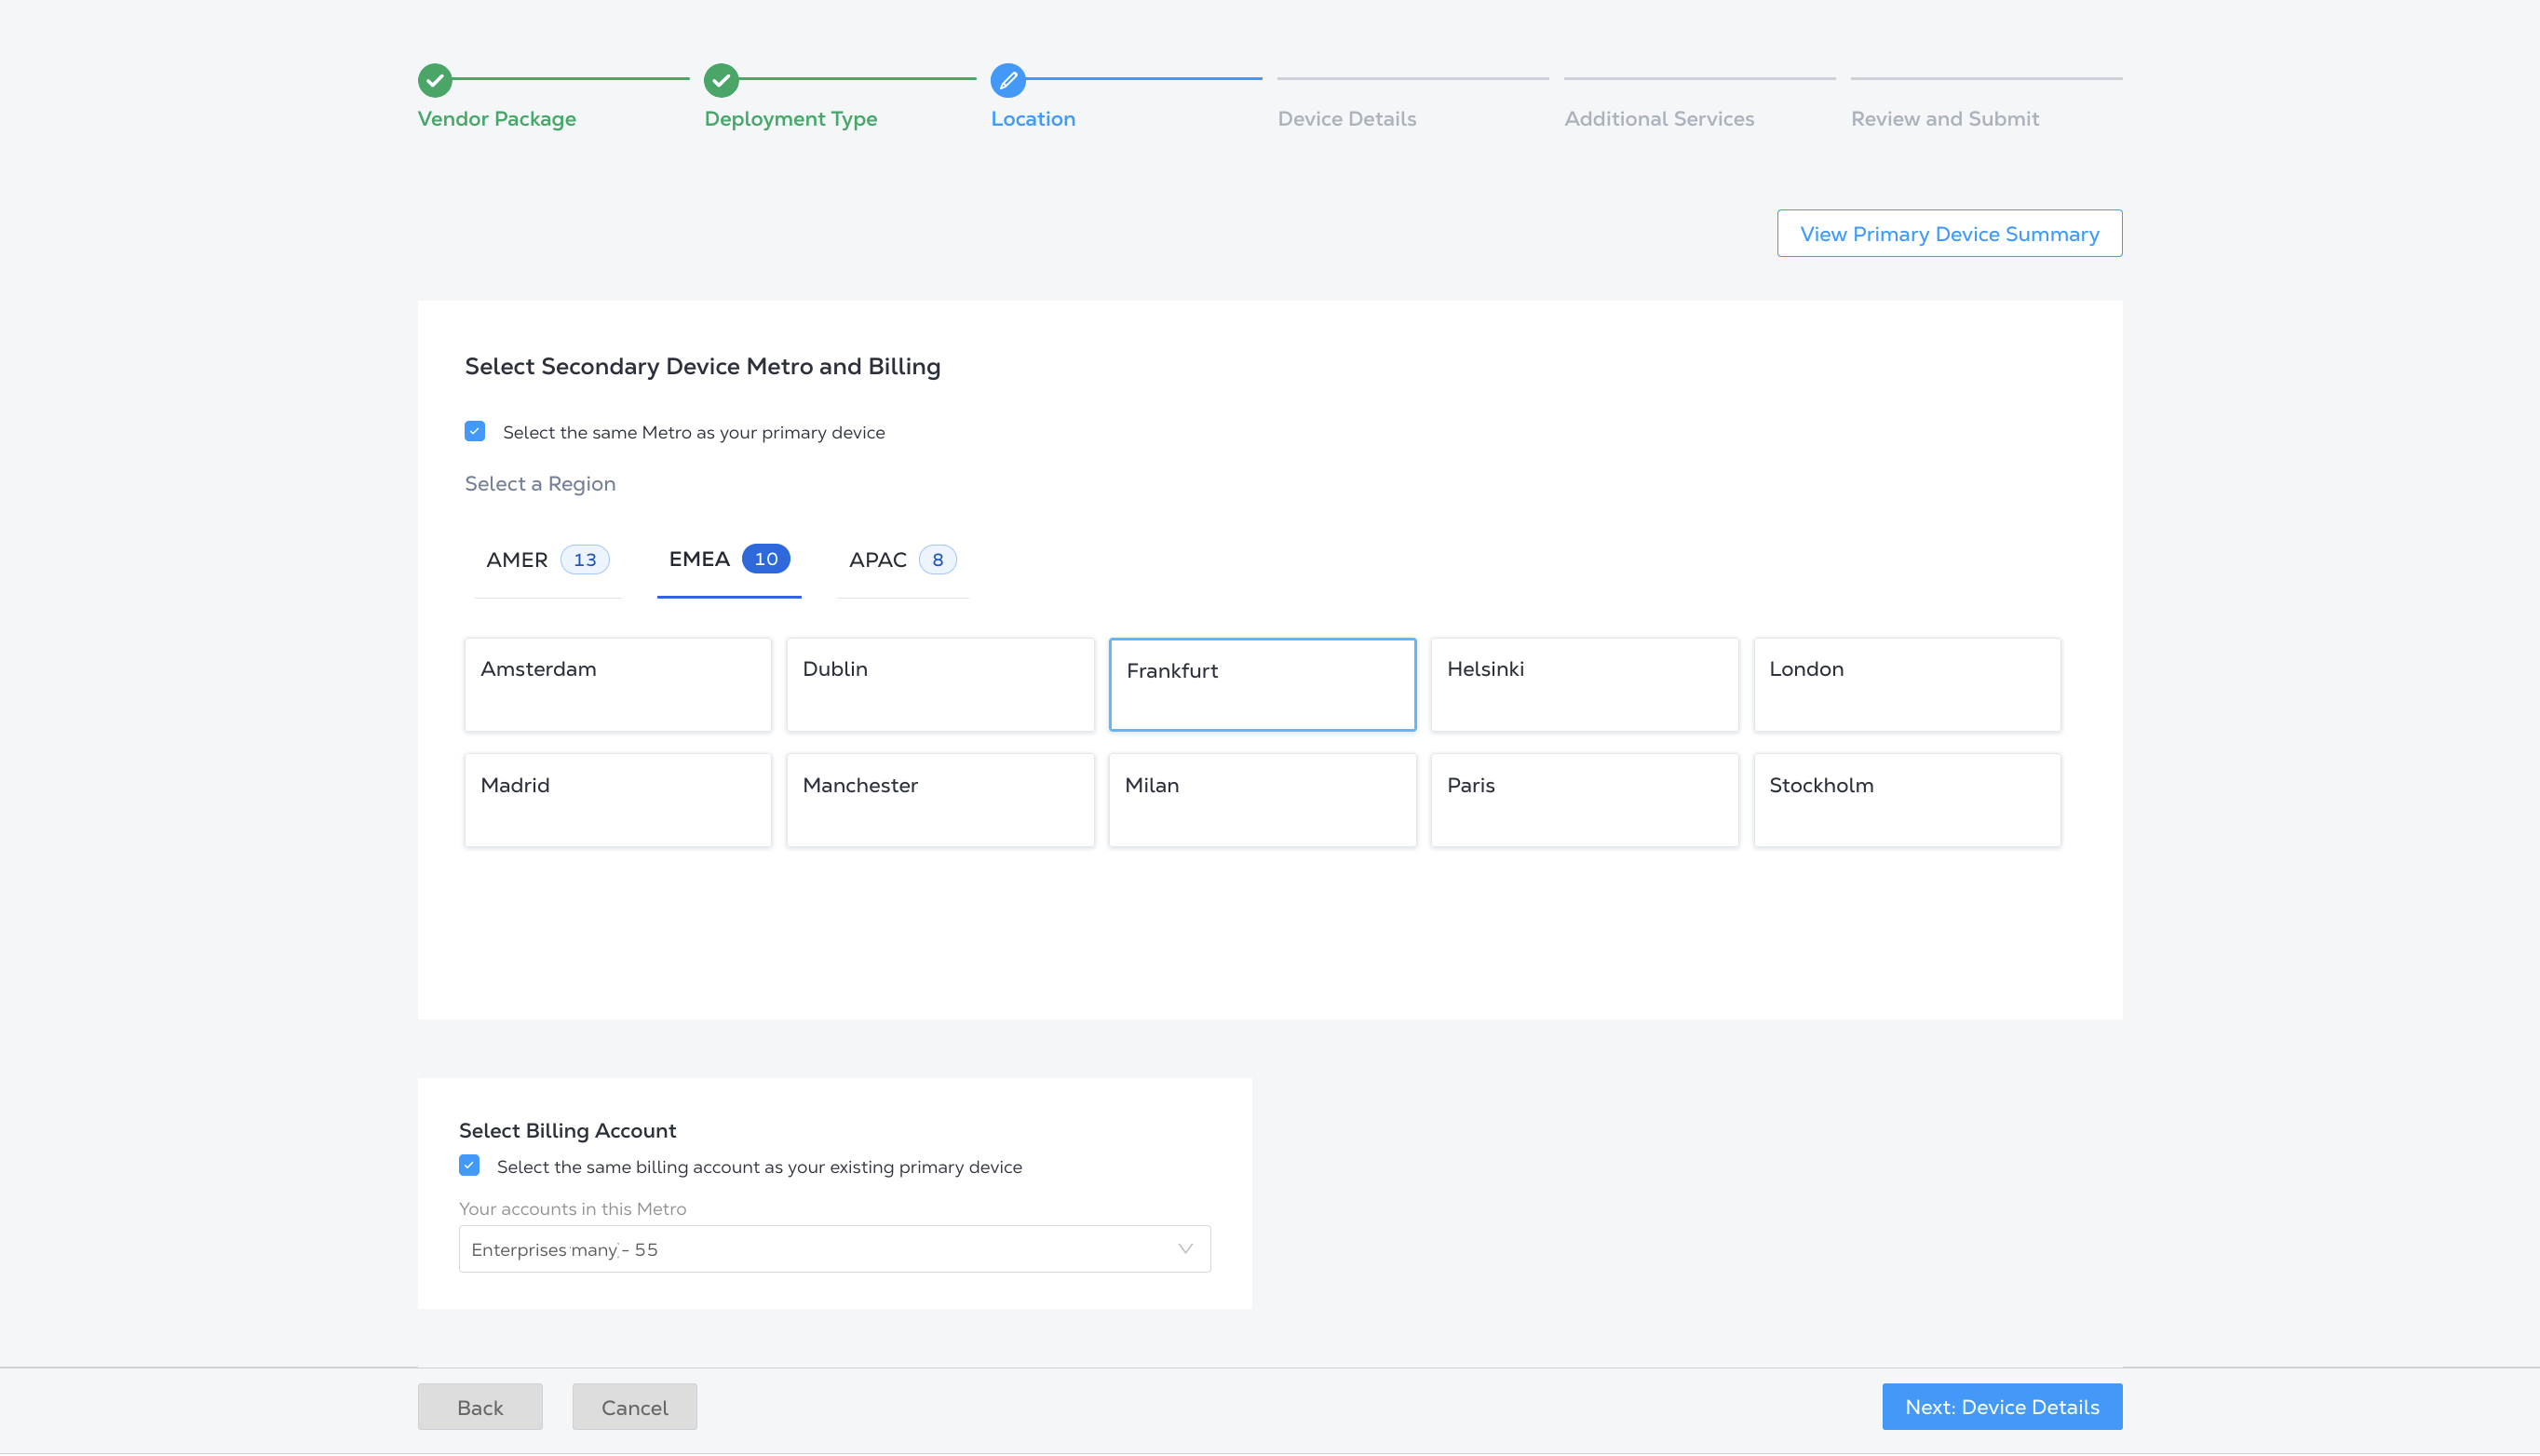
Sélectionnez un emplacement pour l'appareil secondaire. Par défaut, l'option « Sélectionner le même Metro que votre appareil principal » est cochée et le Metro de l'appareil principal est sélectionné.
Pour sélectionner une autre station Metro, décochez Sélectionner la même station Metro que votre appareil principal et sélectionnez une autre station Metro.
-
Sélectionnez un compte de facturation dans la liste déroulante, ou cliquez sur Sélectionnez le même compte de facturation que votre appareil principal existant.
infoCliquez sur Afficher le résumé du périphérique principal pour consulter les détails du compte, les détails du périphérique, les informations de licence, les détails des notifications et les informations de bande passante du périphérique principal.
-
Cliquez sur Suivant: Détails de l’appareil.
-
La plupart des informations relatives à l'appareil doivent être identiques à celles de l'appareil principal, sont sélectionnées automatiquement et ne peuvent pas être modifiées. Toutefois:
-
Si des versions logicielles différentes (plus récentes) sont prises en charge pour l'appareil secondaire, l'utilisation de deux appareils en redondance avec des versions logicielles différentes peut affecter les performances. Nous vous recommandons de mettre à jour la version logicielle de votre appareil principal.
-
Vous pouvez donner un nom différent à votre appareil secondaire.
-
Si vous avez choisi un compte de facturation différent de celui utilisé pour l'appareil principal, sélectionnez une durée d'engagement dans la section Durée d'engagement.
-
-
Cliquez sur Suivant: Services supplémentaires.
-
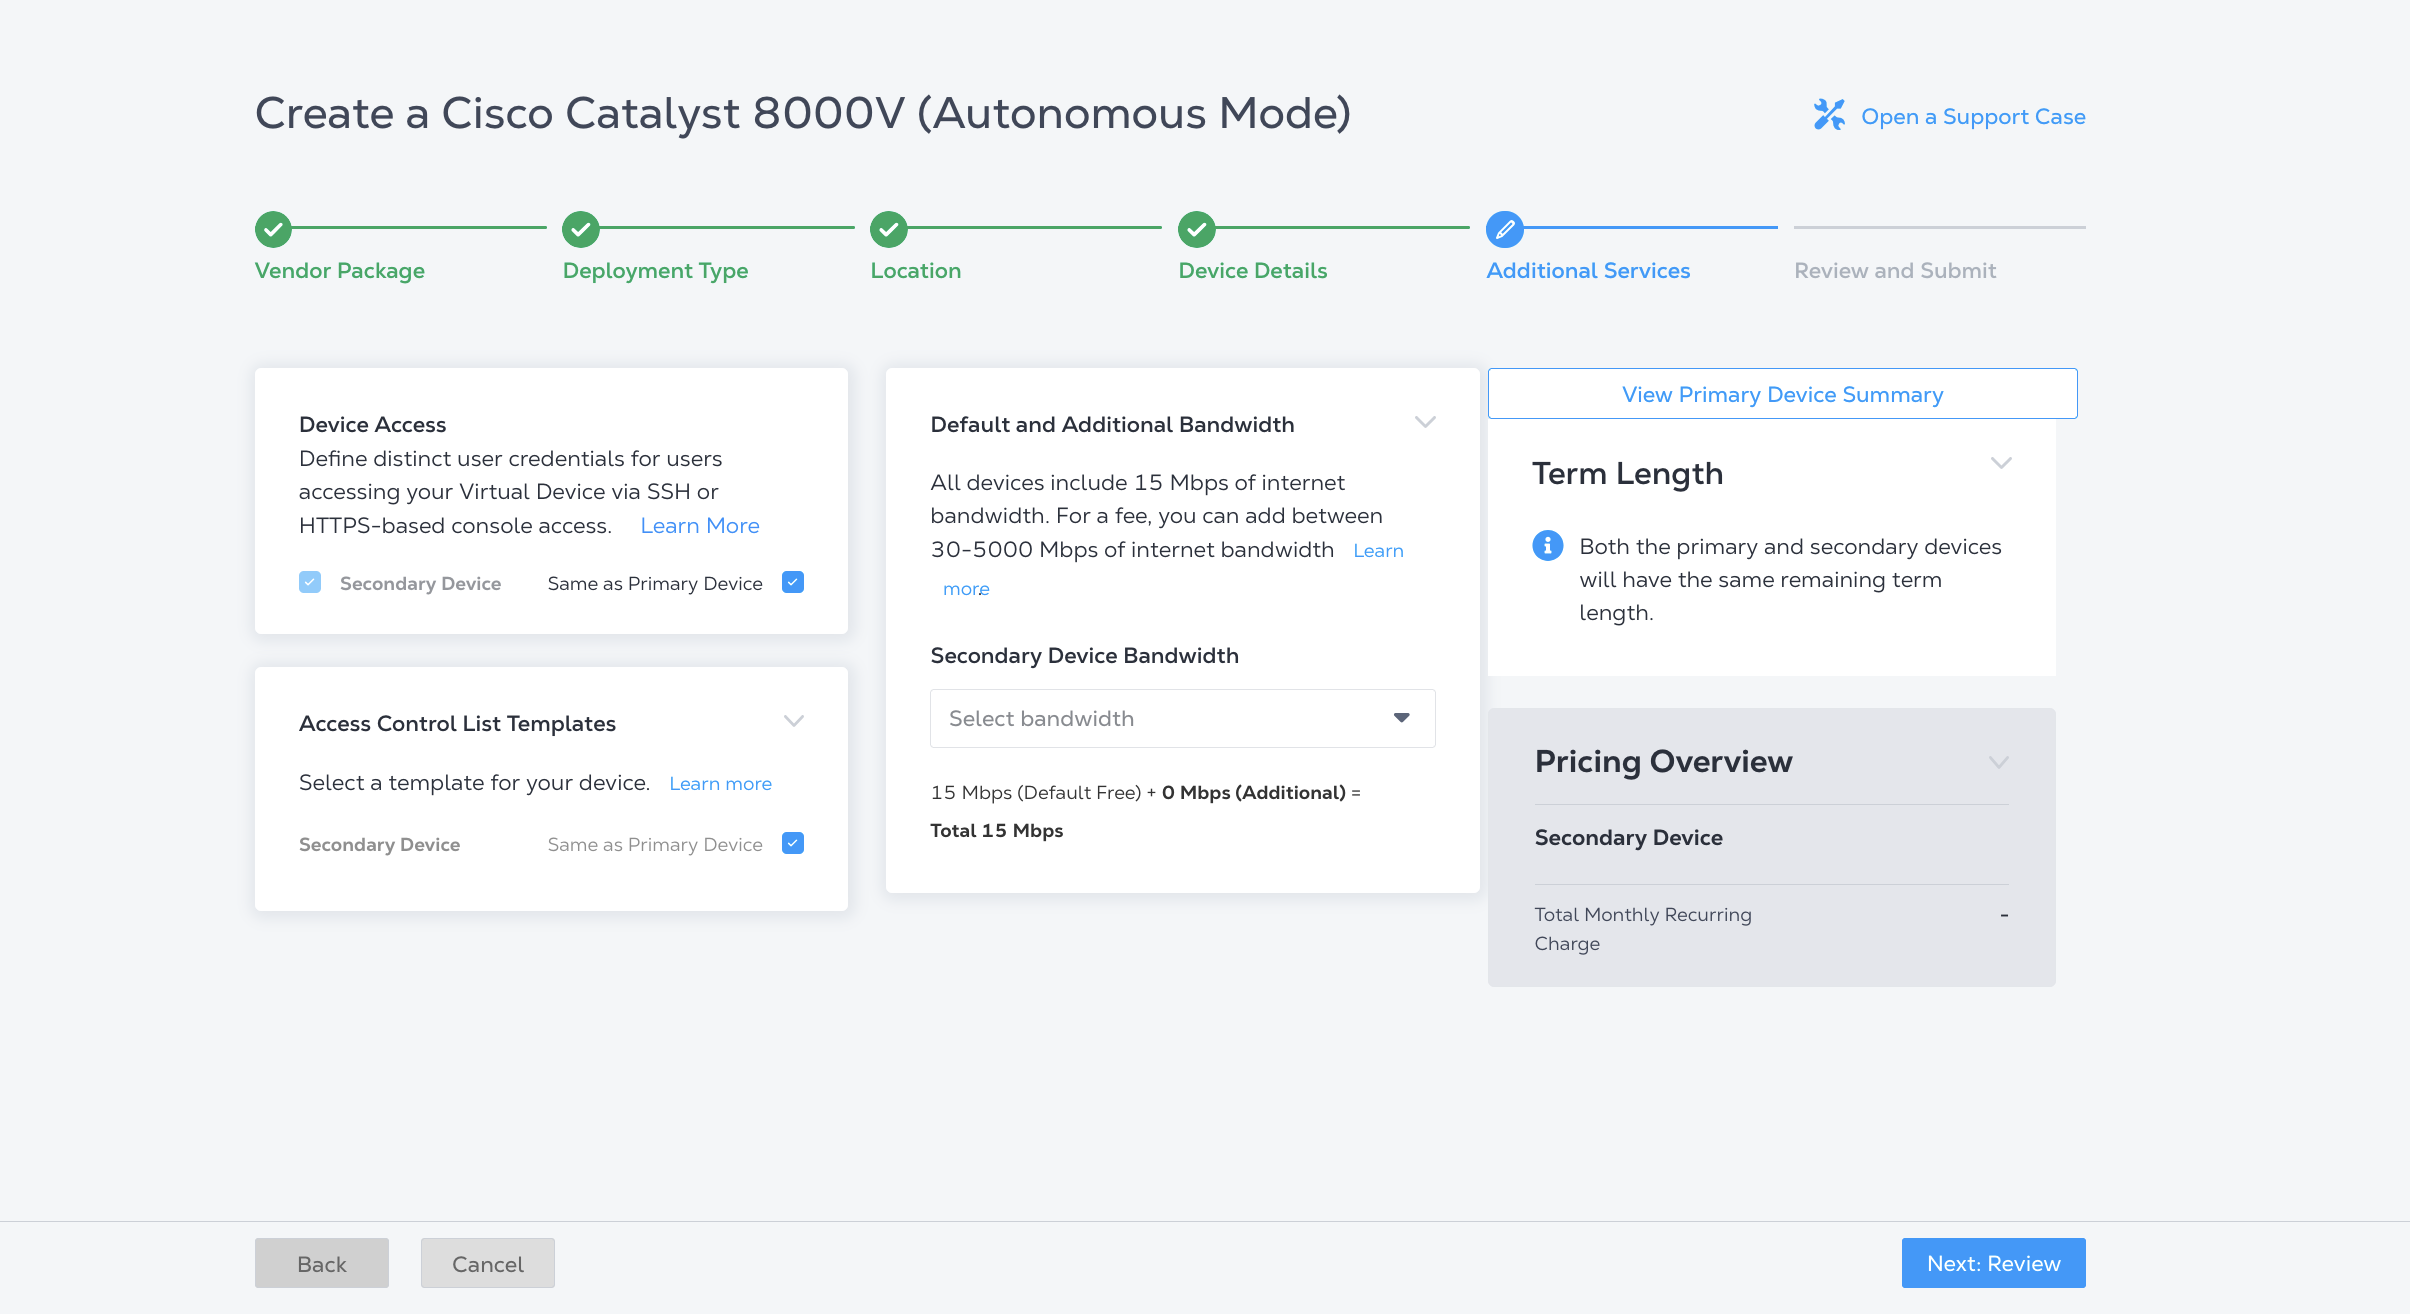
Sélectionnez les services supplémentaires souhaités pour l'appareil secondaire. Par défaut, ils reprennent les mêmes sélections que pour l'appareil principal.
-
Pour modifier l'accès à l'appareil, décochez la case « Identique au périphérique principal » et configurez l'accès du périphérique secondaire.
-
Pour modifier les Modèles de liste de contrôle d'accès, décochez Identique au périphérique principal et sélectionnez-en un dans la liste déroulante ou créez-en un nouveau.
-
Pour ajouter de la bande passante supplémentaire au périphérique secondaire, sélectionnez une bande passante dans la liste déroulante Bande passante du périphérique secondaire.
-
-
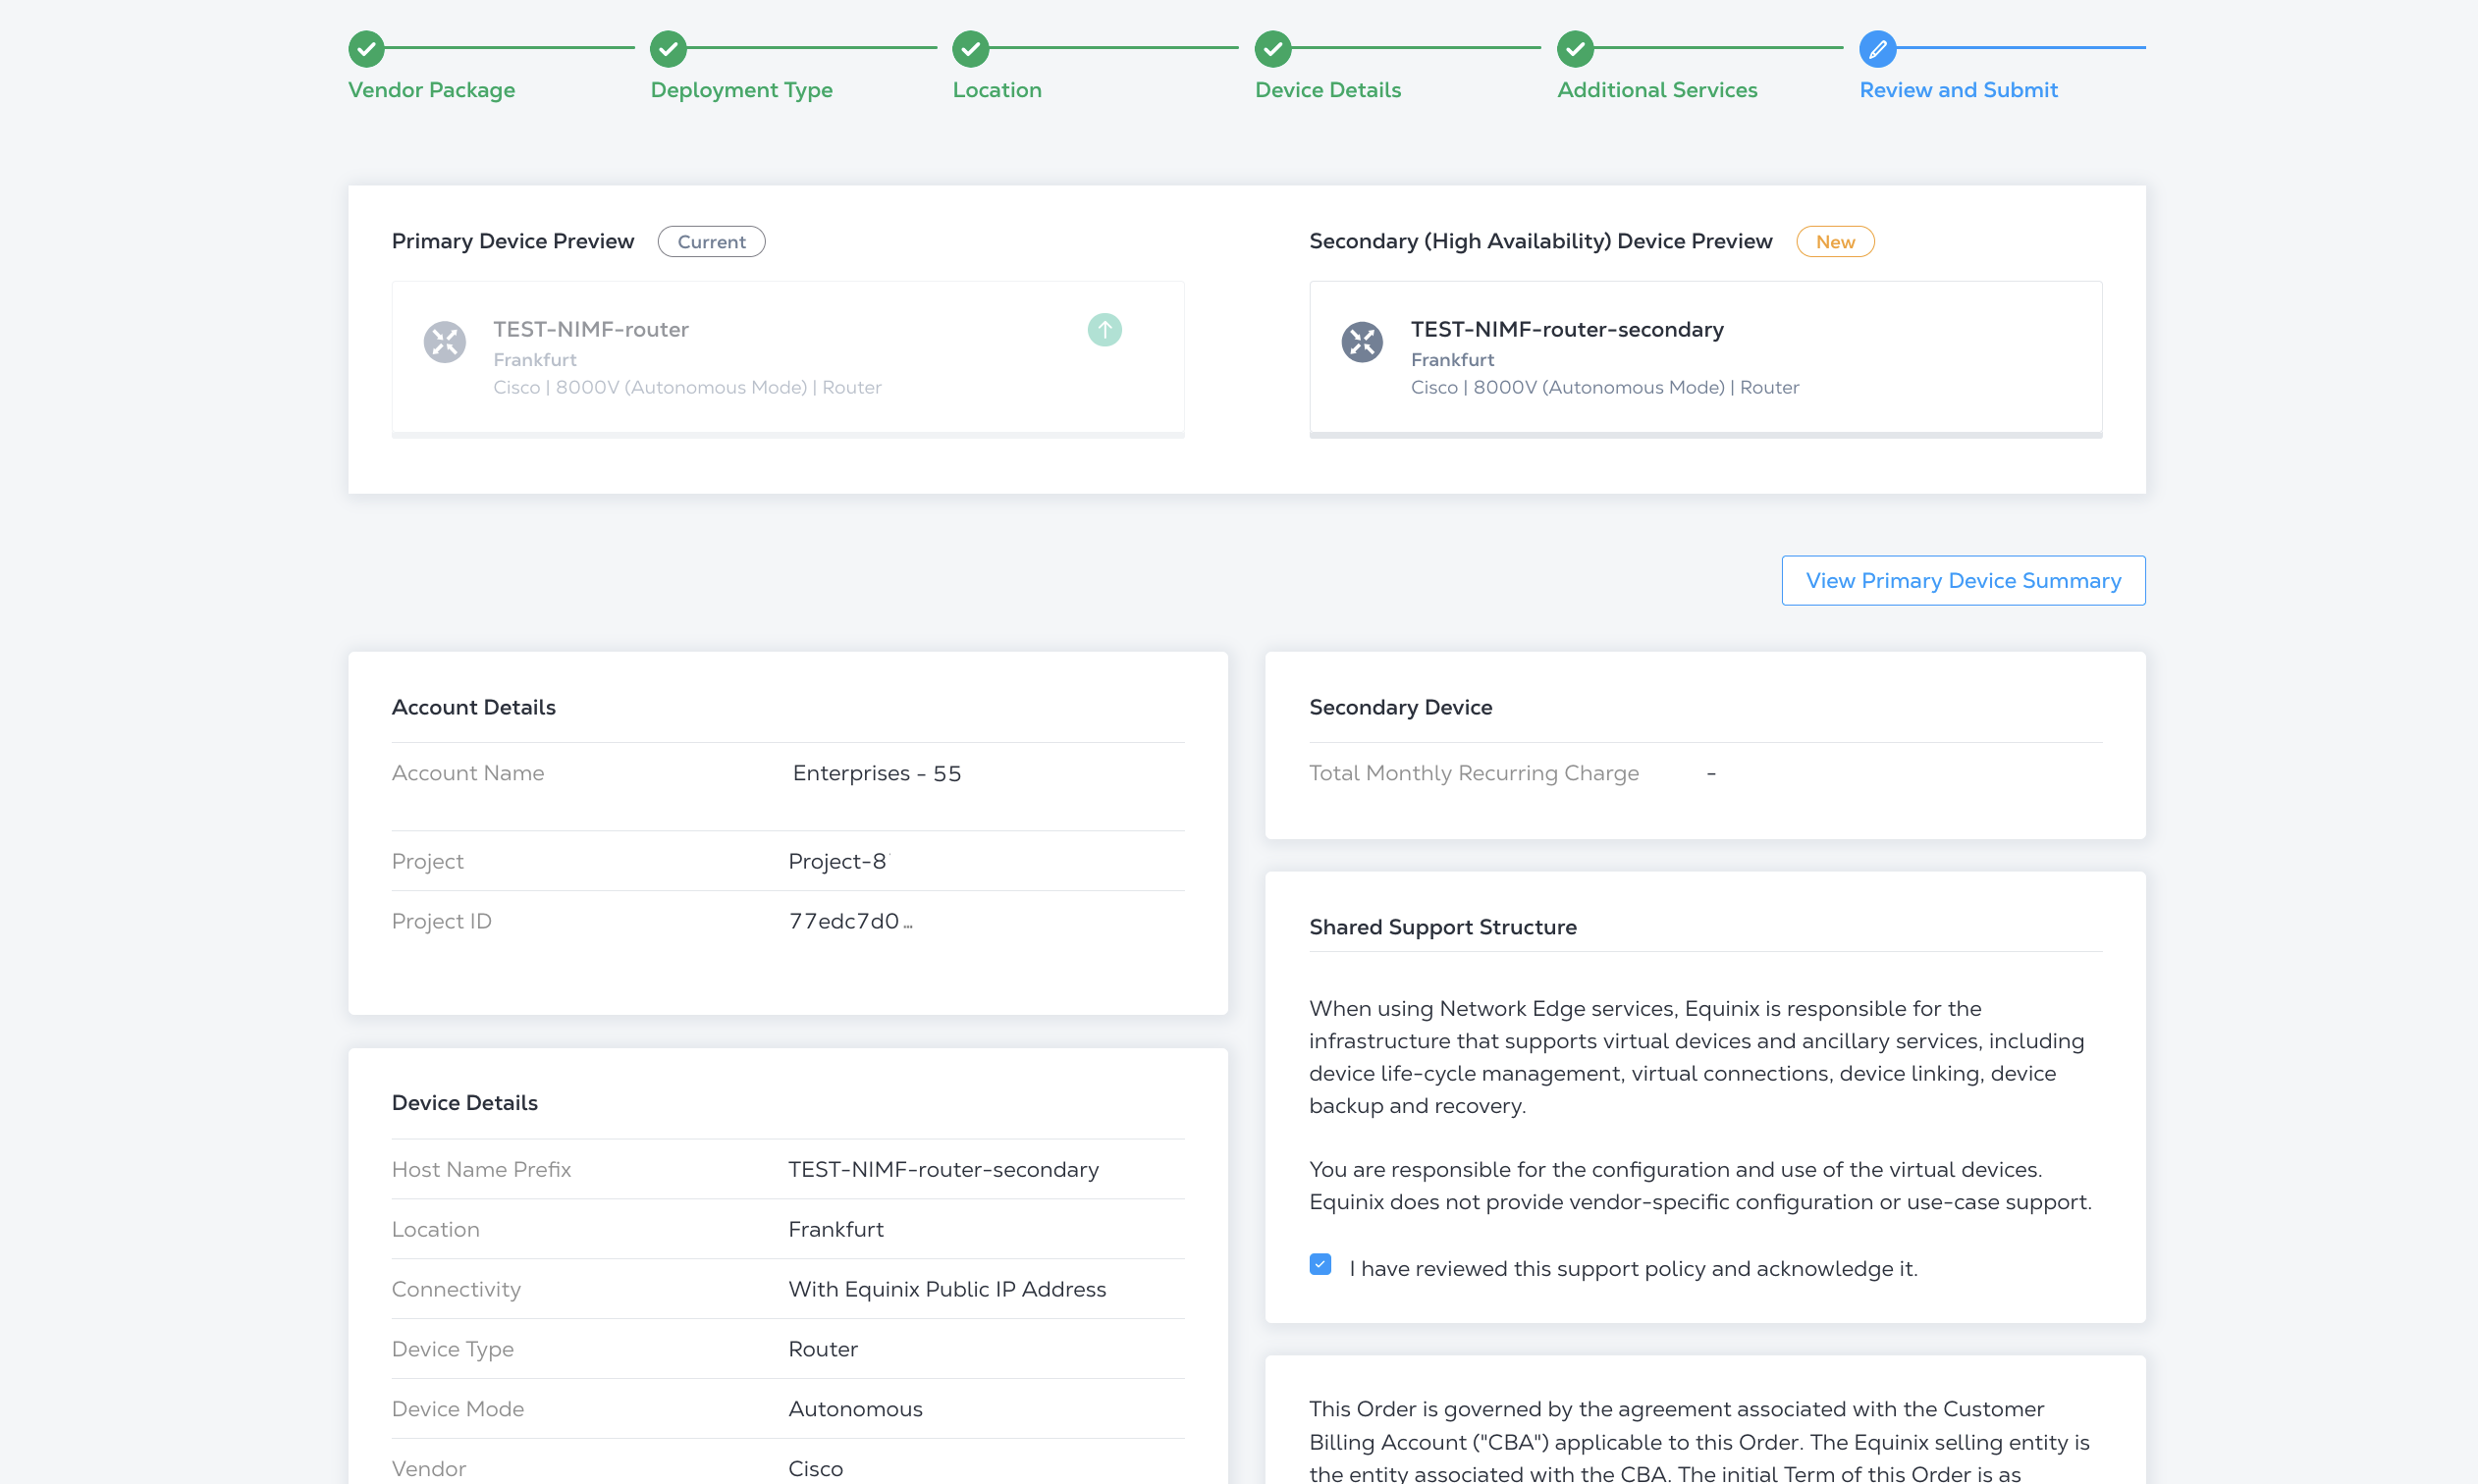
Cliquez sur Suivant: Vérification et vérifiez votre commande. Dans la section Structure de soutien partagée, vous devez cocher la case J’ai pris connaissance de cette politique de soutien et je l’accepte.
-
Cliquez sur Créer un appareil virtuel.
Pour créer un périphérique secondaire, envoyez une requête POST au point de terminaison /ne/v1/devices. Dans le corps de la requête, précisez:
- L'UUID de votre appareil principal à
primaryDeviceUuid. - Configuration du périphérique secondaire dans l'objet
secondary. Veuillez noter que si des versions logicielles différentes (plus récentes) sont prises en charge pour le périphérique secondaire, la présence de deux périphériques en redondance avec des versions logicielles différentes peut affecter les performances. Nous vous recommandons de mettre à jour la version logicielle de votre appareil principal.
Exemple de requête cURL:
curl -X POST "https://api.equinix.com/ne/v1/devices" \
-H "content-type: application/json" \
-H "Authorization: Bearer <token>" \
-d '{
  "primaryDeviceUuid": "device_uuid",
  "secondary": {
    "metroCode": "<metro_code>",
    "version": "<version_number>",
    "virtualDeviceName": "<secondary_device_name>",
    "hostNamePrefix": "<secondary_device_hostname_prefix>",
    "notifications": [
      "<contact_email>"
    ],
    "termLength": 1,
    "aclDetails": [
      {
        "uuid": "<acl_uuid>",
        "interfaceType": "<acl_interface_type>"
      }
    ],
    "userPublicKey": {
      "username": "<username>",
      "keyName": "<keyname>"
    },
    "licenseFileId": "<license_file_id>",
    "accountNumber": "<account_number>"
  }
}'
Inclure licenseFileId seulement si votre fournisseur et votre mode de licence nécessitent un fichier de licence.
Pour une liste complète des paramètres et des options, consultez la référence API.
Lors de la mise en service du périphérique secondaire, l'état du périphérique principal passera à
WAITING_FOR_SECONDARY. Si le serveur secondaire ne parvient pas à provisionner, le serveur principal retournera au serveur principal.
État provisionné. Si les provisions secondaires sont activées, l'état des deux appareils passera à
PROVISIONED.