Ordering a Fabric Port
Equinix Fabric ports are available in various configurations including standard and metro ports, remote ports, and extended ports, depending on where customers are located in relation to the physical Equinix Fabric equipment.
Prerequisites
To order an Equinix Fabric port, you must have:
- One of the following Roles:
Fabric Port Manager,Fabric Manager, orFabric Service Provider. - If you are ordering ports that connect to your own cage, you need
Network Ports Orderingcolocation permissions for your specific cage. - If you are a Reseller ordering a port for your end-customer, you need the
Fabric Partner Resource Managerrole. End-customer users are not allowed to place Fabric Port orders.
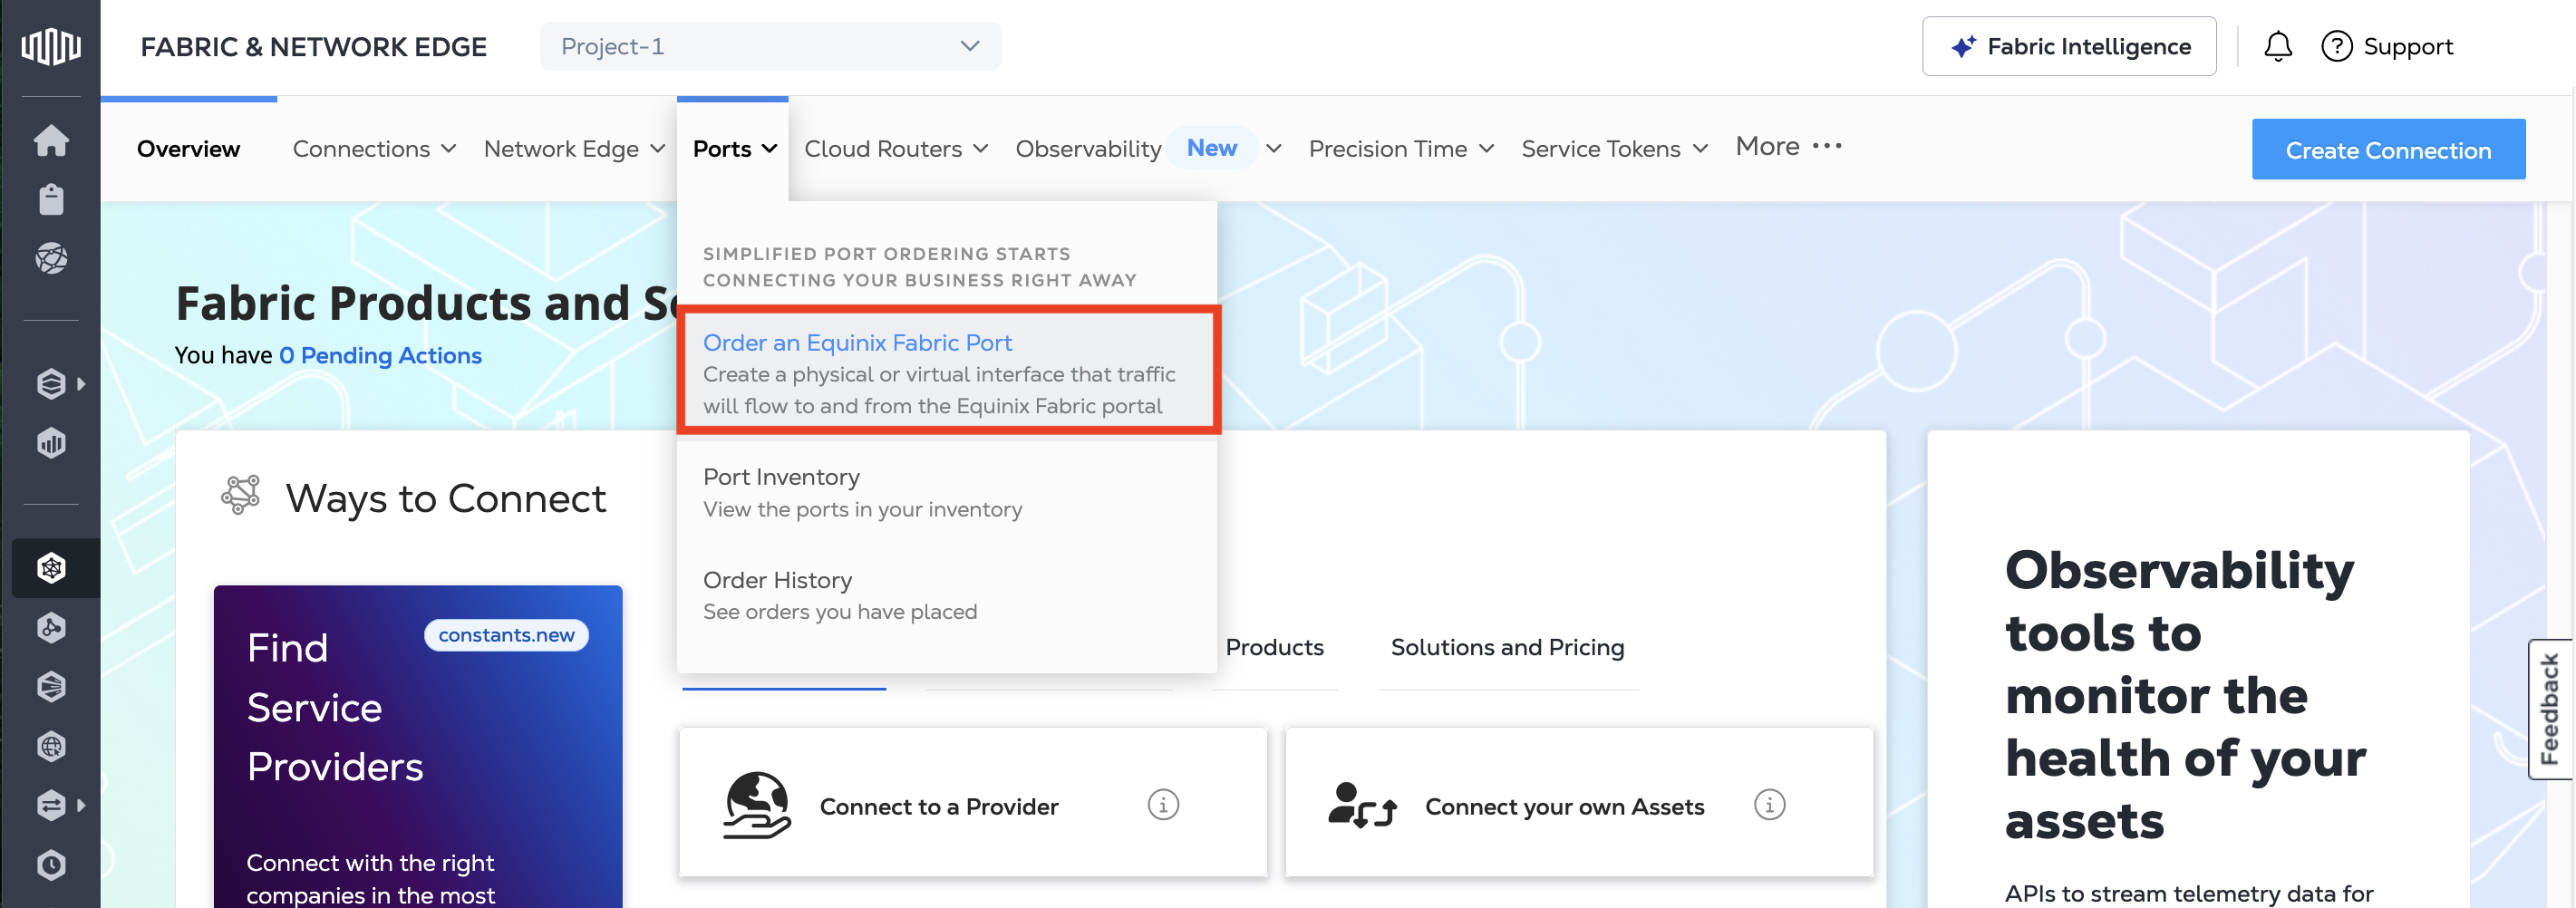
Start Your Order
To order a Fabric port:
-
Sign in to the Customer Portal > Fabric Dashboard.
-
From the Ports menu, select Order an Equinix Fabric Port.
-
Select a project that your new port is assigned to.
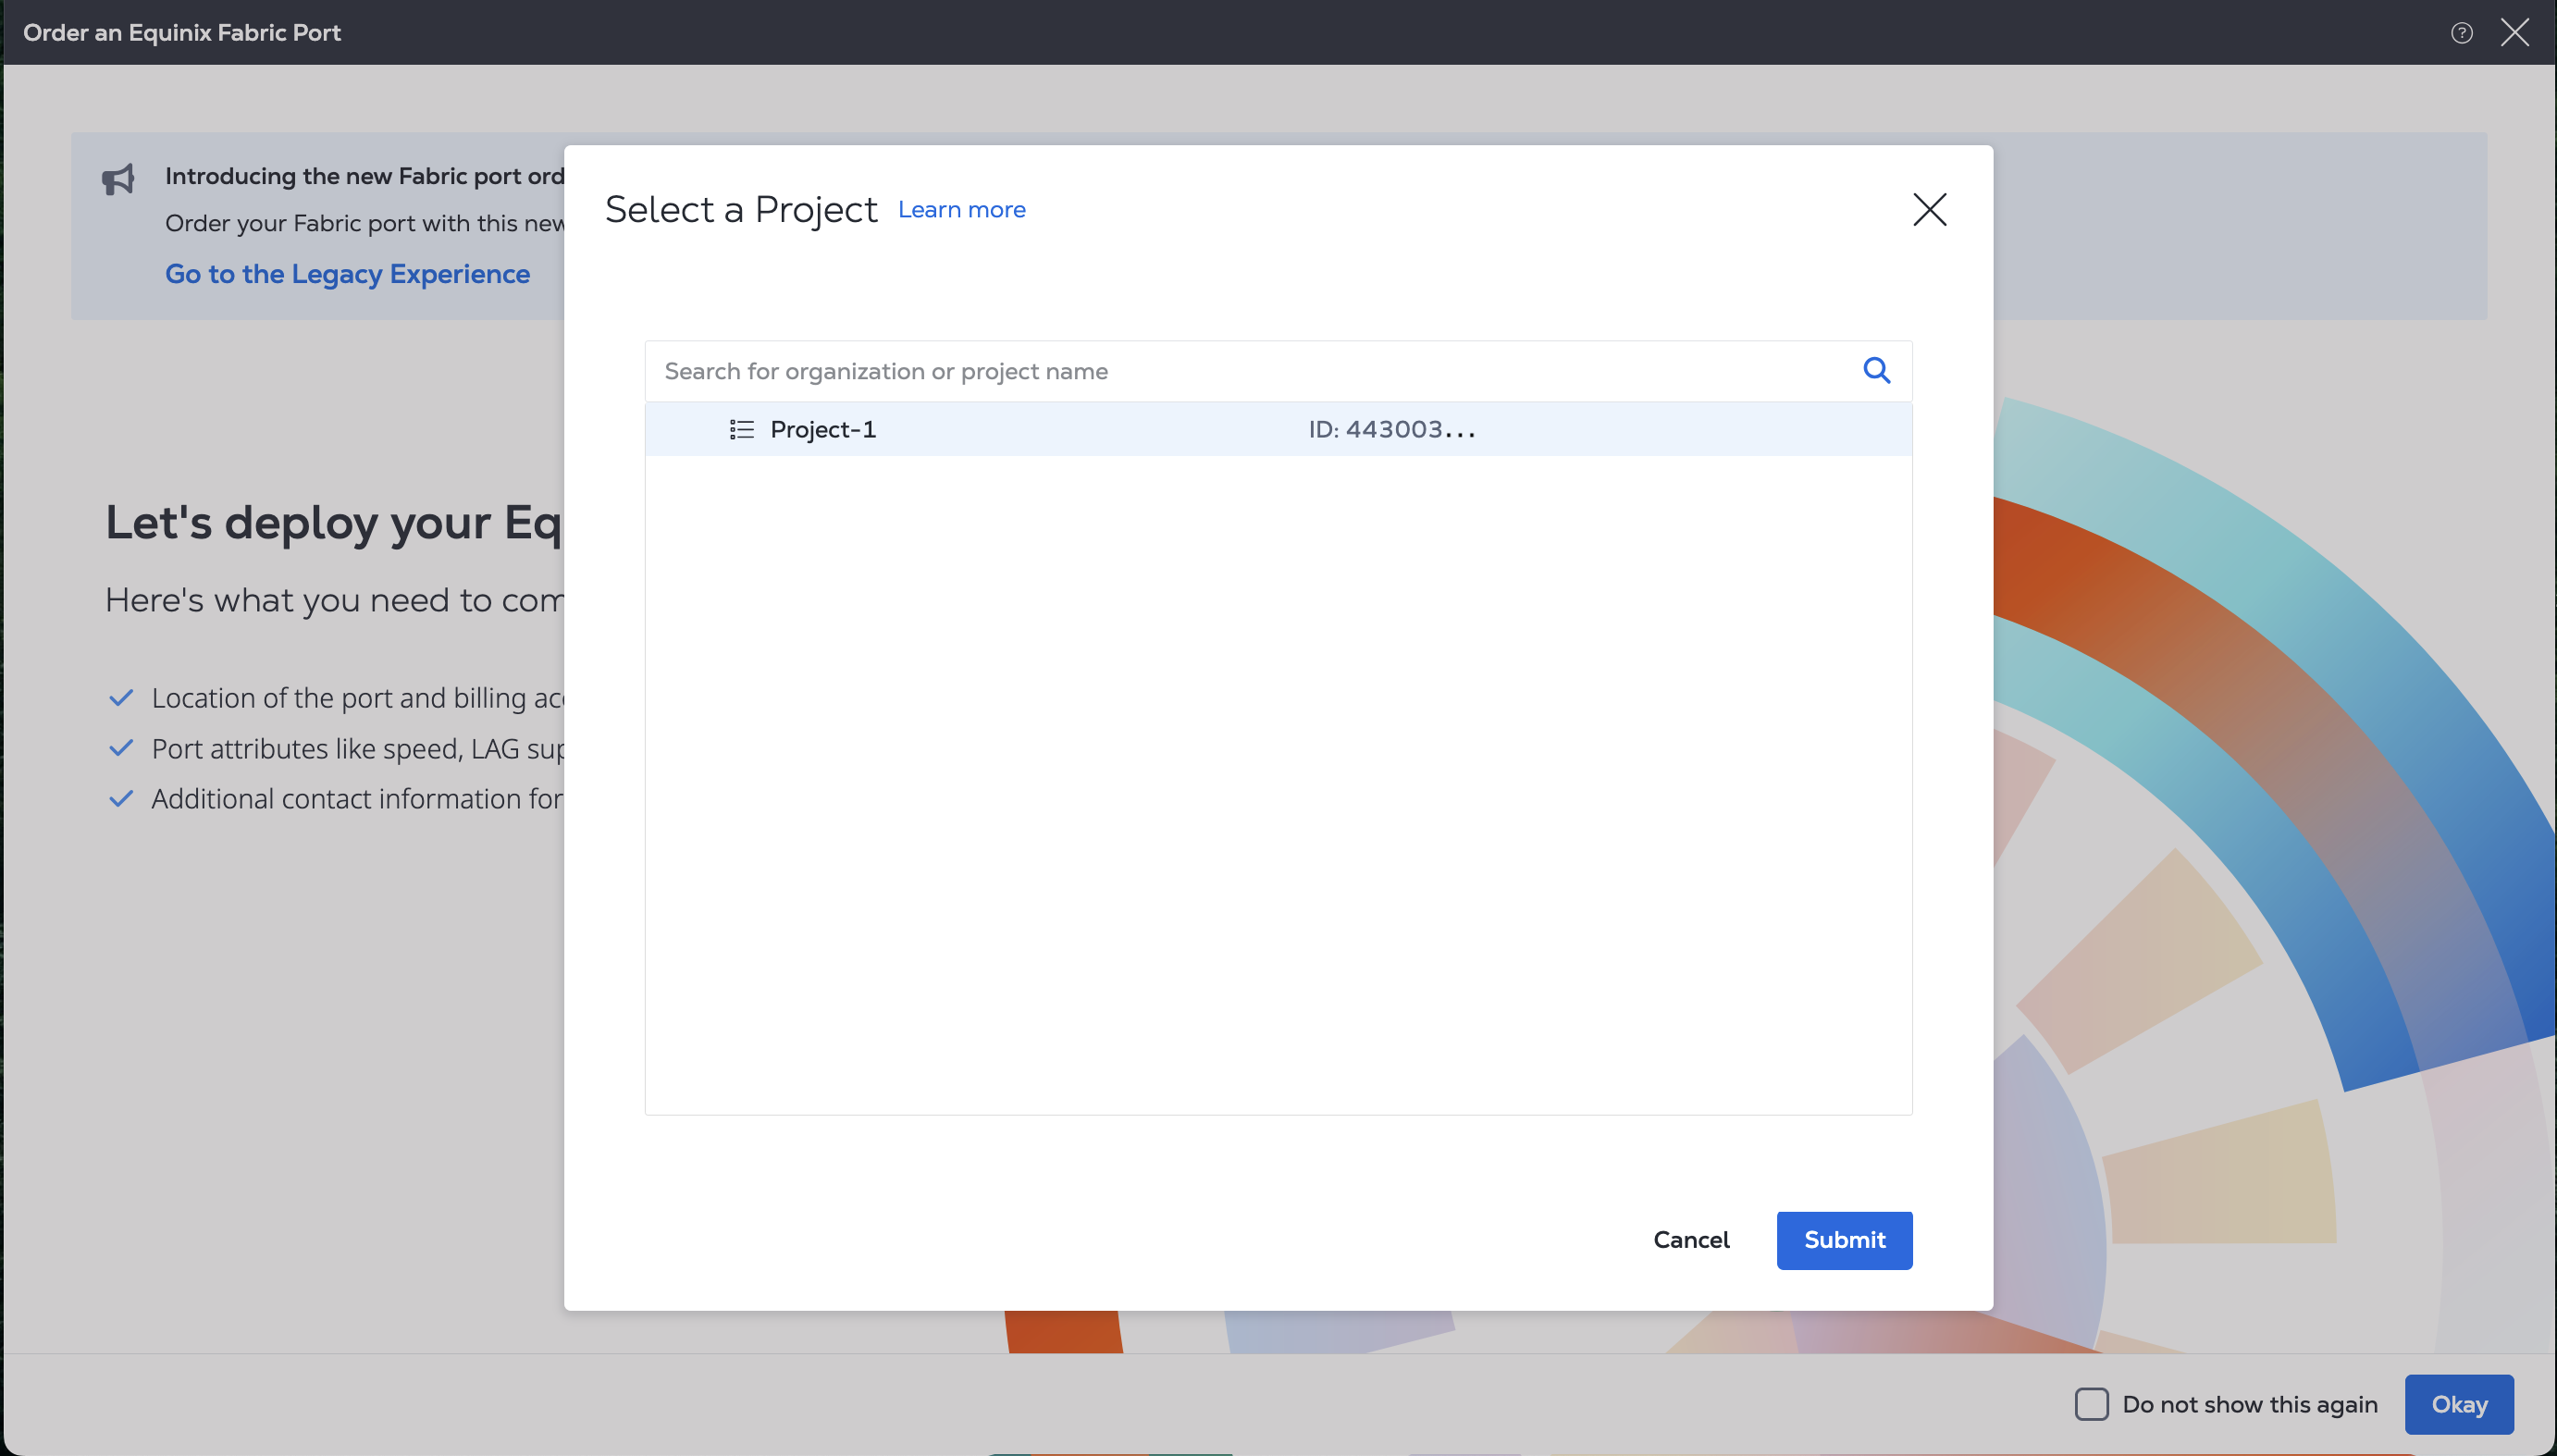
For more information about Projects, see Managing Projects.
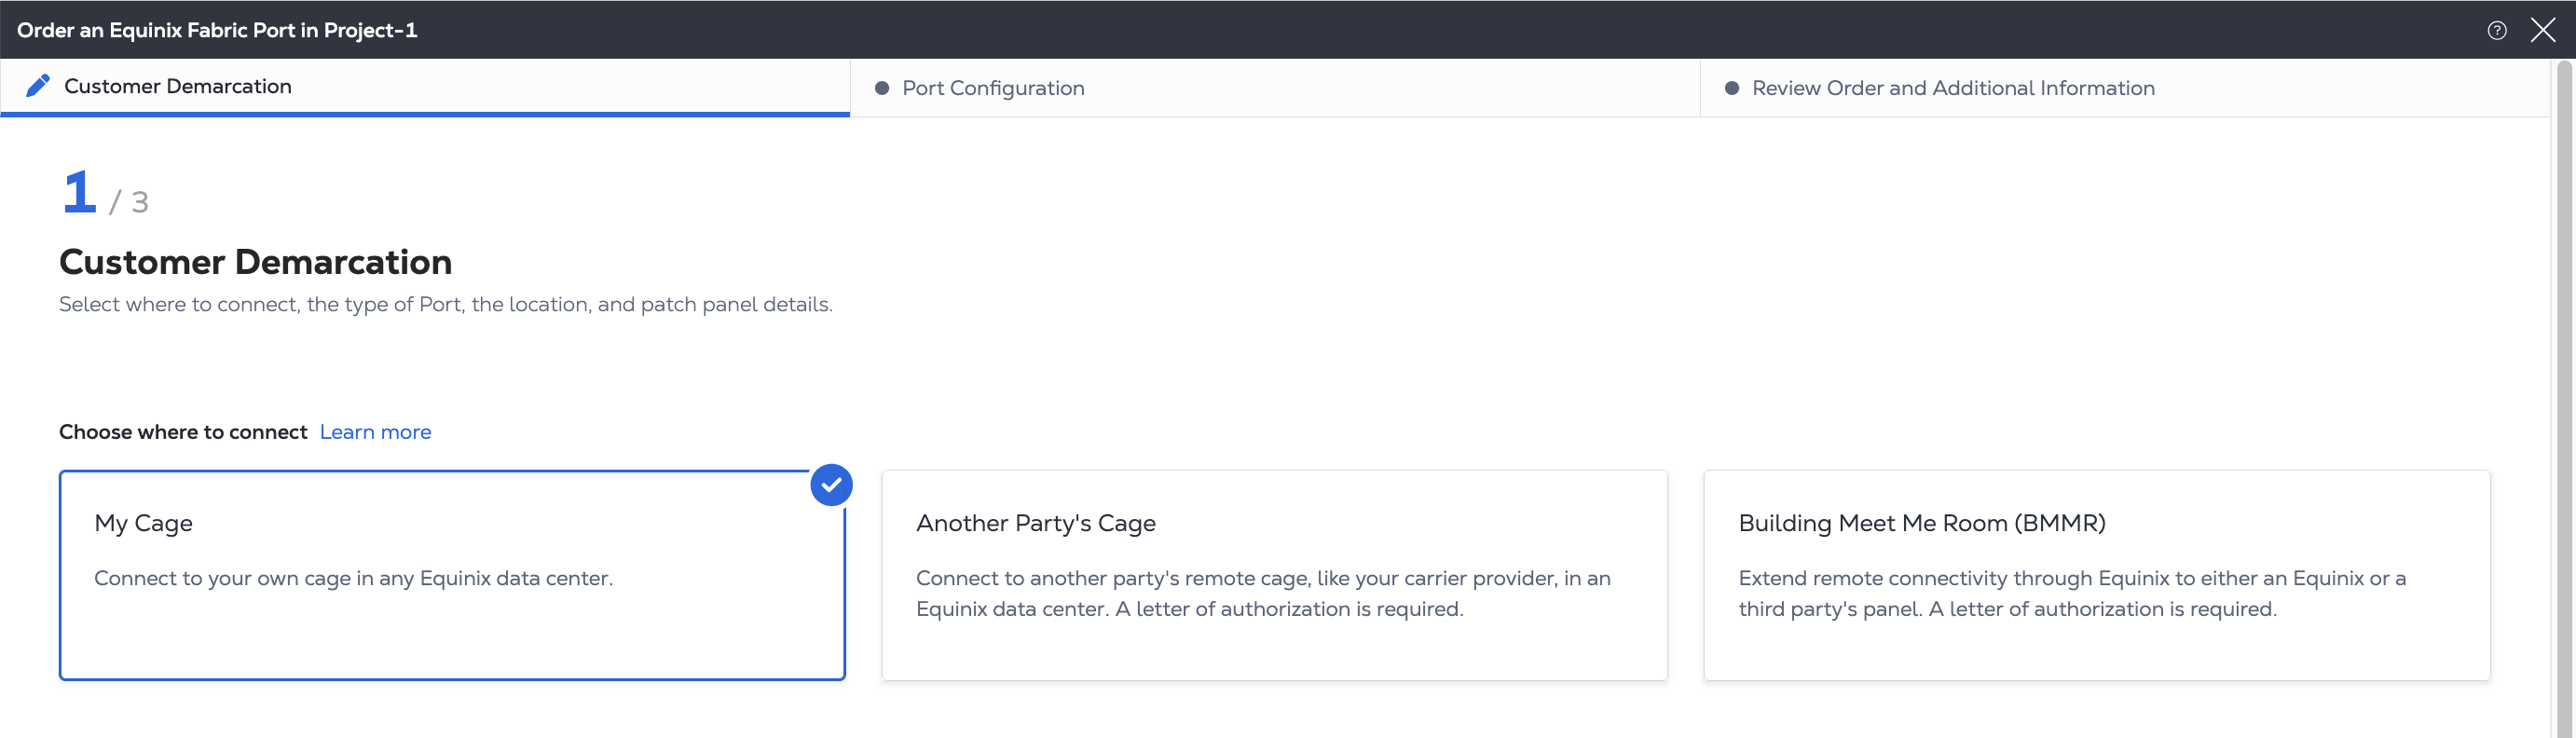
Customer Demarcation and Port Details
On the Customer Demarcation page, configure the demarcation point and port details, depending on where you want to provision your port.
-
In Choose where to connect, select one of:
- My Cage in an Equinix IBX – You have your own equipment in an Equinix data center.
- Another Party's Cage – You are ordering a remote port and connecting via another party. Delivering a Fabric port to another party's cage requires a letter of authorization.
- A Building Meet-Me Room (BMMR) – You are using a neutral cage to connect to others.
-
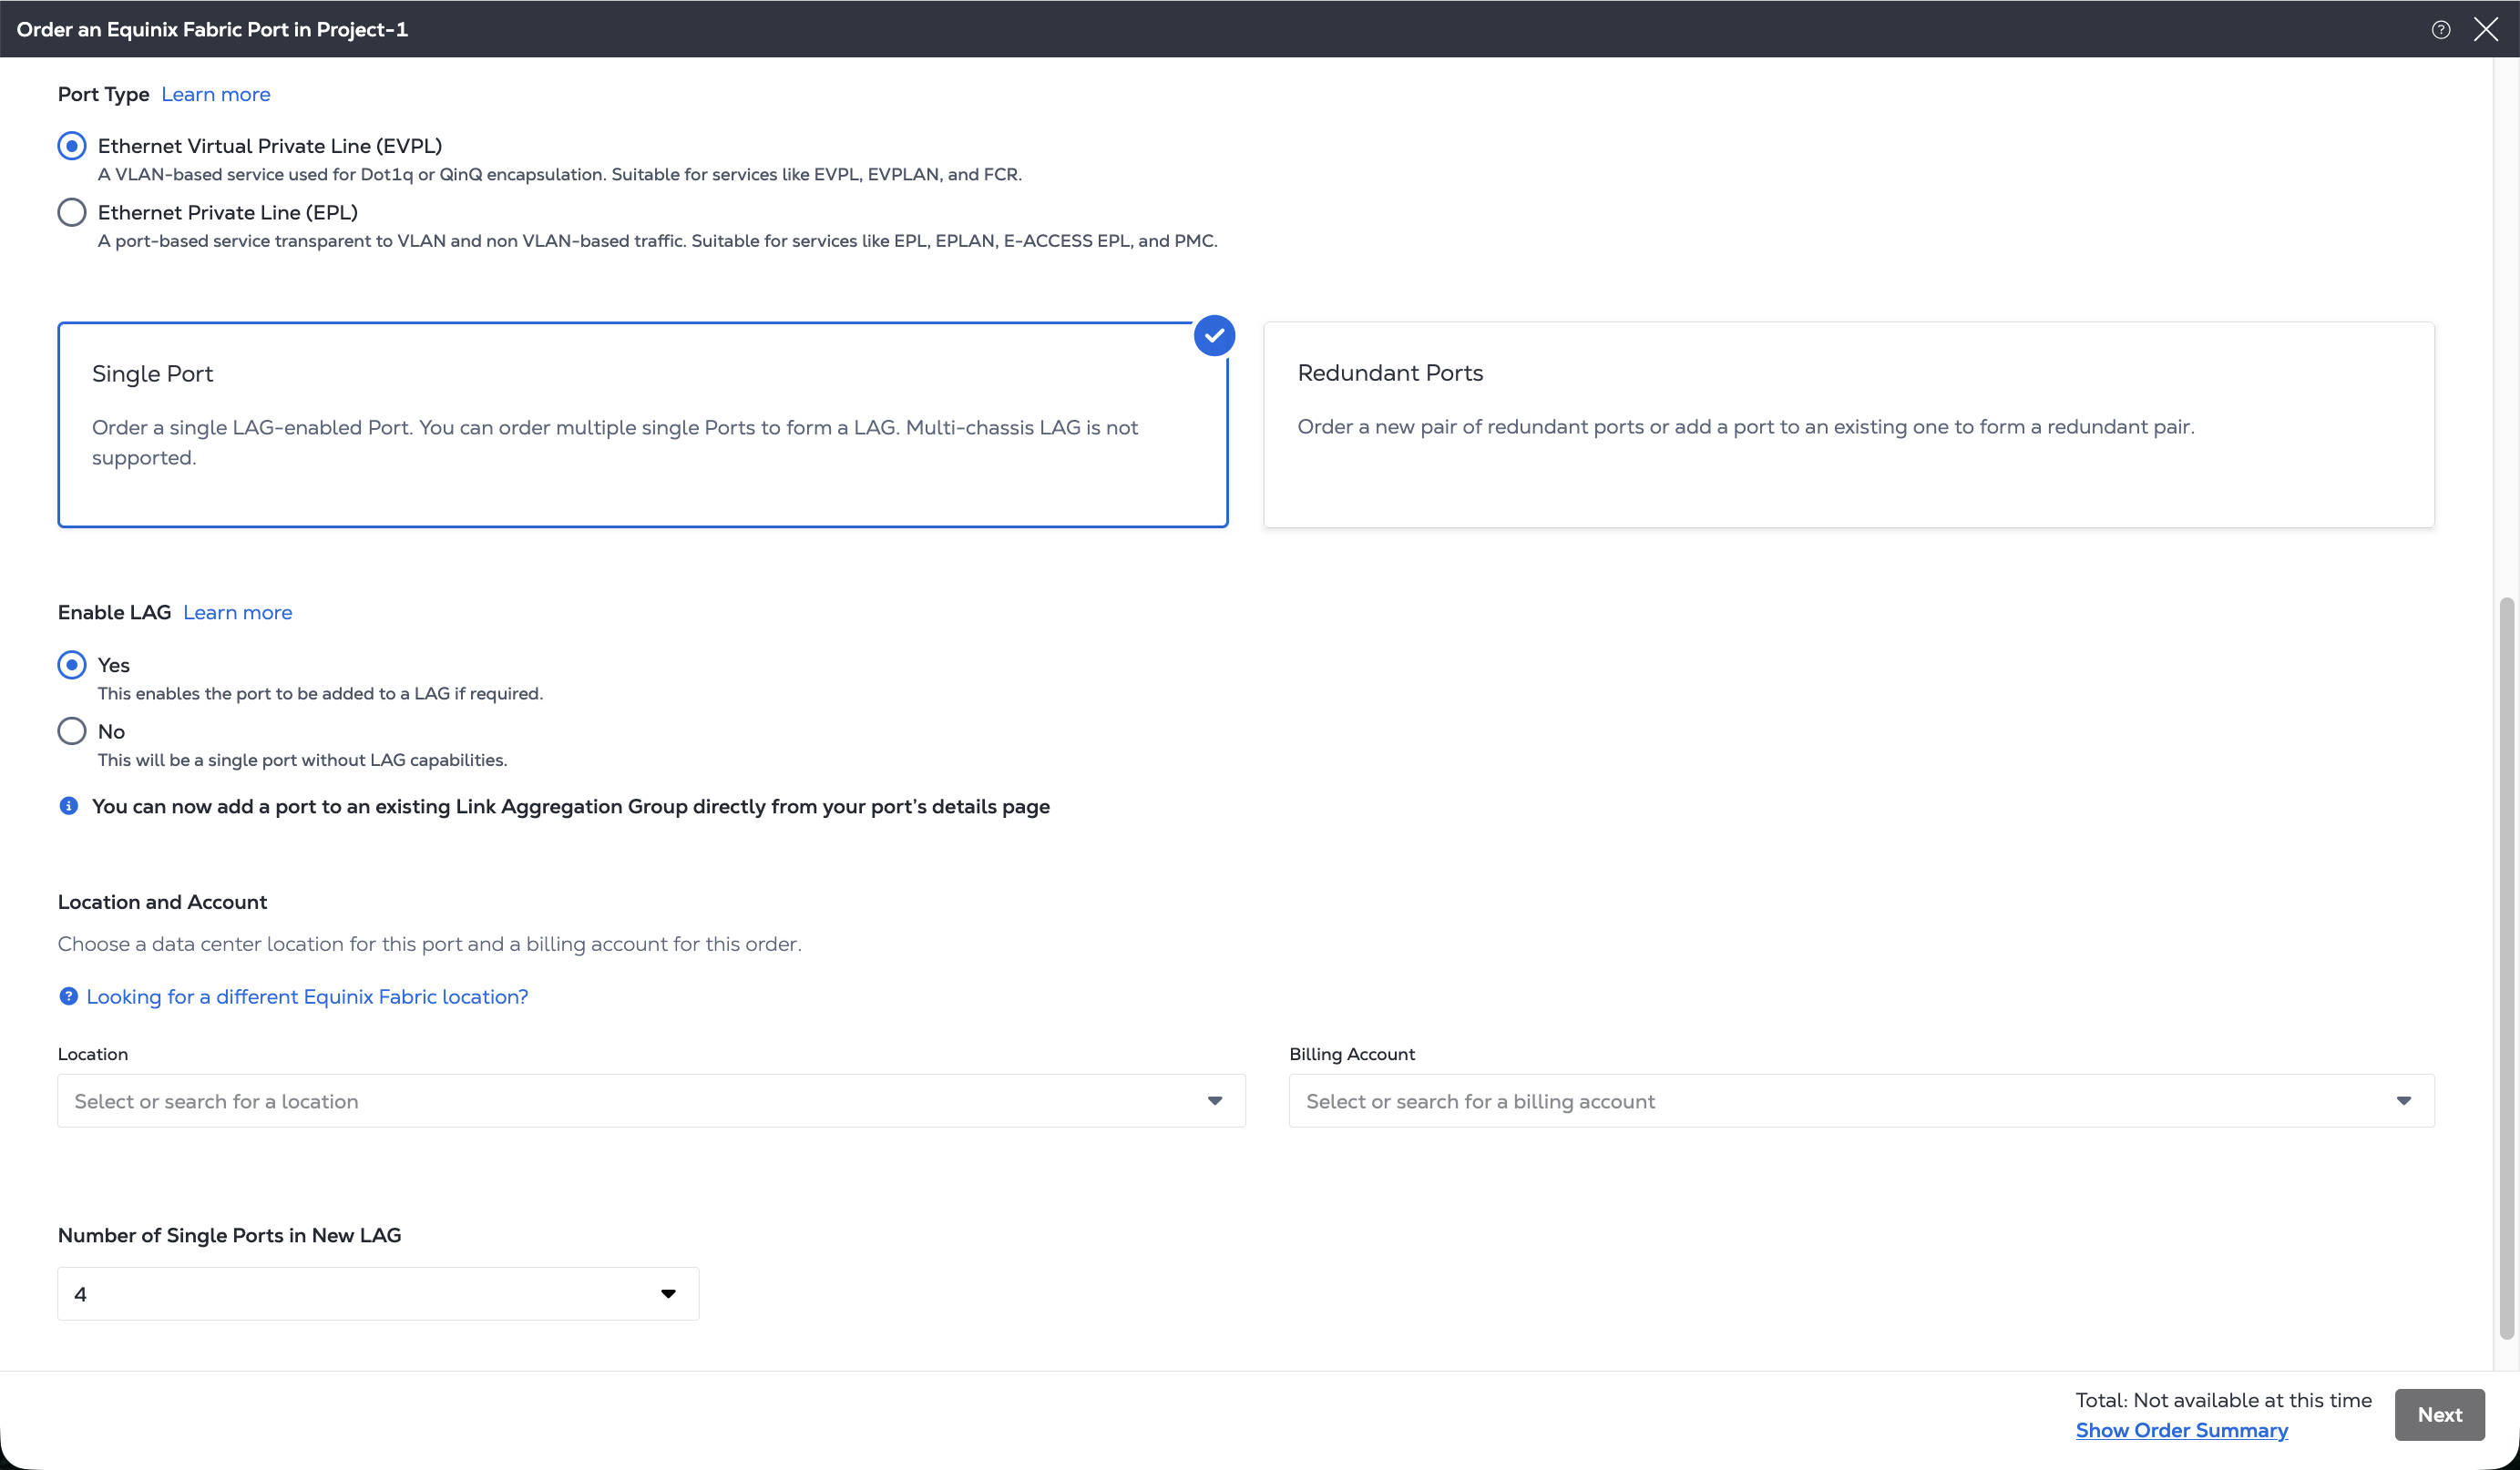
In the Port Type section, select port type:
- Ethernet Virtual Private Line (EVPL) – EVPL ports allow for creating multiple connections, segmenting the traffic based on the VLAN tags.
- Ethernet Private Line (EPL) – An untagged port that allows a transparent flow of traffic. An EPL port allows for one connection and there is no separation of traffic.
-
In the Redundancy Type section, choose a redundancy option:
-
Single Port – Order a single port. Available for both EVPL and EPL port types. In the Enable LAG section, choose either Yes or No. If you enable LAG, choose the number of ports from the drop-down, max 8.
-
Redundant Ports – Order a pair of redundant ports. Available for EVPL ports. You can choose to either create two new ports as a high availability redundant pair or to create a single port, and pair it with an existing port to form a high availability pair.

-
-
In the Location and Account section, select an IBX data center where you want a Fabric port and a billing account for ordering in the selected location. Click Create Billing Account to create a new billing account that you can use to place your order.
Depending on the demarcation point you choose, complete the following steps.
My Cage in an Equinix IBX
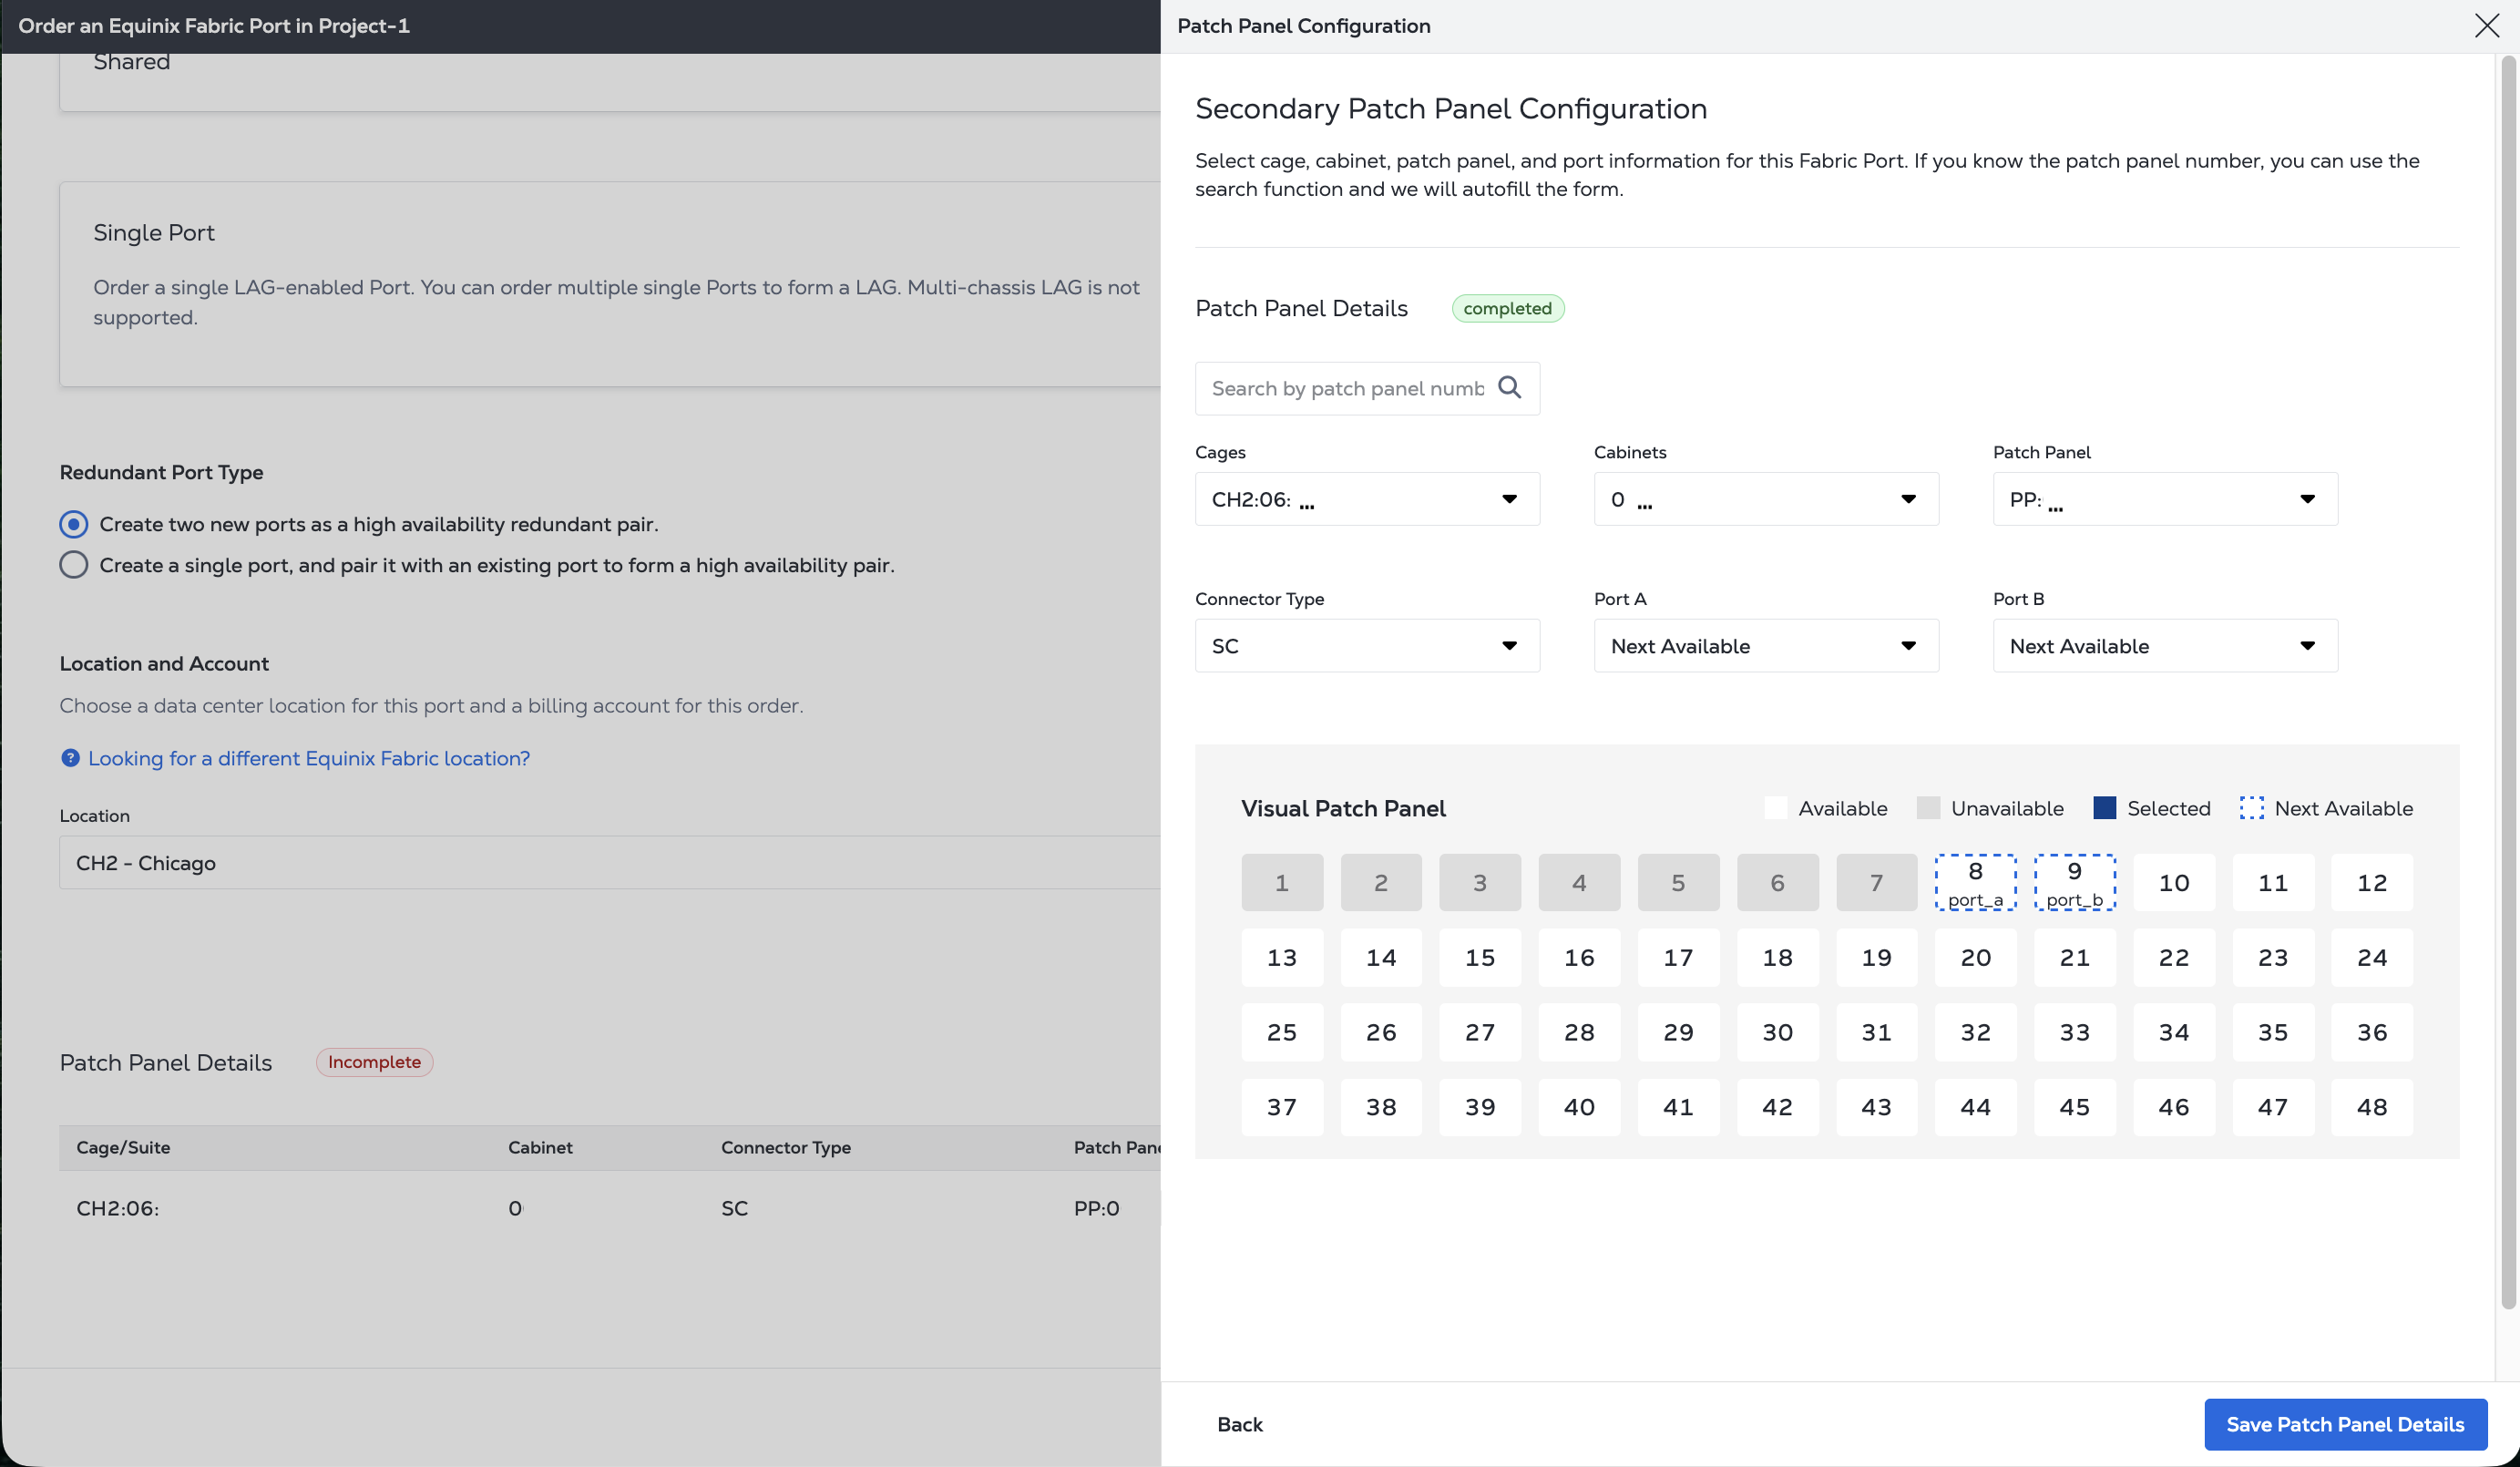
If you are using your cage, select the cage, cabinet, and patch panel. By default your options are filtered by the billing account. If you want to select different billing & cage accounts, deselect Show the patch panels associated with this Billing Account only. Select a different cage account for which you have access and then select the demarcation point.
-
Click Add Patch Panel Details.

-
In the Patch Panel Configuration panel, select the cage, cabinet, patch panel, and port information for your new port. If you know the patch panel number, enter it in the search field to autofill the form.
If you are ordering a redundant pair of ports, repeat the process for the secondary port.
-
Click Save Patch Panel Details.
-
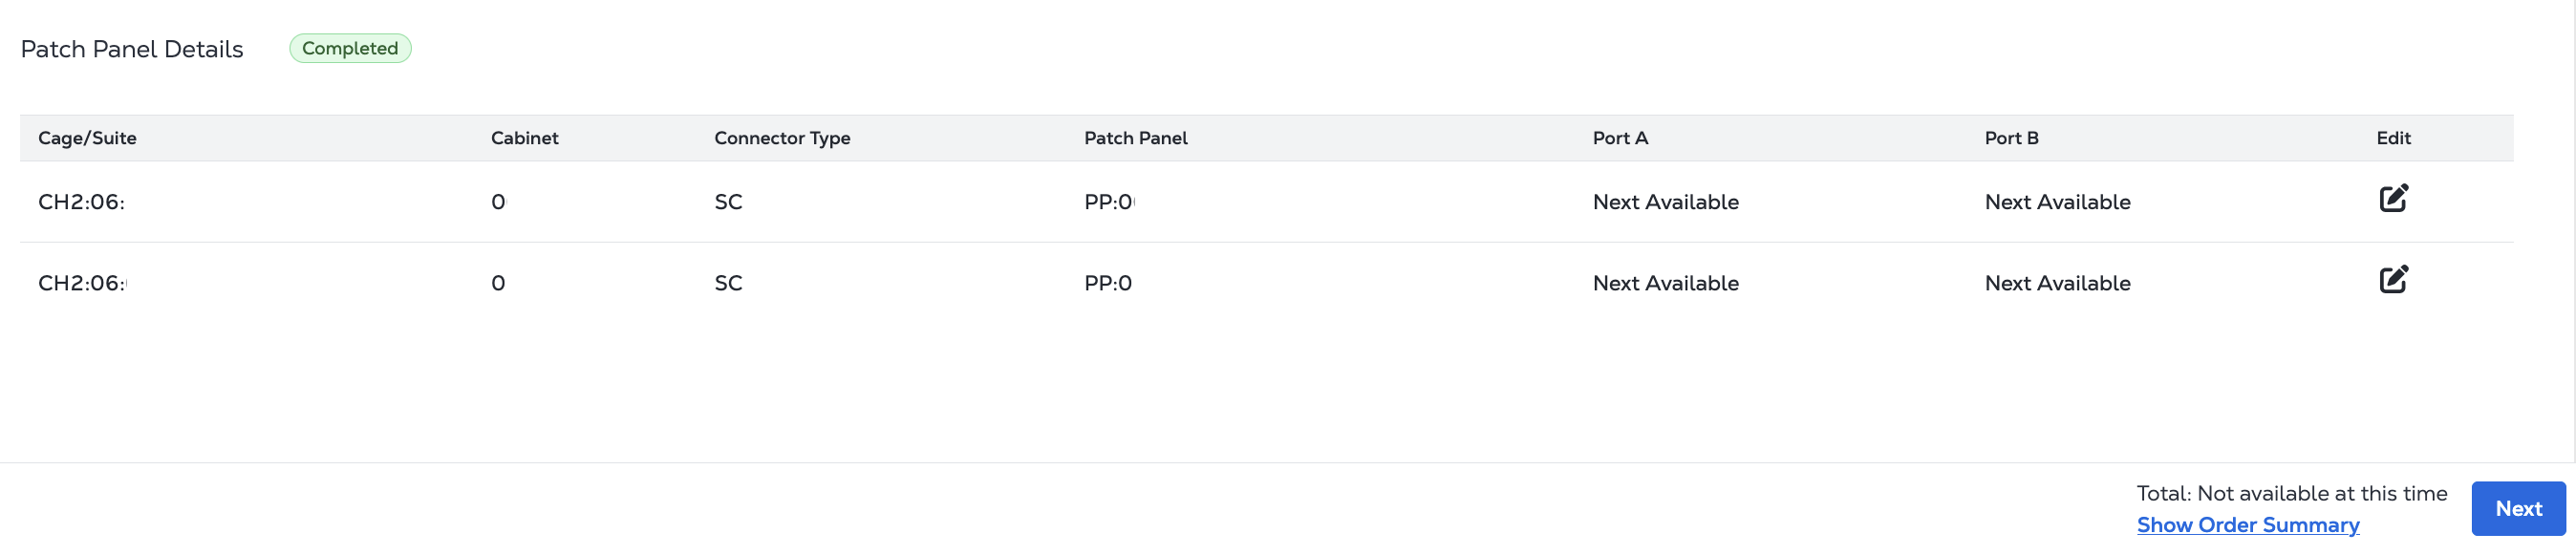
Review you port selections.
-
Click Next to go to Port Configuration.
Another Party's Cage
If you are using Another Party's Cage, provide a Letter of Authorization (LOA) that authorizes provisioning of a port in the selected location.
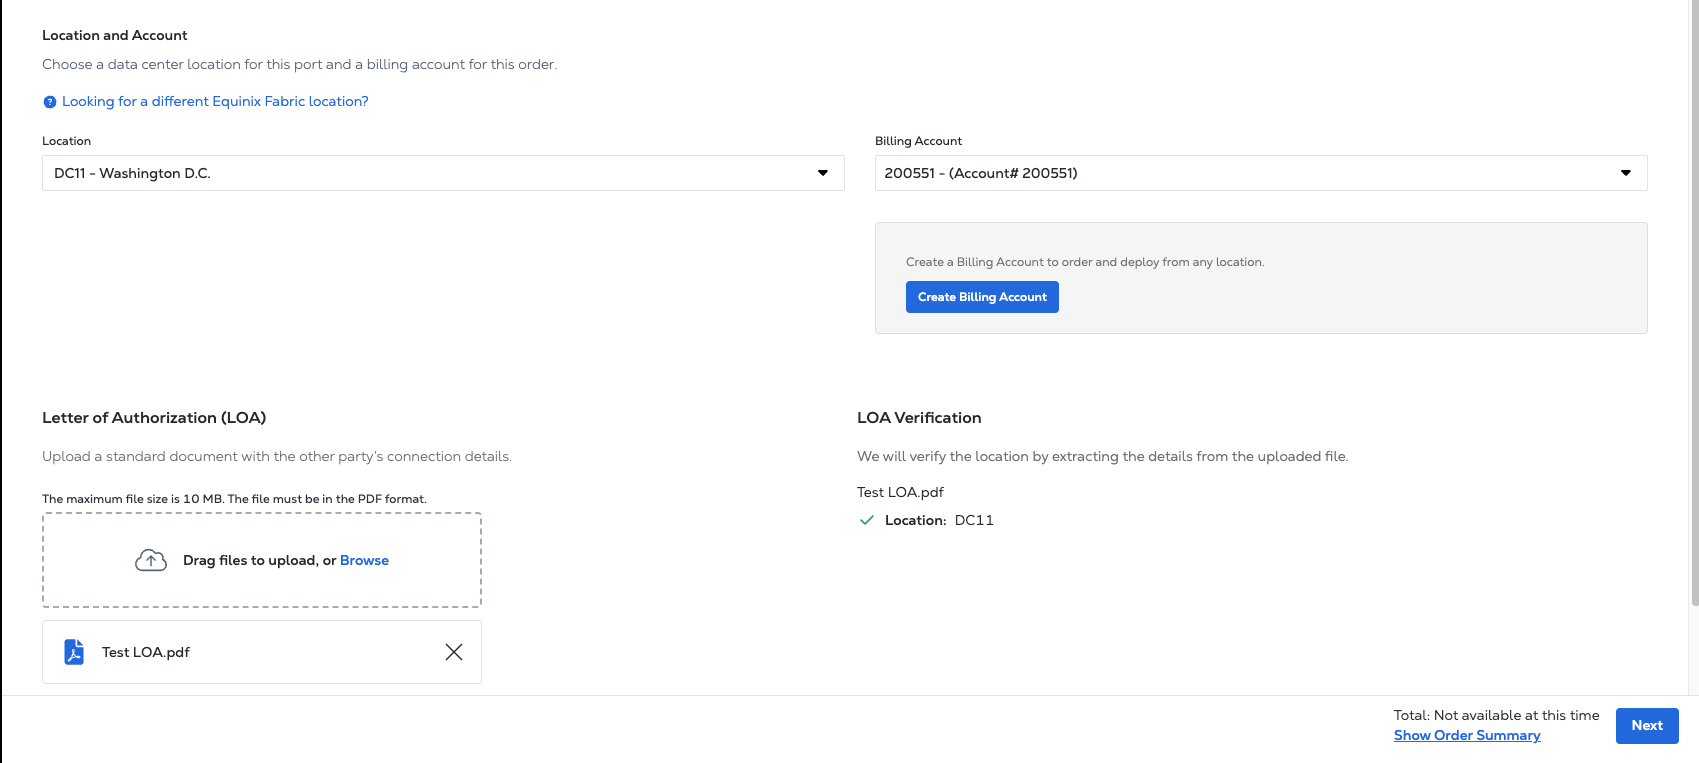
The uploaded PDF file is validated to verify the selected data center location. Ensure that the location selected in the Location dropdown matches the data center location specified in the LOA.
Click Next to go to Port Configuration.
A Building Meet-Me Room (BMMR)
If you are using a Building Meet Me Room (BMMR), select who will install the final connection in the Building Meet Me Room.
-
Equinix - An Equinix technician performs the port installation in the BMMR. This option requires providing a Letter of Authorization (LOA). The uploaded PDF file is validated to verify the selected data center location. Ensure that the location selected in the Location drop-down matches the data center location specified in the LOA.
-
Self - Your personnel performs the installation of the port.
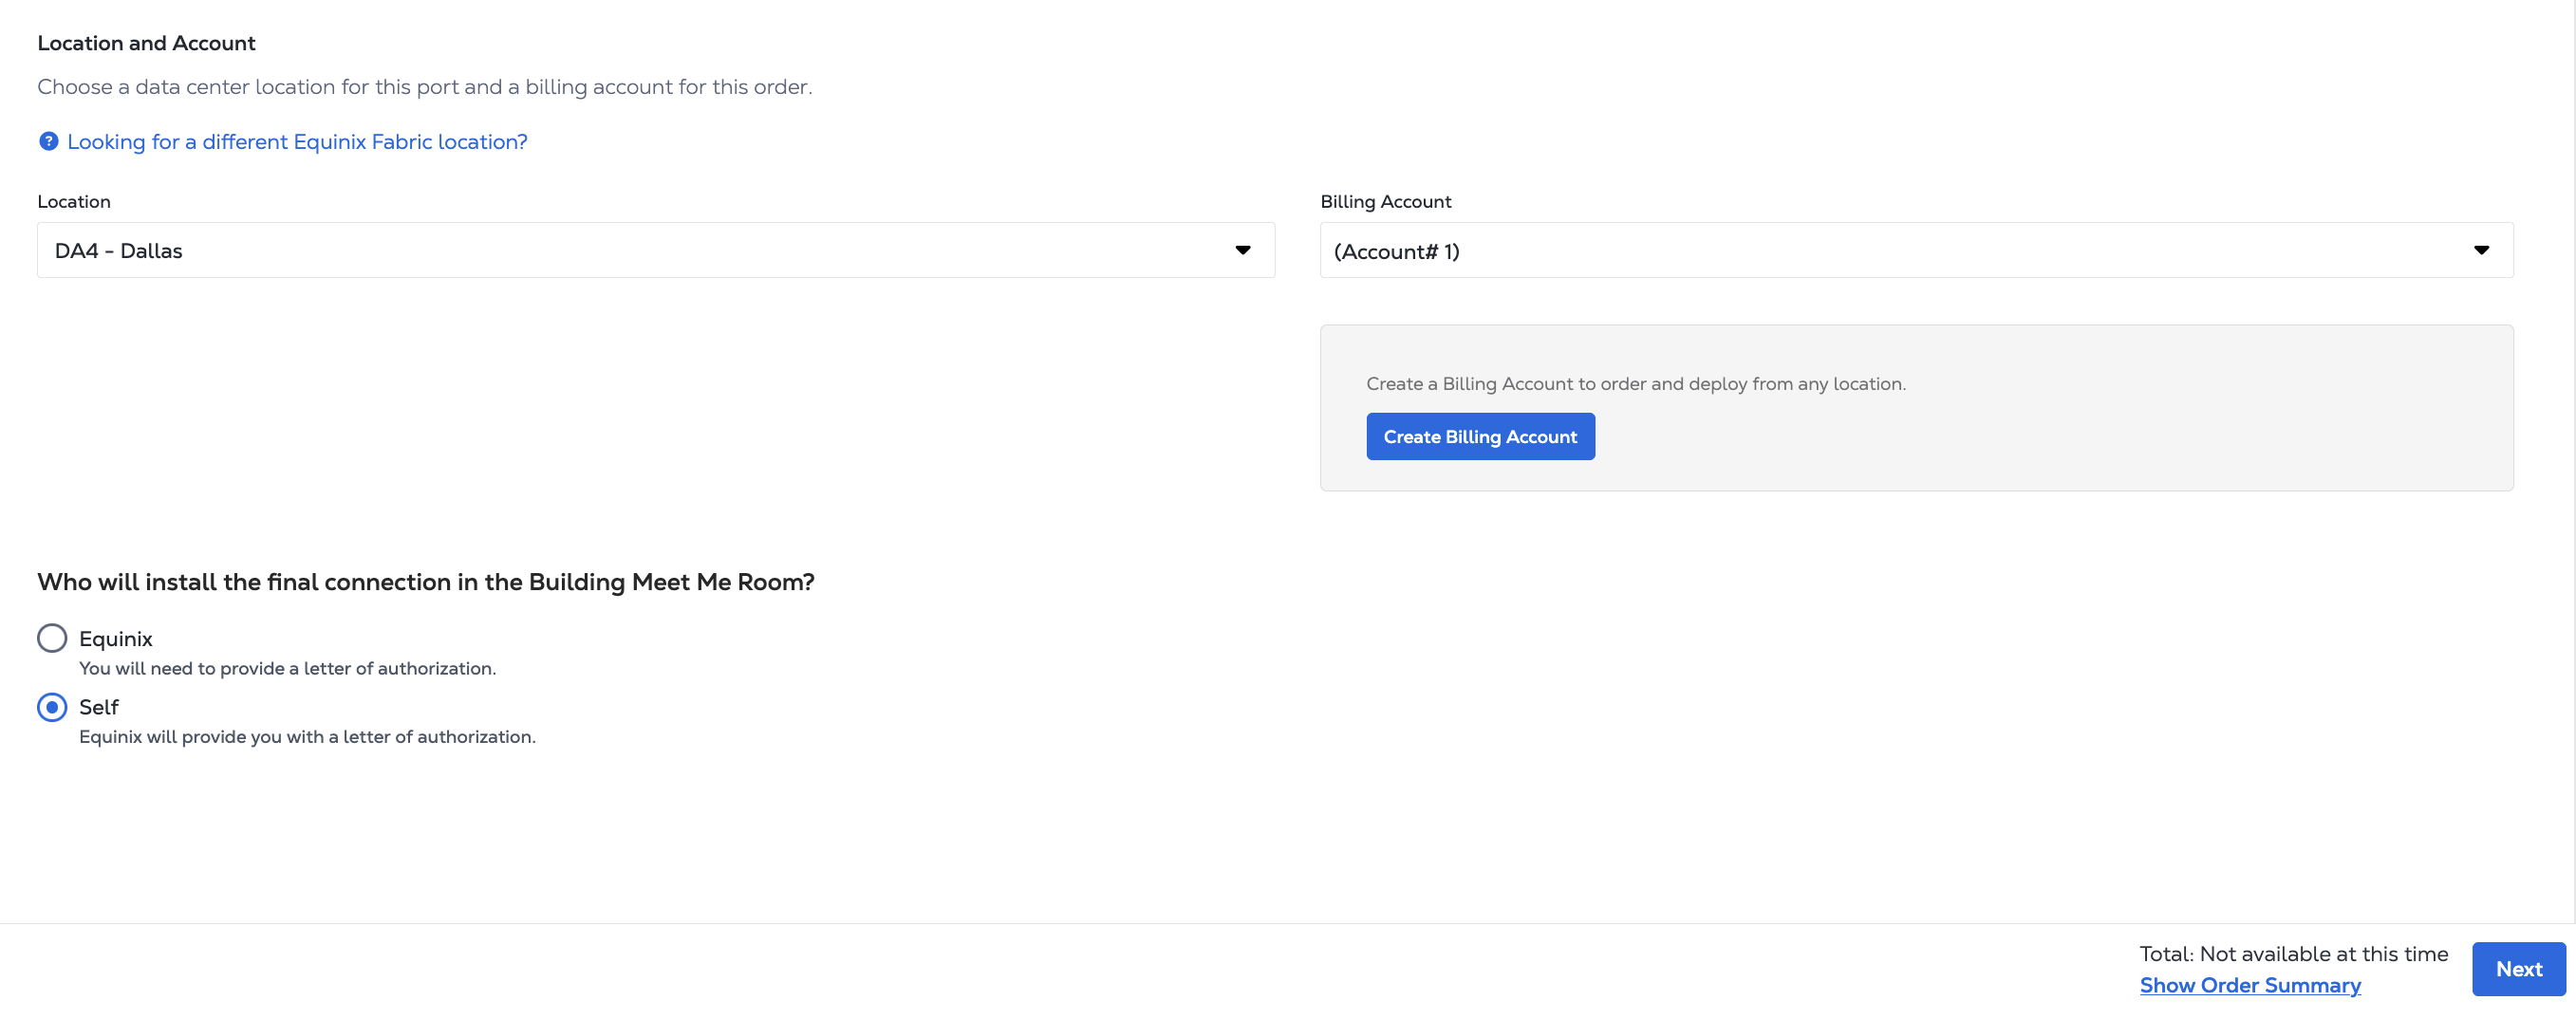
Click Next to go to Port Configuration.
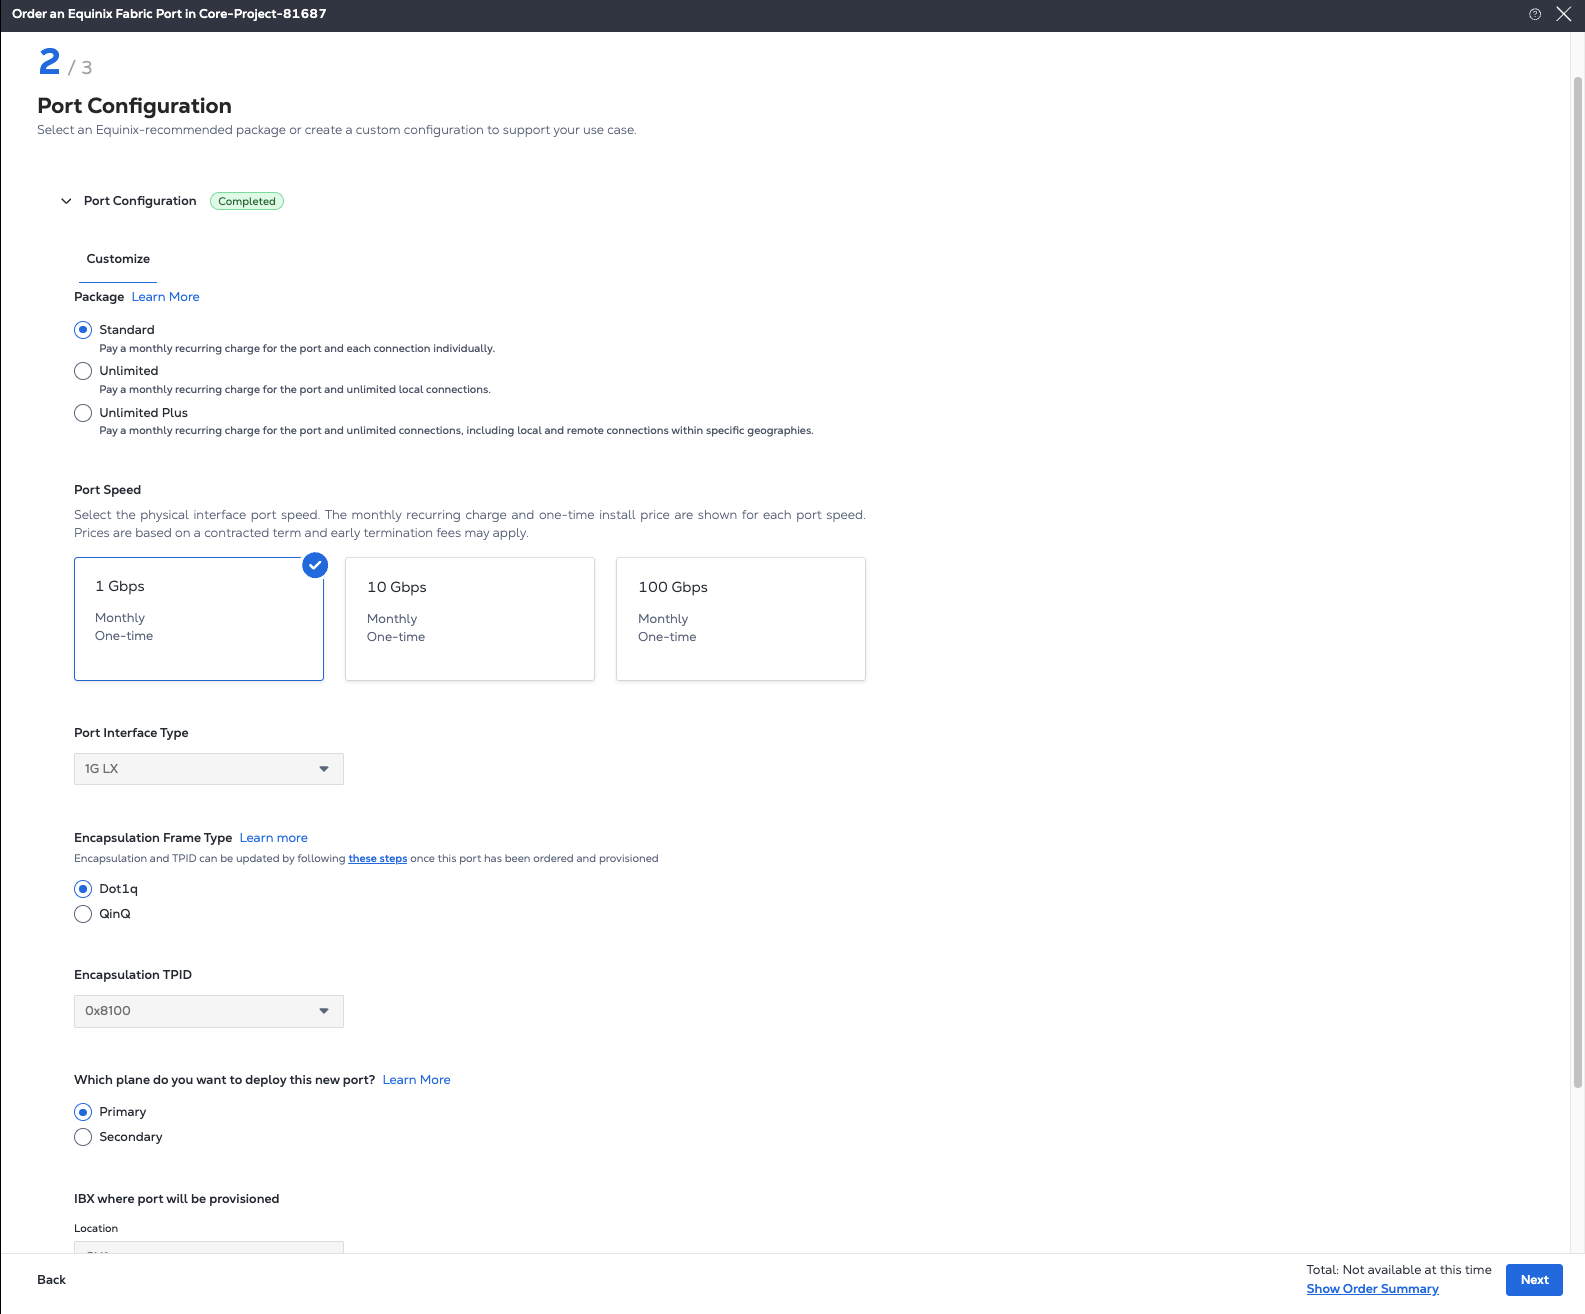
Port Configuration
On the Port Configuration page:
-
Select a Package.
-
Standard - Pay a monthly recurring charge for the port. Each connection is billed individually and separately.
-
Unlimited - Pay a monthly recurring charge for the port and unlimited unlimited number of point-to-point local connections.
-
Unlimited Plus - Pay a monthly recurring charge for the port and unlimited point-to-point local and remote connections. Available in Europe, Canada, and the US. Contact your Equinix sales representative to order this port type.
For more details, see Connection Packages.
-
-
Select the physical interface Port Speed: 1 Gbps, 10 Gbps, or 100 Gbps. The monthly recurring charge and one-time install price are shown for each port speed. Prices are based on a contracted term and early termination fees may apply.
(Optional) Select port interface type. This option may not be available or auto-selected based on the Port Speed.
-
Select the Encapsulation Frame Type.
- Dot1q - For Dot1q ports, TPID is fixed at
0x8100and cannot be changed. - QinQ - For QinQ ports, TPID defaults to
0x8100, and can be optionally changed to0x88A8.
- Dot1q - For Dot1q ports, TPID is fixed at
-
Select which Equinix Fabric redundancy plane you want to provision the port on.
- Primary - The port is provisioned on Fabric's "A" chassis group.
- Secondary - The port is provisioned on Fabric's "B" chassis group.
For more information, see Port Redundancy.
-
(Optional) Select an IBX data center where you want to provision your port. This is auto-selected based on your previous location selection and is only applicable when there's no capacity on the Fabric switch in the IBX data center where the previously configured demarcation point is located.
-
Click Next.
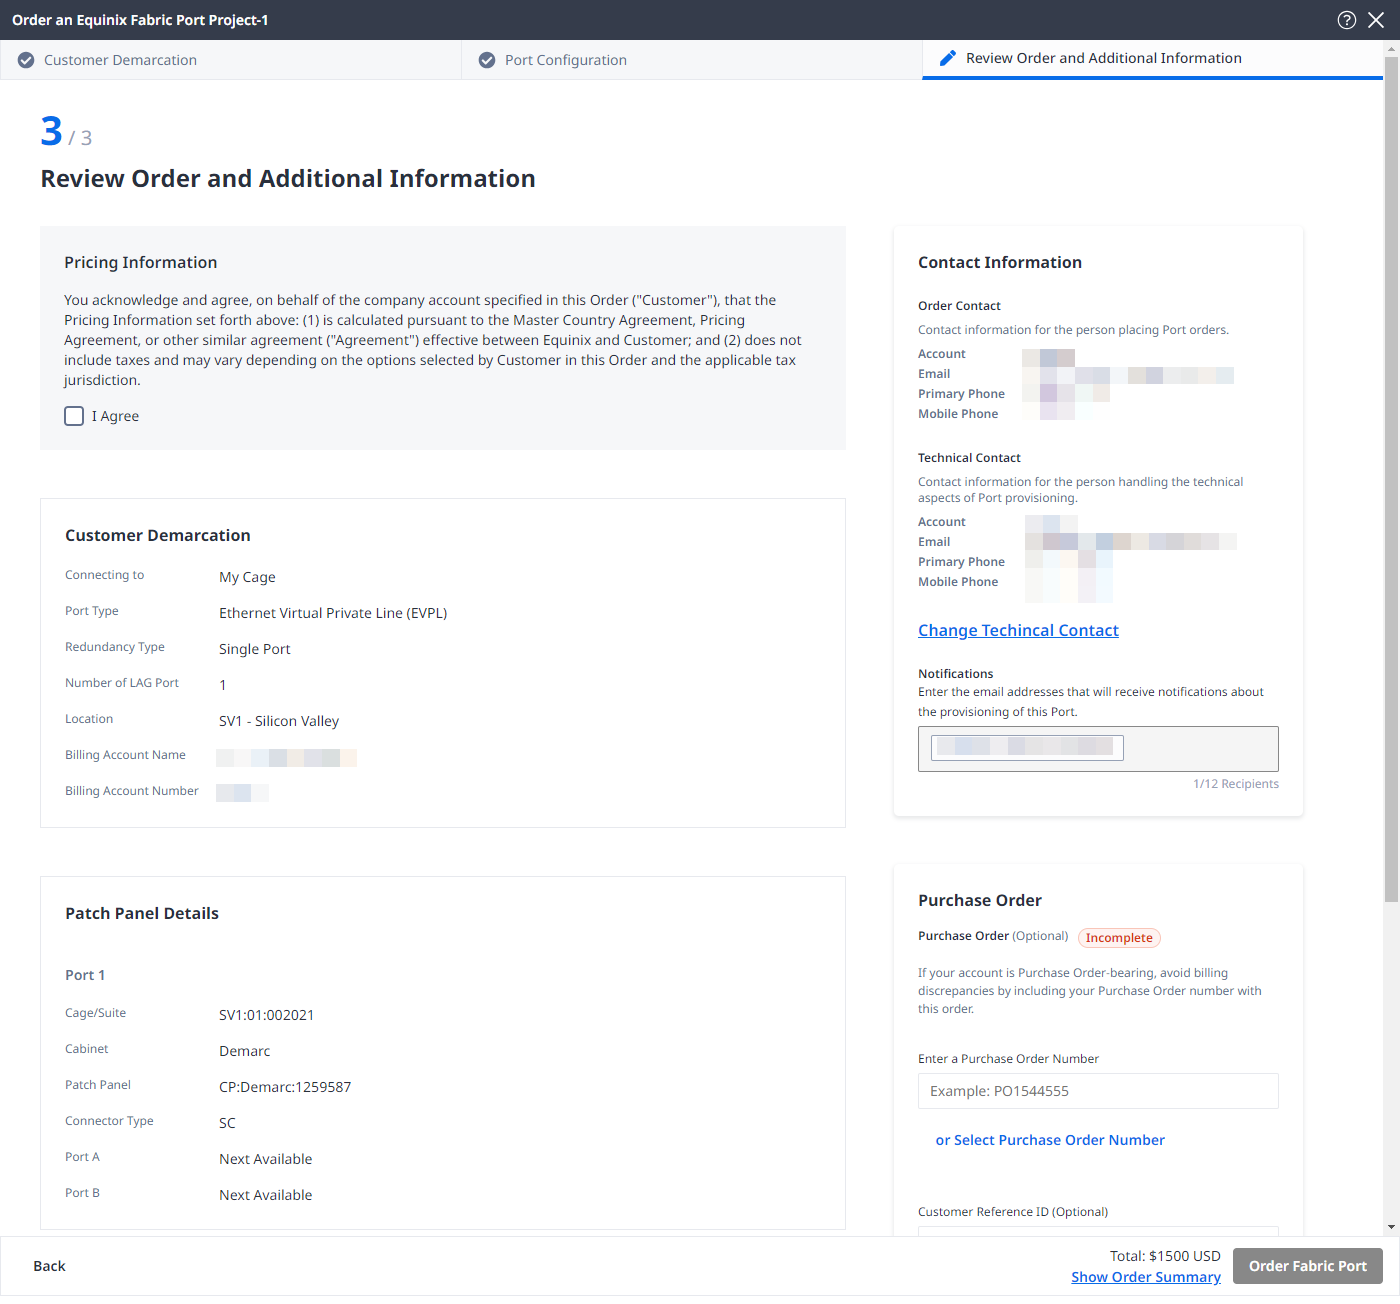
Review and Submit Order
On the Review Order and Additional Information page:
-
In the Pricing Information section, select I agree to acknowledge the pricing disclaimer.
-
Review information in the Customer Demarcation, Patch Panel Details, and Port Configurations sections.
-
In the Contact Information section, review contact details for technical inquiries. Click Change Technical Contact to update the information.
-
In the Purchase Order section:
- Enter a purchase order number, or click Select Purchase Order Number to choose from the pool of eligible purchase order numbers.
- Provide customer reference identifier, that will help you identify this order on your invoice.
-
Click Order Fabric Port.