Connectors
Legacy Layer 3 services (Connectors, Routing Instances and Subscriptions) are being sunset. To learn about new Layer3 services offered by Fabric, see the Fabric Cloud Router documentation for more information.
A connector brings two other components together. In the context of a basic Layer 3 service, this is between a port and an RI, though it can and will have other functions in the future. If the port is a tagged interface, the connector does this with a VLAN. The nature or setup of both the port and RI are generally not relevant and don't affect how the connector is configured, except as noted below in limitations.
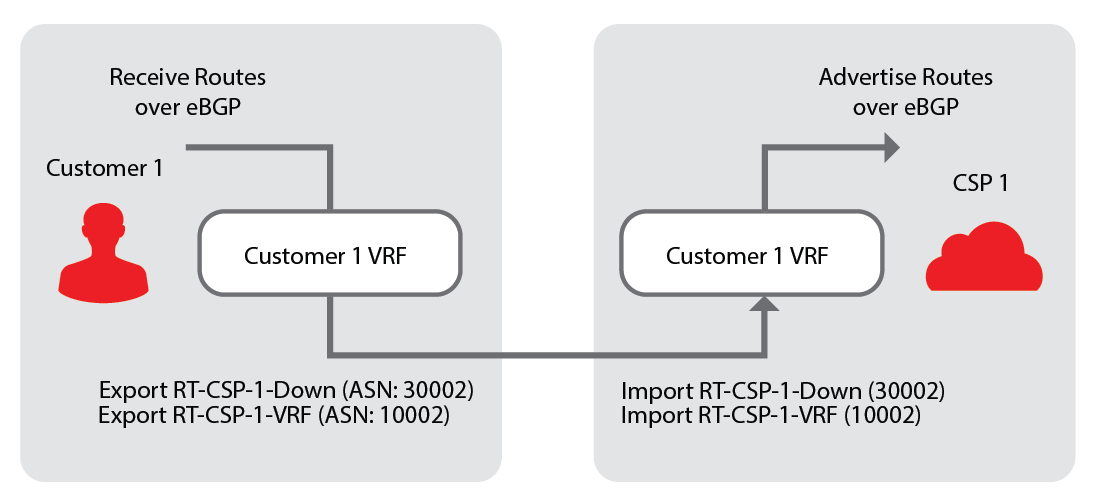
Connecting a port and an RI together allows a user to peer with Equinix using eBGP at either end of the below diagram:
Limitations
- The connector component is limited to connecting one port and one RI together. Users should be aware that the connector is a generic component
- Once provisioned, assigned IP addresses will appear on the connector details for a user to create their own configurations
- Although users can create multiple connectors from the same or multiple ports to the same RI, the system will not allow connectors from more than one chassis group to the same RI
Creating a Connector
-
Log in to the Customer Portal > Fabric Dashboard.
-
Go to Inventory, select View Connectors, and click Create Connector.
-
Fill all the fields for basic configuration of the connector.
- Select the Routing Instance to attach the connector
- Select Port to attach the connector
- Connector Name - This will default to [port name] to [RI name] but the user can enter a value that is unique to their account and that metro
- Conditional (C-Tag) - If the selected port is a Dot1Q or a Q-in-Q port, user enters a valid VLAN value (if the port is untagged no VLAN is entered)
- Conditional (S-Tag) - If the selected port is a Q-in-Q port, user enters a valid VLAN value (if the port is untagged, no VLAN is entered)
- An email address that will receive notifications about this component
Optional Network Services
Optional Network Services allow a Cloud Exchange user to add or enhance the functionality of a component or solution with special configurations, additional information, or customized work-flows. This component will operate properly without these services, unless the system indicates that one or more is required.
Always read and understand the service description before adding or editing. It could change the functionality of this or related components.
-
Policer - This option allows you to put an upper limit on the connector speed. You can add a policer to any connection that sets a traffic rate limit at or below the capacity of the port it's connected to, using the VLAN as the sub interface. All traffic to and from the routing instance, from all subscriptions that are not dedicated, are limited to this speed. it's also the speed from which the billing tier is derived on a connection.
First, determine whether you want to choose a standard tier or custom speed. Select the radio button beside the category you want.
-
If you select a standard speed, you can now select the billing tier you want to assign. If you opted for a custom speed, you need to enter the speed and unit. You are assigned the appropriate billing tier
-
If a service mandates a speed, the Policer becomes mandatory
-
-
Bi-directional Forwarding Detection (BFD) - This enables a specific protocol that the connector uses when associated to an RI. The BFD protocol allows detection of a BGP signal and is generally used as a monitoring feature to determine an active peering on a particular link.
Managing a Connector
The connector component is used to connect the Port and a Routing Instance so that data can pass between them.
For organizations transitioned to Equinix Identity and Access Management, the permissions to create and manage Layer 3 components are inherited from the Layer 2 connection permission settings.
Go to Inventory and click Connectors.
To find a connector, in the Search Connectors field, enter the name of the connector. The handy auto-complete function helps you narrow down the list.
The filter bar helps you with useful options to sort and narrow your search results. You can sort your Connectors based on status, name and date created. To sort your results, you simply click the drop-down for each category.
Port Tagging
-
You can choose to leave a port untagged or tagged.
-
For Dot1Q ports, you can choose to tag the port by selecting Tagged and entering its VLAN ID, which should be between 2–4094.
-
For QinQ ports, you must input a number for your sTag and your cTag, which should be between 2-4094.
-
Port encapsulation (Dot1Q or QinQ) can't be modified at this stage.
From Connectors, click the connector you want to view in detail. The detail window shows additional information about the connector, as well as the RI it's connected to.
Edit a Connector
-
Go to Connectors, edit the connector’s name, optional network services, and contact information.
-
Click Edit next to the section you want to revise.
-
When you have finished making your edits, click Update to save the changes.
Clone a Connector
You can make a copy of or clone an existing connector.
-
Go to Connectors, and click Clone Connector. A pre-populated Create Connector request window displays with all the parameters replicated, except for the name and VLAN IDs. The following settings are replicated in the new connector:
- Location
- Routing Instance
- Port
- Tag Settings
- Bidirectional Forwarding Settings
- Policer speeds
-
To modify the parameters, click Next. You can review and submit the Clone Connector request.
Delete a Connector
-
To delete the connector, click Delete Connector. A message asks you to confirm your submission.
-
Once you confirm, you get a success notification.
When status on the Connector shows Being Deprovisioned, you can no longer edit this Connector.