Connect to Oracle Cloud - Port, Cloud Router, Service Token
Connect to Oracle FastConnect from a Fabric port, a Fabric Cloud Router, or using a service token.
For instructions on connecting from a Network Edge virtual device, see Connect to Oracle FastConnect (Network Edge Device).
20 Gbps & 50 Gbps Virtual Connection Availability to Oracle Cloud
Equinix Fabric has added support for Oracle FastConnect at 20 Gbps and 50 Gbps speeds in select metros.
If your A-side port location and the Z-side Oracle metro onramp combination qualifies, these connection speeds will be made available to you during the connection creation process.
These speeds are currently available for:
- Customers with 100 Gbps EVPL Fabric ports; single 100 Gbps port and nx100 Gbps LAG group configurations.
- Connections in select metros (see list below).
- Remote connections between metro pairs where higher speeds are supported. For details, see 25 Gbps & 50 Gbps Virtual Connection Availability.
20 and 50 Gbps speeds availability:
| AMER | EMEA | APAC |
|---|---|---|
Mexico City (MX) São Paulo (SP) Washington D.C. (DC) | Frankfurt (FR) Madrid (MD) | Mumbai (MB) Singapore (SG) |
Prerequisites
Before creating a connection to Oracle FastConnect from a Fabric port, a Fabric Cloud Router, a Metal VLAN or using an A-side service token, you must have:
- Oracle VCN instance.
- An Equinix Fabric account, with the following IAM roles assigned: Fabric Connections Manager.
- A Fabric port, an A-side service token, or a Fabric Cloud Router.
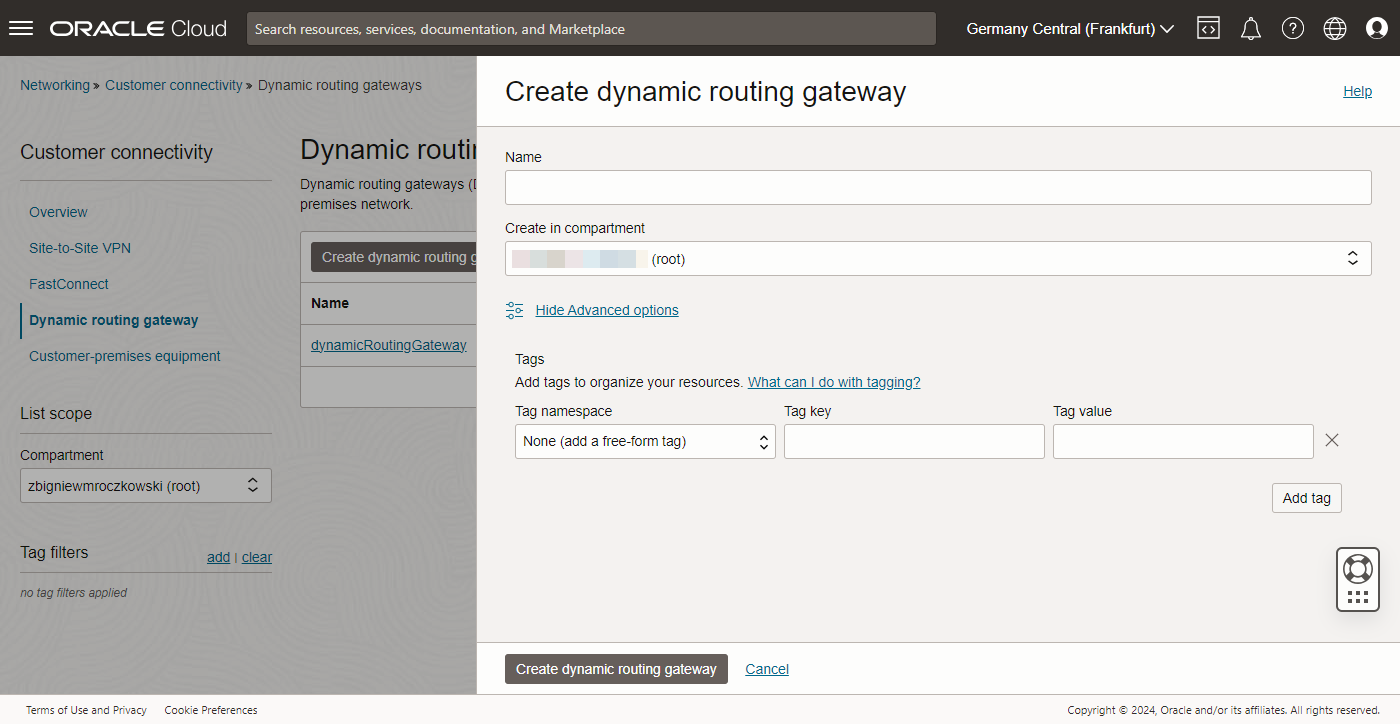
Create a Dynamic Routing Gateway in the Oracle Console
To create a Dynamic Routing Gateway:
-
Log in to the Oracle Console and select the desired region.
-
From the navigation menu, select Networking, then click Dynamic routing gateway.
-
Click Create dynamic routing gateway.
-
Enter name, select compartment and click Create dynamic routing gateway.
-
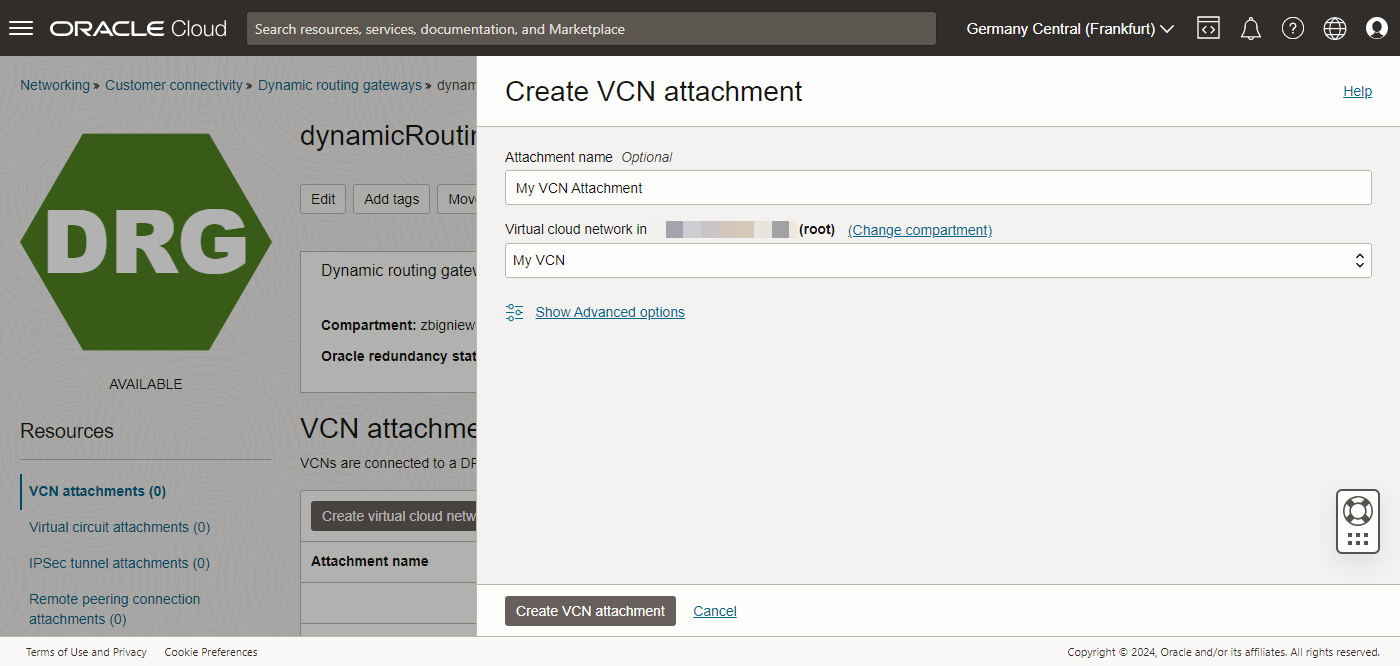
Click your dynamic routing gateway instance, then click Create virtual cloud network attachment.
-
Enter VCN attachment name, select VCN, then click Create VCN attachment.
-
Configure the VCN subnet route table to send traffic to DRG. Select Virtual Cloud Networks in the Networking and select your desired VCN in the Compartment.
-
To create a connection, select Equinix: Fabric and click Next.
-
Enter your information into the Connection form and click Continue.
-
Copy to OCID in the Connection Created confirmation. The Virtual Circuit is now in the
Pending Providerstate.
Create a Connection in the Equinix Customer Portal
To create a connection to Oracle FastConnect from a Fabric Port, a Fabric Cloud Router, or using a service token:
-
Log in to the Customer Portal > Fabric Dashboard.
-
Use the Context Switcher and select the project under which you want to create the connection. For more information on projects, see Equinix Identity and Access Management: Projects.
-
From the Connections menu, select Create Connection.
-
In the A Service Provider card, click Connect to a Service Provider.

-
Search for Oracle. On the Oracle Cloud card, click Select Service, then click Create Connection.
-
Select connection type:
- Redundant – Create a redundant pair of connections.
- Primary – Create a single, primary connection.
- Secondary – Create a single, secondary connection.
-
Enter primary and secondary Oracle Cloud ID.
-
From the Oracle Cloud Destination drop-down list, select the Metro you are connecting to, then click Next.
Connection Configuration
Configure your connection depending on the origin asset type:
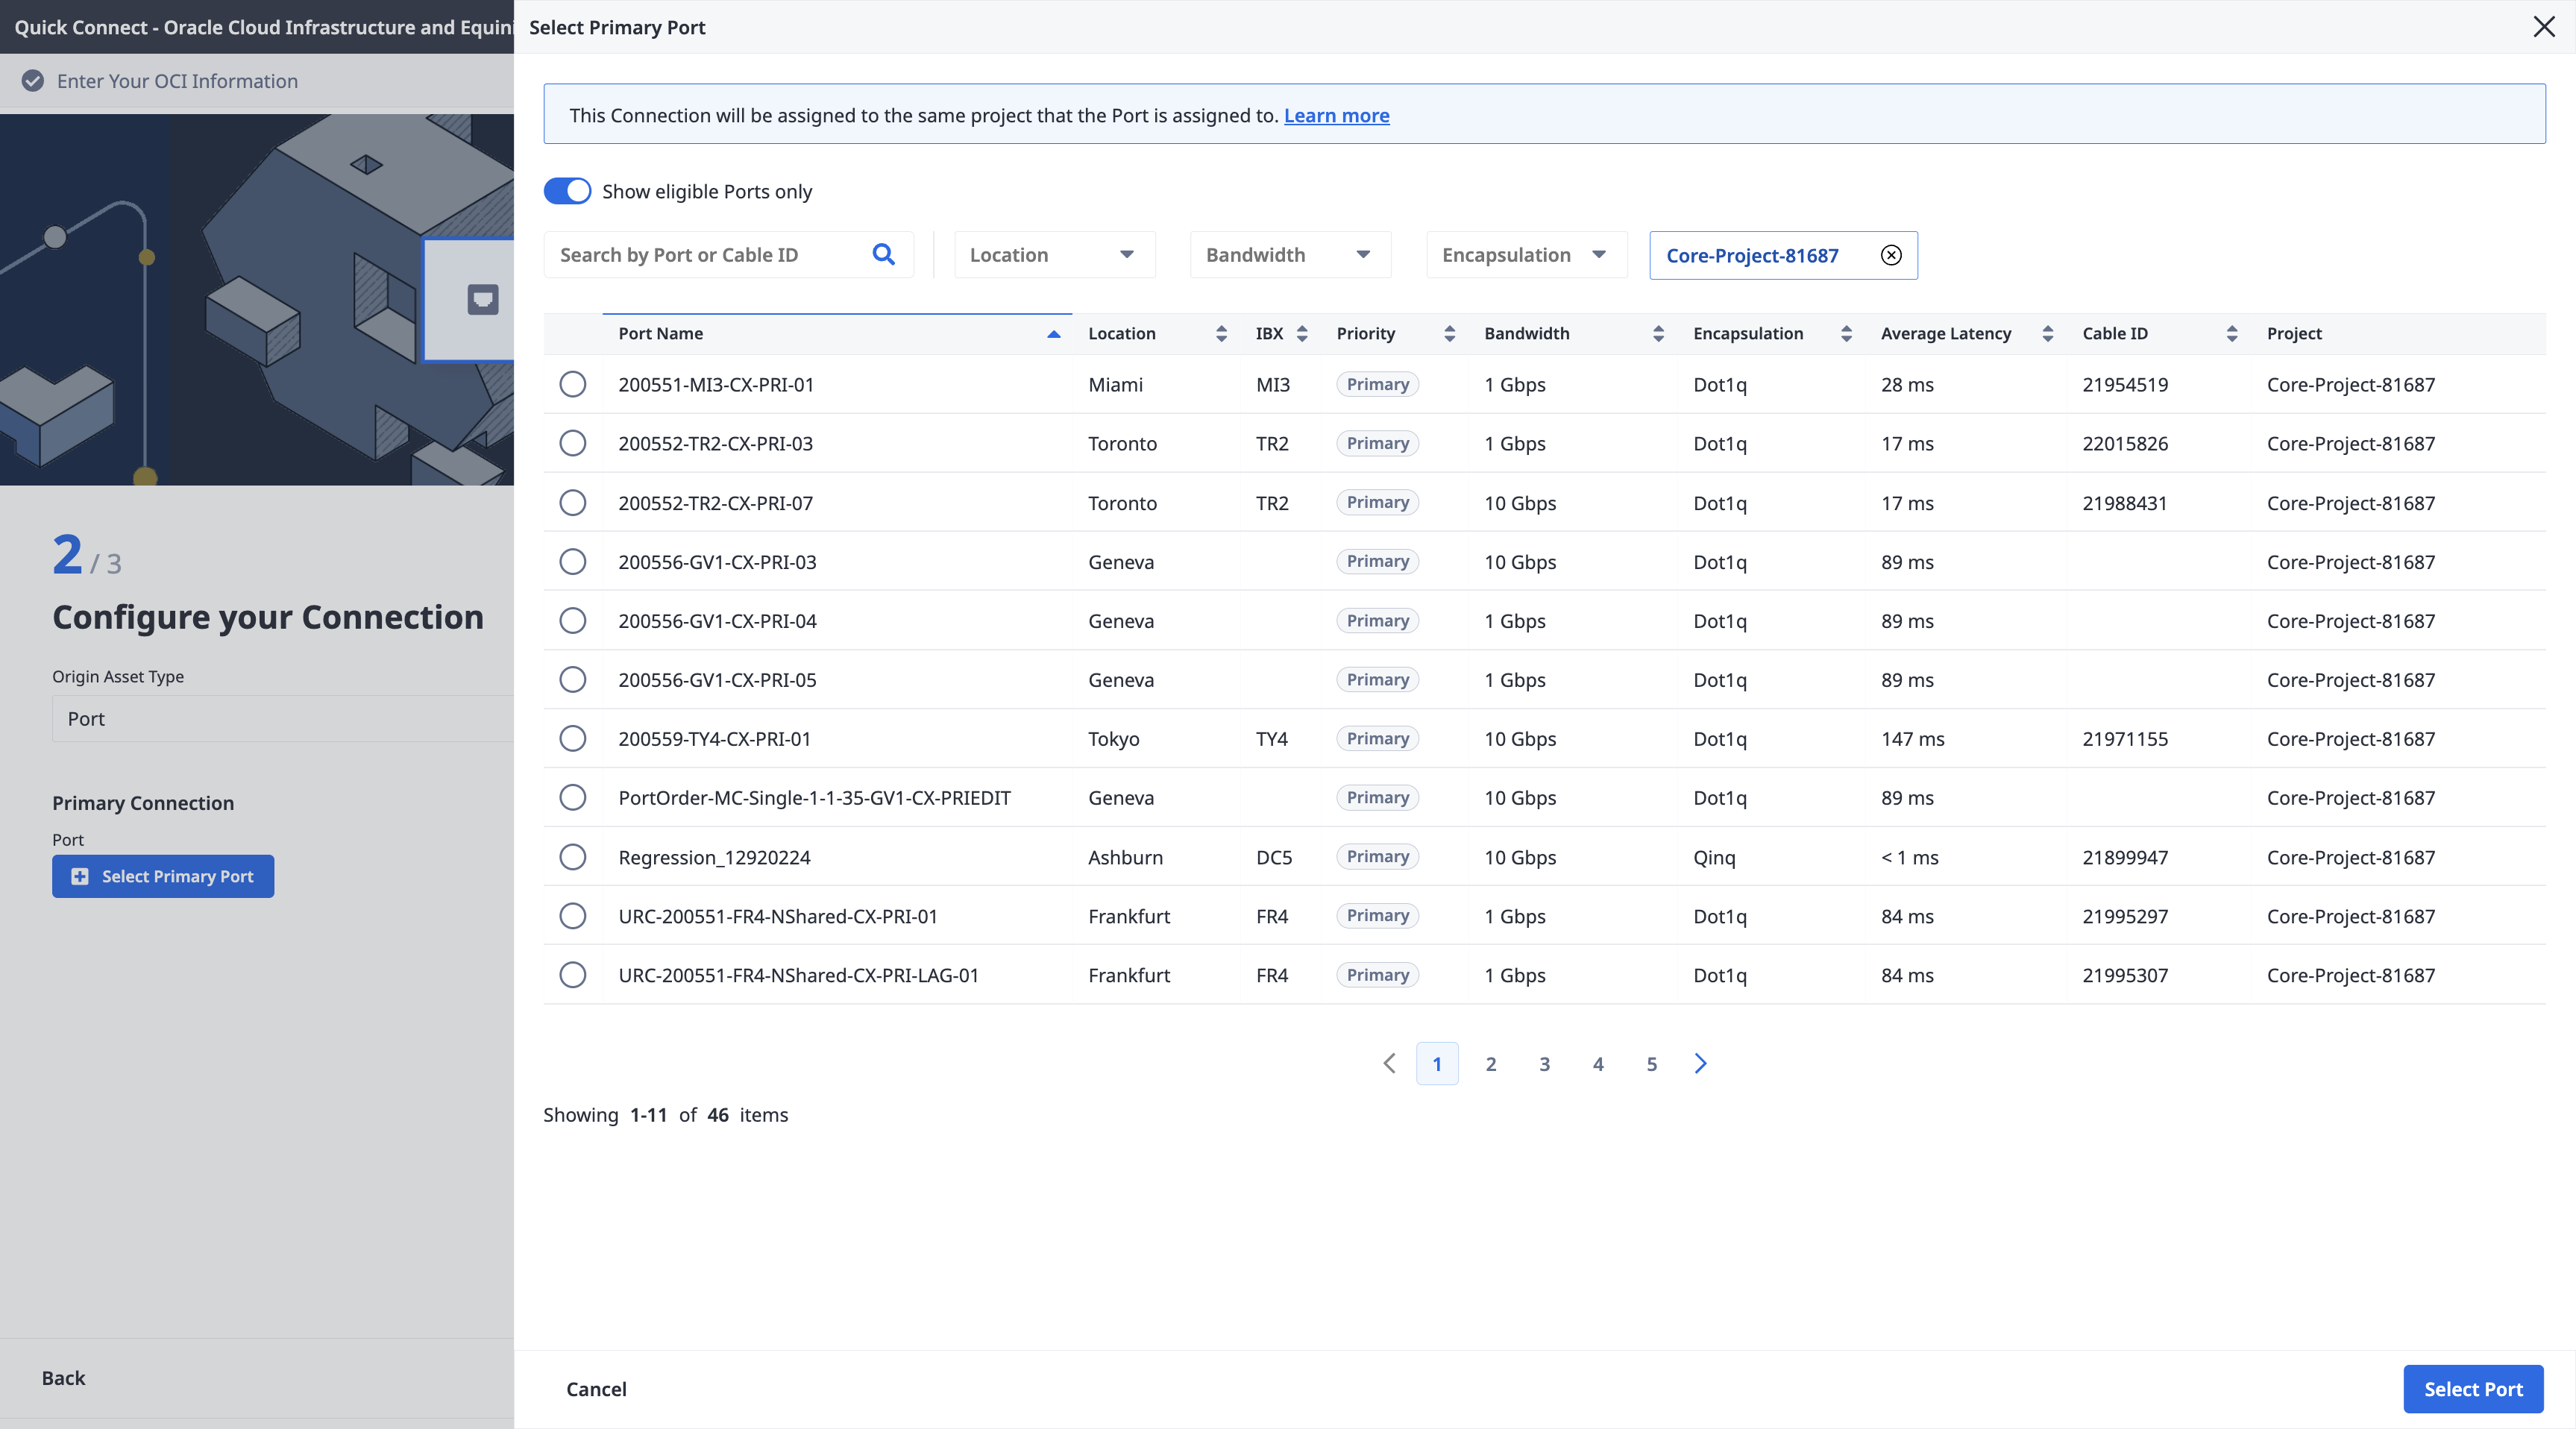
Port
-
From the Origin Asset Type drop-down list, select Port.
-
In the Primary Connection section:
-
Click + Select Primary Port, then select your primary connection port and click Select Port. Only primary ports are available for selection.
-
Enter the primary connection name.
-
Select a bandwidth.
-
Enter a VLAN ID (applicable to Dot1q ports) or a Customer VLAN Tag (C-tag) and a Service VLAN Tag (S-tag) (applicable to Qinq ports).
-
-
In the Secondary Connection section:
- Click + Select Secondary Port, then select your secondary connection port and click Select Port. Only secondary ports are available for selection.
- Enter the secondary connection name.
- Select a bandwidth.
- Enter a VLAN ID (applicable to Dot1q ports) or a Customer VLAN Tag (C-tag) and a Service VLAN Tag (S-tag) (applicable to Qinq ports).
-
Click Next.

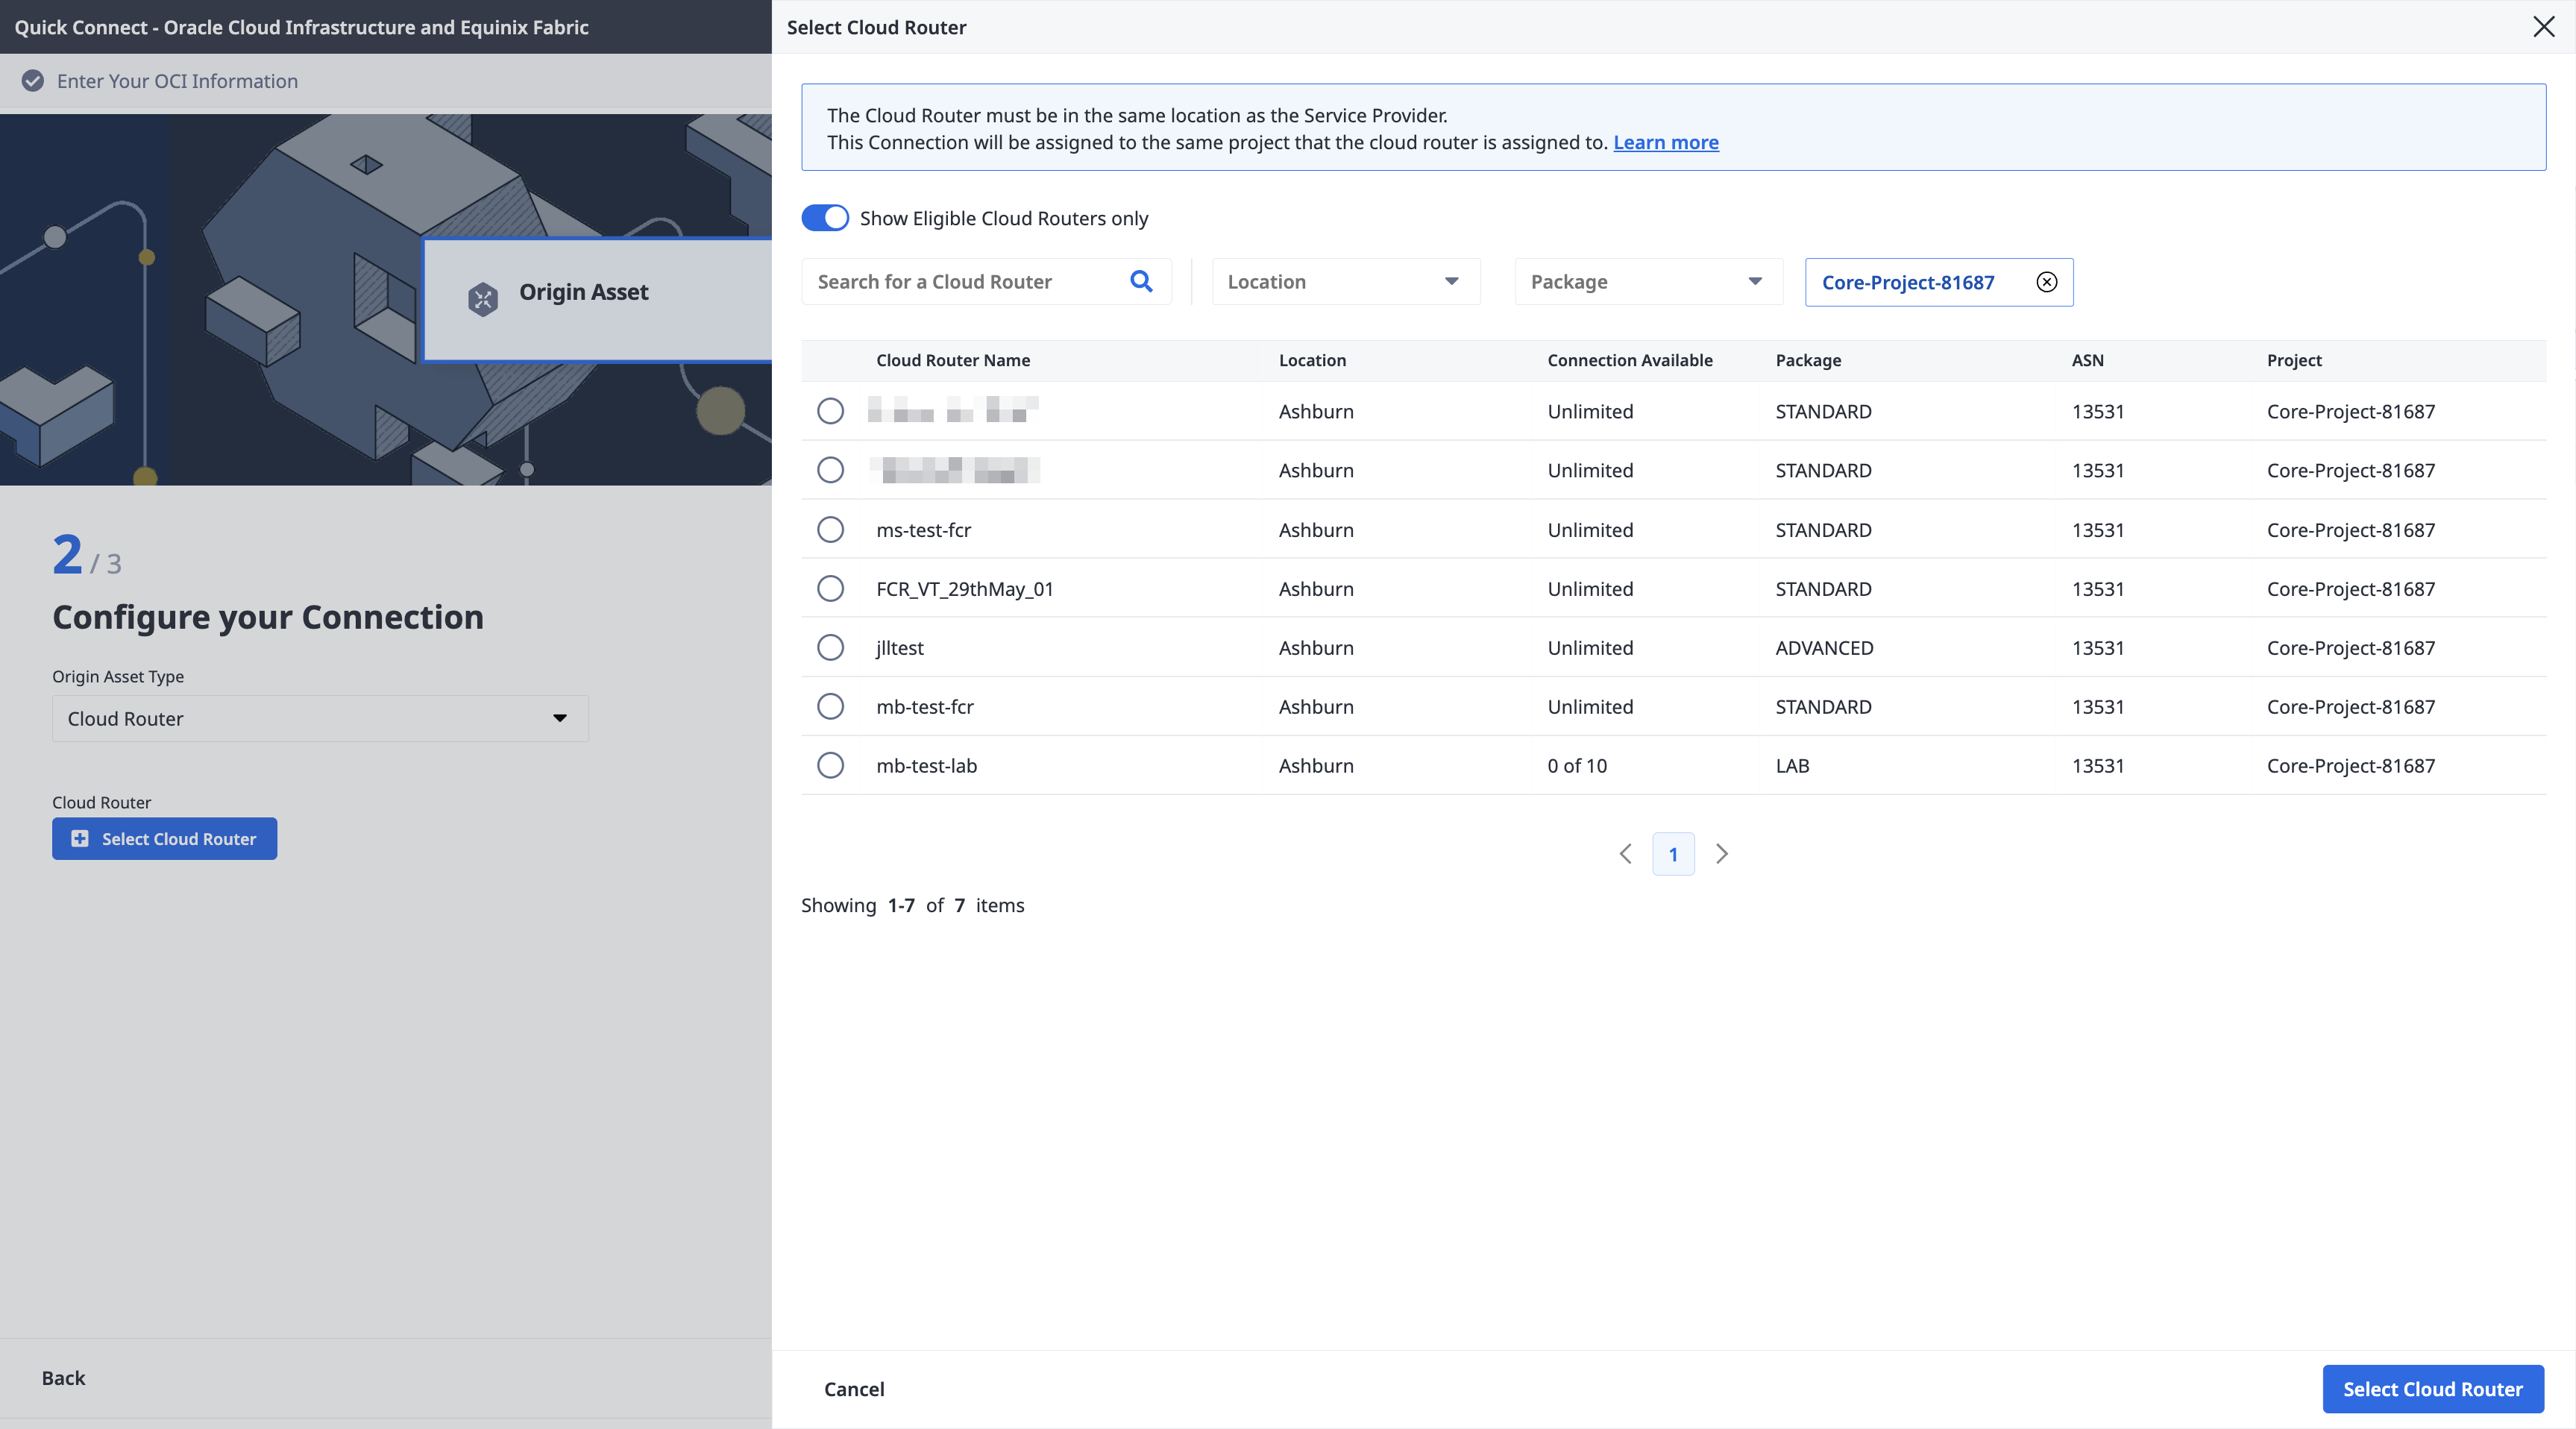
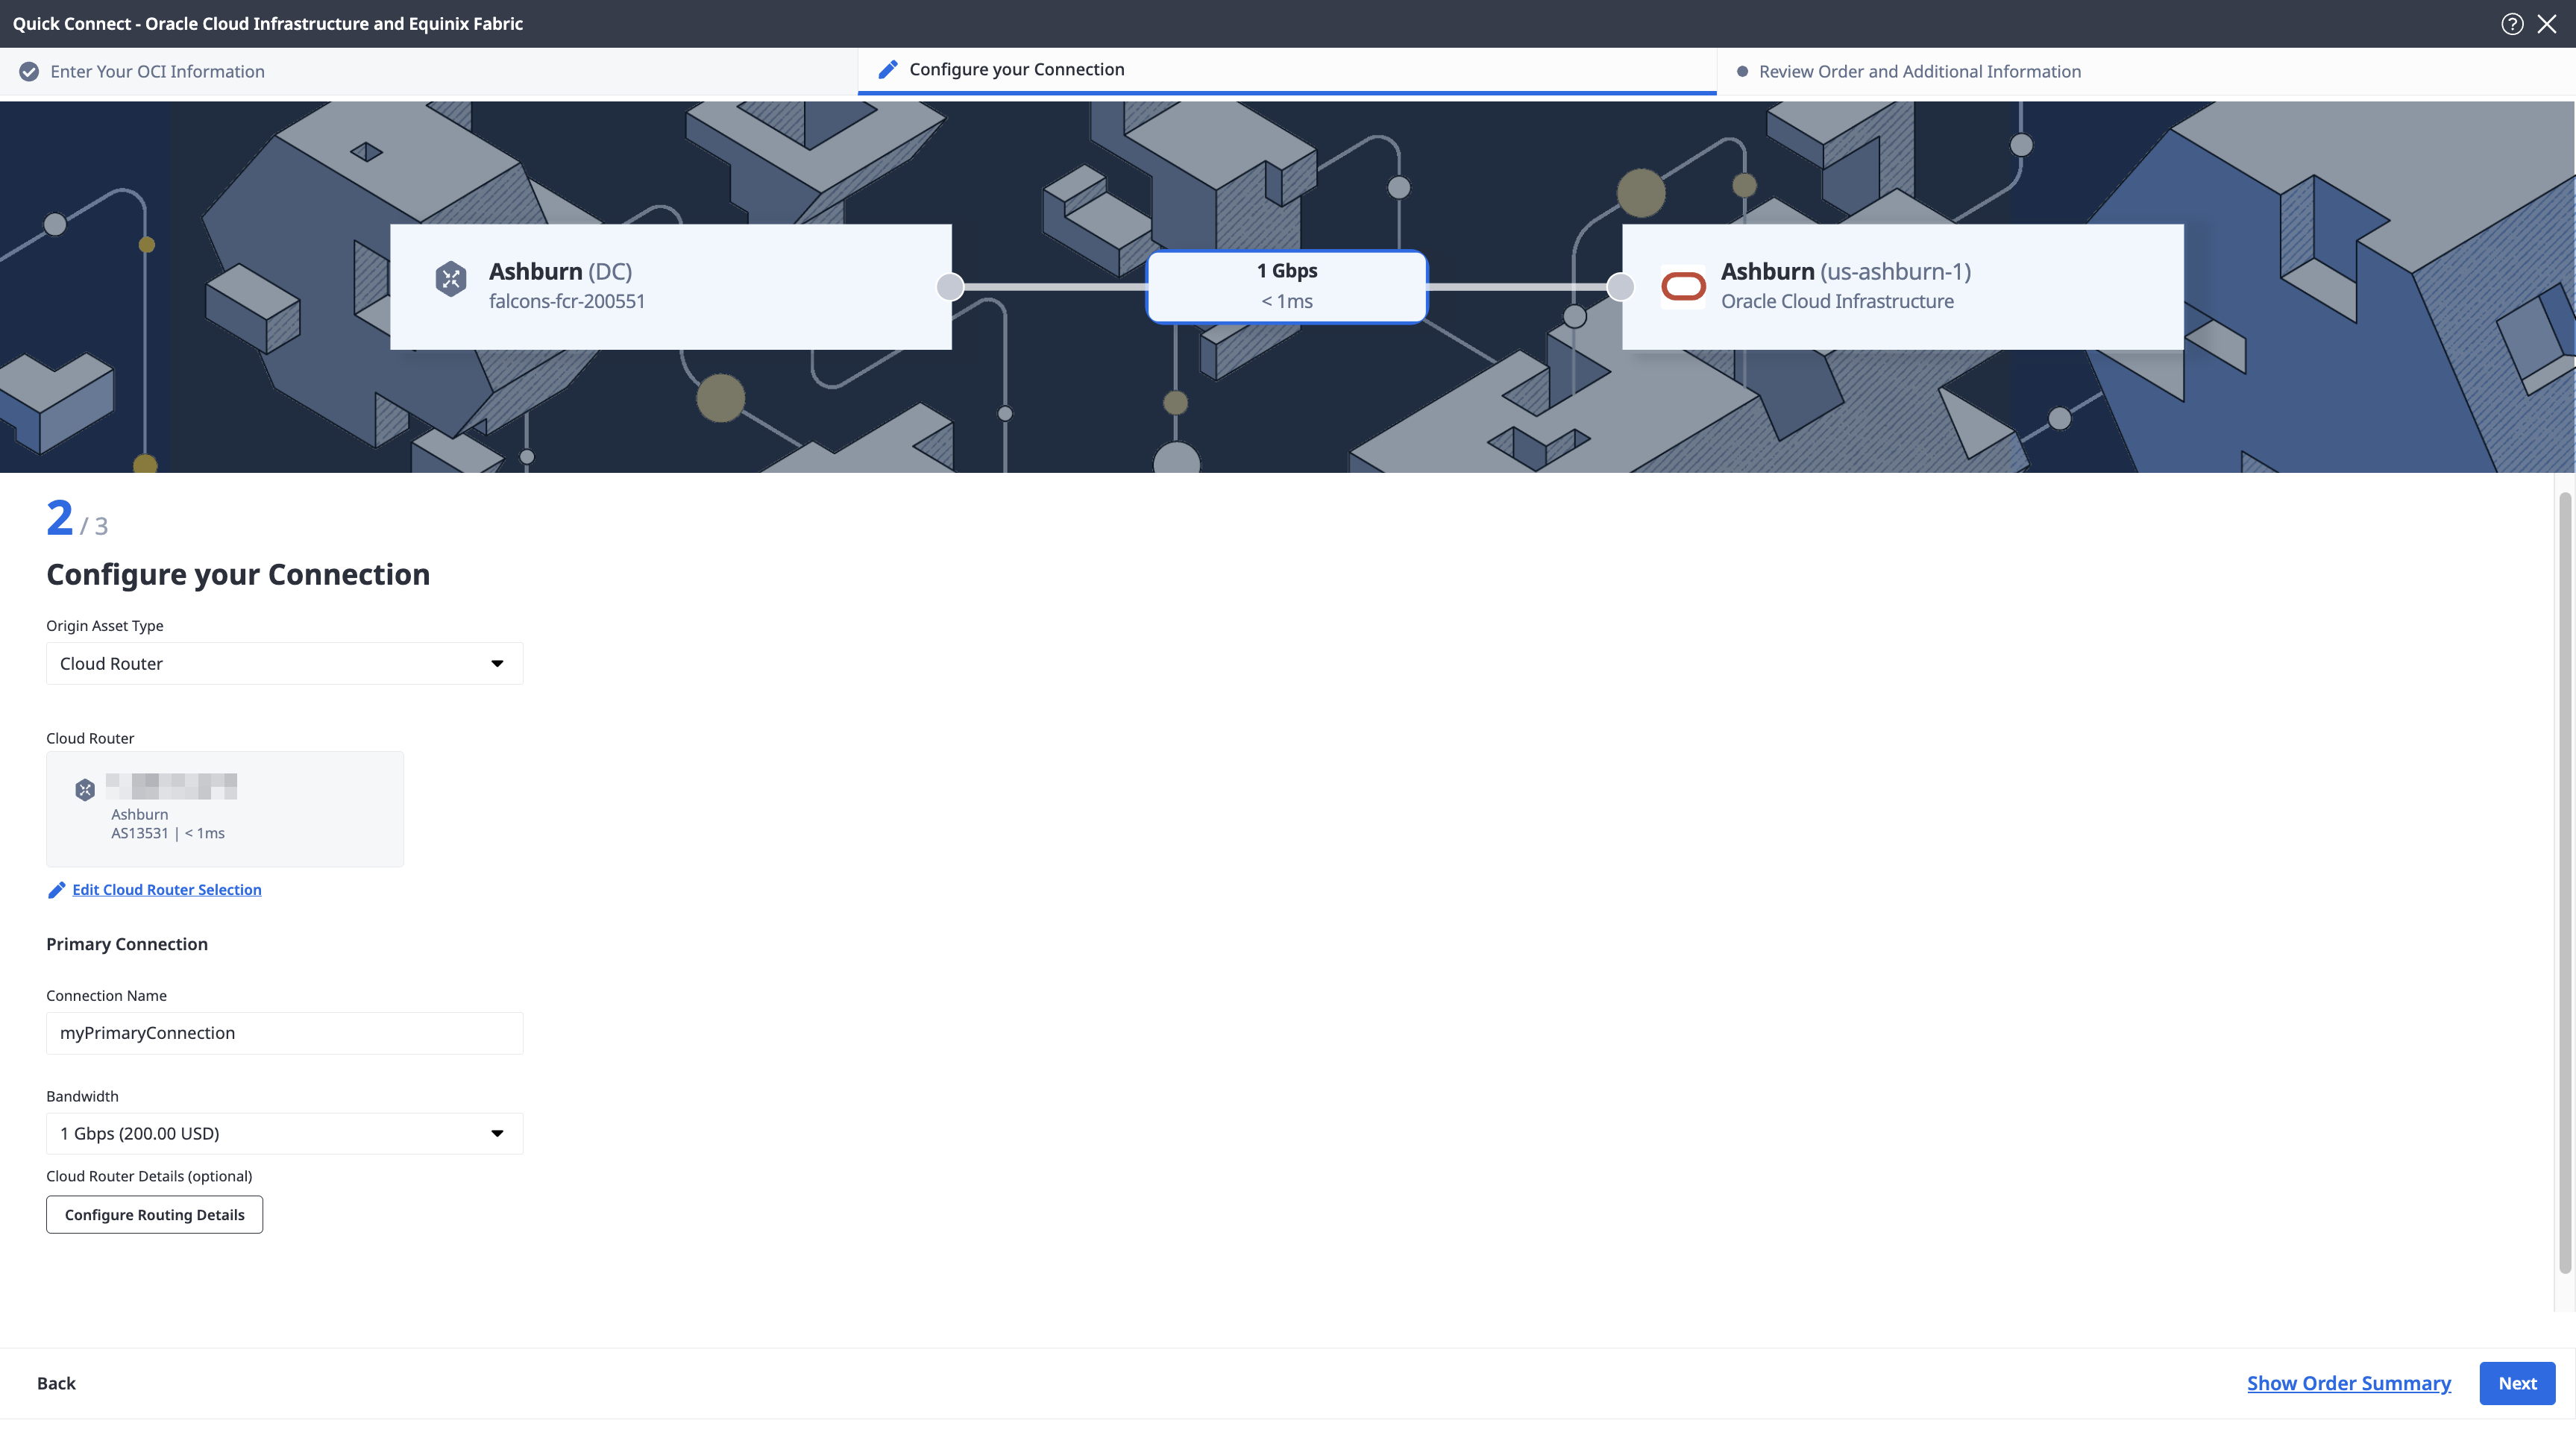
Cloud Router
-
From the Origin Asset Type drop-down list, select Cloud Router.
-
Click + Select Cloud Router, select a cloud router instance, then click Select Cloud Router.
-
In the Primary Connection section:
- Enter the primary connection name.
- Select a bandwidth. The bandwidth value you select will also apply to the secondary connection.
-
In the Secondary Connection section, enter your secondary connection name.
-
Click Next.
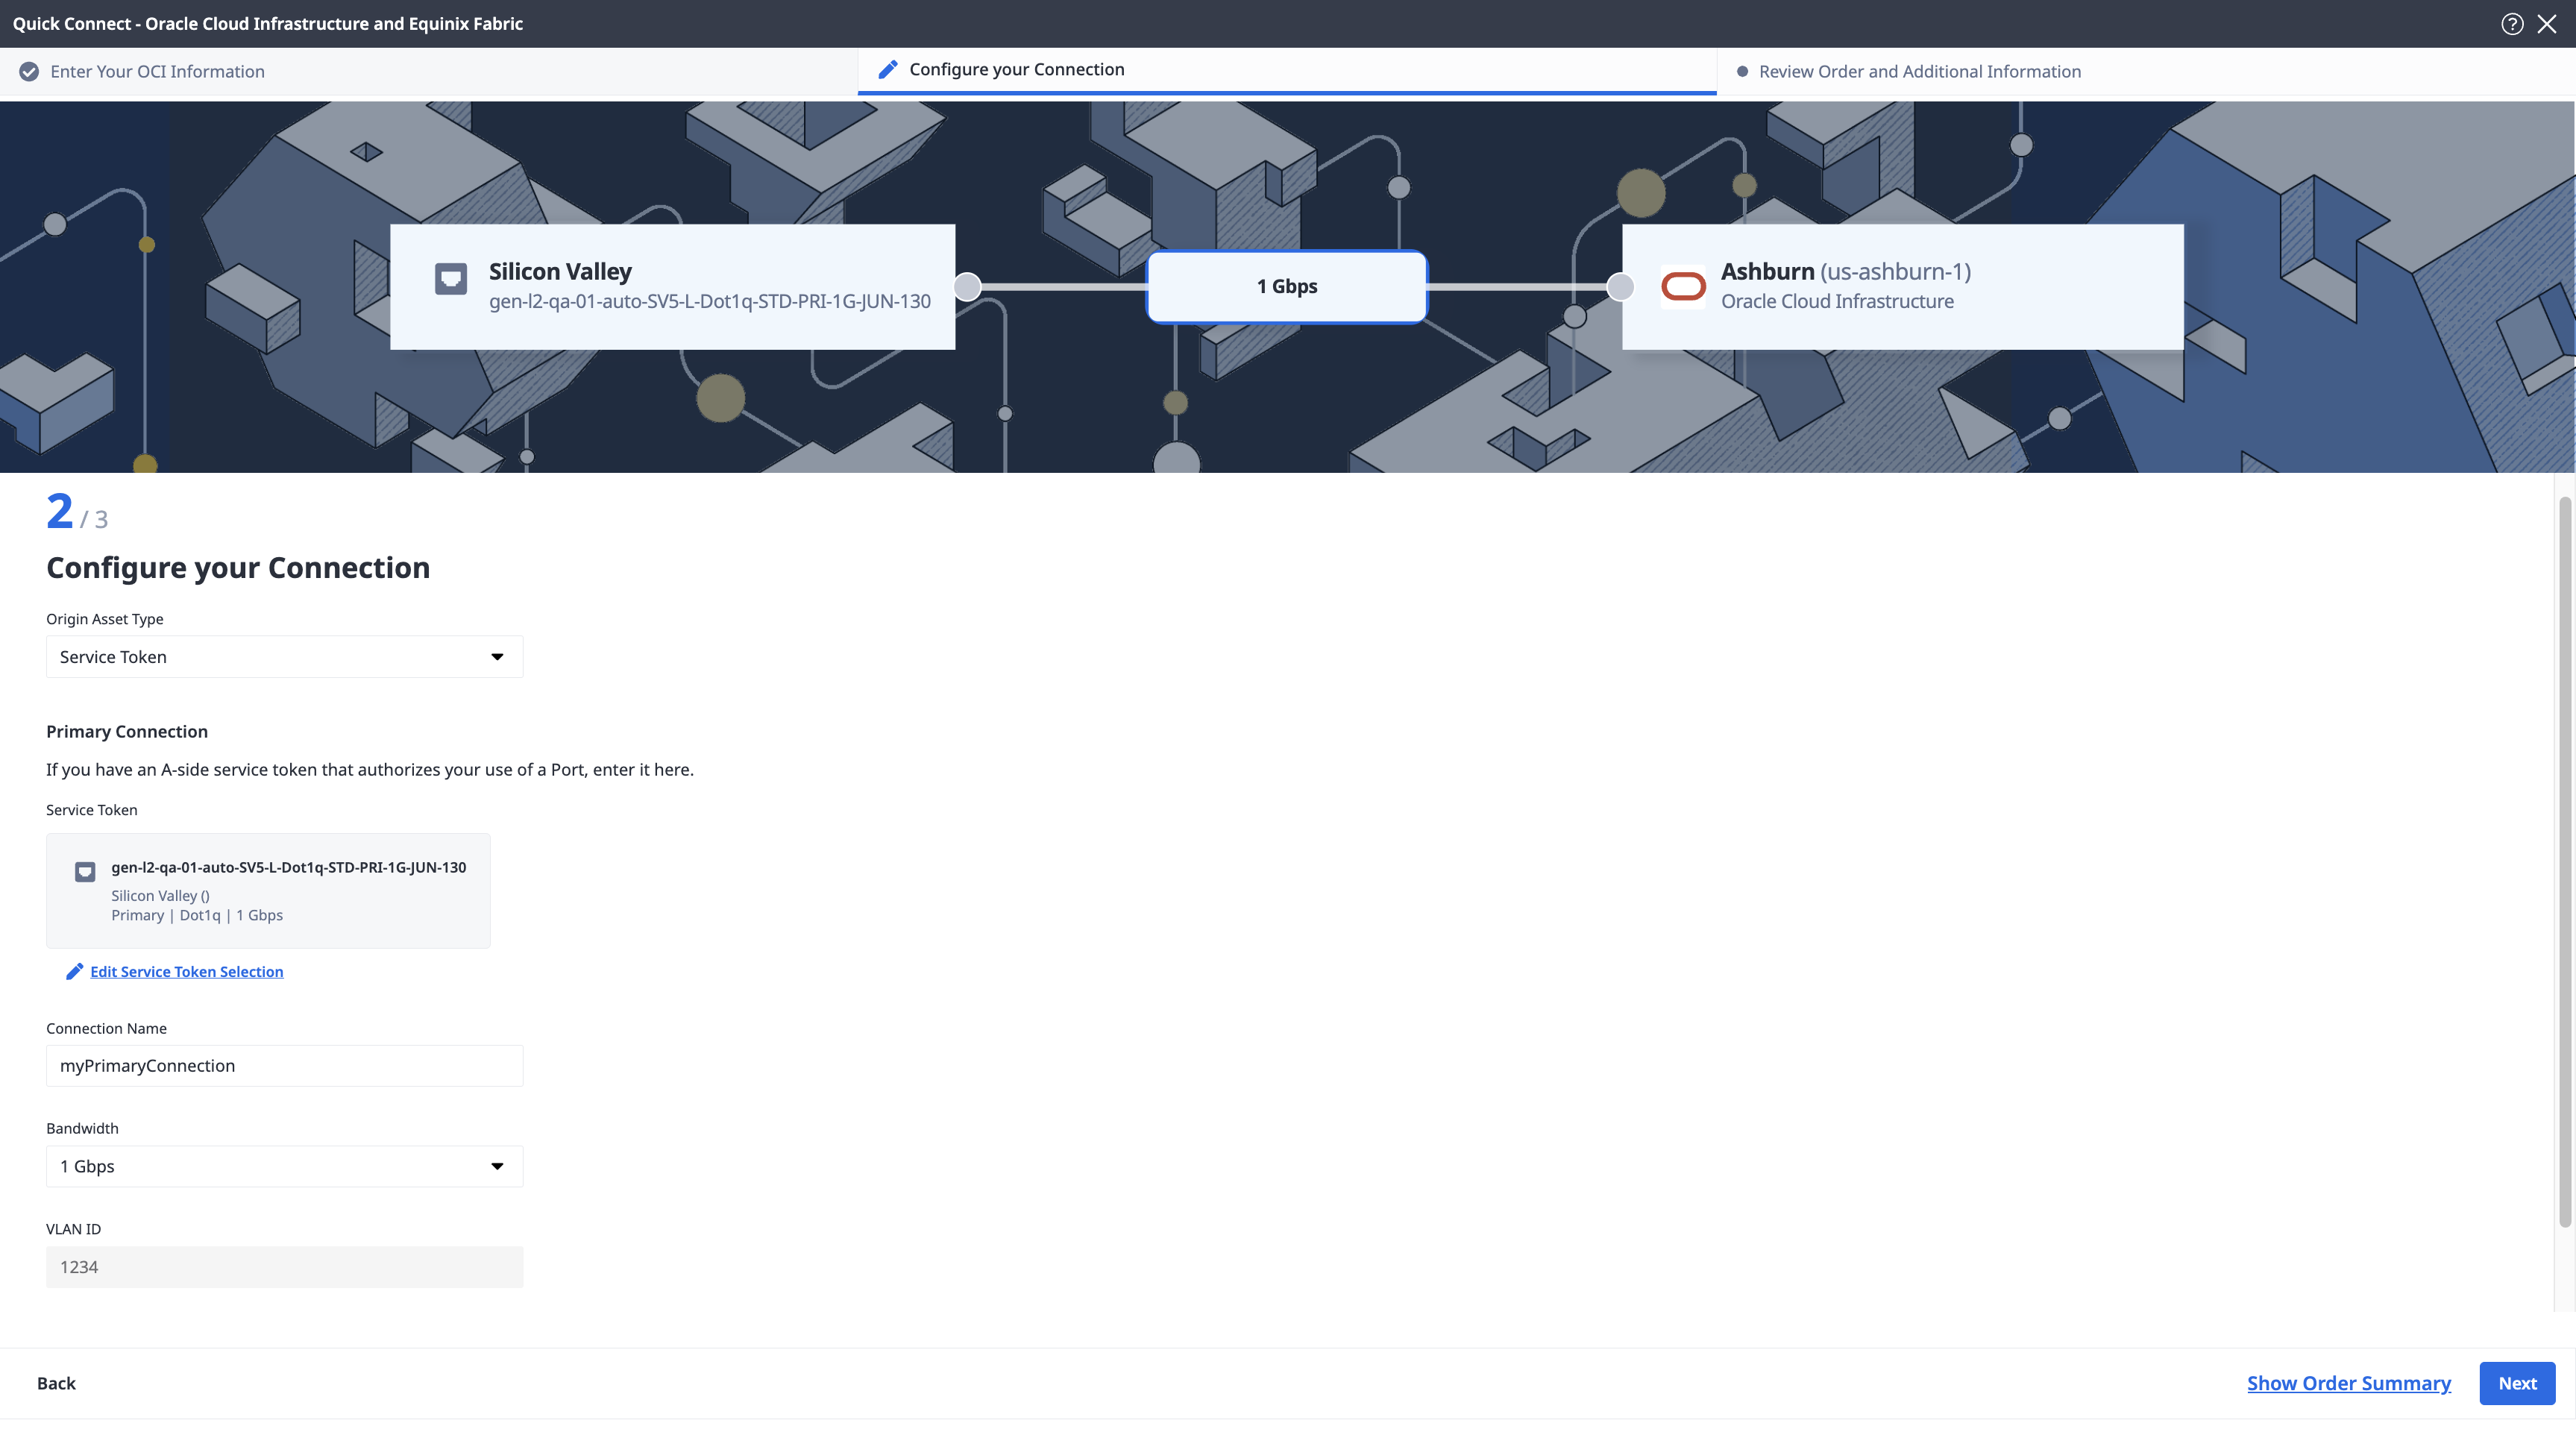
Service Token
-
From the Origin Asset Type drop-down list, select Service Token.
-
In the Primary Connection section:
-
Click + Enter Primary Service Token, provide the service token, then click Enter Service Token.
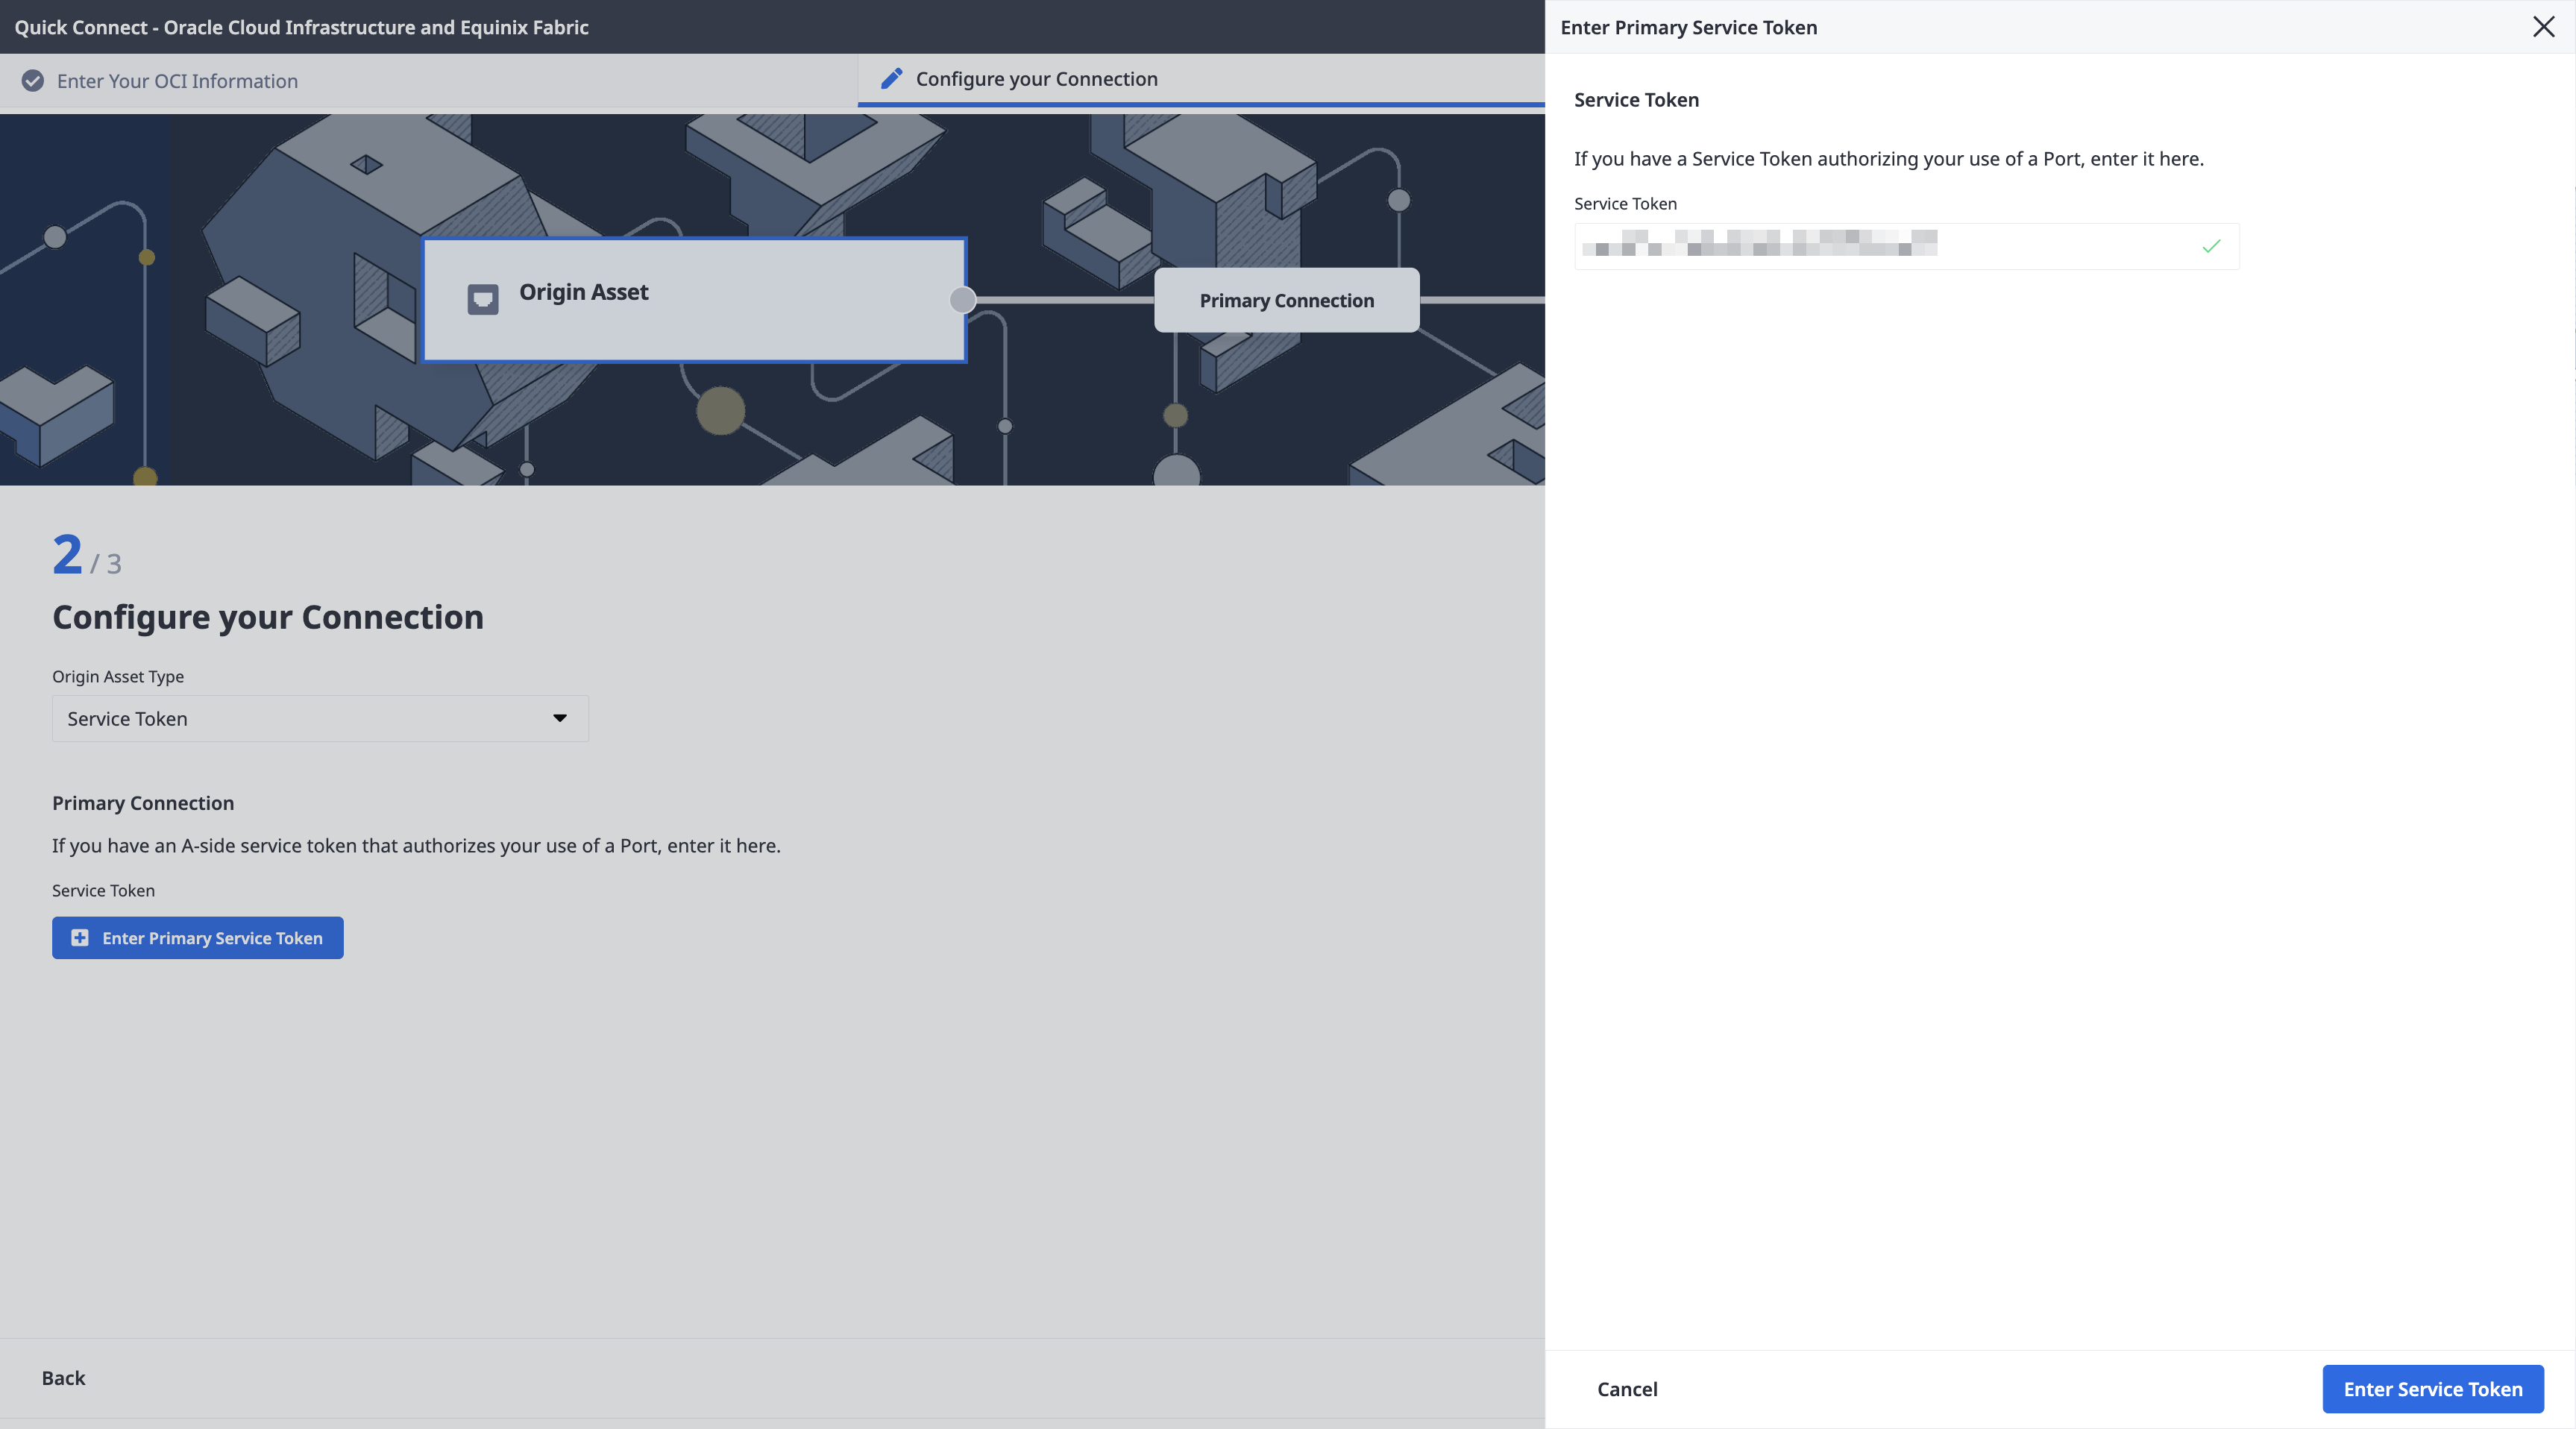
-
Enter the primary connection name.
-
Select a bandwidth.
-
-
In the Secondary Connection section:
- Click + Enter Secondary Service Token, provide the service token, then click Enter Service Token.
- Enter the secondary connection name.
- Select a bandwidth.
-
Click Next.
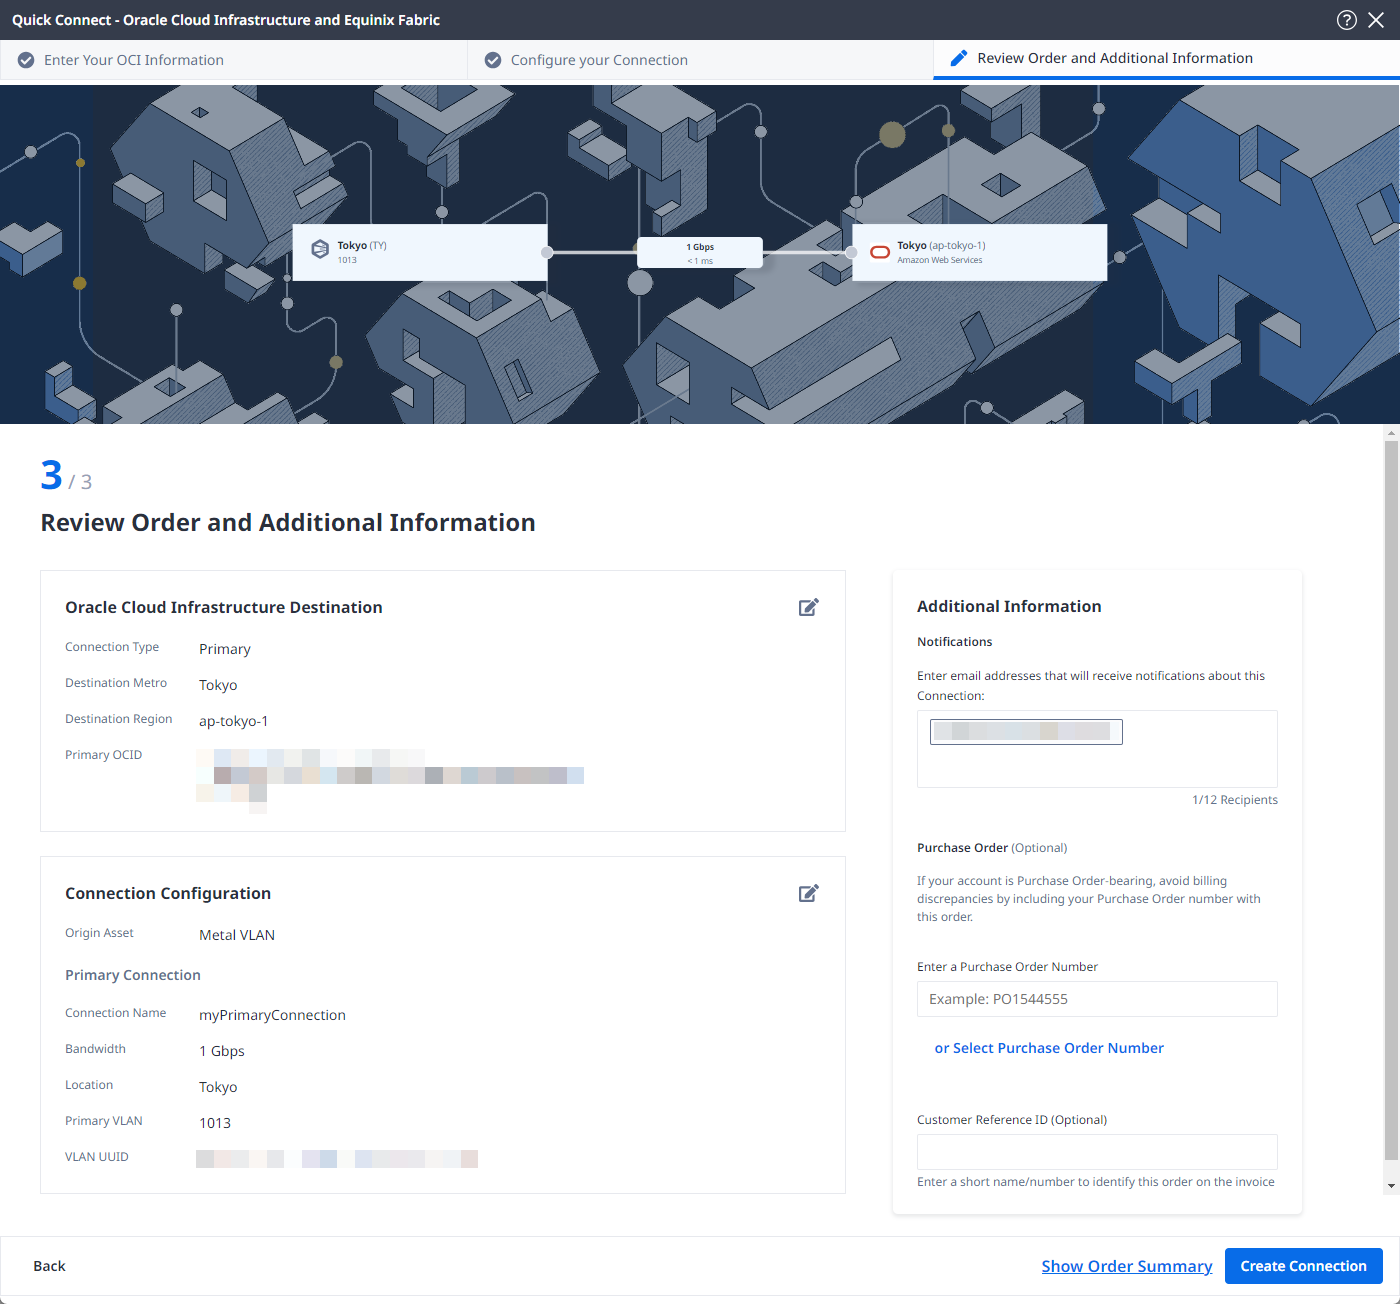
Review and Submit
On the Review Order and Additional Information page:
-
Review the information in the Connection Configuration sections.
-
Use the Notifications field to provide the email addresses of the recipients to be notified about the connection's status. You can add up to 12 email addresses.
-
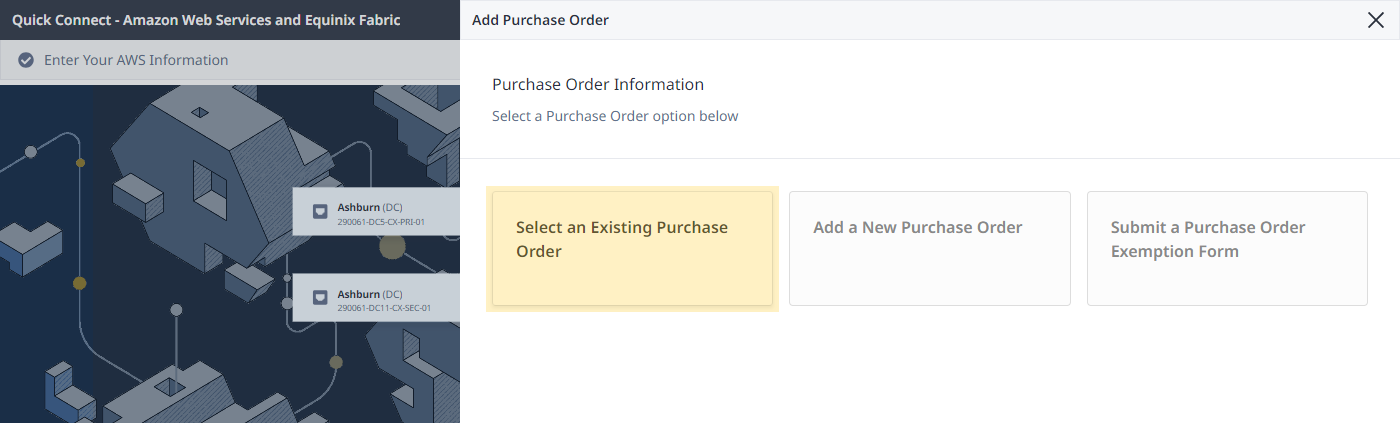
(Optional) Enter or add order information in the Purchase Order section.
-
Click Select Purchase Order Number.
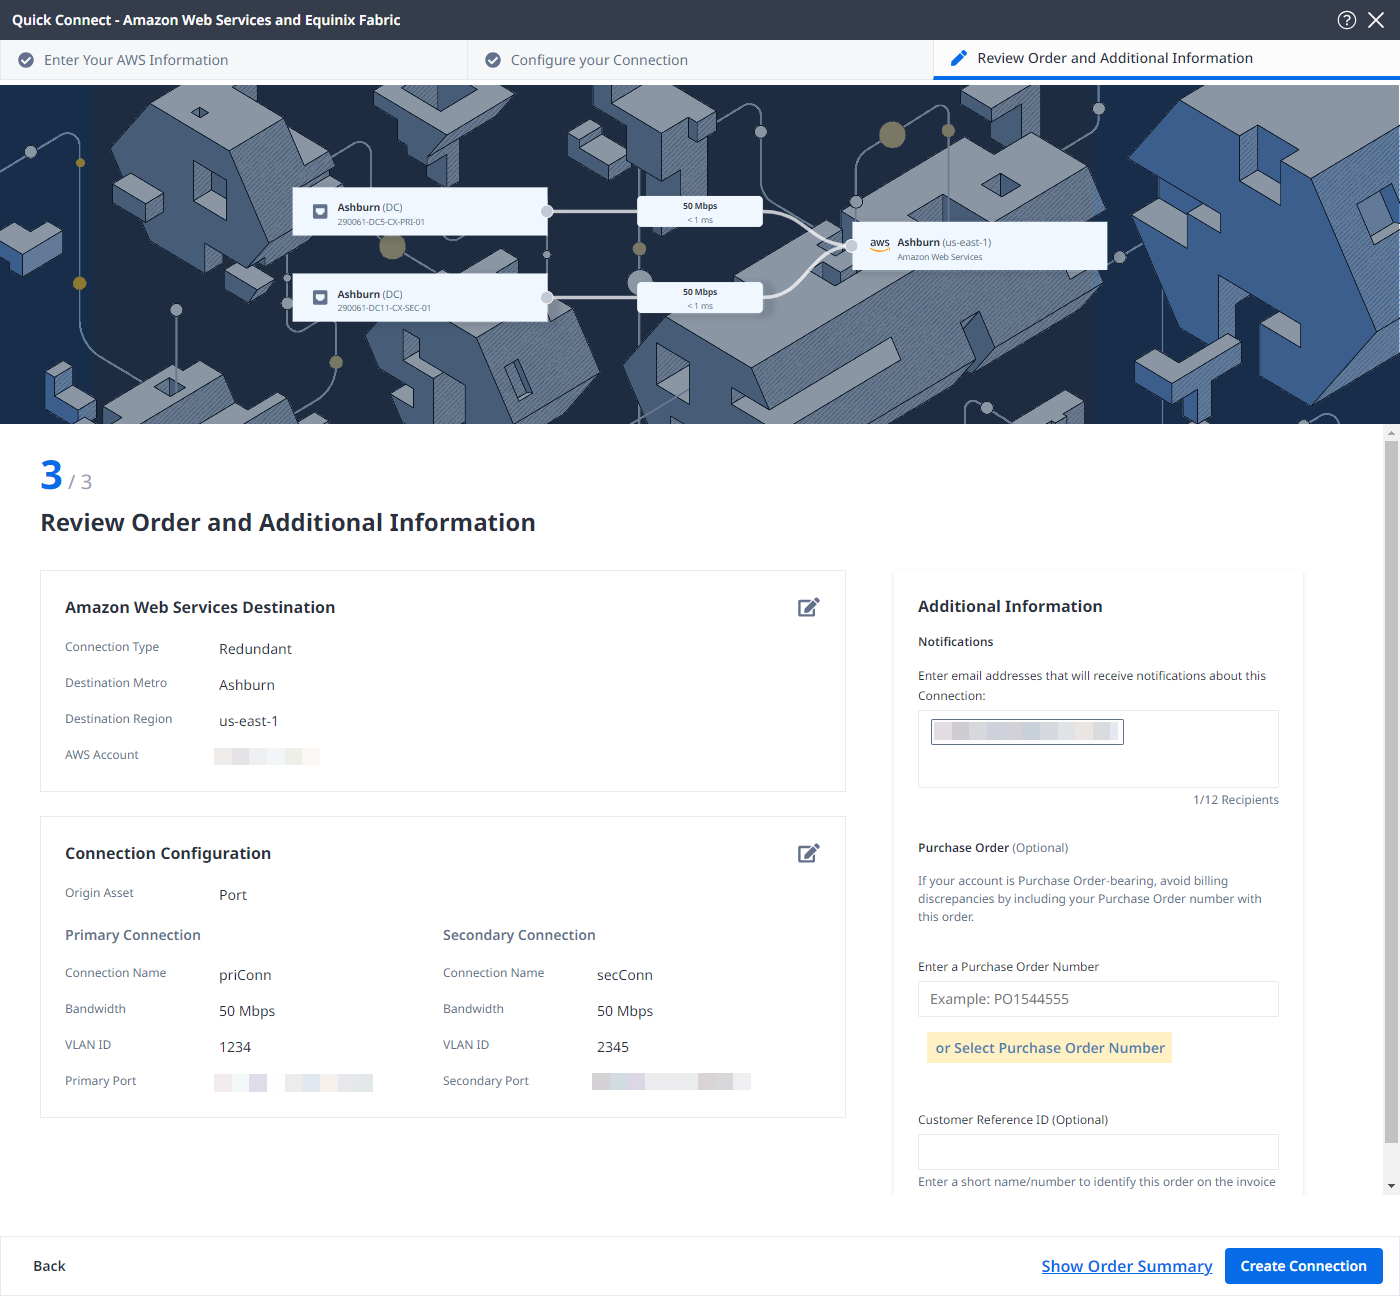
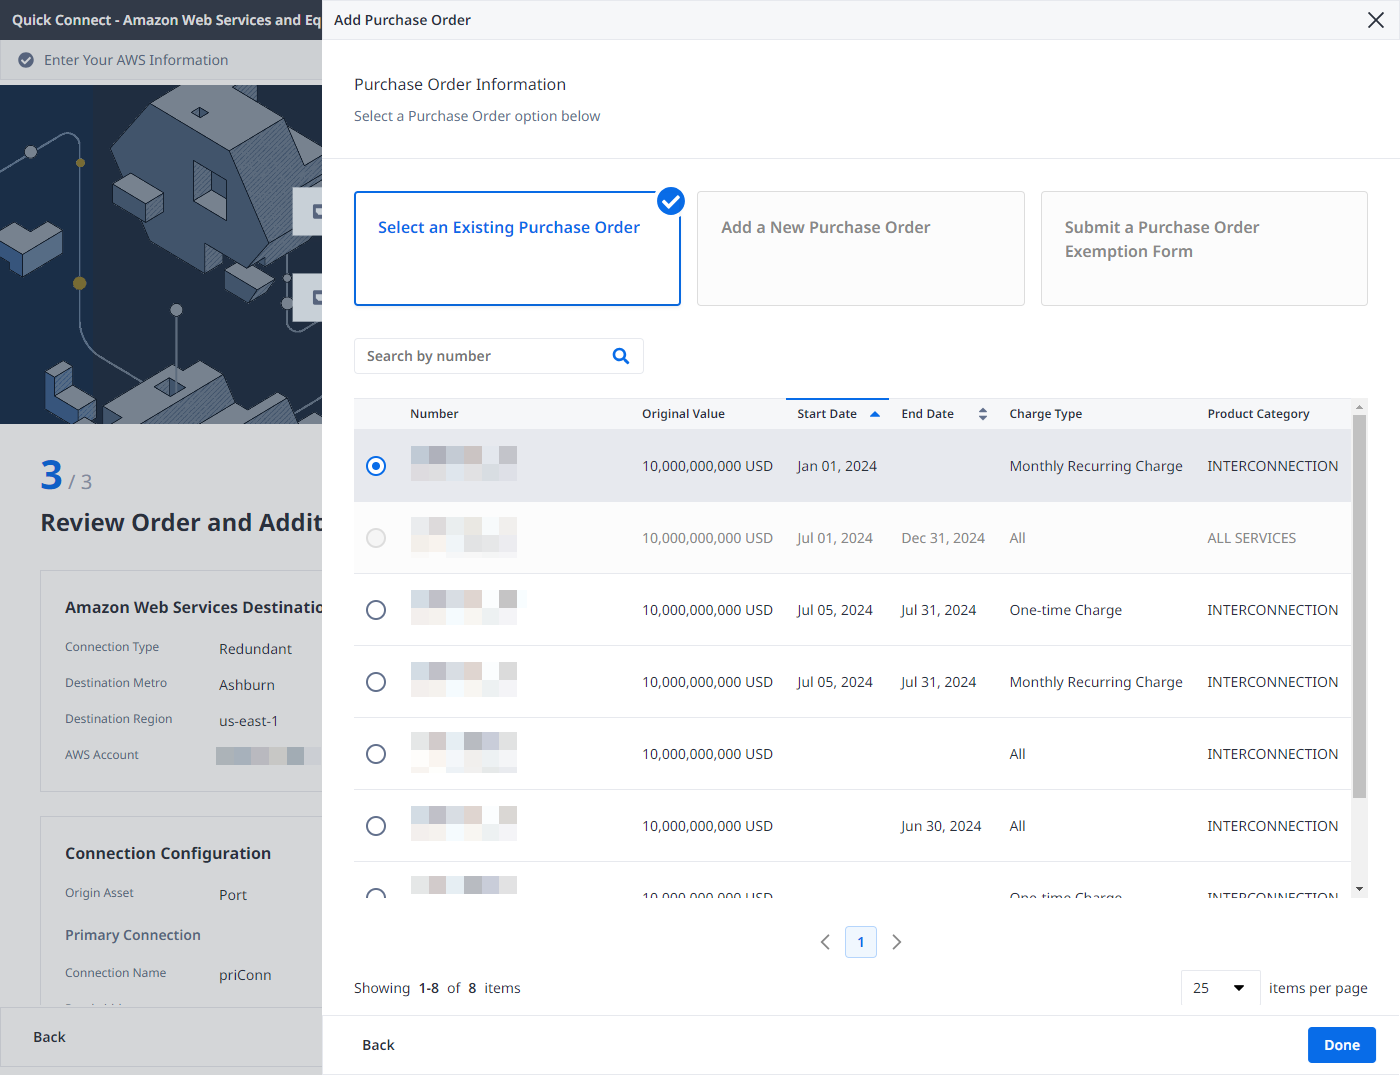
-
Click Select an Existing Purchase Order.
-
Select purchase order number you want to apply to your order, then click Done.
-
-
Provide a customer reference identifier that will help you identify this order on your invoice.
-
Click Show Order Summary to see order details and connection pricing information.
When you are ready, click Create Connection.
Complete the BGP setup in the Oracle Cloud Console
Configure your CPE to establish BGP session(s) with the DRG and exchange routes. Note that Oracle’s ASN is 31898 which is needed when setting up the BGP peering session.

Here are some suggested steps:
- Check that the BGP session is working. The session can be seen in your CPE or in the Oracle Console via the FastConnect VC state.
- Check the received prefixes on your CPE.
- Ping or trace the route to the DRG using the IP that was setup as the Oracle BGP Peer IP.
- Ping or trace the route to the Bare Metal host or VM within Oracle Cloud.
- Establish fail over testing to validate your network design as needed.
You can confirm the connection status from the Connections Inventory page.
Connect to Oracle FastConnect Using API
You can use Fabric's API to automate this procedure and integrate it with your internal systems. For details, see Connect to Oracle.