Wasabi Hot Almacenamiento en la nube a petición
Utilice Equinix Fabric y Wasabi Direct Connect para conectar su infraestructura física o virtual a su red Wasabi. Se puede llegar a Wasabi On Demand Storage-as-a-Service desde Equinix Fabric localmente en varios metros y de forma remota desde cualquier ubicación de Equinix Fabric.
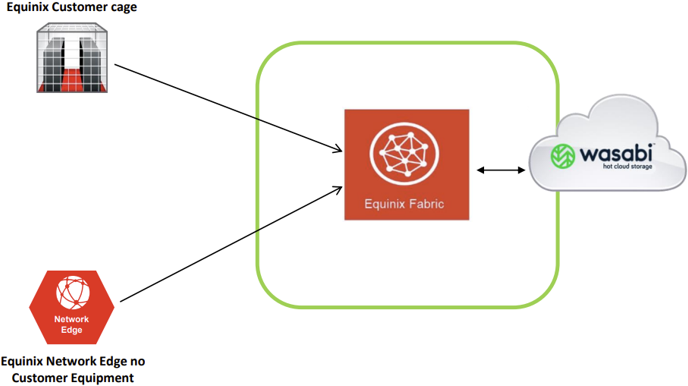
El proceso de Wasabi Direct Connect no está completamente automatizado. Debe ponerse en contacto con Wasabi para proporcionar un circuito virtual al que pueda conectarse y el equipo de Wasabi revisa manualmente su solicitud de conexión.
Requisitos previos
- Un puerto de tela , un token de servicio del lado A , un Fabric Cloud Router , o un dispositivo virtual Network Edge .
- Para crear conexiones en Fabric, debes tener el
Fabric Connections Managerrol. - Una cuenta de Wasabi Hot Cloud Storage y Wasabi Direct Connect.
Aprovisionamiento de un circuito virtual a la región de almacenamiento de Wasabi
Póngase en contacto con su administrador de cuentas de Wasabi o envíe un correo electrónico a sales@wasabi.com para solicitar un circuito Equinix Fabric Cross Connect (VXC). Asegúrese de incluir la siguiente información:
- Un ID de cuenta de Wasabi.
- Un ID de cuenta AWS (solo para circuitos AWS DX).
- Su ubicación de Wasabi Data Center.
- La tasa de servicio en incrementos de 1 Gbps.
- Sus requisitos de enrutamiento de capa 3. Puede optar por crear una interfaz NAT para el lado A o utilizar el enrutamiento BGP. En el caso de esto último, incluir el ASN y el prefijo público para anunciar a Wasabi. Los prefijos privados requieren más debate. Wasabi proporciona la asignación de IP punto a punto con un
/31prefijo. Solicite/30si es necesario, junto con cualquier requisito adicional.
En respuesta a su solicitud, recibirá un identificador de circuito (ejemplo: DEVOPS-1234). Este identificador es necesario para crear una conexión Equinix Fabric.
Creando la conexión
Para crear una conexión de Fabric a Wasabi:
-
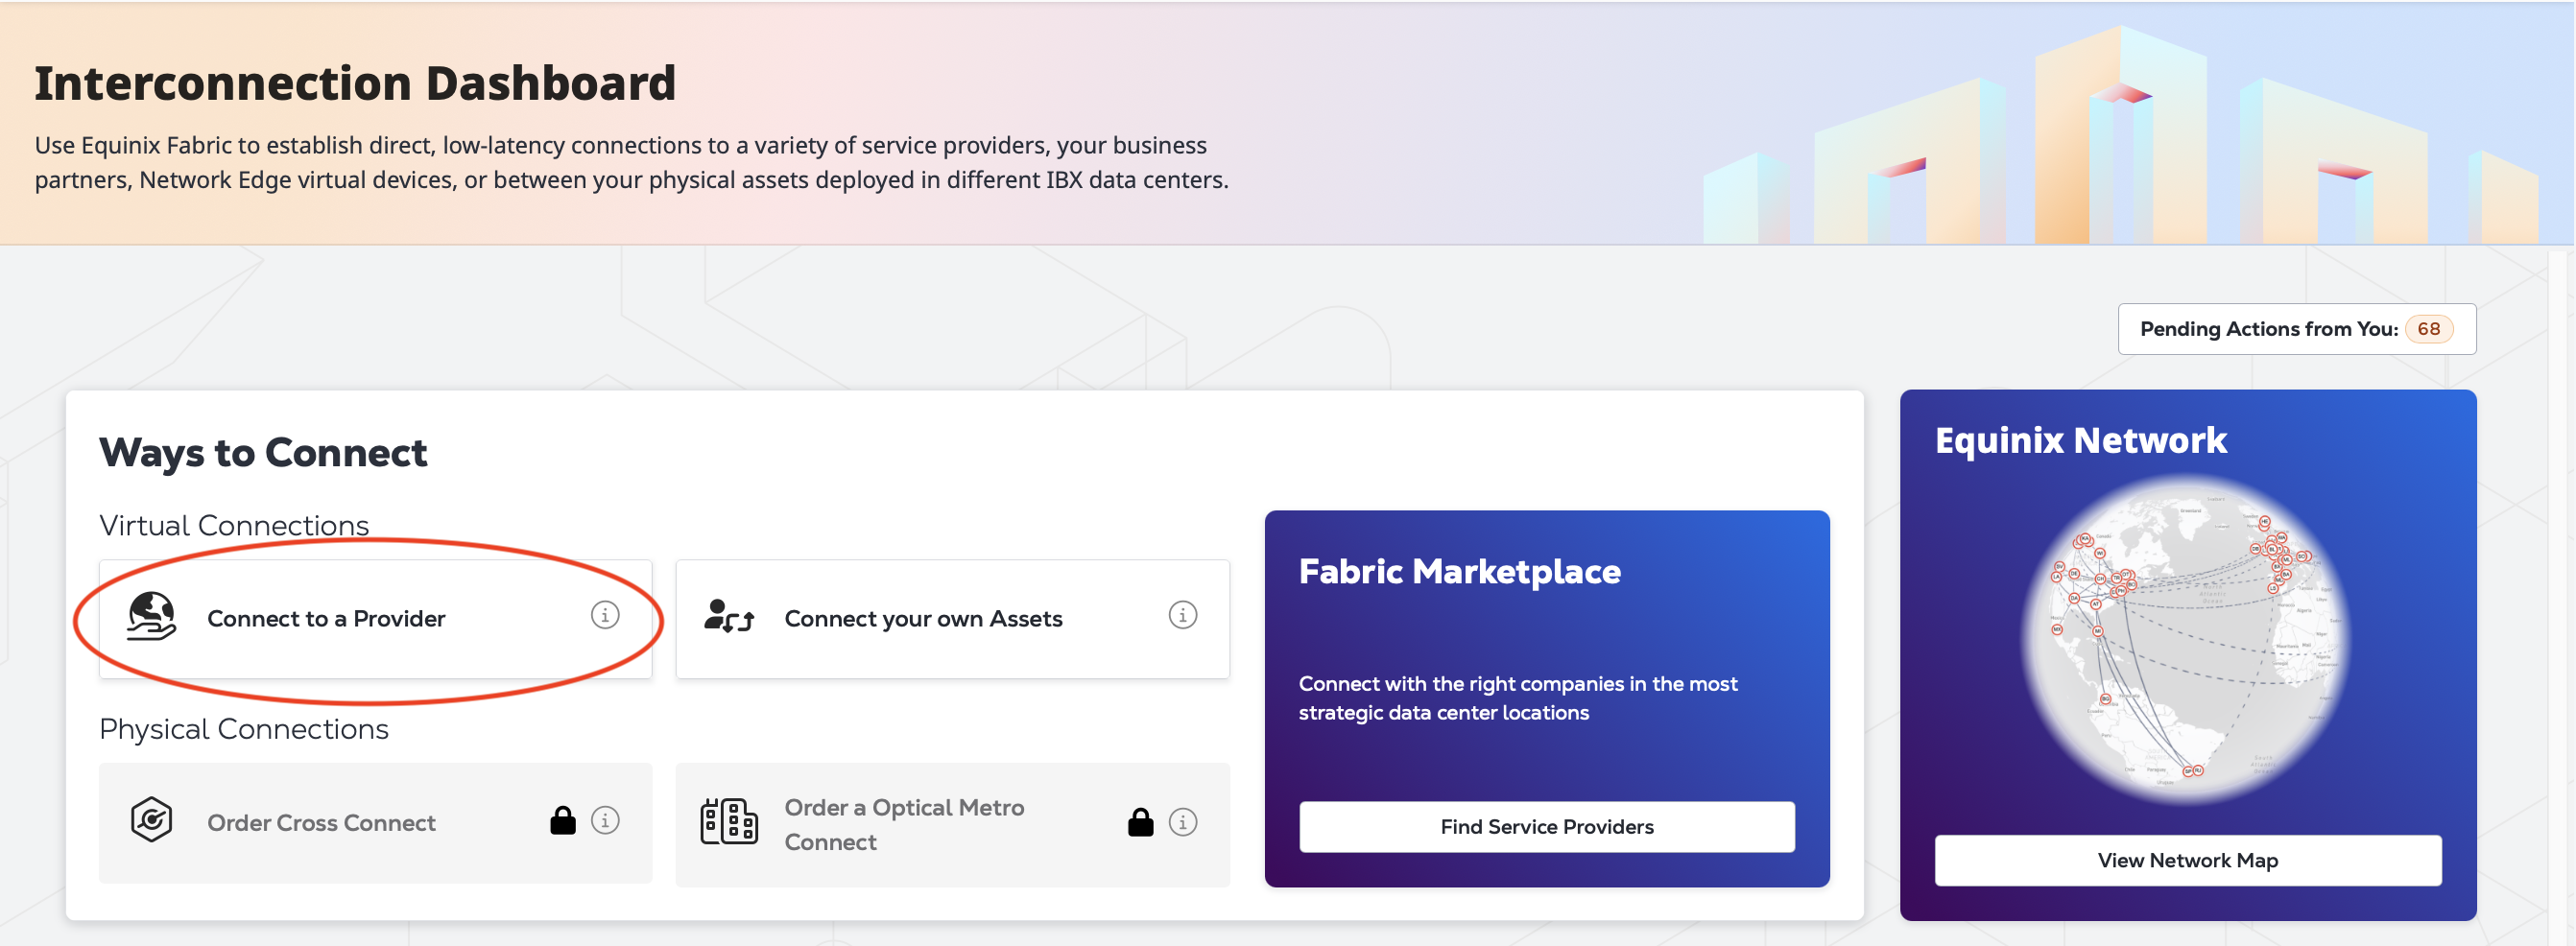
Inicie sesión en el Portal del Cliente y navegue hasta el Panel de Interconexión .
-
En la sección Formas de conectar, haga clic en Conectar a un proveedor.
-
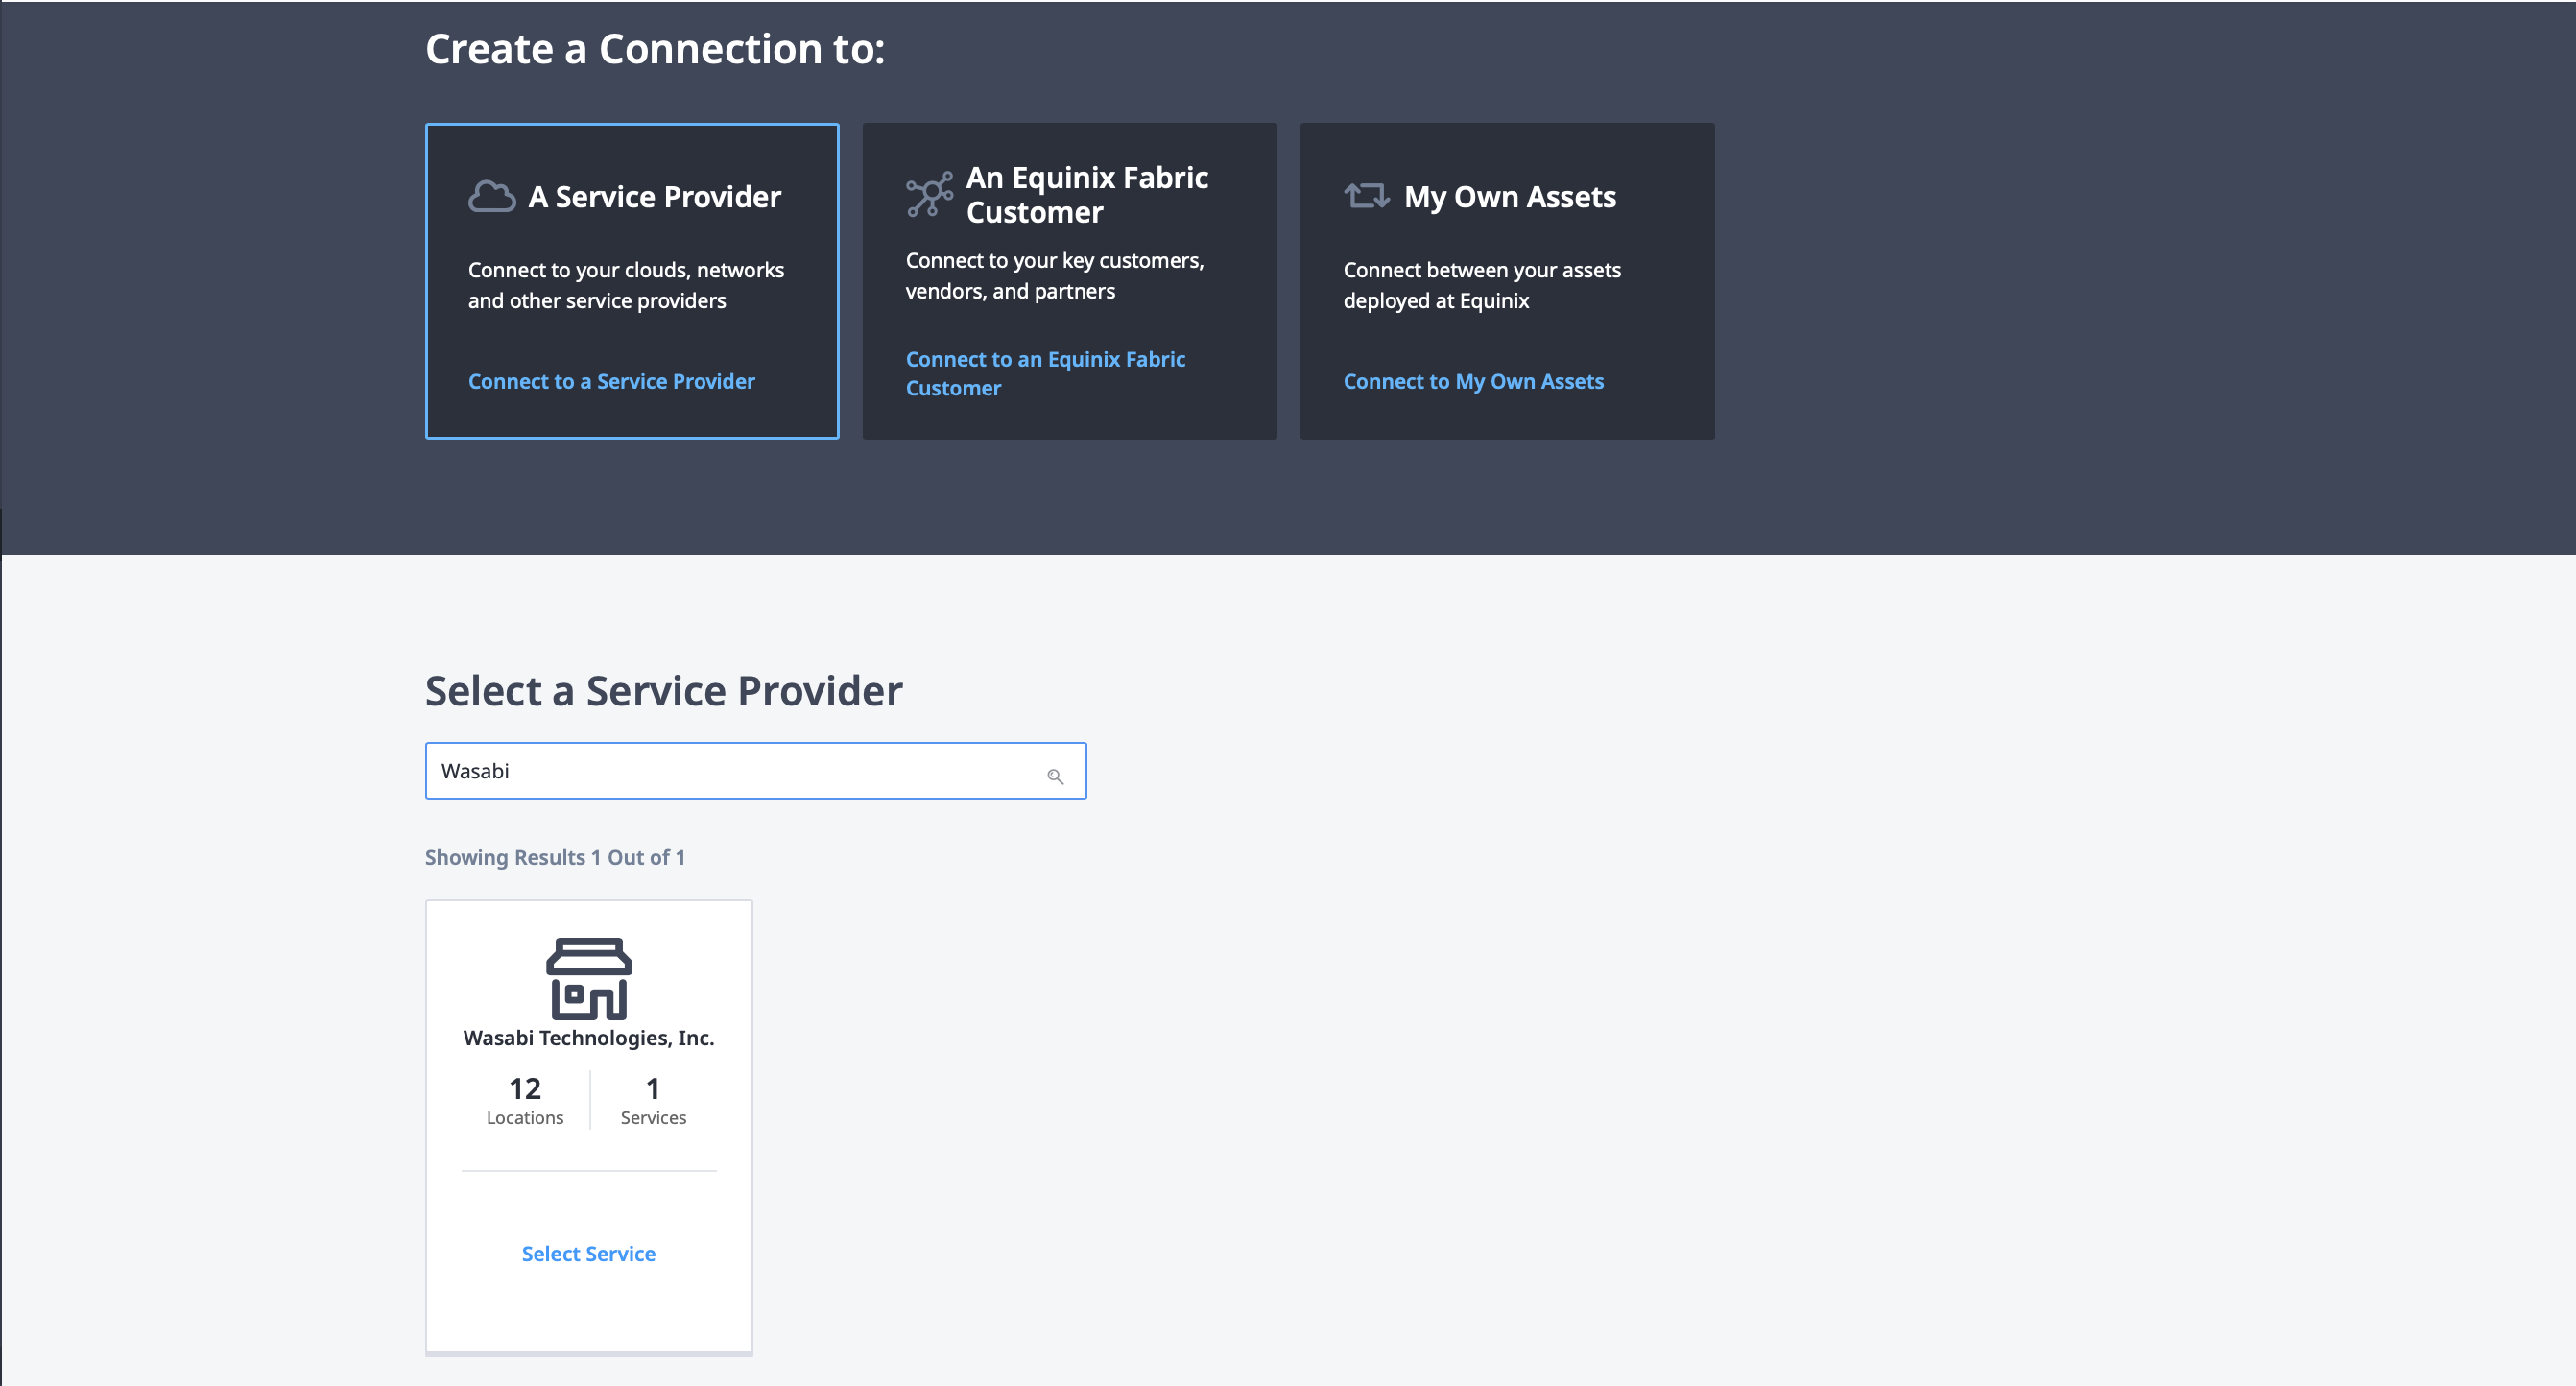
En la página Crear una conexión, haga clic en Un proveedor de servicios . Búsqueda de "Wasabi". En la tarjeta de Wasabi Technologies, Inc., haga clic en Seleccionar servicio.
-
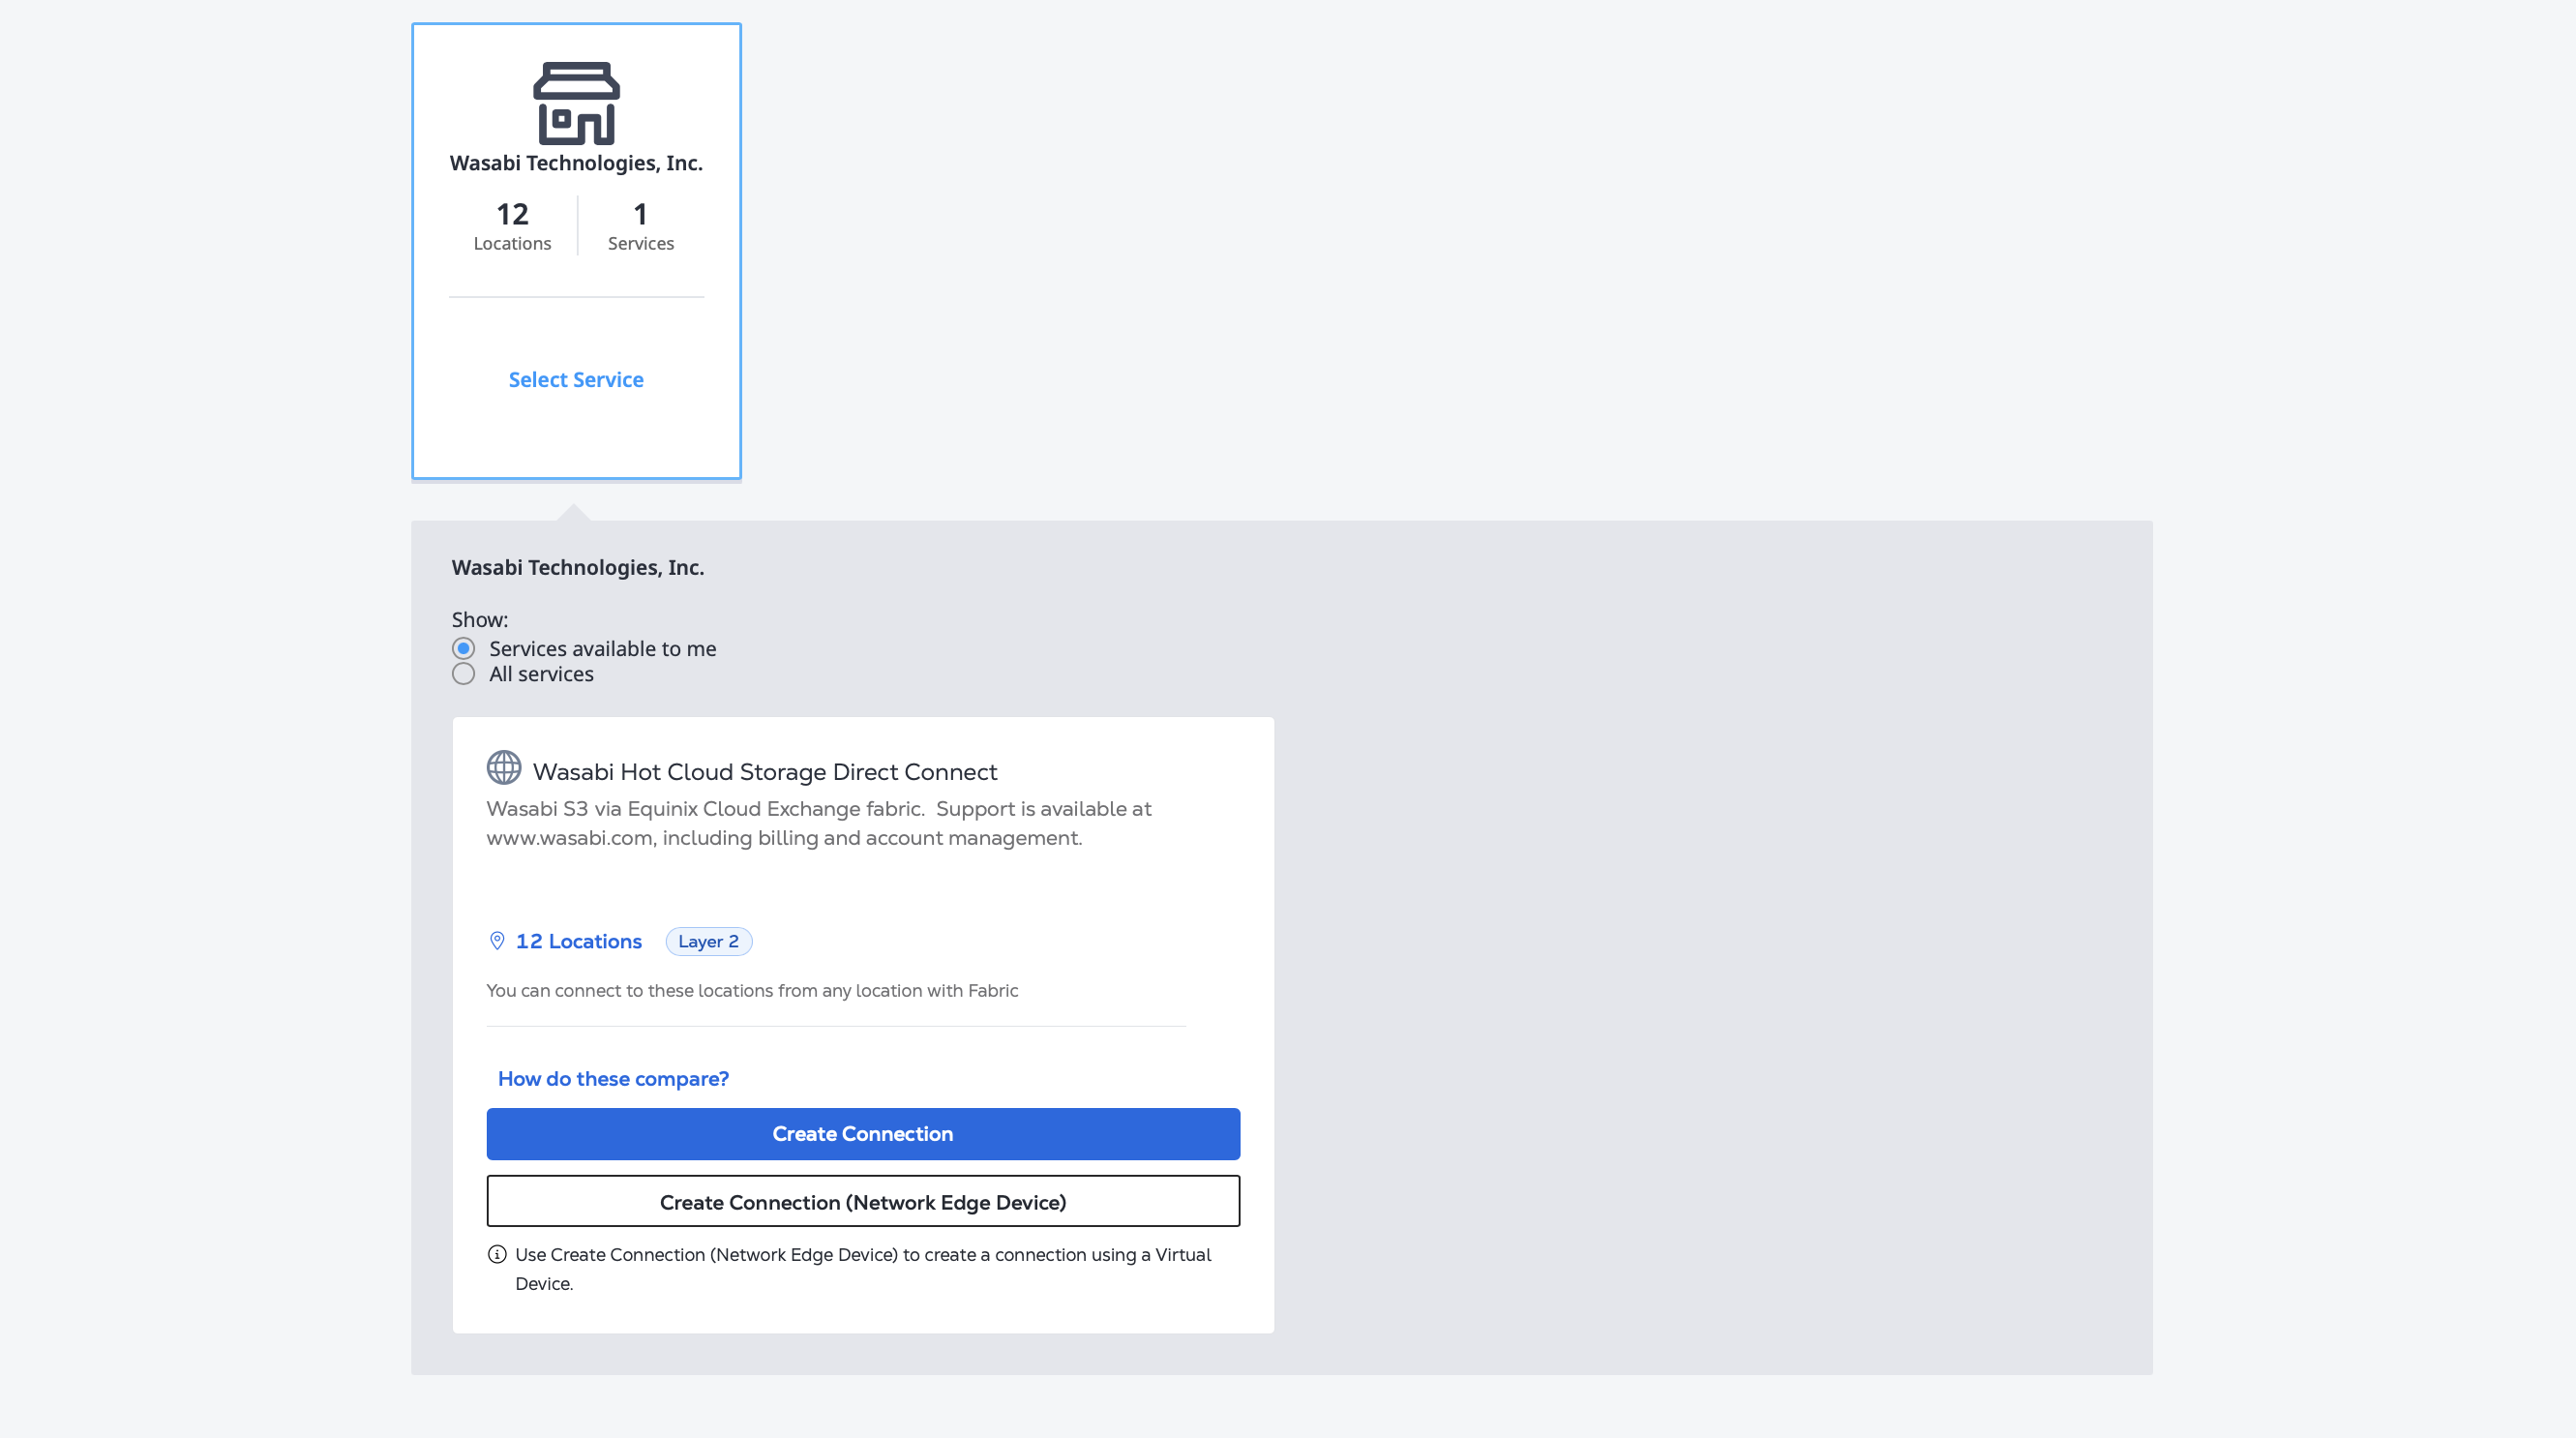
En la tarjeta Wasabi Hot Cloud Storage Direct Connect, haga clic en Crear conexión. Si se conecta desde un dispositivo virtual Network Edge, haga clic en Crear conexión (dispositivo Network Edge) y consulte Creación de una conexión desde Network Edge .
-
Ingrese la información de Wasabi para el destino de la conexión.
- El tipo de conexión predeterminado es Primary.
- Selecciona la ubicación de Wasabi a la que te conectas desde el menú desplegable Destino.
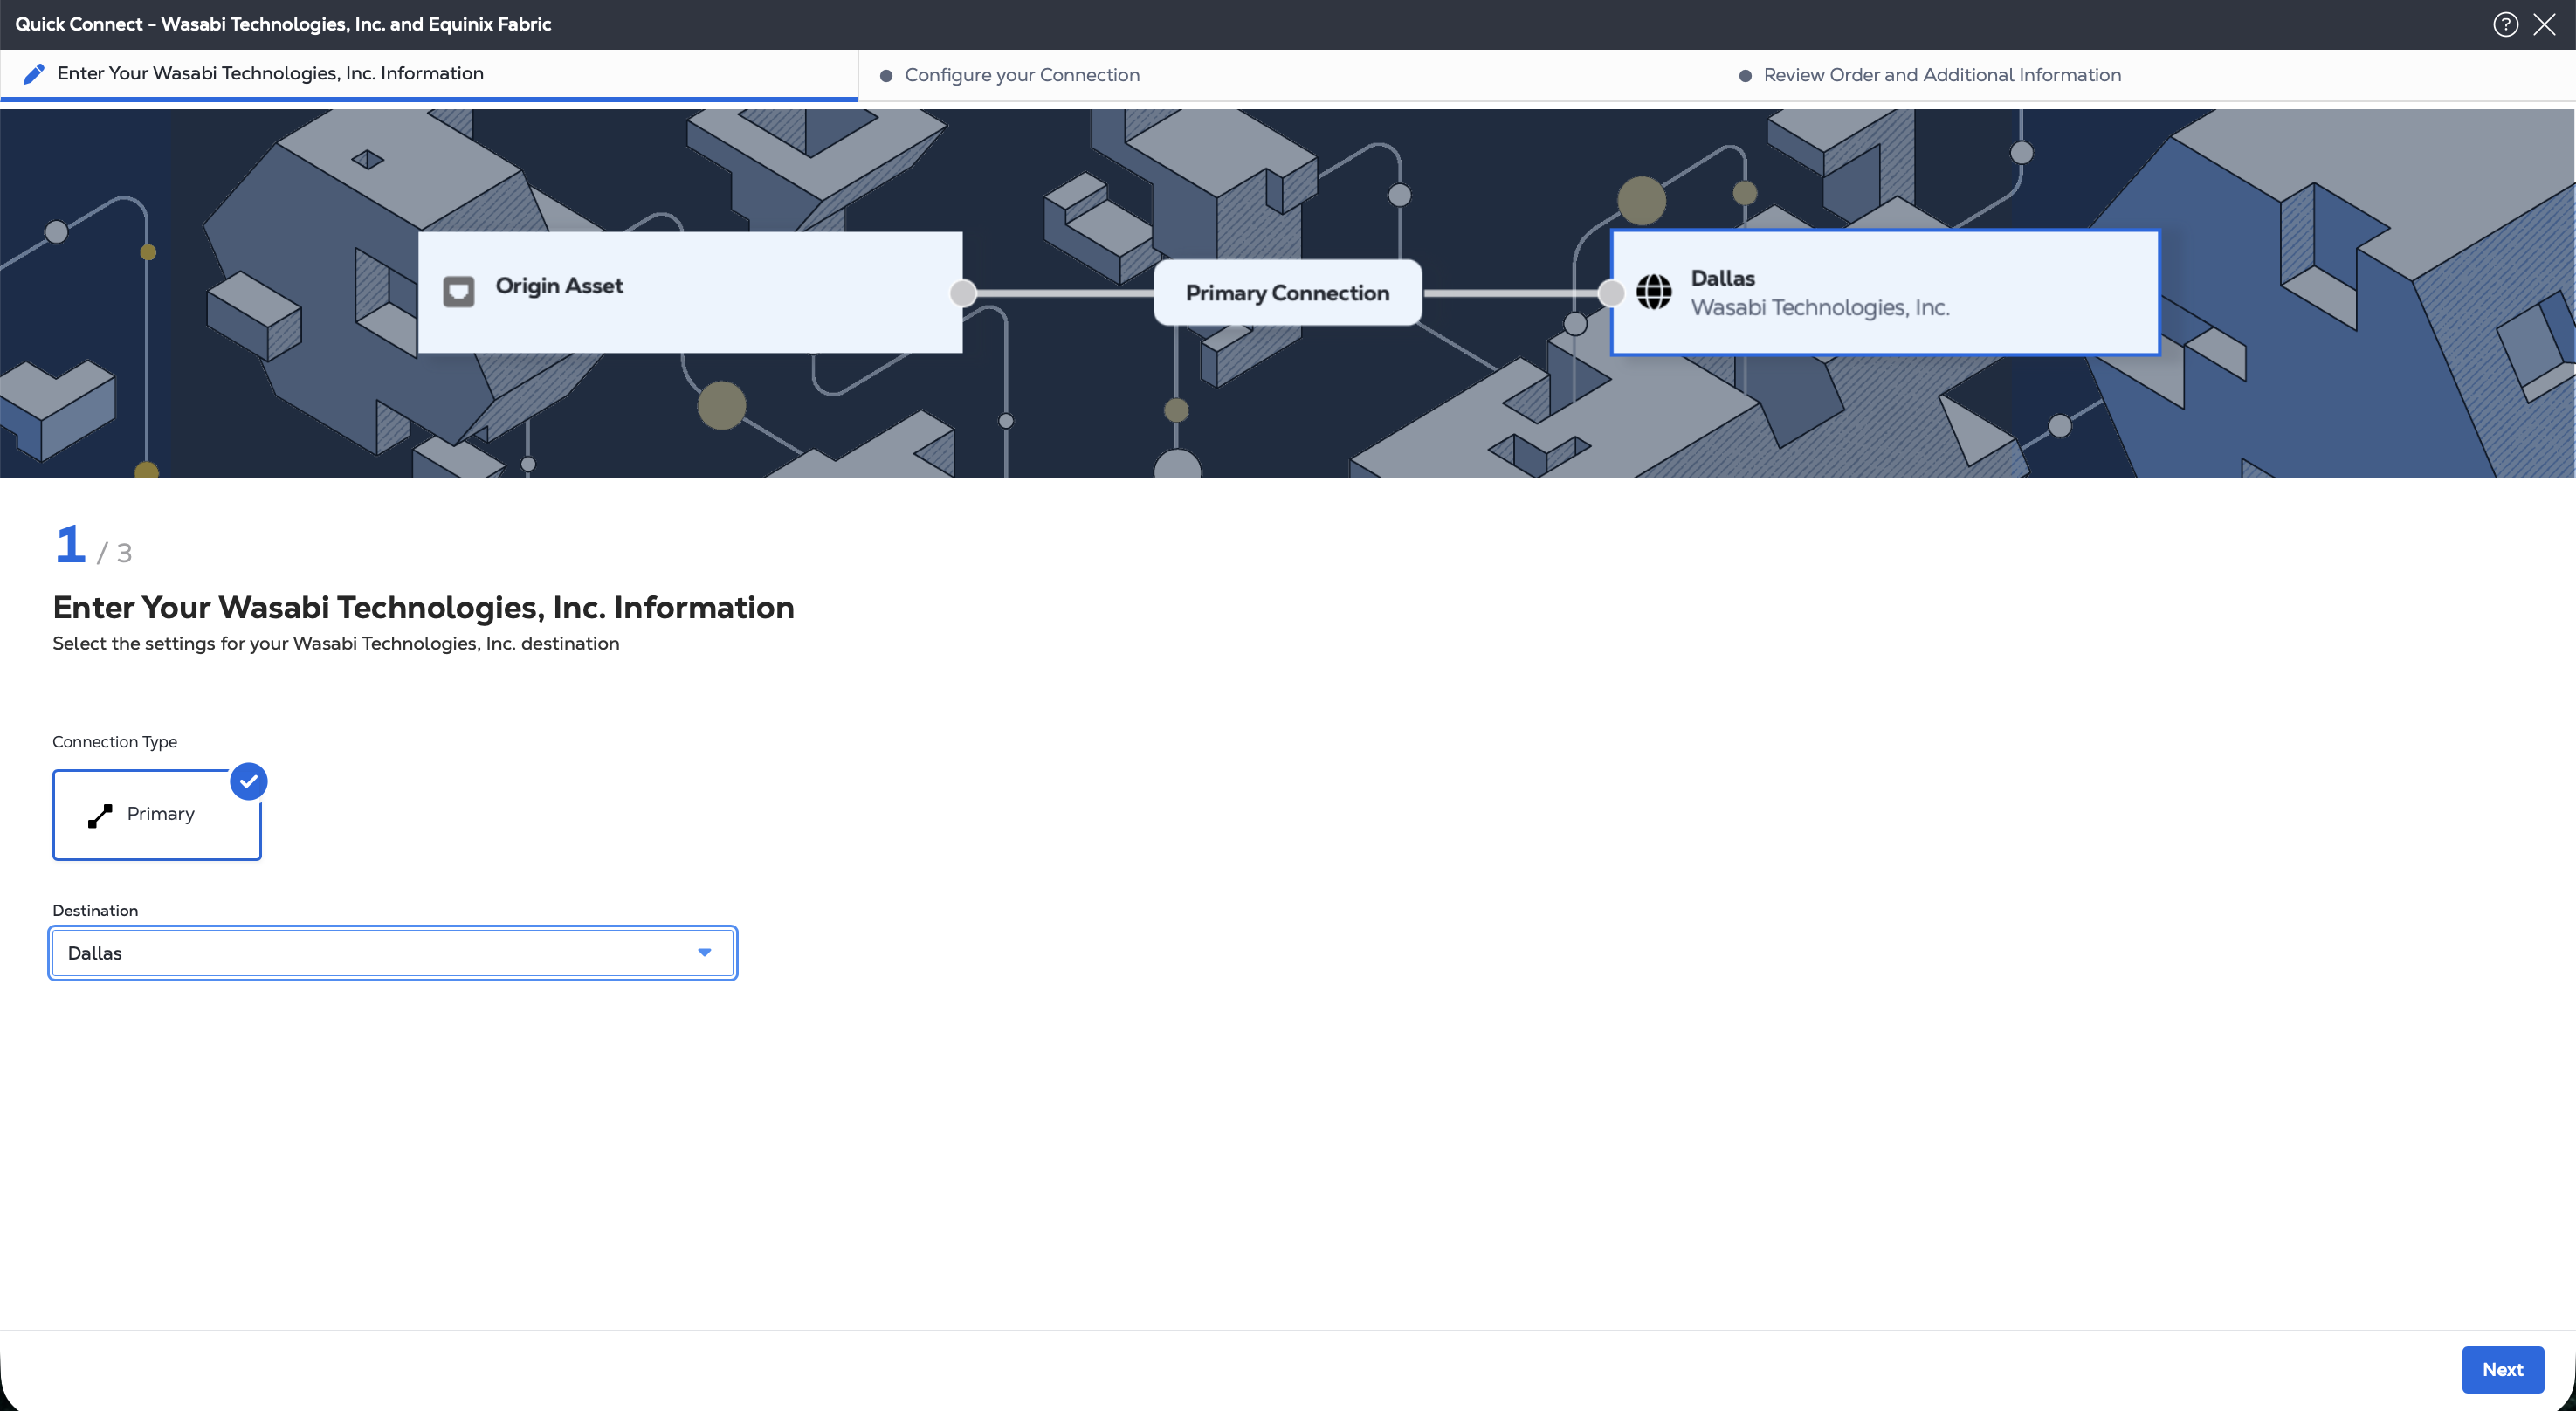
Haga clic en Siguiente.
-
Configure su conexión.
- Para Origin Asset Type, seleccione si se está conectando desde un puerto, router en la nube o utilizando un token de servicio. A continuación, seleccione el puerto específico o el router de la nube a utilizar. Si está utilizando un token de servicio, introdúzcalo en el campo.
- Dale un nombre a tu conexión.
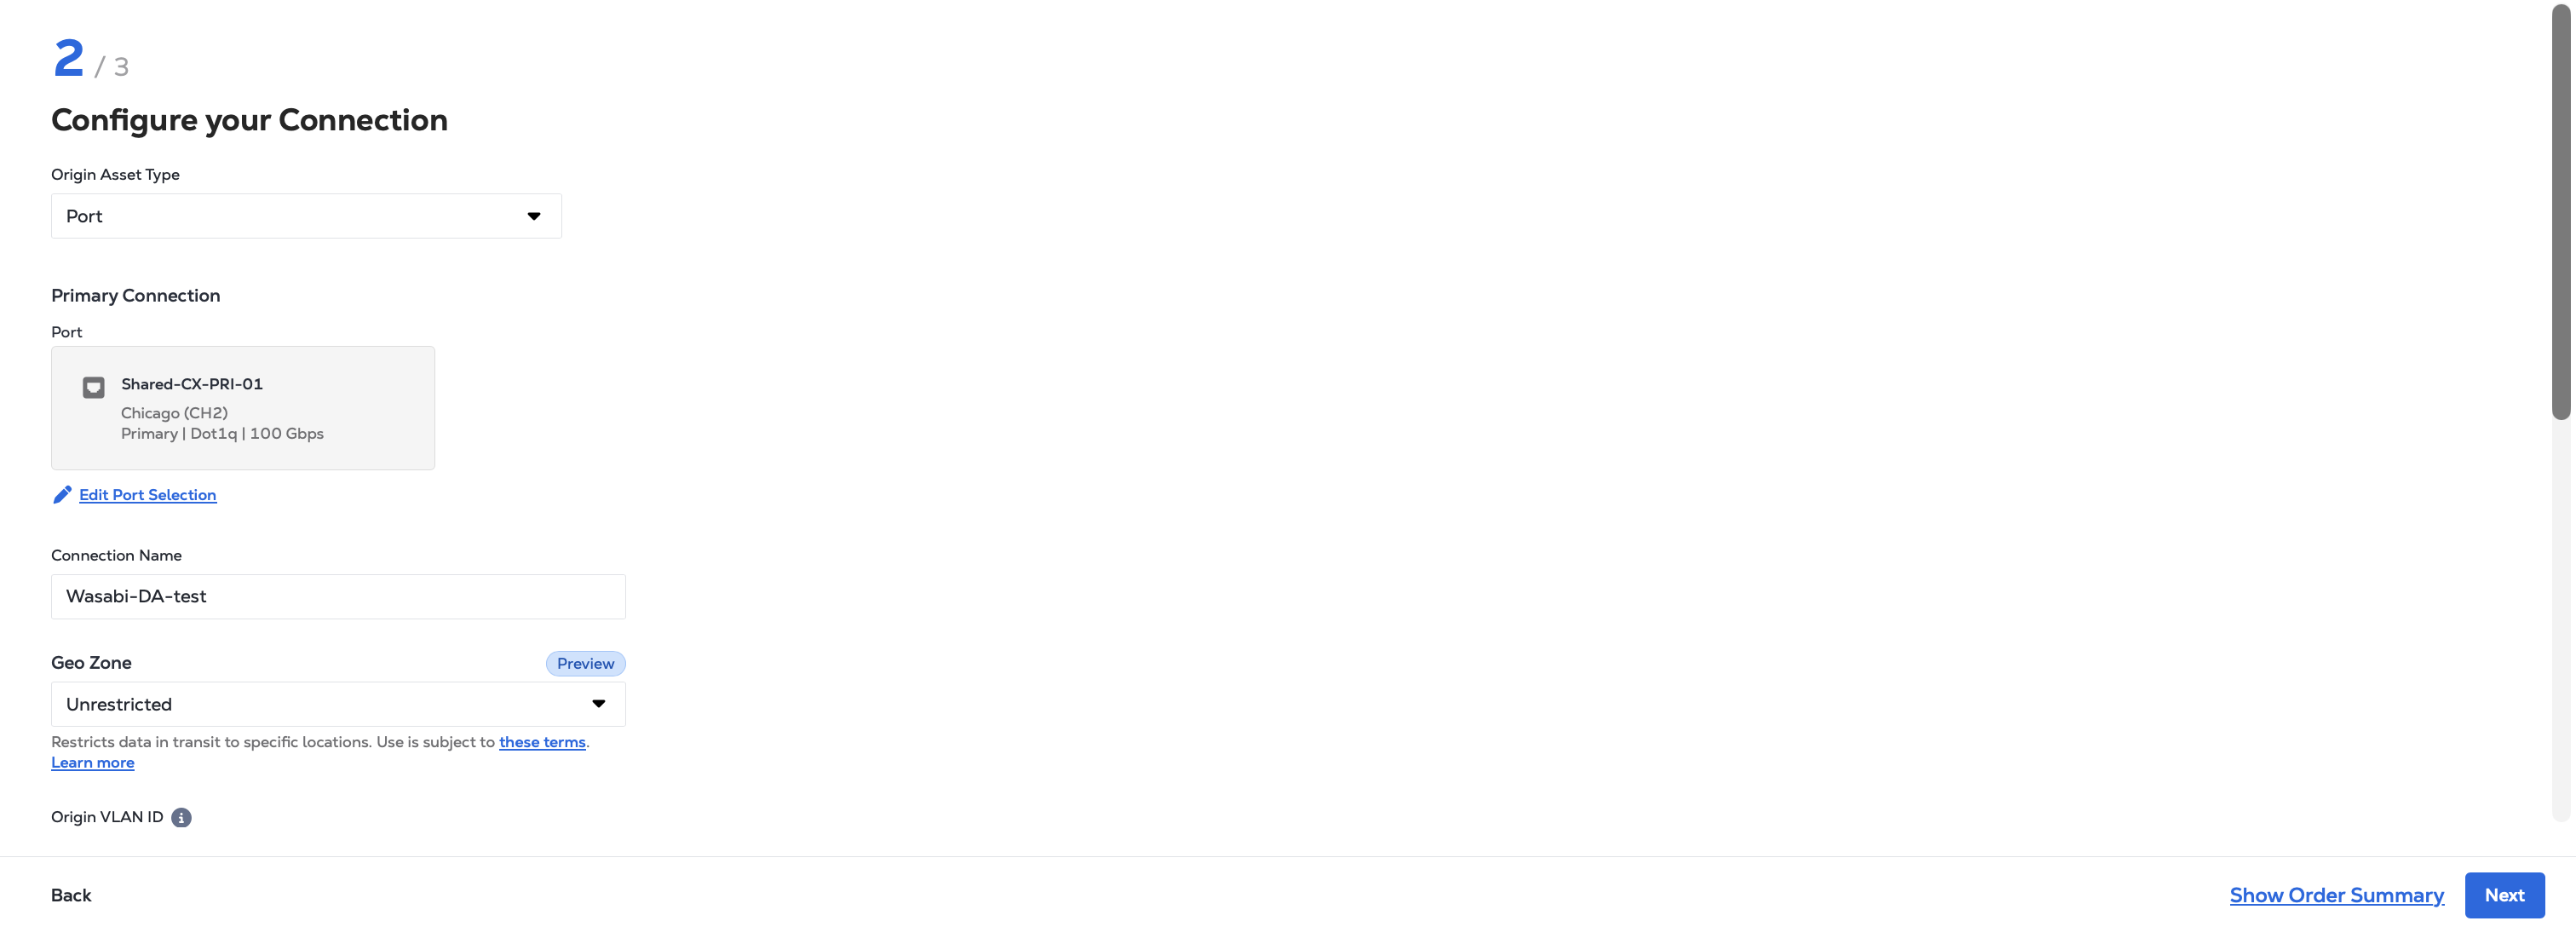
- (Opcional) Si su origen y destino se encuentran en el mismo país o región, elija si desea utilizar las zonas geográficas .
- Introduzca un ID de VLAN. Si está utilizando un puerto QINQ, ingrese una etiqueta de VLAN de Cliente (etiqueta C) y una etiqueta de VLAN de Servicio (etiqueta S).
- Elija el ancho de banda de conexión.
- (Opcional) Si su origen y destino se encuentran en diferentes metros, elija el término de la conexión Longitud.
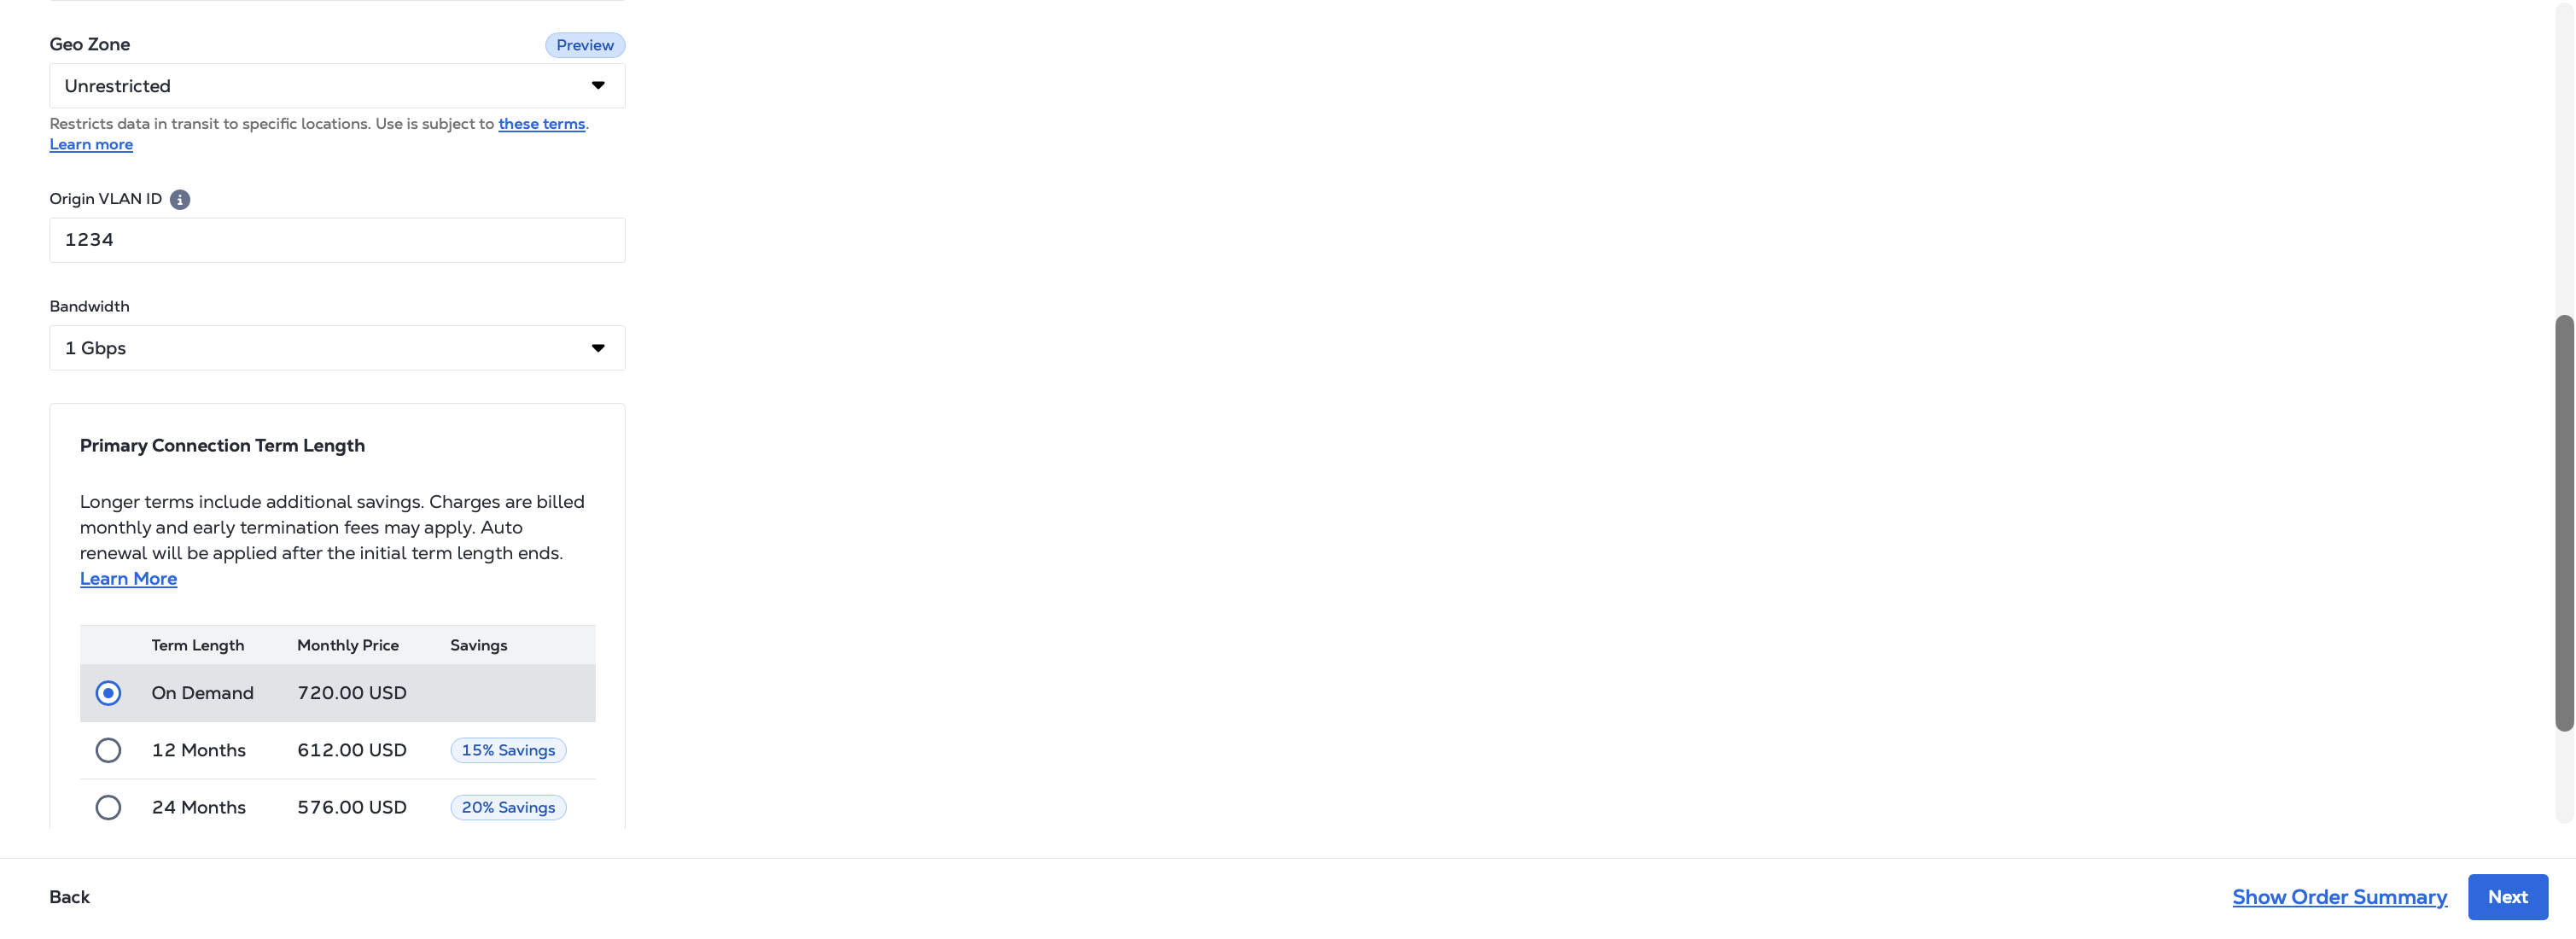
Haga clic en Siguiente.
-
Añade tu identificador de circuito Wasabi y revisa tu pedido.
- En el campo Número de orden de compra, introduzca el identificador de circuito que recibió de Wasabi. Este paso es requerido. El identificador de circuito es lo que utiliza el equipo de operaciones de Wasabi para asegurarse de que la conexión es a su cuenta e infraestructura.
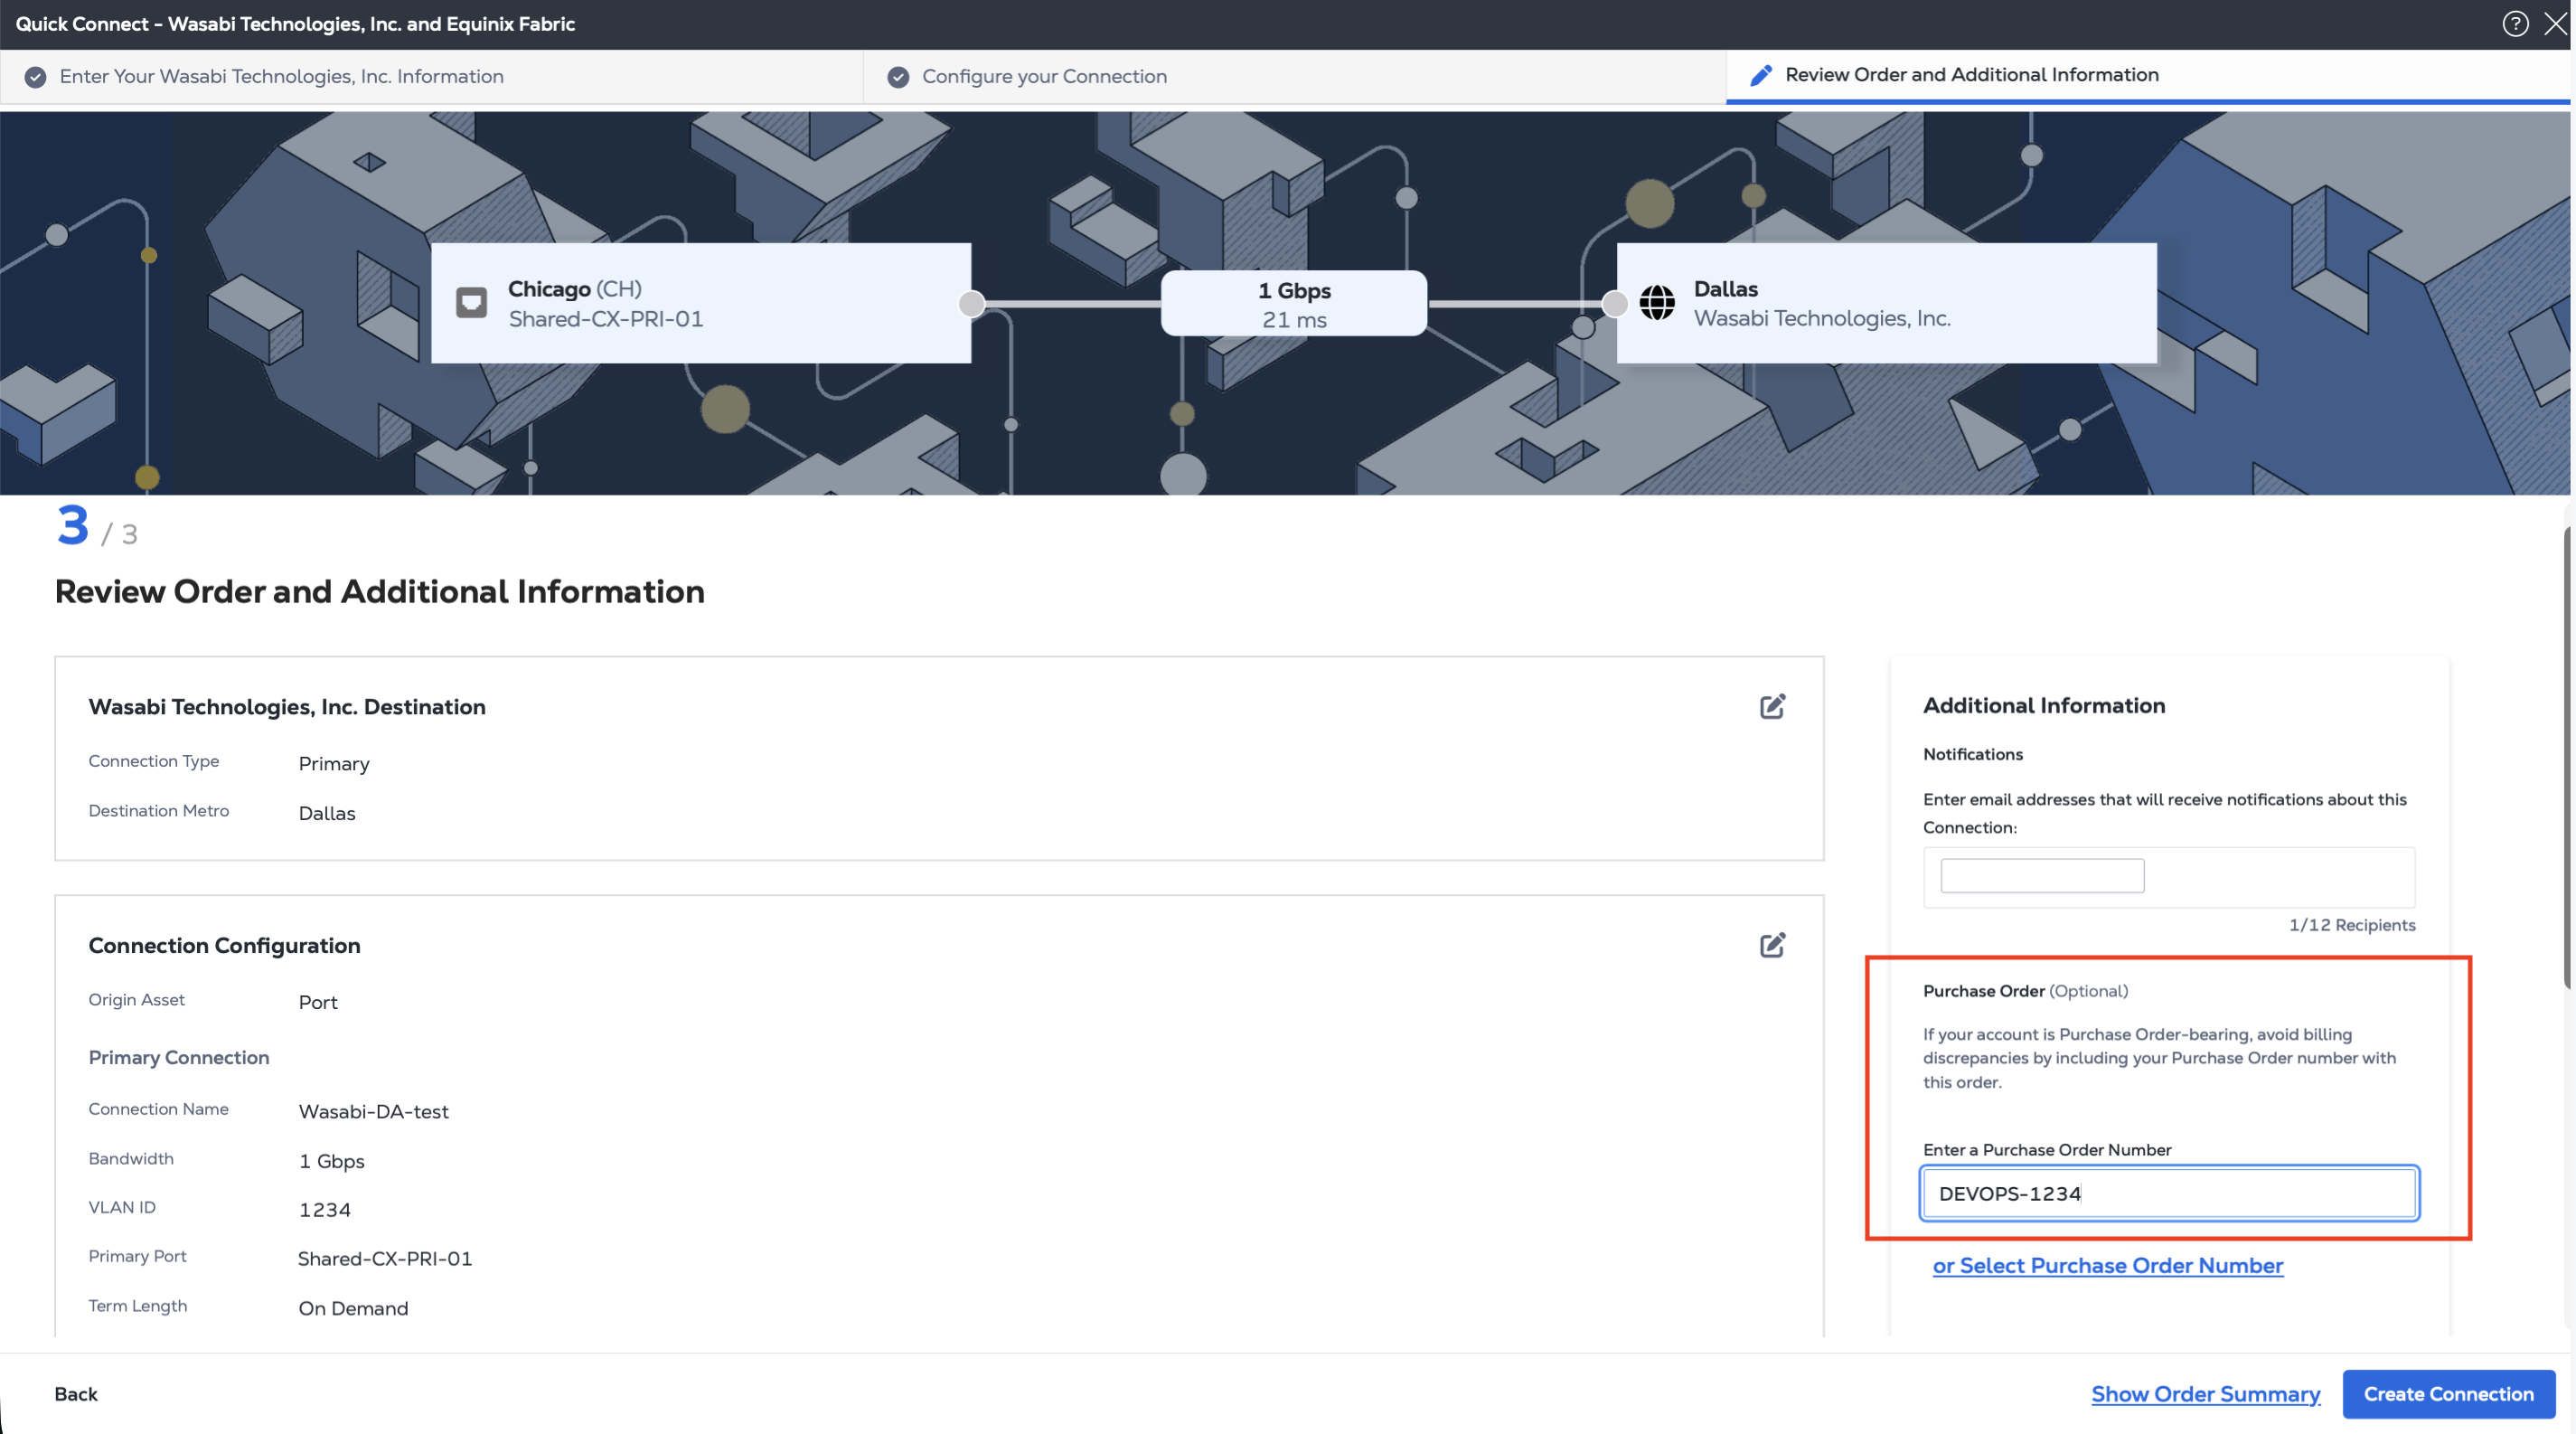
- Revise la información de las secciones Destino y Configuración de la conexión.
- Utilice el campo Notificaciones para proporcionar las direcciones de correo electrónico de los destinatarios a los que se notificará el estado de la conexión. Puede añadir hasta 12 direcciones de correo electrónico.
- (Opcional) Proporcionar un identificador de referencia de cliente que le ayudará a identificar este pedido en su factura.
Cuando esté listo, haga clic en Crear conexión.
Una vez que haya enviado su orden de conexión virtual, Equinix enviará una notificación al equipo de operaciones de WASABI. El cambio típico para la aprobación de la orden es menos de una semana.
Crear una conexión desde Network Edge
-
Seleccione las ubicaciones y el dispositivo virtual a utilizar para la conexión.
- En la sección Origen, elige conectar usando un dispositivo virtual . A continuación, seleccione la ubicación, el tipo de dispositivo, el tipo de conexión y, finalmente, el dispositivo específico que se utilizará para la conexión.
- En la sección Destino, elige la ubicación de Wasabi a la que te conectas.
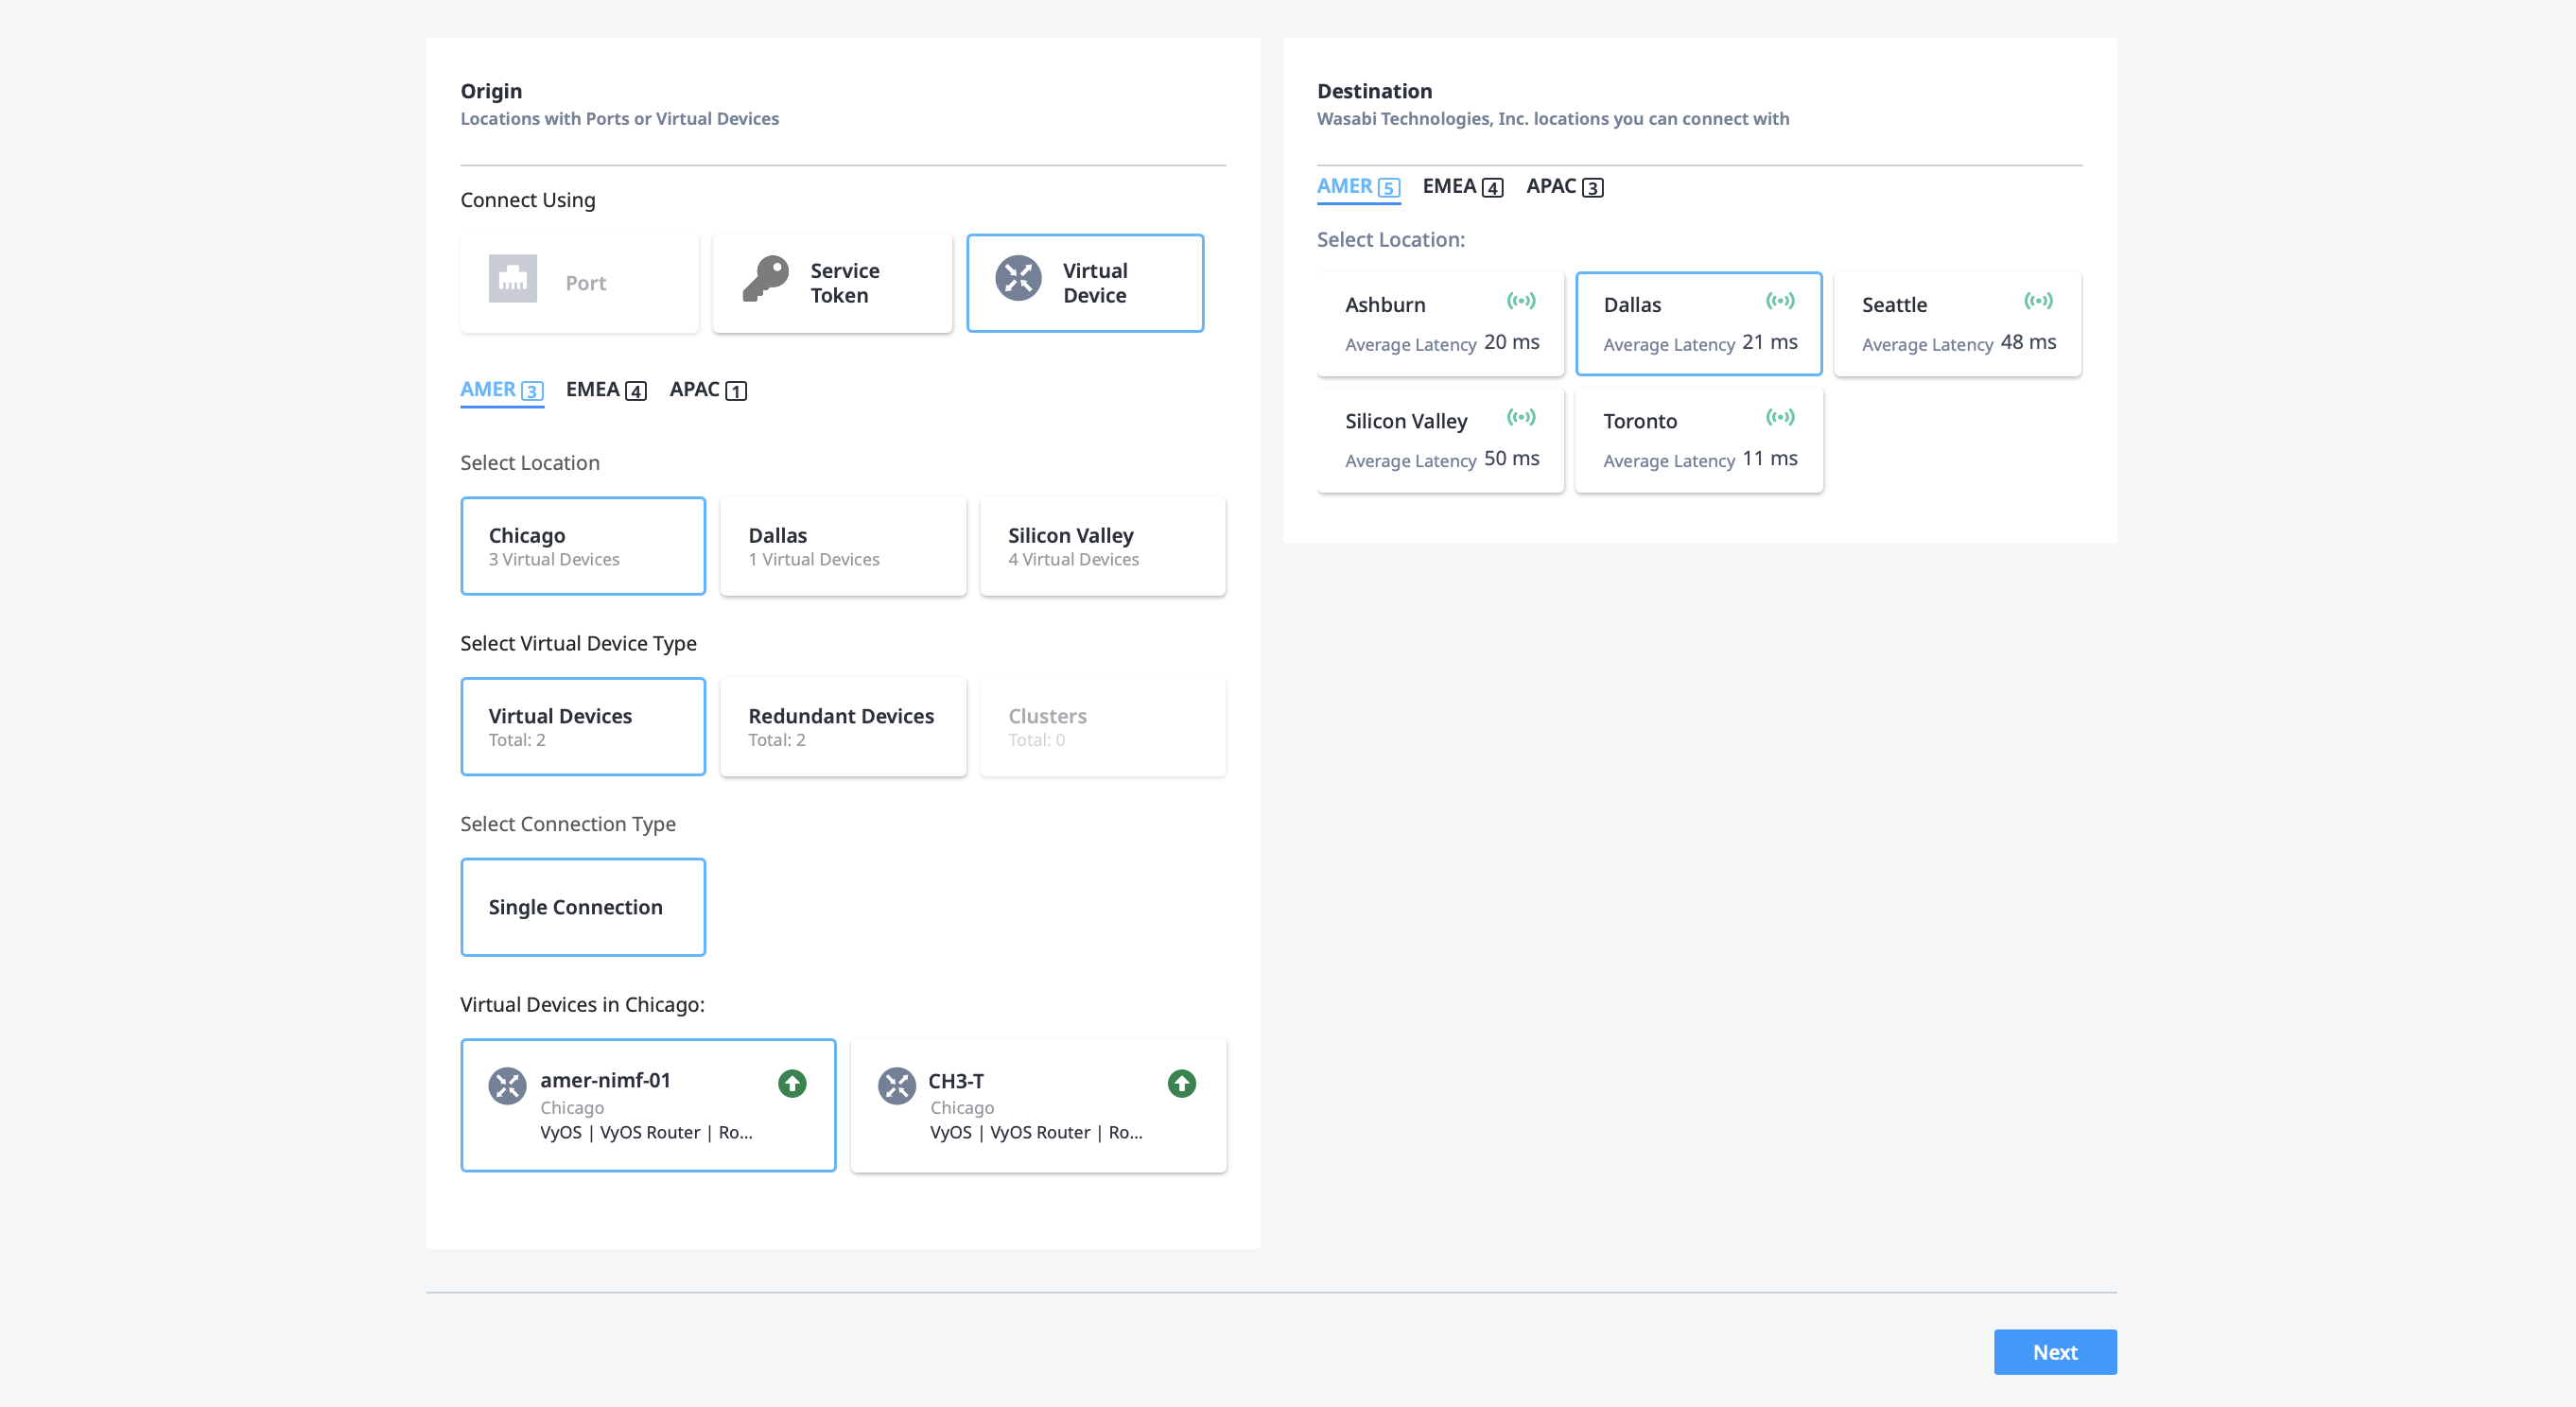
Haga clic en Siguiente.
-
Configure sus detalles de conexión.
- Dale un nombre a tu conexión (s).
- Seleccione si desea seleccionar automáticamente la siguiente interfaz disponible en el dispositivo para esta conexión o elija manualmente la interfaz.
- Requerido. Introduzca el identificador de circuito que recibió de Wasabi en el campo Número de orden de compra. El identificador de circuito es lo que utiliza el equipo de operaciones de Wasabi para asegurarse de que la conexión es a su cuenta e infraestructura.
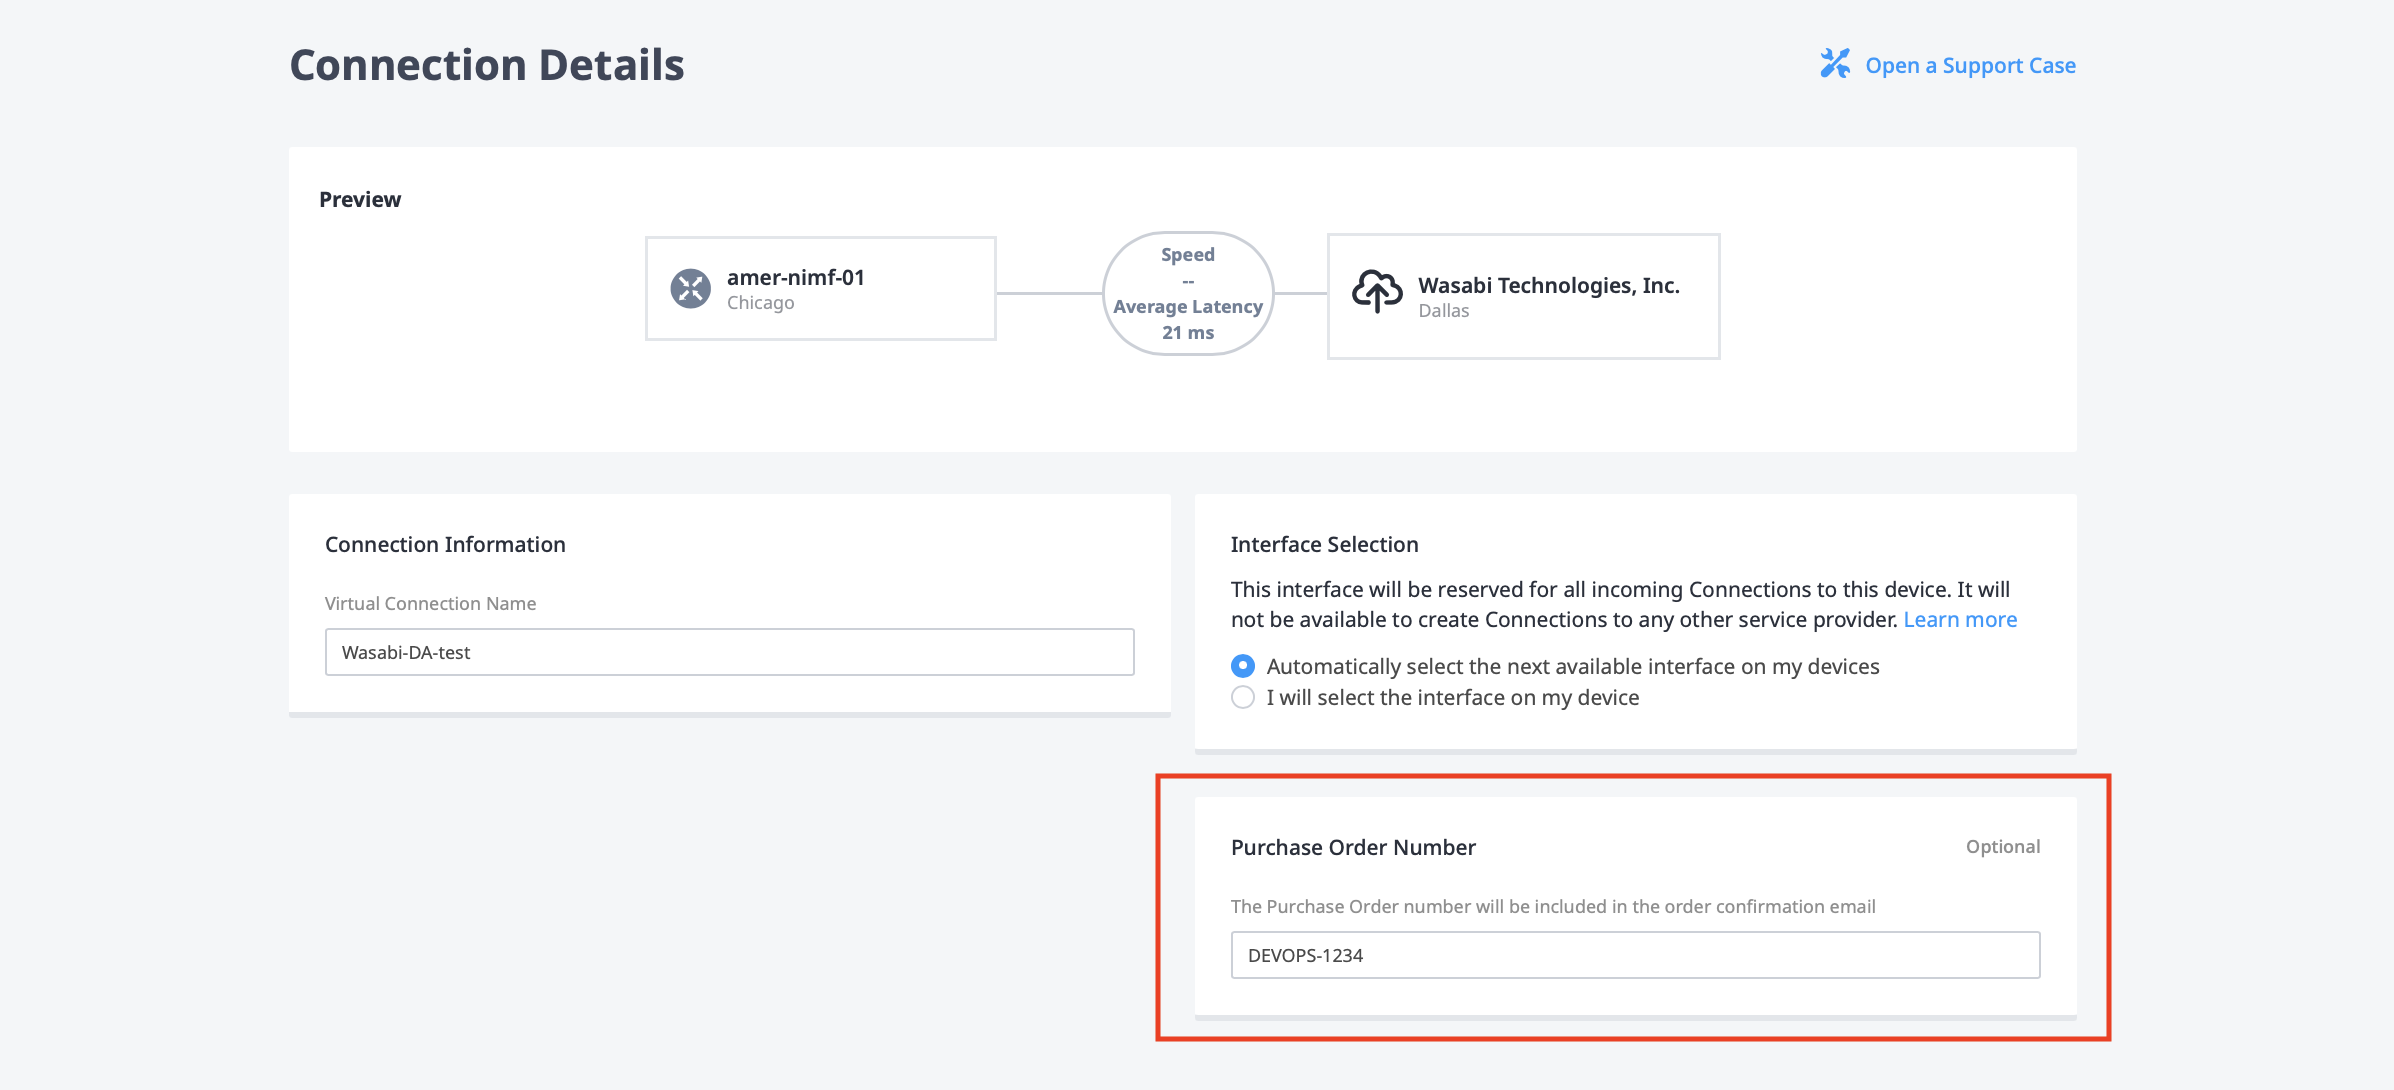
- Elija la velocidad de conexión (s).
- (Opcional) Si su origen y destino se encuentran en diferentes metros, elija el término de la conexión Longitud.
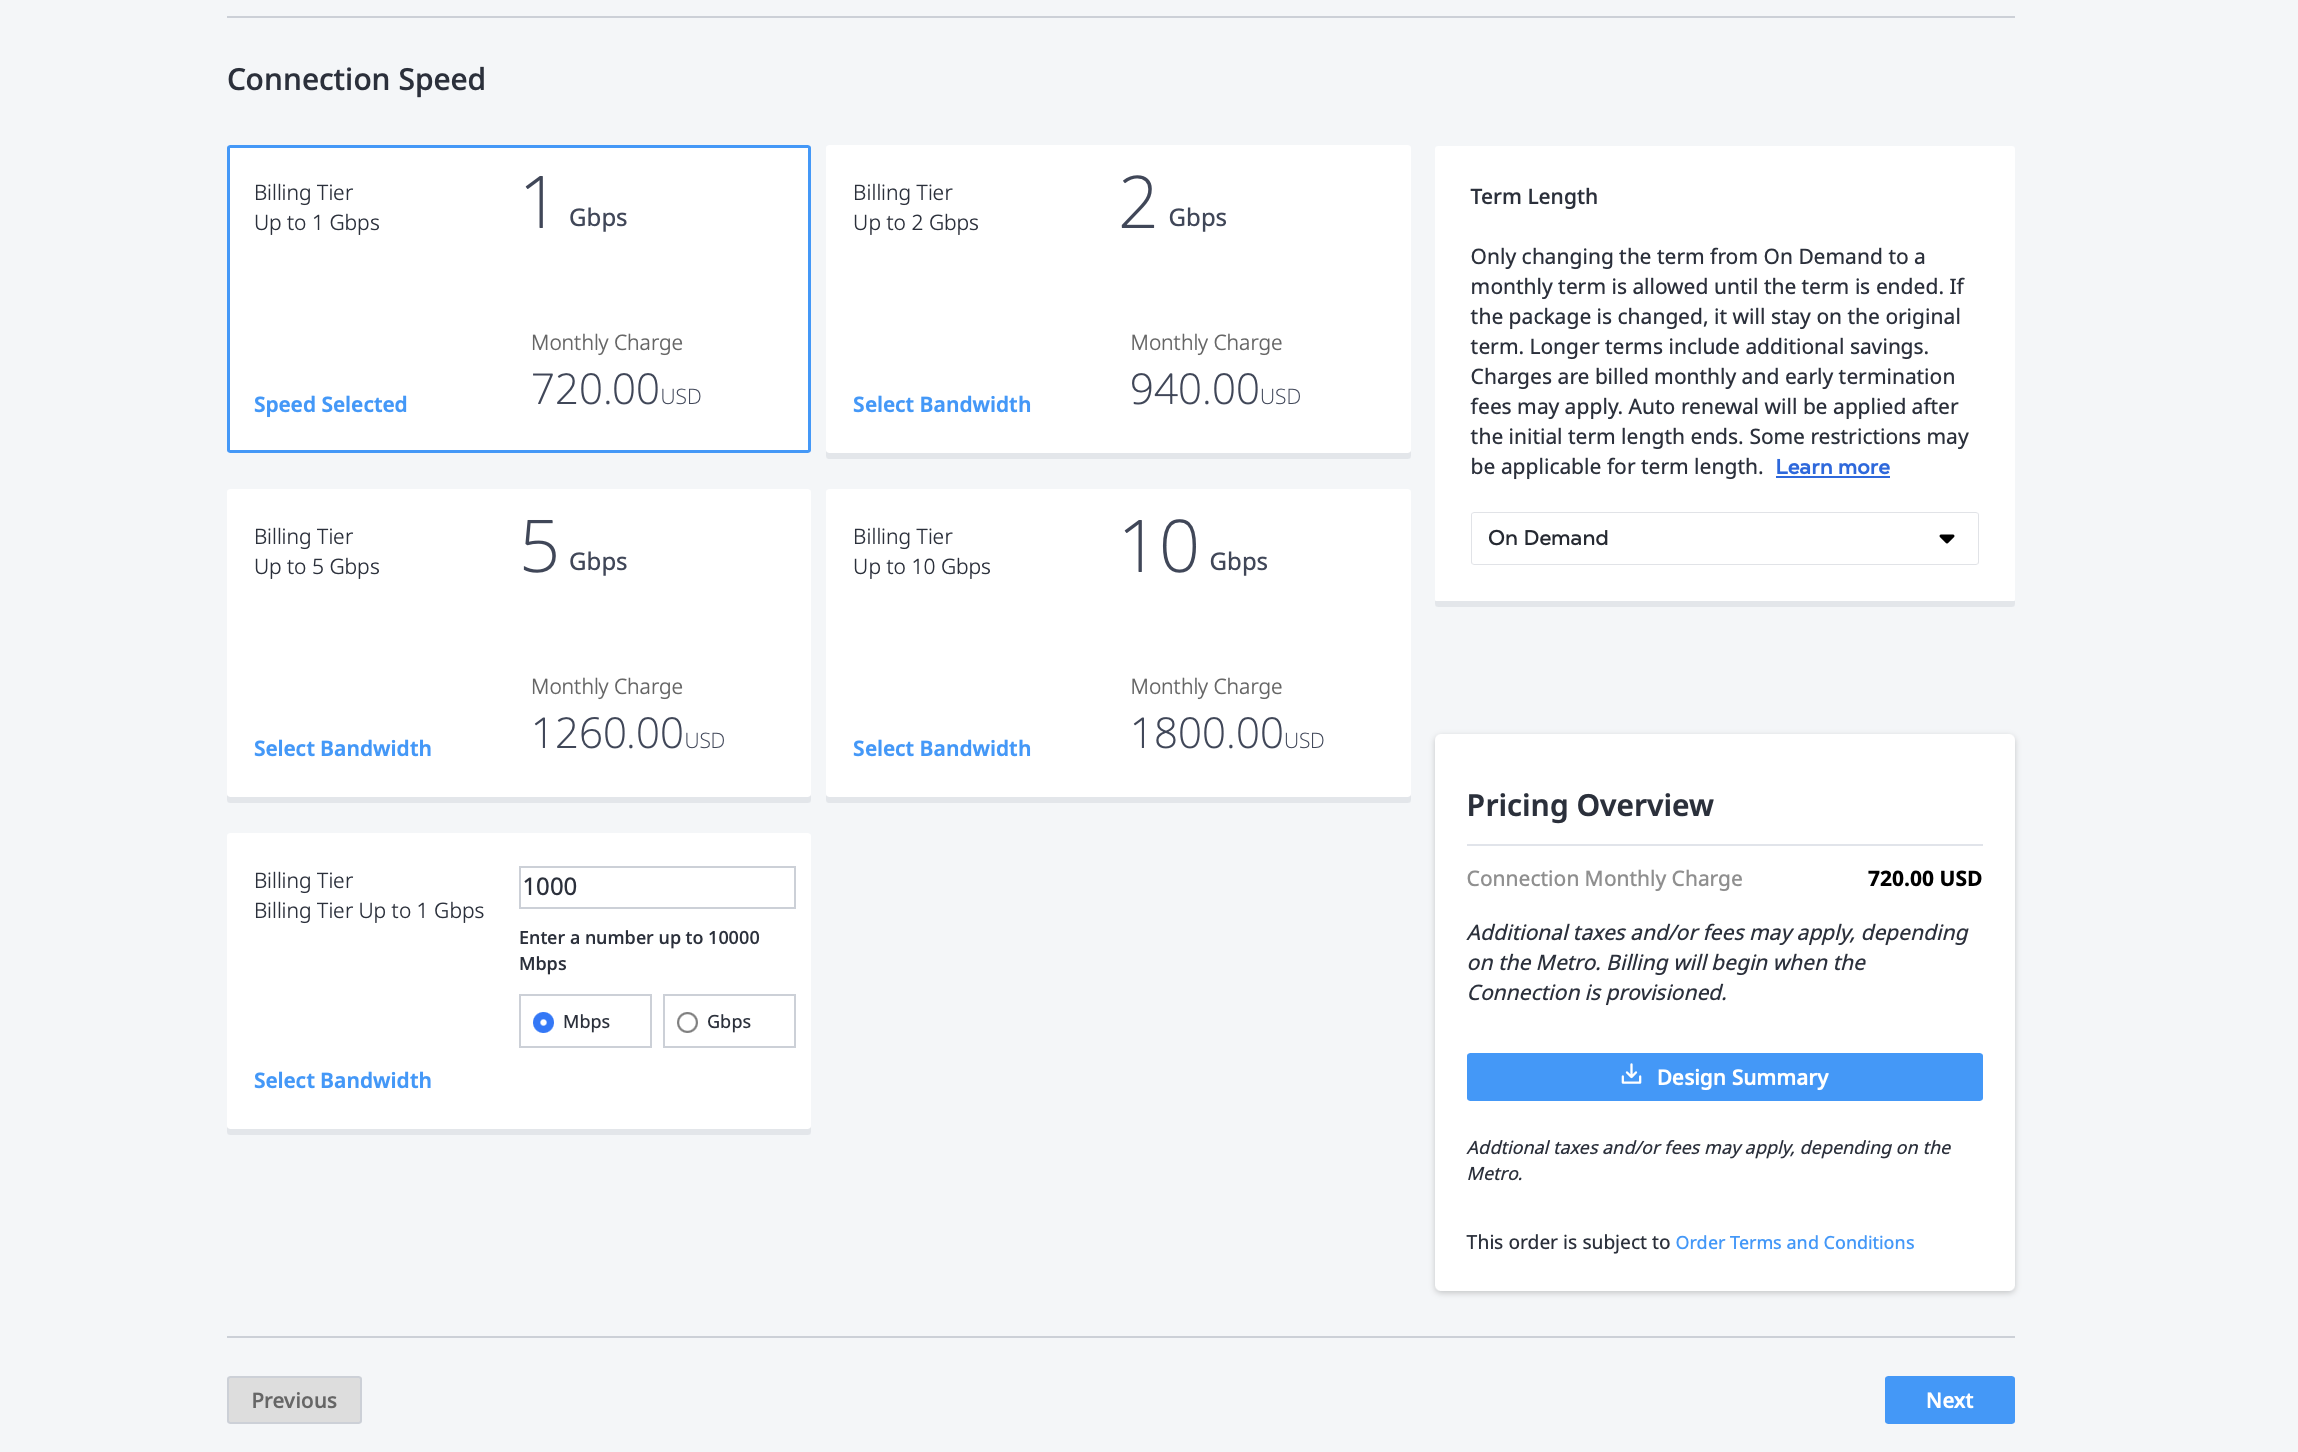
Haga clic en Siguiente.
-
Revisar y presentar.
- Revise la información en el Resumen de Conexión .
- Utilice el campo Notificaciones para proporcionar las direcciones de correo electrónico de los destinatarios a los que se notificará el estado de la conexión. Puede añadir hasta 12 direcciones de correo electrónico.
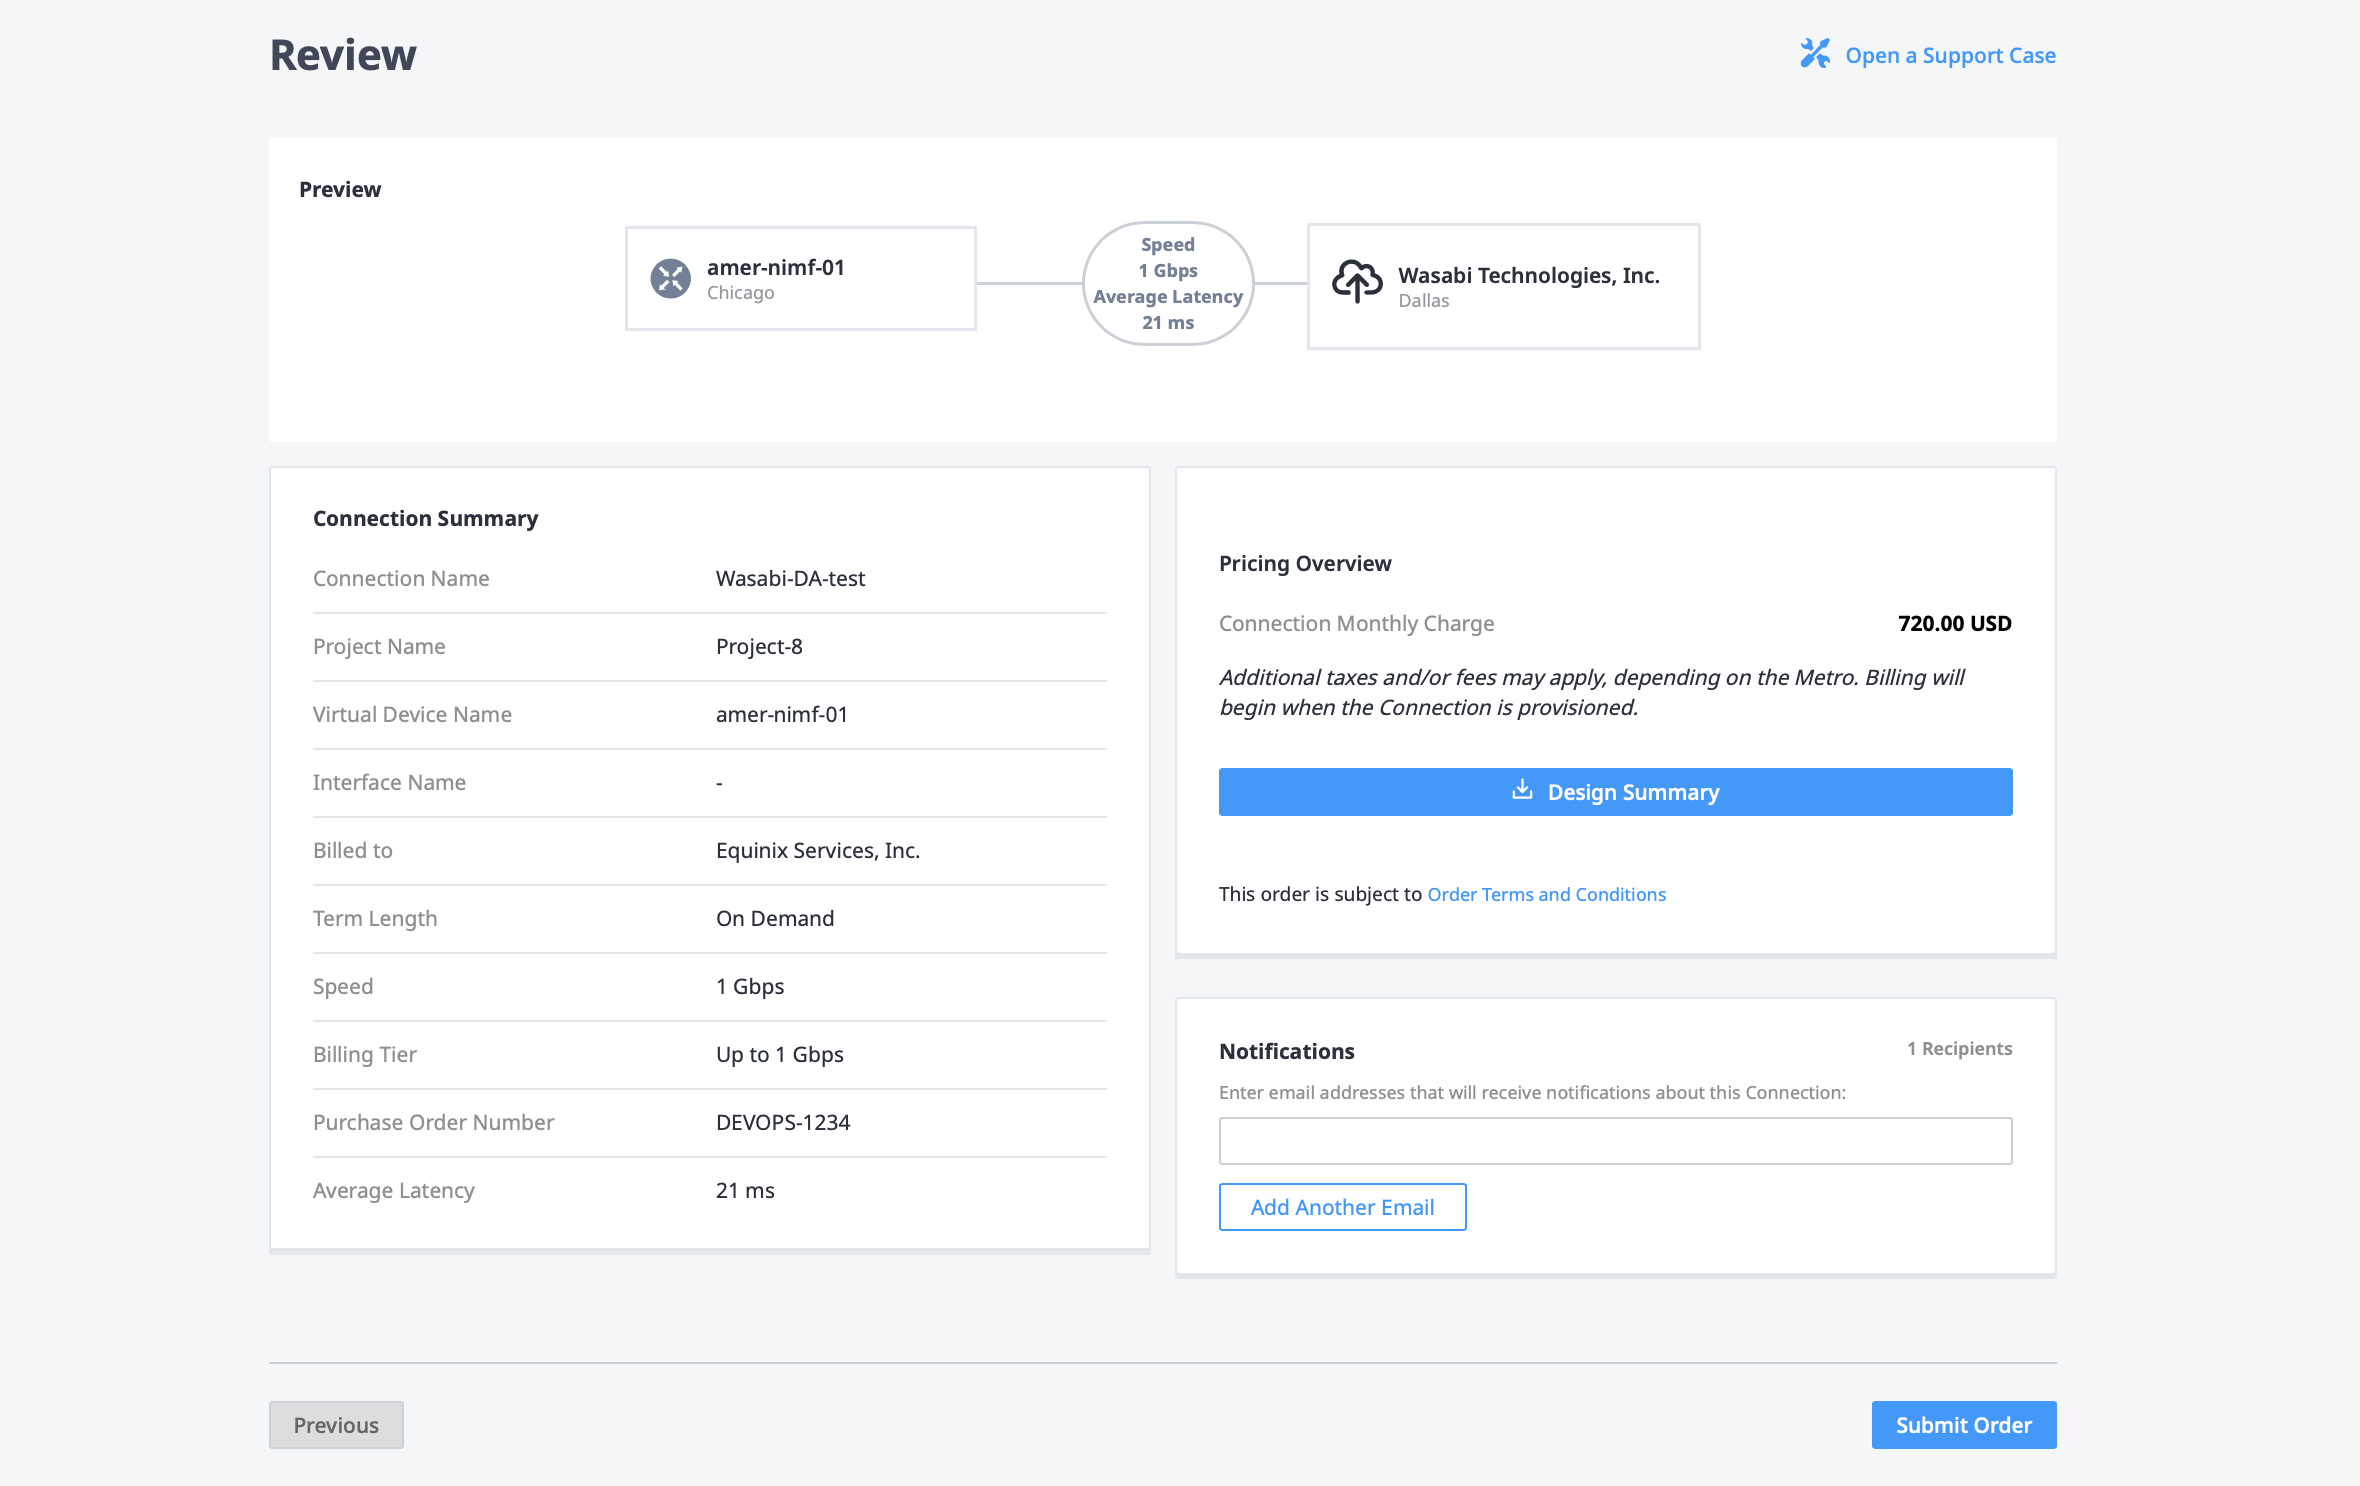
Cuando esté listo, haga clic en Enviar pedido.
Una vez que haya enviado su orden de conexión virtual, Equinix enviará una notificación al equipo de operaciones de WASABI. El cambio típico para la aprobación de la orden es menos de una semana.
Supervisión del estado de la conexión
Una vez que hayas creado la conexión, aparecerá en tu inventario de conexiones donde podrás monitorear su estado. El estado de conexión permanece Pending Approval hasta que Wasabi apruebe la solicitud.