MCP Server Overview
Equinix MCP (Model Context Protocol) servers provide a standardized interface for AI assistants and developer tools to interact with the Equinix API. MCP is an open protocol that enables secure, structured access to external APIs and services, allowing MCP clients to perform operations on your Equinix resources.
Equinix MCP servers are currently in Private Beta. If you are interested in joining the Beta program, please email fabric-intelligence-support@equinix.com or reach out to your Equinix account representative.
The following MCP servers are available:
| MCP Server | Location | Description |
|---|---|---|
| Fabric MCP Server | https://mcp.equinix.com/fabric | Interact with your Equinix Fabric resources. |
Supported MCP Clients
Equinix MCP servers work with any MCP client that supports remote servers and OAuth authentication. See the Model Context Protocol specification for the full protocol definition.
Examples of MCP clients that work with Equinix MCP servers include:
- Claude Desktop -- Anthropic's desktop application
- Cursor -- AI-native code editor
- Visual Studio Code -- With GitHub Copilot and built-in MCP support
Any other MCP-compatible client that supports remote servers with OAuth authentication can also be used. See Other MCP Clients below for generic configuration guidance.
Prerequisites
Before using Equinix MCP servers, ensure you have:
- An Equinix Customer Portal account
- An MCP client that supports remote MCP servers with OAuth authentication
No additional software or packages are required. Authentication is handled automatically by your MCP client through a browser-based login flow.
Authentication
Equinix MCP servers use OAuth 2.1 for authentication. For client registration, the server supports both Dynamic Client Registration (DCR) and Client ID Metadata Documents (CIMD). Your MCP client selects the mechanism it supports -- most MCP clients today use DCR, while some (such as Visual Studio Code) support CIMD as well. Either way, you do not need to manually generate or manage access tokens; your MCP client handles the entire authentication flow for you.
How It Works
- Add the MCP server URL to your MCP client's configuration (see Setup and Configuration below).
- Your MCP client detects that an auth token is missing and authentication is required and prompts you to connect.
- A browser window opens where you log in with your Equinix Customer Portal credentials.
- You review a consent page that describes the permissions and scopes being granted and approve the connection.
- Your MCP client receives and stores tokens automatically. Tokens are refreshed in the background -- you do not need to manually regenerate them.
After completing this flow once, you are authenticated until you revoke access or your session is explicitly ended.
Token Lifecycle
- Tokens are automatically refreshed by your MCP client. There is no manual token management.
- If your session is revoked or expires, your MCP client will prompt you to re-authenticate through the same browser flow.
Setup and Configuration
To connect an Equinix MCP server, add the server URL to your MCP client's configuration file. When the client connects for the first time, it will initiate the authentication flow described above.
Setup instructions for the most common MCP clients are below. The exact format varies slightly by client, but all follow the same pattern: add the server URL, save the config, and restart.
Claude Desktop
Claude Desktop supports two ways to add a remote MCP server: the Connectors UI (recommended) or editing the configuration file directly. For detailed instructions, refer to the Anthropic documentation on custom MCP integrations.
Option 1: Add via Connectors (Recommended)
-
Open Claude Desktop and click your profile menu, then Settings.
-
In the Settings sidebar, click Connectors.
-
Click Add custom connector.
-
Enter a Name (for example,
Fabric MCP) and set the Remote MCP server URL tohttps://mcp.equinix.com/fabric, then click Add.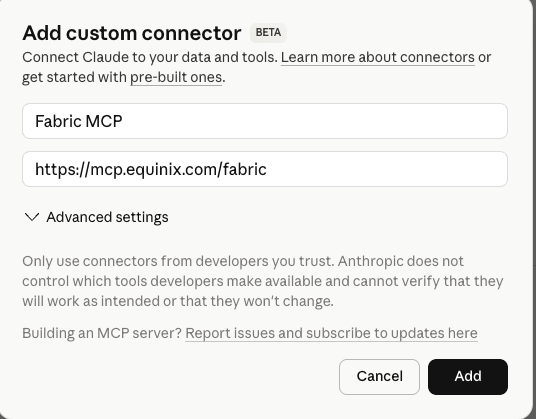
-
Click Connect next to the new connector. A browser window opens where you authenticate with your Equinix Customer Portal credentials.
If the session later expires, the connector shows a "Connection has expired" message — click Connect to re-authenticate.
Option 2: Edit the configuration file
Configuration file location:
- macOS:
~/Library/Application Support/Claude/claude_desktop_config.json - Windows:
%APPDATA%\Claude\claude_desktop_config.json
You can also open the configuration file from Settings > Developer > Edit Config inside Claude Desktop.
Fabric MCP Server example:
{
  "mcpServers": {
    "Equinix Fabric MCP Server": {
      "url": "https://mcp.equinix.com/fabric"
    }
  }
}
Save the configuration file and restart Claude Desktop. You will be prompted to authenticate in your browser on first use.
Cursor
Add the MCP server to your Cursor MCP configuration. For detailed instructions, refer to the Cursor MCP documentation.
Configuration file location:
- Project-level:
.cursor/mcp.jsonin your project root - Global:
~/.cursor/mcp.json
You can also add servers through Cursor Settings > Tools & MCP > New MCP Server.
Fabric MCP Server example:
{
  "mcpServers": {
    "Equinix Fabric MCP Server": {
      "url": "https://mcp.equinix.com/fabric"
    }
  }
}
After updating the configuration, restart Cursor. You will be prompted to authenticate in your browser on first use.
Visual Studio Code
Add the MCP server to your VS Code MCP configuration. For detailed instructions, refer to the VS Code documentation on MCP servers.
Configuration file location:
- macOS/Linux:
.vscode/mcp.json(workspace) or~/.vscode/mcp.json(user) - Windows:
.vscode\mcp.json(workspace) or%USERPROFILE%\.vscode\mcp.json(user)
Fabric MCP Server example:
{
  "servers": {
    "fabric-mcp": {
      "type": "http",
      "url": "https://mcp.equinix.com/fabric"
    }
  }
}
After updating the configuration, restart VS Code or reload the window (Cmd+Shift+P on Mac, Ctrl+Shift+P on Windows and Linux > Developer: Reload Window). You will be prompted to authenticate in your browser on first use.
Google Antigravity
Add the MCP server to your Antigravity MCP configuration. For detailed instructions, refer to the Antigravity documentation on MCP servers.
Configuration file location:
- macOS/Linux:
~/.gemini/config/mcp_config.json(workspace or user) - Windows:
.gemini/config/mcp_config.json(workspace or user)
Fabric MCP Server example:
{
  "mcpServers": {
    "fabric-mcp": {
      "serverUrl": "https://mcp.equinix.com/fabric"
    }
  }
}
After updating the configuration, restart Antigravity or reload the window. You will be prompted to authenticate in your browser on first use.
Codex
Codex supports two ways to add a remote MCP server: the CLI (recommended) or editing the configuration file directly.
Option 1: Add via CLI (Recommended)
-
Install Codex CLI using the Codex CLI setup documentation.
-
Add an MCP server using the following command:
codex mcp add fabric-mcp --url https://mcp.equinix.com/fabric -
Run the login command:
codex mcp login fabric-mcpA browser window opens where you authenticate with your Equinix Customer Portal credentials.
Option 2: Add via Codex Desktop
-
Open Codex Desktop.
-
Go to Settings.
-
In the settings sidebar, click MCP Server.
-
Click Add Server.
-
Enter a Name (for example,
Fabric MCP), select Streamable HTTP as the type, set the URL tohttps://mcp.equinix.com/fabric, then click Save.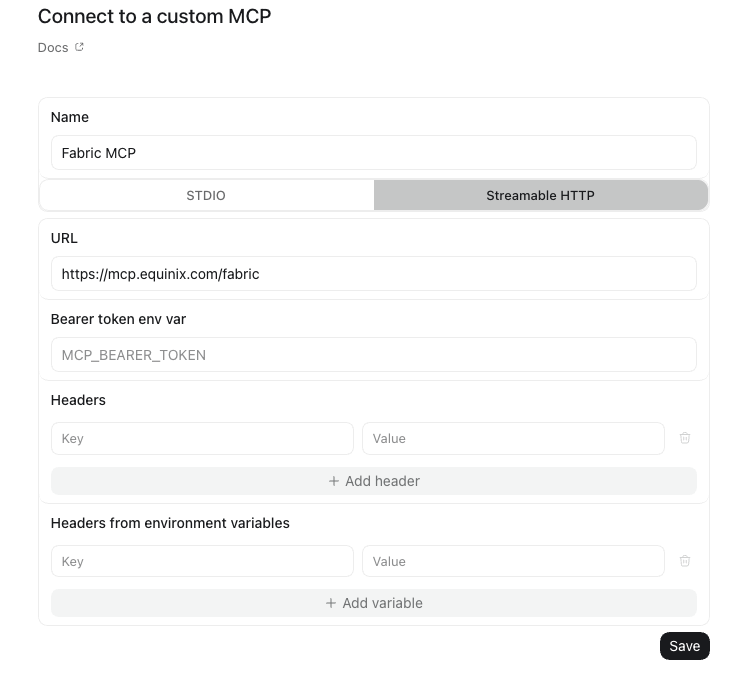
-
After adding the server, run the login command from your terminal:
codex mcp login fabric-mcpA browser window opens where you authenticate with your Equinix Customer Portal credentials.
Option 3: Edit the configuration file
Configuration file location:
~/.codex/config.toml(user-level).codex/config.toml(project-level)
Fabric MCP Server example:
[mcp_servers.fabric]
url = "https://mcp.equinix.com/fabric"
Save the configuration file and restart Codex Desktop. You will be prompted to authenticate in your browser on first use.
Other MCP Clients
For other MCP clients that support remote MCP servers with OAuth, add the server URL following your client's MCP configuration format. The server URL for each Equinix MCP server is listed in the table at the top of this page. Your client should handle the OAuth authentication flow automatically when it connects.
Security Considerations
User Token Risk
The MCP server authenticates to Equinix APIs using your credentials. This means the MCP server operates with the same permissions as the account you use to authenticate. Any action the MCP server performs is executed as you.
When you authenticate to an Equinix MCP server, you are granting your MCP client the ability to call Equinix APIs on your behalf. The MCP server inherits all the permissions of the authenticated user. If your account has broad administrative privileges, the MCP server will also have those privileges.
To limit risk, we strongly recommend authenticating with a dedicated MCP user rather than your personal or administrative account. See Dedicated MCP User below.
Dedicated MCP User
Create a separate Equinix user account specifically for MCP access. This limits what the MCP server can do and provides a clear audit trail.
Benefits:
- Least privilege -- Scope the MCP user's permissions to only the projects and resources it needs
- Audit trail -- Distinguish MCP actions from your own actions in logs
- Blast radius -- If the MCP session is compromised, only the dedicated user's permissions are exposed
- Easy revocation -- Disable or remove the MCP user without affecting your own account
How to create a dedicated MCP user:
- In the Equinix Customer Portal, go to Organization > Users > Invite User (see User Management)
- Create a user identity designated for MCP, for example
yourname+mcp@yourcompany.com - Assign the user to only the projects and resources MCP should have access to
- Authenticate as this user when prompted during the MCP setup flow
Consent and Permissions
During the OAuth authentication flow, you will see a consent page that describes the permissions being granted. Review this page carefully before approving.
Only Use Trusted MCP Clients
Only authenticate to Equinix MCP servers through MCP clients that you trust and have installed yourself.
Because MCP supports dynamic client registration (DCR) and Client ID Metadata Documents (CIMD), any MCP client application can initiate an authentication request to Equinix. When you approve the consent page, you are granting that application access to your Equinix account (or your dedicated MCP user's account) for as long as the session is active. Clients that support CIMD identify themselves via a metadata document published at a stable URL, which provides a stronger signal of client identity than DCR alone -- but the consent decision is still yours to make.
Before approving an authentication request:
- Verify that the request is coming from an application you installed and configured
- Do not approve authentication requests from unfamiliar applications or links
- If you did not initiate the connection, do not approve the request
Additional Security Guidance
- Permissions -- The MCP server respects the same permissions as direct API access. Ensure the authenticated account has appropriate roles for the operations you want to perform.
- Tool Confirmation -- Enable human confirmation in your MCP client for operations that create or modify resources. This prevents unintended changes to your infrastructure.
- No Delete Operations -- Delete functionality is not currently supported in the Fabric MCP Server. This includes deletion of connections, ports, and Cloud Routers.
- Audit Trail -- All operations performed through the MCP server are logged in the same way as direct API calls and are attributable to the authenticated user.
The MCP server does not bypass any permissions or account requirements. If a direct API call would be rejected due to missing entitlements or invalid account state, the MCP server call will be rejected as well.
Troubleshooting
Authentication Failed
Problem: Your MCP client cannot authenticate or reports an authorization error when connecting to the MCP server.
Solution:
- Ensure your Equinix Customer Portal account is active and in good standing
- Try re-authenticating by removing and re-adding the MCP server in your client, then completing the browser login flow again
- Clear your client's cached credentials if available, then restart and re-authenticate
- Confirm that your account has been added to the Private Beta allowlist
MCP Server Not Responding
Problem: Your MCP client cannot communicate with the MCP server or tools are not available.
Solution:
- Verify that your internet connection is active and can reach
https://mcp.equinix.com/<service>, where<service>is the Equinix MCP server you are trying to use - Check that your MCP client configuration file has the correct URL and format
- Restart your MCP client to reinitialize the MCP server connection
- Review the MCP server logs in your MCP client for specific error messages
Permission Denied Errors
Problem: Operations fail with permission or authorization errors.
Solution:
- Ensure the Equinix account you authenticated with has the appropriate roles and permissions for the operations you are attempting
- If using a dedicated MCP user, verify that the user has been assigned to the correct projects and has the necessary permissions
- Confirm that the account has access to the resources you are trying to manage
Session Expired
Problem: Operations that were previously working begin to fail with authentication errors.
Solution: Your MCP client should refresh tokens automatically. If the session has been revoked or cannot be refreshed:
- Restart your MCP client to trigger a new authentication flow
- Complete the browser login flow when prompted
- If the issue persists, remove and re-add the MCP server configuration
Rate Limiting
Problem: Requests are being throttled or rejected due to rate limits.
Solution: Equinix MCP servers respect the same rate limits as direct API access. If you encounter rate limiting, reduce the frequency of requests or contact Equinix support to discuss your rate limit requirements.
Additional Resources
- Fabric API Reference -- Complete API documentation for all Fabric endpoints
- API Authentication -- Detailed guide on Equinix API authentication
- Model Context Protocol Specification -- The open protocol specification for MCP