Register for Federated SSO
The master administrator for your organization must register for federated Single Sign-On (SSO). Use the procedures below to provide the necessary information and to connect your company Identity Provider (IdP) to Equinix.
Important: If you’re migrating to the new Equinix authentication system for Federated SSO login, refer to Federated SSO Migration instead.
To register your organization for federated SSO:
-
From the Administration menu in the Customer Portal, click Account & Security Management.
-
Click Federated Single Sign-On.
-
On the Federation Registration page, read the instructions for the set-up process and click Next.
-
On the Metadata Details page:
-
Enter your organization's email address domain. If you have multiple domains, separated them with a comma.
Example: acme.com, eu.acme.com
-
Provide the metadata in one of two ways:
Upload your SAML fileThis method automatically enters the required information.
Note: With this method, the Entity ID, SSO URL, and Identity Location fields are disabled and you cannot edit them. To change these fields, click Discard, then import an updated SAML file (or enter the information manually, as described below).
Important: Equinix requires a user email address in the SAML response. All other attributes are ignored.
or
Manually enter SAML information-
Entity ID – Enter the entity ID for your organization. Ask your company's identity administrator for the value for this field.
-
Single-Sign-On URL – Enter the IdP URL where Equinix will post the SAML request. Ask your company's identity administrator for the value for this field.
-
-
-
Click Next.
-
On the Technical Contact page, indicate the Point of Contact between your organization and Equinix. Select either Internal or External:
-
Internal (default) – Select an existing Equinix-registered user within your organization.
-
External – Add a user as the point of contact who is not a registered user; enter the first name, last name, email address, and phone number.
Note: Typically, the Identity Administrator from your organization may be interested in setting up this SAML configuration with Equinix.
-
-
Click Next.
-
On the Certificate Upload page, if your certificate is not part of the SAML data, then upload it here:
Note: 
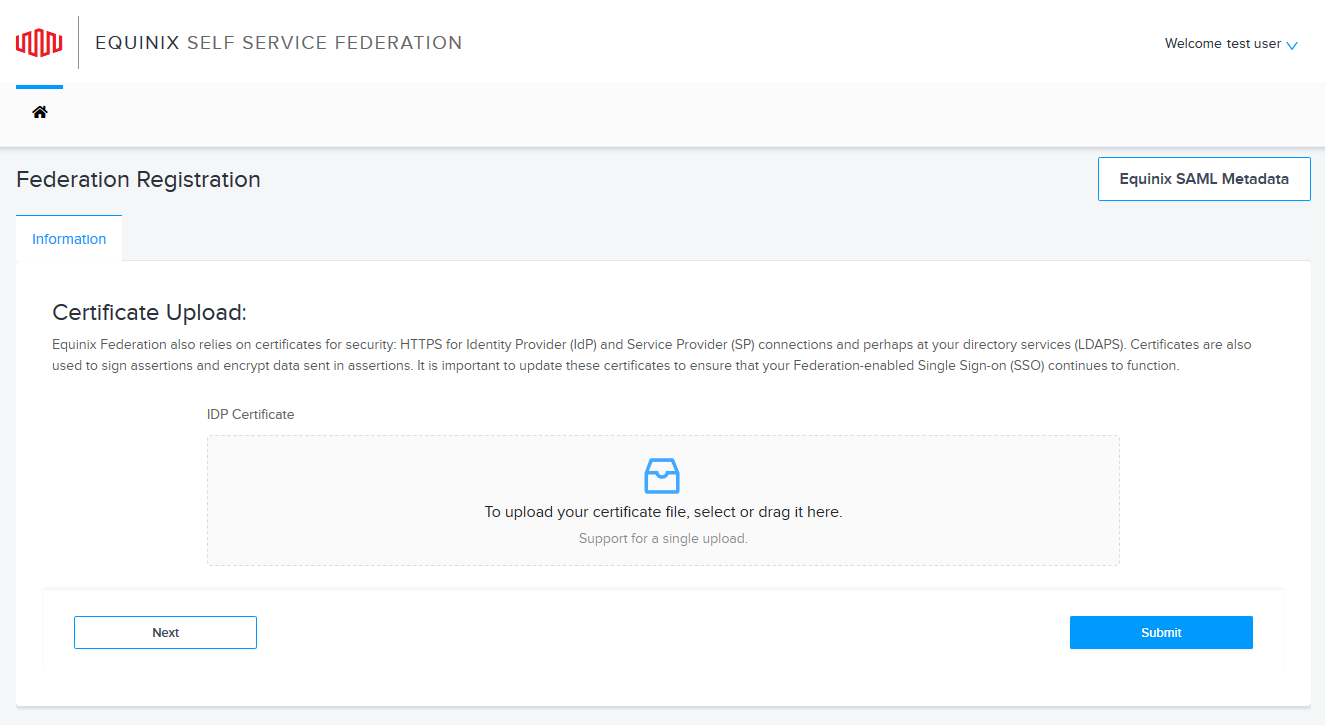
Equinix uses this certificate to validate the authenticity of the SAML requests that originate from your organization.
Important: Equinix verifies the certificate end date; expired certificates are not accepted.
-
Click Submit.
The Federation Details page shows the Provisioned Status as Submitted.
Tip: You can update your request for as long as the Equinix administrator doesn't process and approve it.
Note:-
The Equinix Administrator reviews your submitted information and contacts you if further information is required.
-
You can see the comments entered by the Equinix Administrator on your request page.
-
During this process, you will receive emails to update you on the progress.
List of Federation Statuses:Provisioning statuses that you might see during the process:
- SUBMITTED – The application registration request has been submitted and is being reviewed by the Equinix Administrator.
- AWAITING RESPONSE – The Equinix Administrator needs additional information to process the request.
- IN-PROGRESS – Provisioning is in progress.
- PROVISIONED – The application is provisioned in all systems.
- COMPLETED – You have tested the application and the request is closed.
-
-
Click Equinix SAML Metadata to download Equinix metadata and follow your identity provider's instructions to set up federated SSO integration.
-
Once you receive an email that your federated SSO request has been approved, verify that you can log in to Equinix portal.
When the federated SSO configuration is ready and your request is in PROVISIONED status, validate your federated SSO setup:
-
Go to portal.equinix.com.
-
Click Sign In with SSO, then provide your email address and click Continue.
-
Enter your login credentials to authenticate and access the Equinix portal.
Important: If you're unable to log in, add a comment to your federation request to engage with Equinix administrator and troubleshoot your login issues.
-
Go to your federation portal (using the link in the email or through the Customer Portal).
-
Under Portal URLs, click I have verified that the federation single sign-on is working for all applications.
-
Click Confirm.
Note: An email notification is sent with a confirmation that the processing of your federated SSO request has been completed.
After your organization is successfully on-boarded, you can use the Self Service Federation application request page if you need to upload a new certificate or to change point-of-contact information:
This feature replaces the provisioning of user profiles via Federated SSO with System for Cross-domain Identity Management (SCIM) API calls. Shifting from Federated SSO to SCIM involves changing from a trust-based authentication model to a standardized provisioning and deprovisioning model.
To enable provisioning of user profiles via SCIM API calls:
-
From the Administration menu in the Customer Portal, click Account & Security Management.
Note: The Administration menu is visible only to Administrators.
-
Click Federated Single Sign-On. Federation details screen will be displayed. Alternatively, you can access via https://federation.equinix.com/.
-
Select the Provisioning tab. This will be available if you have successfully setup federated connection, and login via federated authentication.
-
Click on the toggle to turn on using SCIM API for provisioning user profiles. You will be prompted with a series of confirmation to turn on this feature. Turning on SCIM API management will turn off the Automatic Provisioning of user profiles via Federated SSO.
-
Details such as Endpoint URL for provisioning user profiles via SCIM API will be displayed. You will need to generate tokens to access the API endpoint.
Note: A maximum of two tokens are allowed.
Click Generate New Token.
-
Token details will be displayed. Copy and save the token in a secure location. You will need the token in order access the API endpoint.
Note: This is the only time this token details will be displayed. If you lose the token, you will need to delete an existing token and regenerate a new one.
For more details on how to configure EntraID and Okta, refer to:
In critical situations, Equinix offers this feature to ensure you have account access without compromising security. This feature is available to federated customers. An emergency authentication method (in case SSO login is compromised) will be made available to users to log into Equinix.
Set up Break-glass Access
-
Log in to an Equinix portal, as a federated customer with Administrator access.
-
From the Administration menu, choose Account and Security Management.
Note: The Administration menu is visible only to Administrators.
-
Click on Federated Single Sign-On. Federation details screen will be displayed. Alternatively, you can access via https://federation.equinix.com/.
-
Select the Break-glass Access tab. This will be available if you have successfully setup federated connection, and login via federated authentication.
-
You can enable Multi-Factor Authentication (MFA) for Break-glass Access. Click on MULTI-FACTOR AUTHENTICATION to display options for MFA.
-
You can define email addresses who will be notified when Break-glass Access is used.
-
Input up to 10 emails for emergency use. An email message will be sent to these users to inform them that they are designated Break-glass Access users. It will also prompt them to create passwords for Break-glass Access.
Note: Emails must belong to existing Equinix users. Email link will expire after a week.
-
Click on Create Password in the email.
Password requirements:
-
Must be at least 26 characters long
-
Must contain at least 3 of the following:
-
one lower-case letter (from a-z)
-
one upper-case letter (from A-Z)
-
one numeral (from 0-9)
-
one special character (e.g. ! @ # $ % ^ & * )
-
-
Must not include spaces
-
Must not contain two identical characters consecutively
Note: This feature is meant for use only in emergencies when SSO login is not working. The password will be valid for 72 hours from the first login (unlimited logins during such time).
-
-
Click on Resend Link to resend the Create Password email to the user. This is for cases where the password has expired, or the user failed to create a password before the expiration of the first email.
-
Click on Revoke Access to remove access from the user. An email will be sent to the user to inform them that their Break-glass Access has been revoked.
Accessing Equinix via Break-glass Access
During critical situations where SSO login is not working, you can log into Equinix portal if you are a designated Break-glass Access user.
-
After creating your password for Break-glass Access, the following email will be sent to you with links to access Equinix. Click on the links to access Equinix Customer Portal or Metal portal.
-
Use your email address and password associated with Break-glass Access to log in.
How do you know if you have Break-glass access?
You can find out if you have Break-glass access from your User Account. If you were enabled for Break-glass Access, you would have received an email informing you.
-
Log in to an Equinix portal.
-
Click your user name and select User Account.
-
From the left menu, select Authentication and Security.
-
If you have Break-glass Access, you will see the following screen.
Before Registration
Once the federation setup is complete, any user from the customer organization can visit the Equinix federation URL or log in via federation from the Equinix unified login page. The user then must enter their organization's email address. Based on the email domain provided, the user is redirected to the organization's identity provider page for authentication. Once authenticated, the user can access the appropriate Equinix portals.
The master administrator should work with your organization's internal security team to determine the Single Sign-On (SSO) configuration. The master administrator then must submit the federation request using the Self-Service Federation application. Enter the required federation information on the subsequent screens to complete the setup request.
Currently, Equinix supports SAML 2.0 for federation. Equinix can federate with any Identity Provider (IdP) that supports the SAML 2.0 protocol. In the future, Equinix may support other protocols like OIDC, as needed.
We support any IdP vendor that supports SAML2.
The SAML subject must contain the email address attribute. Any user attribute other than email address is not required and will be ignored. Ensure that the primary email address in the ECP profile matches the organization's email address for every user that wants to log in via federation.
Equinix federation only supports POST binding.
Click the Download button on the top-right corner of the federation portal.
You need to provide an email domain for your organization and the SAML metadata. A digital certificate is required if the metadata file does not contain a digital certificate. If you do not want to upload the metadata file or if there is any issue with the metadata file update, manually provide the Entity ID and the SSO URL of the organization, and then upload a digital certificate on the next screen.
During Registration
Enter the email domain for your organization (for example, if the email address for your organization is user@acme.com, enter acme.com). If you need to enter multiple domains, separate them with a comma (for example, if email addresses are user@acme.com and user@acme.co.eu, enter acme.com, acme.co.eu in the domain field).
An Entity ID is a globally unique name for a SAML entity, i.e., your Identity Provider (IdP) or Service Provider (SP). It is how other services identify your entity. Like any other unique identifiers that you share to interoperate with others, making sure your identifier is clear, unique, and permanent is critical for the successful continued operation of your service(s). Choose your entity ID carefully and deliberately.
Enter your single sign-on URL, where Equinix will redirect users from your organization to log in.
See Register for Self Service Federation. After you select the Federated Single Sign-On card, the Federation Registration page appears. This page contains a link to download the Equinix SAML metadata.
Yes. If your IdP has MFA enabled, users are prompted for MFA authentication when they sign in to the Customer Portal. See Multi-Factor Authentication (MFA).
Note: Managing MFA is the responsibility of the client or IdP.
After Registration
Go to https://portal.equinix.com, enter your email address, and click Next. You will be redirected to your organization's login page. Log in with your organization credentials. Once authenticated, users can access the appropriate Equinix portals.
Contact your Equinix representative. They will forward your questions to the federation support team.
Add a comment to your federated SSO request to engage with Equinix administrator and issue a request to disable the option to sign in using username and password.
Information to include in your request:
-
Would you like to stop username and password access on the mobile application?
Important: The mobile application does not support federated sign in, so this will disable all access to the mobile application.
-
Is there a specific date to make the change?
Add a comment to your federated SSO request to engage with Equinix administrator. Provide your updated metadata and, if it is not in the metadata, provide the updated certificate. Updated metadata is required when changing IdPs entirely or when updating your metadata for the same IdP.
When a federation request is submitted, it applies only to the organization that the master administrator used to sign in. To add additional organizations for federation, add a comment to your federated SSO request to engage with Equinix administrator and get the support to enable federated SSO for multiple organizations.
This error usually occurs if you POST the SAML response to the portal, instead of using a GET request.
There are two main settings to verify:
-
Make sure the ACS URL endpoint is correct.
-
Make sure the SAML response you send is a GET request (not POST or any other request).
Also confirm the following in your IdP:
-
Name ID Format – Unspecified
-
Application username – Email
-
The username email address should match the primary email address in your Customer Portal user profile.
Make sure the Audience URI value is correct. Add a comment to your federated SSO request to engage with Equinix administrator and ask for the correct value. In case you're unable to access your federated SSO settings, contact your Equinix representative and your request will be forwarded to the Equinix administrator.
Make sure the user's account exists in the Customer Portal:
-
If the account does not exist, you can create it.
-
If the account does exist, contact the Global Service Desk (GSD) for additional troubleshooting.
Note: We do not support just-in-time provisioning, so we do not create Equinix accounts on the fly.