IBX Access Permissions
If you're an Administrator, you can assign IBX access permissions for your users. These permissions control whether a user:
- Can physically enter an IBX.
- Can bring guests to the IBX.
- Can remove equipment from the IBX.
- Can access specific cages and cabinets.
- Can schedule work visits, data center tours, and conference rooms.
- Can perform administrative tasks.
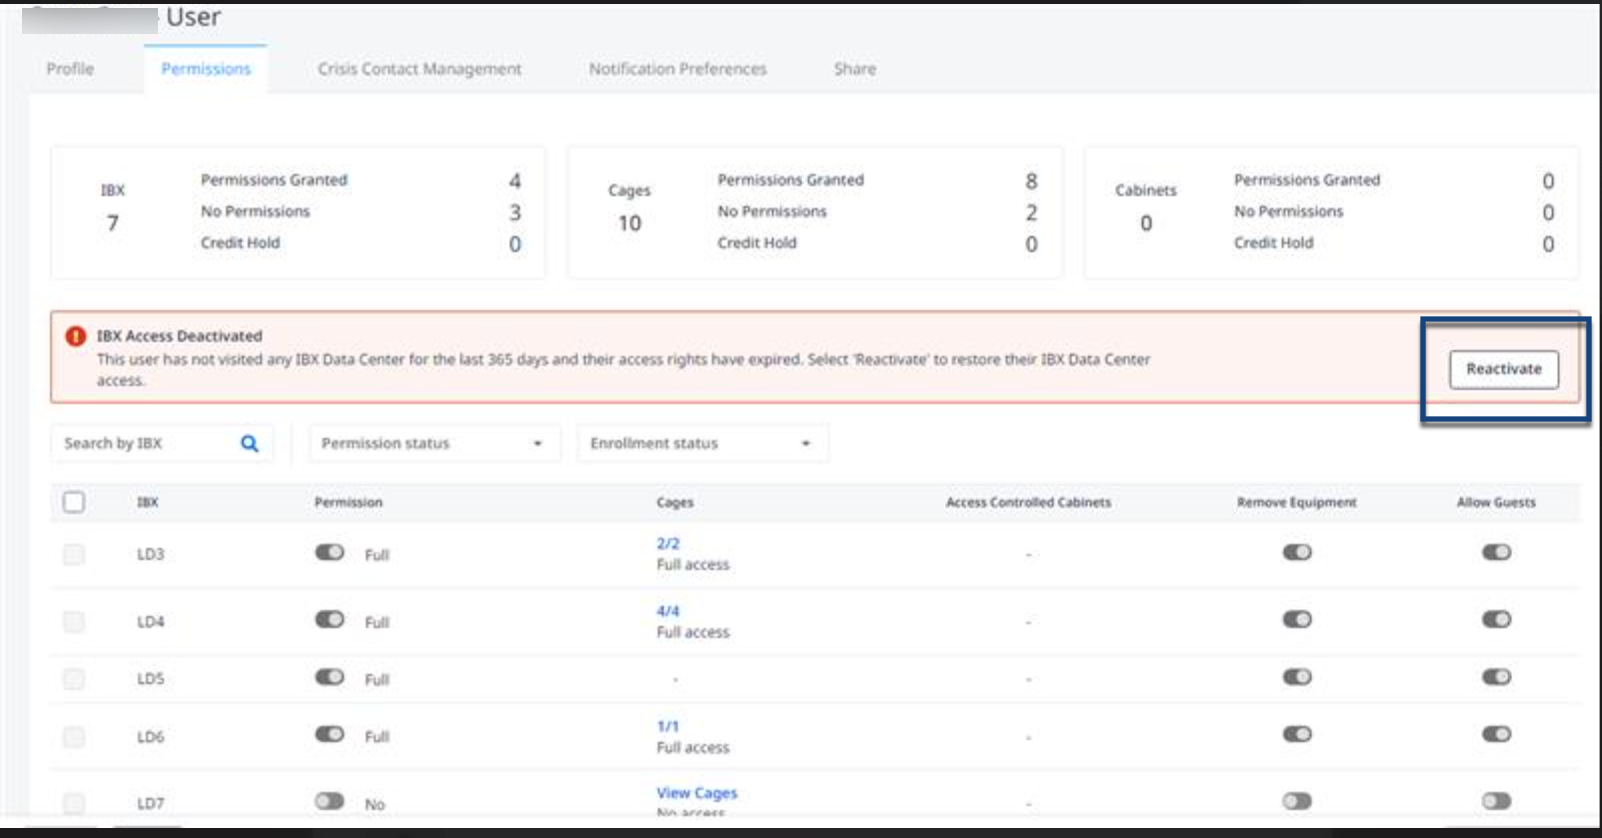
A user's physical IBX access is deactivated after one year of inactivity. That is, if the user does not check in to any IBXs using the standard Equinix process for 365 days, their physical access permission is deactivated. Only IBX data center access permissions are deactivated. This does NOT affect the user's User Account or Customer Portal account. A company administrator can reactivate the user's IBX access.
Assign Virtual Privileges for an IBX
Use these steps to:
- Specify which IBXs the user can access in the portal.
- Grant the user permission to schedule work visits, data center tours, and conference rooms.
- Designate a user as an Administrator.
To assign IBX privileges:
-
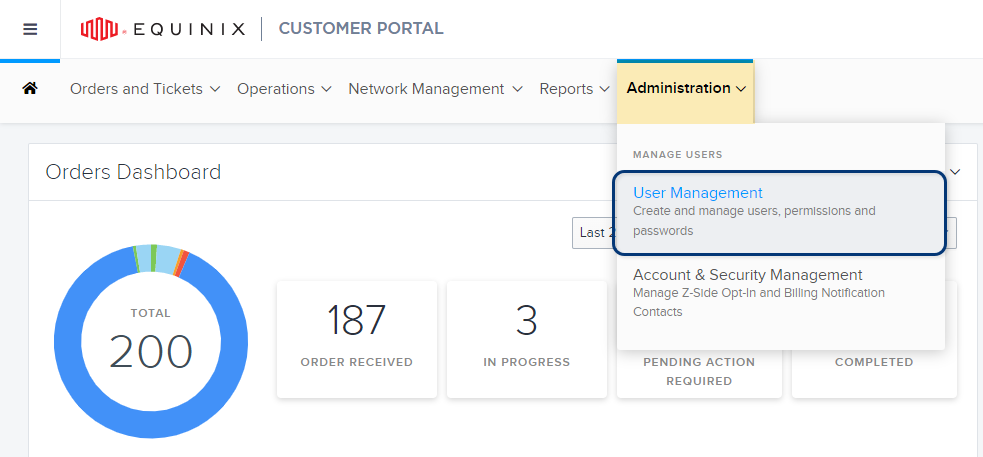
From the Administration menu, choose User Management.
-
Find the user account you want to manage.
-
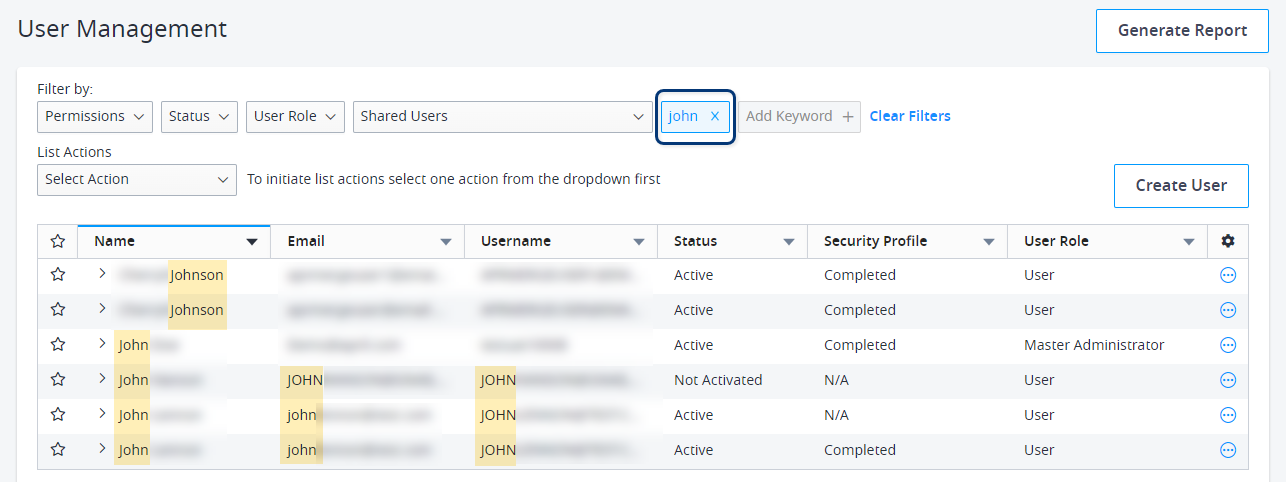
To search for a specific user, type a first name, last name, username, or email address in the Add Keyword field:
-
You can also use the filter options at the top to refine the user list by user status, role, organization, and current permissions.
tipTo quickly locate new user accounts, set the Status filter to Not Activated.
-
-
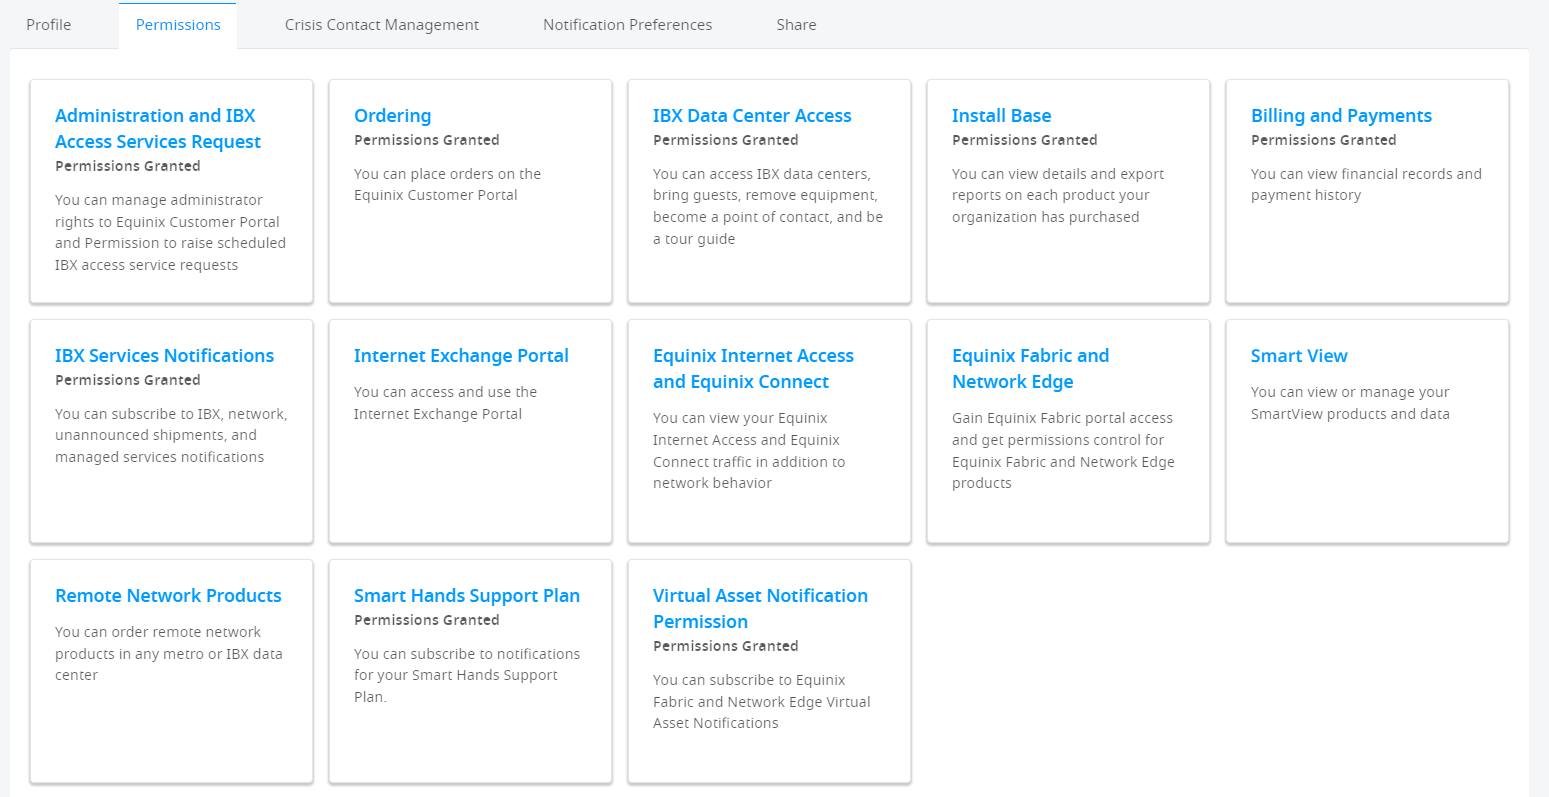
Click the options menu and choose Manage Permission.

The Permissions tab displays a catalog of permission types.
-
Click Administration and IBX Access Services Request.
A list shows all the IBX locations available for this user. (The list only shows locations where the user's organization has a contract for colocation space or products.)
-
(Optional) To assign company or IBX administrator privileges to this user, click Administration and IBX Access Services Request. A list shows all the IBX locations available for this user.
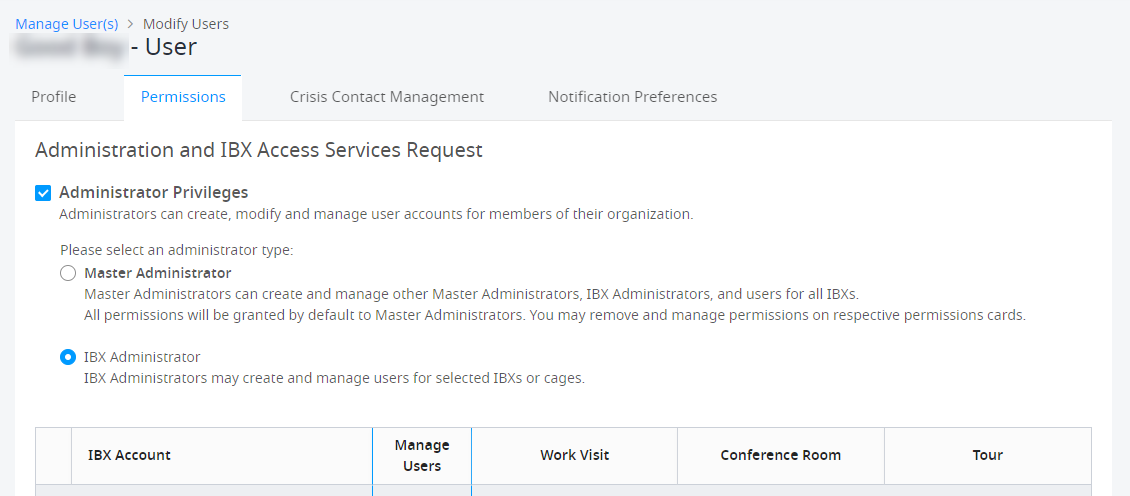
For information about admin roles, see Roles in the Customer Portal.
-
Select the IBX and cage permissions for the user:
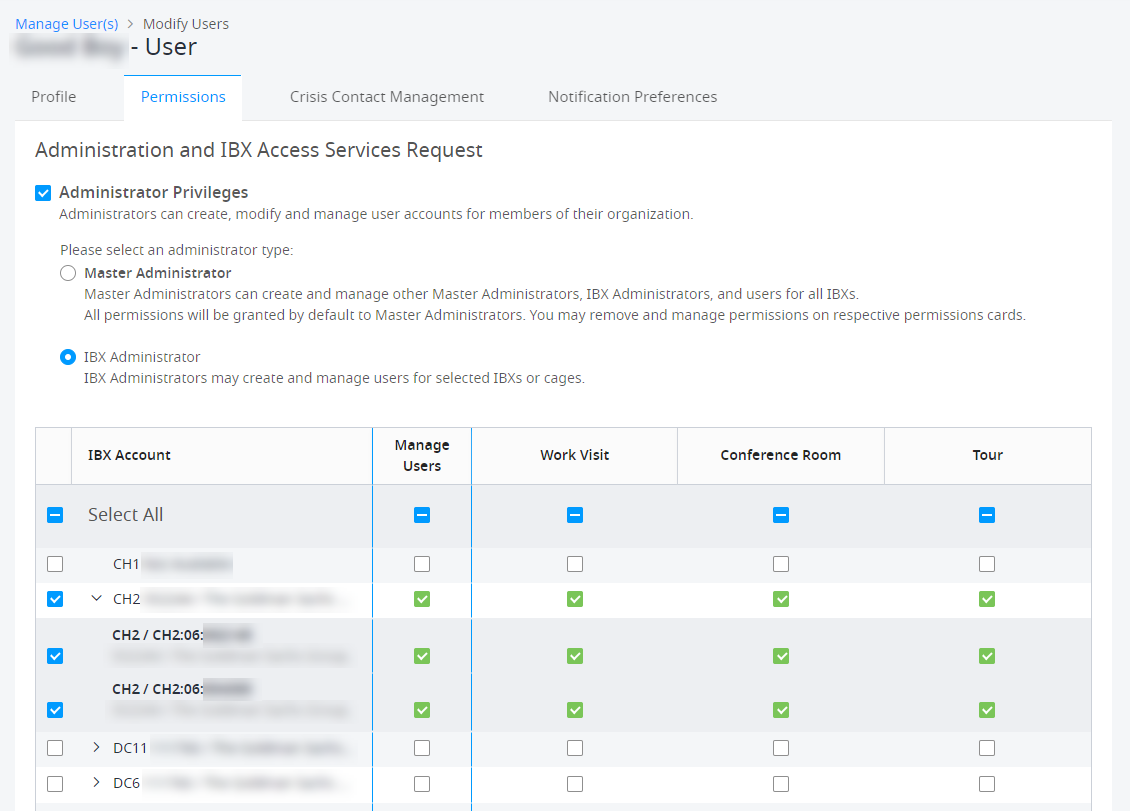
Icon Meaning Full access Partial access Permission is assigned Permission is not assigned Permission is not available To give full permissions for an IBX, enable the checkbox in the IBX Account column.
To give permissions for specific cages only, click the arrow beside the IBX code, then select the cages to enable.
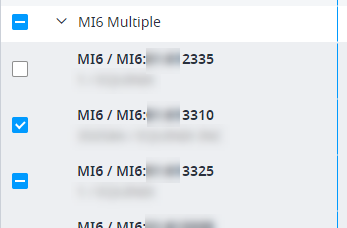 Example
In the example above, the user has full access for cage 3310 and partial access for cage 3325, but no access for cage 2335.
-
If the user will be allowed to manage other user accounts, enable the Manage Users option. This option is only available for users designated as administrators.
-
In the remaining columns, specify whether the user is allowed to schedule requests for IBX work visits, conference rooms, or data center tours.
-
Click Submit.
Grant Physical Access for an IBX
Use these steps to:
- Allow a user to physically enter an IBX.
- Allow a user to bring guests to the IBX.
- Allow a user to remove equipment from the IBX.
To grant or restrict a user's physical access permissions:
-
From the Administration menu, choose User Management.

-
Find the user account you want to manage.
-
To search for a specific user, type a first name, last name, username, or email address in the Add Keyword field:

-
You can also use the filter options at the top to refine the user list by user status, role, organization, and current permissions.
tipTo quickly locate new user accounts, set the Status filter to Not Activated.
-
-
Click the options menu and choose Manage Permission.

The Permissions tab displays a catalog of permission types.

-
Click the IBX Data Center Access card. A list shows all the IBX locations available for this user. The list only shows locations where the user's organization has a contract for colocation space or products.
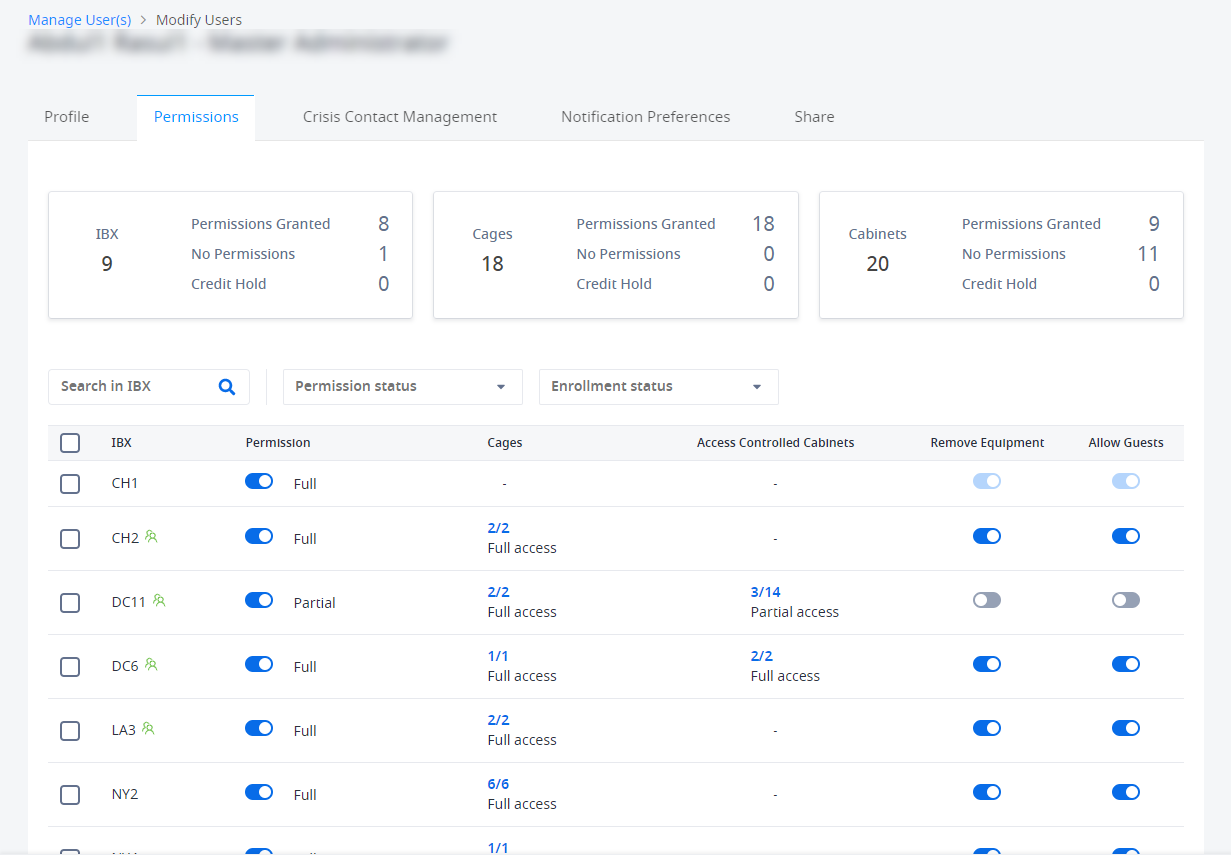
The summary at the top shows the number of IBXs, cage, and cabinets where the user already has access.
-
To find the desired IBX, you can:
- Use the Search box.
- Filter by Permission Status, which shows IBXs based on whether the user is fully authorized, partially authorized, or not authorized.
- Filter by Enrollment Status, which shows IBXs based on whether the user has completed their enrollment
-
To turn permissions on or off for a specific IBX, toggle the Permission switch:
Permission Meaning NoUser cannot enter the IBX. FullUser can access all cages and cabinets in the IBX (and any cages/cabinets added in the future). User can remove equipment and bring guests. PartialUser can enter the IBX, but some permissions are restricted. If the user currently has
FullorPartialpermissions for the IBX, toggling the switch changes the permissions toNo.If the user currently has
Nopermissions for the IBX, toggling the switch changes the permissions toFull. You can then refine the permissions in the next section, if needed. -
In the columns for Remove Equipment and Allow Guests, enable or disable the user's ability to remove equipment from the IBX or bring guests to the IBX.
noteAllow Guests enables the user to include additional visitors (such as vendors or other members of their organization) in their request for a Work Visit or Data Center Tour.
-
Click Review Changes to verify all modifications before submission.
-
Click Submit to save the changes.
Reactivating IBX Access
If a user's IBX access has expired, you can reactivate it on the Permissions tab of the Manage Users page for that user or from the IBX Data Center Access screen.
Grant Physical Access for an IBX via Mobile app
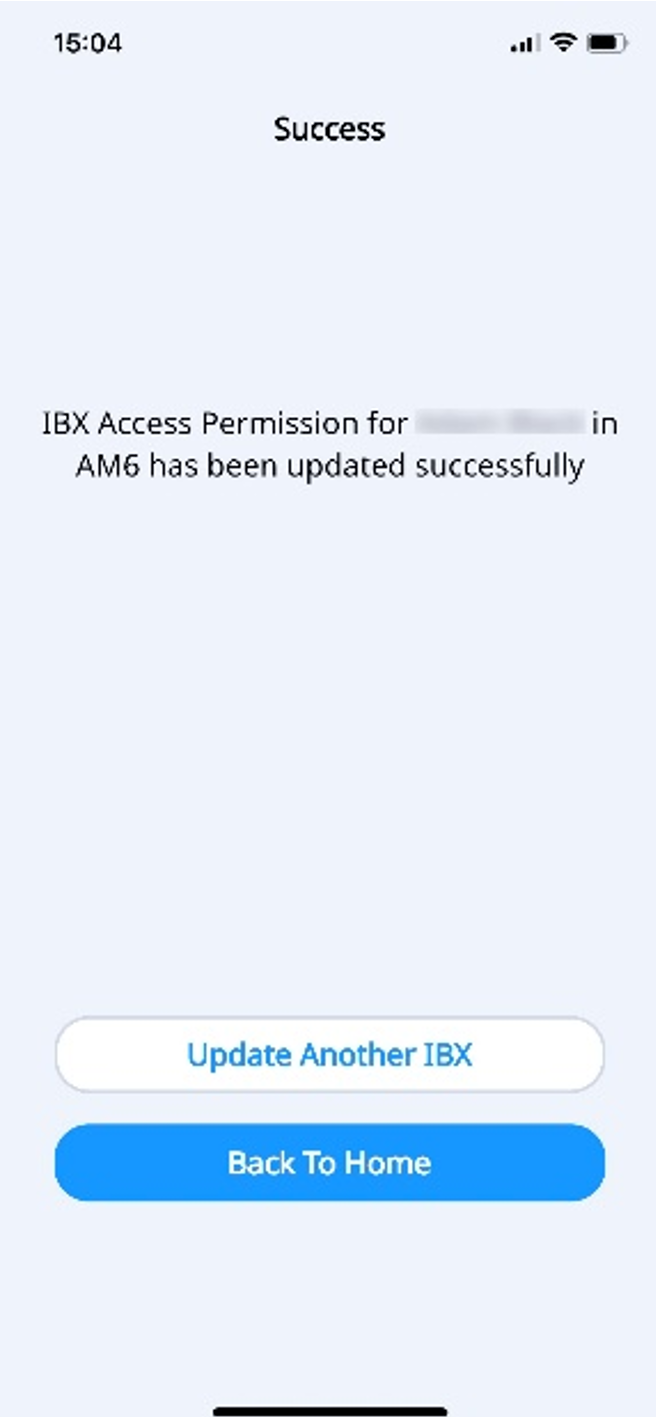
The ECP Mobile app allows you to grant a user physical access to an IBX.
-
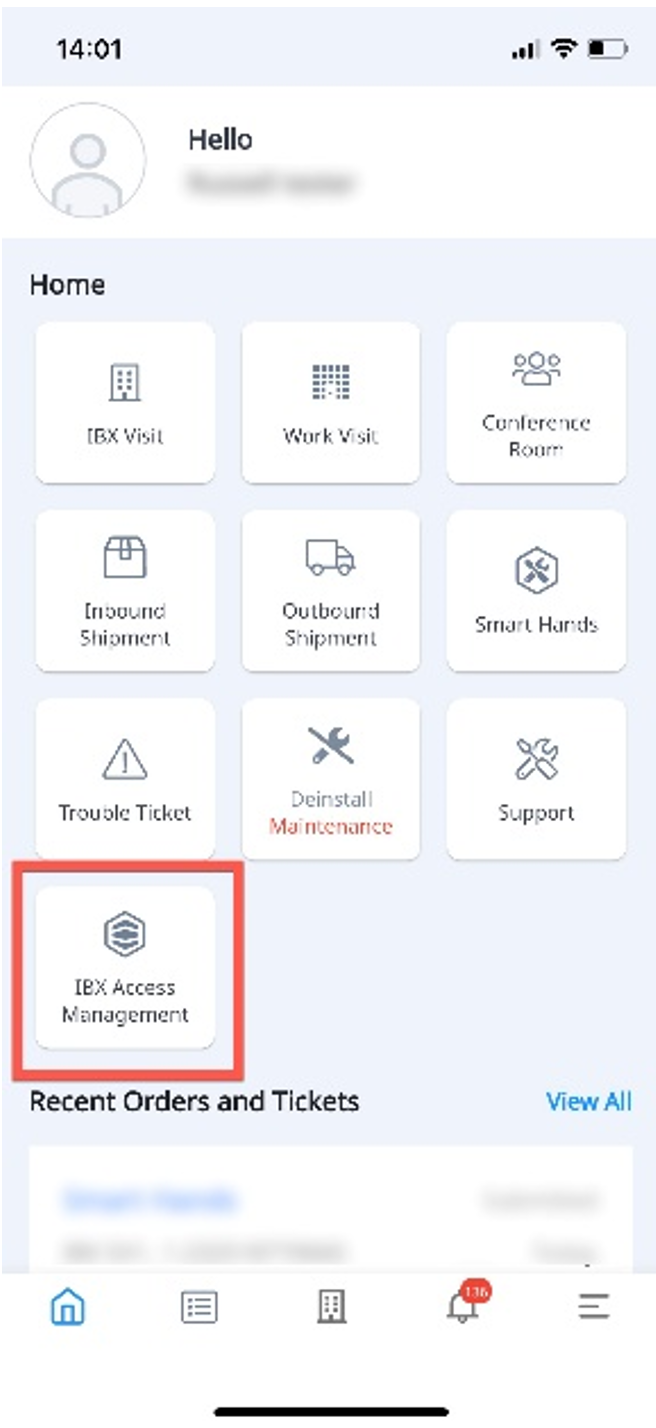
From the Home screen, choose IBX Access Management.
-
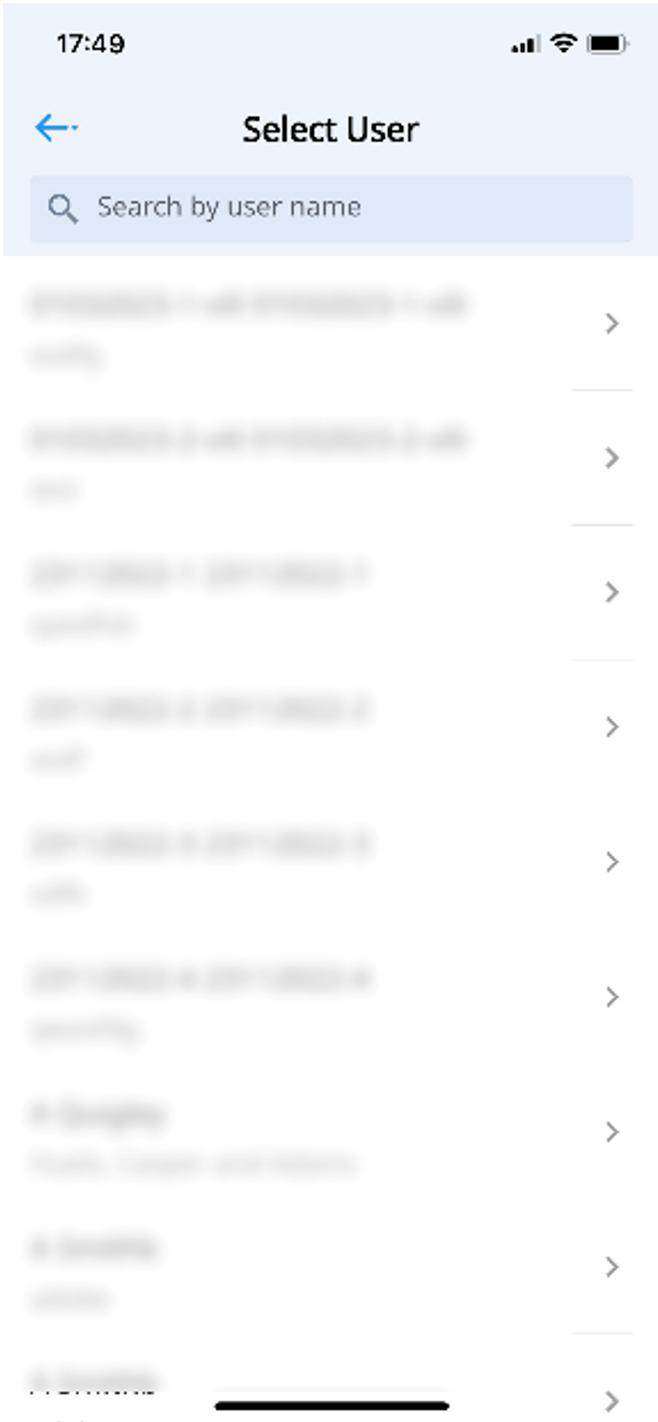
Find the user account you want to manage.
To search for a specific user, type in a first name, last name, username, or email address.
-
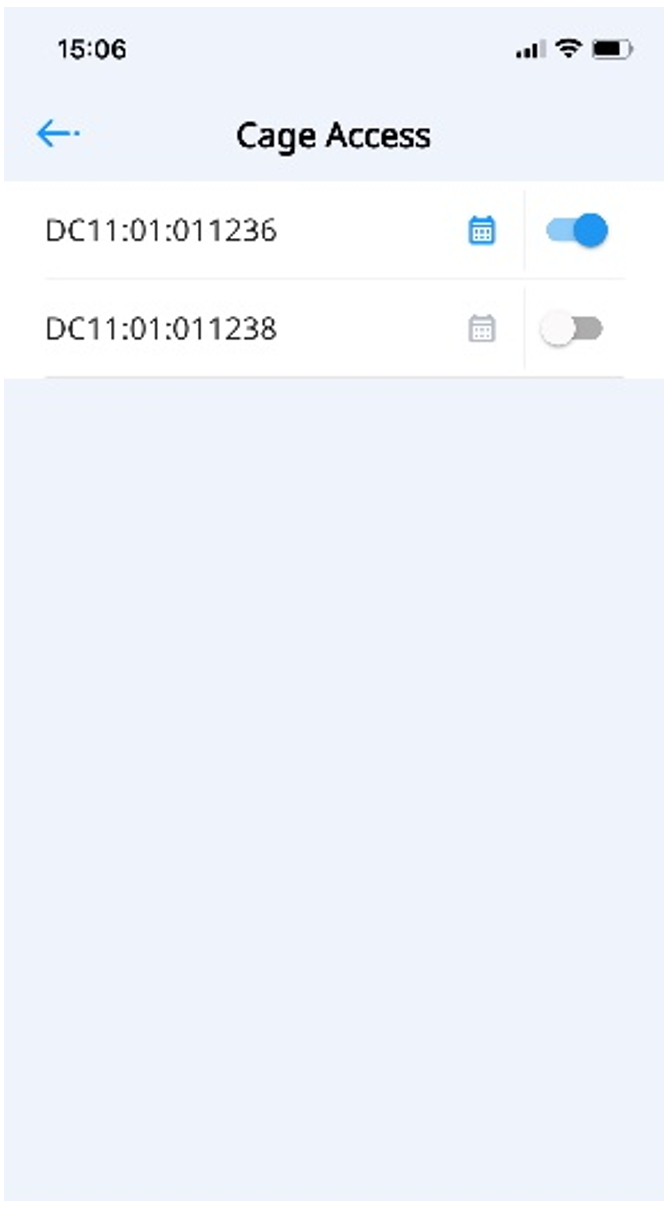
Select the specific IBX to grant physical access. To turn permissions on or off for a specific IBX, toggle the access switch.
-
Once physical access is granted to the IBX, the user's permission will default to the appropriate access (for example,
Full Access). This includes the cages they will have access to.To grant or remove physical access to cages, toggle the Cage Access switch.
-
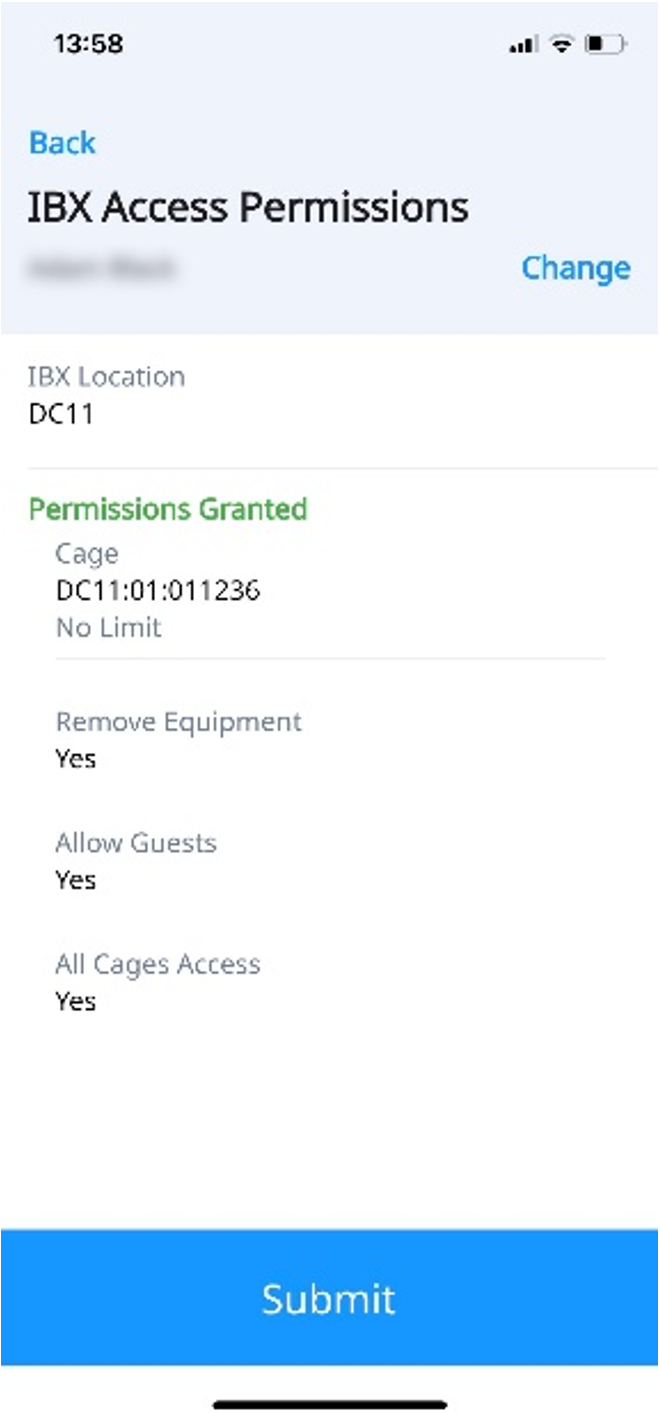
After selecting the cages to grant physical access to, review the Permissions Granted.
-
Click Submit.
Assign Cage/Cabinet Permissions
Assigning permissions to a cage does not automatically grant permission to the cabinets inside. Likewise, assigning permissions to a cabinet does not automatically grant permission to its cage. If you grant cabinet access without cage access, the user must have an escort to the cage.
Cabinet-level permissions are only available if you have access control readers installed on your cabinets.
To grant or restrict access to specific cages and cabinets in the IBX:
-
From the Administration menu, choose User Management.

-
Find the user account you want to manage.
-
To search for a specific user, type a first name, last name, username, or email address in the Add Keyword field:

-
You can also use the filter options at the top to refine the user list by user status, role, organization, and current permissions.
tipTo quickly locate new user accounts, set the Status filter to Not Activated.
-
-
Click the options menu and choose Manage Permission.

The Permissions tab displays a catalog of permission types.

-
Click the IBX Data Center Access card. A list shows all the IBX locations available for this user. The list only shows locations where the user's organization has a contract for colocation space or products.

The summary at the top shows the number of IBXs, cage, and cabinets where the user already has access.
-
To find the desired IBX, you can:
- Use the Search box.
- Filter by Permission Status, which shows IBXs based on whether the user is fully authorized, partially authorized, or not authorized.
- Filter by Enrollment Status, which shows IBXs based on whether the user has completed their enrollment
-
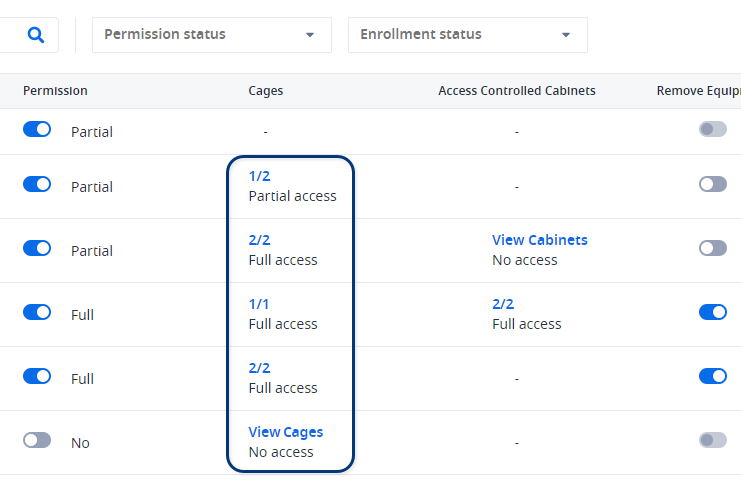
To grant or restrict cage-level permissions, click the blue link in the Cages column:
 note
noteIf the Cages column is blank for an IBX, your organization doesn't have any cages in that IBX.
-
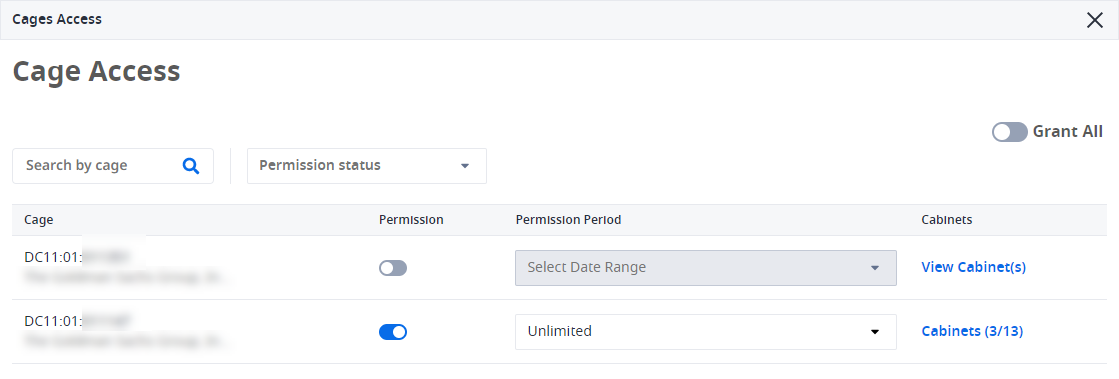
Use the Cage Access window to specify the cage permissions for this user.
 tip
tipTo find a specific cage, use the search box or the Permission Status filter.
To grant or revoke permissions for an individual cage, use the toggle switch in the Permission column.
To grant or revoke permissions for all cages, use the Grant All toggle switch.
(Optional) To assign permissions for a limited period of time, select Custom Date in the Permission Period column, then select a starting and ending date.
noteIf you need to change the start date for an already active permission, turn the permission off and submit the change, then turn the permission back on and set the new permission period.
-
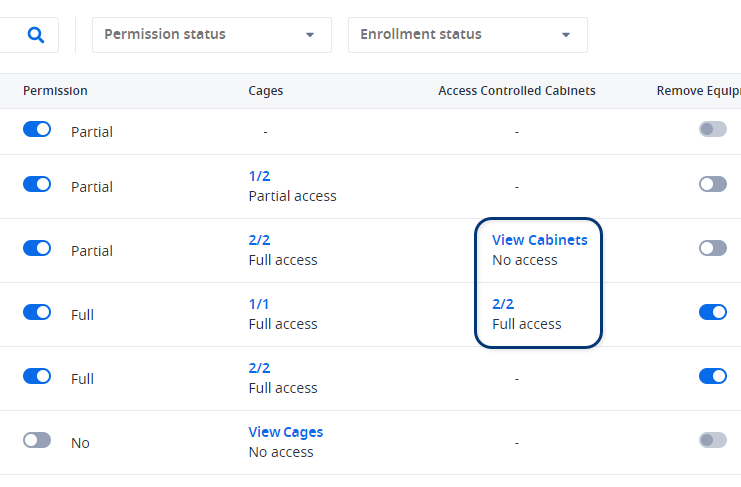
To grant or restrict cabinet-level permissions, click the blue link under Access Controlled Cabinets.
 note
noteIf the Cabinets column is blank, the cage doesn’t contain any cabinets with access control readers.
-
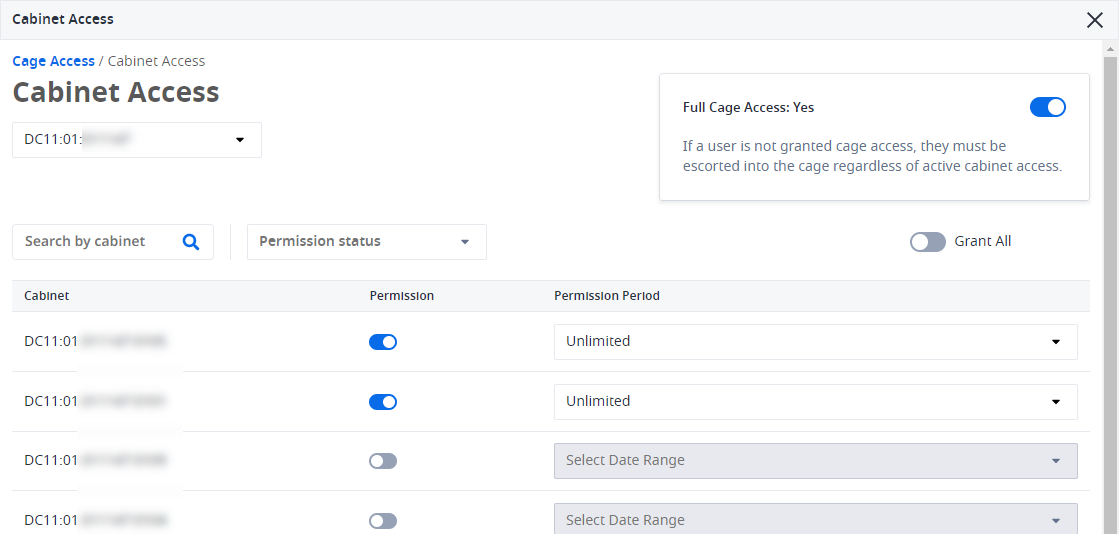
Use the Cabinet Access window to specify the cabinet permissions for this user.
 tip
tipTo find a specific cabinet, use the search box or the Permission Status filter.
To grant or revoke permissions for an individual cabinet, use the toggle switch in the Permission column.
To grant or revoke permissions for all cabinet, use the Grant All toggle switch.
(Optional) To assign permissions for a limited period of time, select Custom Date in the Permission Period column, then select a starting and ending date.
noteIf you need to change the start date for an already active permission, turn the permission off and submit the change, then turn the permission back on and set the new permission period.
infoIf you grant access to a cabinet but not to the cage, the user must be escorted to the cabinet.
-
Click Review Changes to verify all modifications before submission.
-
If you turn on the Notify User option, the user receives an email notification about the permission changes you made.
-
Click Submit to save the changes.