BYOC to Connect a Device to an NSP
You can Bring Your Own Connection (BYOC) to connect your device to a Network Service Provider in Network Edge.
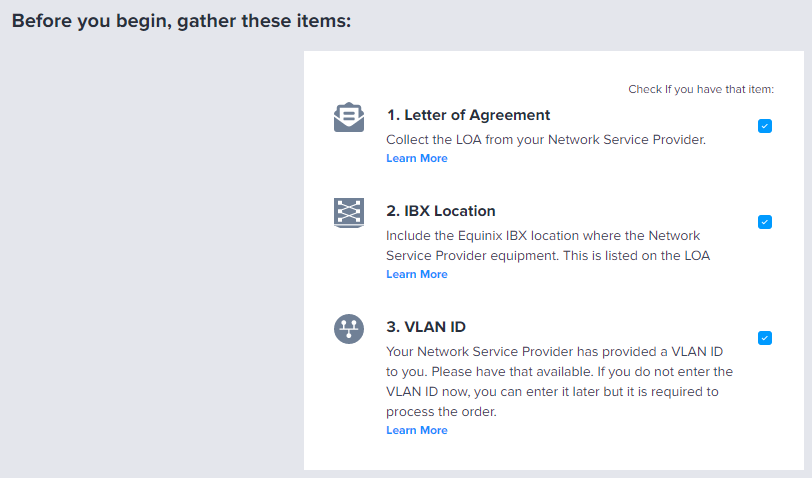
Prerequisites – The following items should be available:
- NSP VLAN information
- Letter of Authorization (LOA)
- The LOA should contain IBX and patch panel information.
The workflow is as follows:
-
Configure a Remote Port – The remote port belongs to you but is tied-down to the NSP’s facilities. The NSP will provide a Letter of Authorization (LOA).
-
Create a Virtual Connection – Create a Layer 2 Equinix Fabric connection from your interface to the remote port.
-
Place Your Order – Submit orders for both a port and a Virtual Connection.
-
Turn-Up Call – The Equinix support team will arrange a call to validate that the Connection between the NSP and port is working. Once the call is complete, the port will be active and the Virtual Connection between the Virtual Device and the NSP's equipment will be provisioned.
-
BYOC Request Completed – When all of the above steps are completed, your Virtual Connection will be established.
Selecting Your Device
-
Sign in to the Equinix Customer Portal and navigate to Network Edge.
-
From the Network Edge menu, select Virtual Device Inventory.
-
Select the device you want to connect to an NSP.
-
Click Connect to a Network Service.
-
Select Ordering an Equinix Fabric Port to connect to a service provider.
-
On the prerequisites checklist, check each item indicating that you have the LOA, the IBX location, and the VLAN ID in hand. You will not be able to proceed until you check each item.
Configuring the Port
-
Click Start Standard Configuration.
-
In the Port Location section, indicate whether the NSP is in the same metro or a different metro as your device.
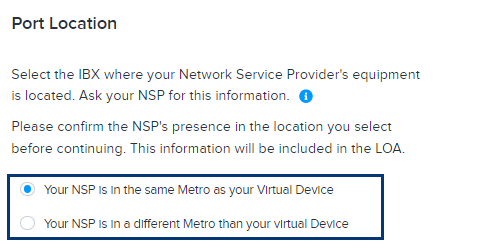
-
Select the IBX where your Network Service Provider's equipment is located. Your NSP will provide the location.
- If your NSP is in the same metro as your device, select Your NSP is in the same Metro as your Virtual Device and then select an IBX.
- If you NSP is in a different metro than your device, select Your NSP is in a different Metro than your virtual Device and select a location.
-
In the Port Attributes section, indicate whether you want Equinix to select the port attributes or you want to set the attributes yourself. If you want to set the attributes yourself, make the following selections:
- Port Speed – Select a port speed.
- Port Interface Type – Select an interface type.
- Encapsulation Frame Type – Select an encapsulation frame type.
- Encapsulation TPID – Select an encapsulation TPID.
-
Enter the Network Service Provider Name.
-
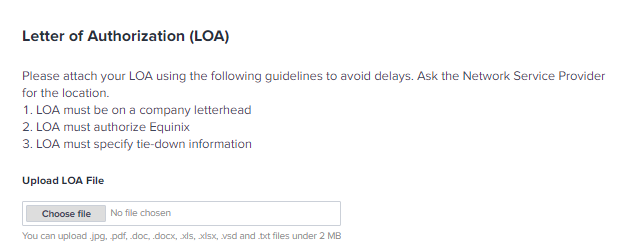
Upload your LOA file by clicking Choose File and browsing to the file. You will not be able to proceed with the order if you don’t upload an LOA.
-
Click Next: Virtual Connection.
Creating the Virtual Connection
-
Enter the Virtual Connection Name.
-
Enter the Virtual Connection Speed.
-
In the VLAN ID section:
- Select I have a VLAN from my Network Service Provider and enter the VLAN ID if you have it.
- Select I will request the VLAN ID from my Network Service Provider and enter it later if you do not have the VLAN ID.
noteIf you don’t have the VLAN ID, you can enter it later but the order will not be processed until the VLAN ID is entered.
-
In the Interfaces section:
- Select Automatically select the next available interface on my device(s) if you want to use the next available interface.
- Select I will select an interface if you want to specify an interface.
noteIf you are creating a redundant connection and you opt to select your own interfaces, you will need to select two different interfaces. The secondary interface can’t be the same as the primary interface.
-
Click Next: Review to review your order.
Placing Your Order
-
Click Review and Accept Order Terms.
-
Review the terms and conditions, select I have read and understand the terms, and click Accept.
-
Click Create Network Service Connection.
Status Tracker
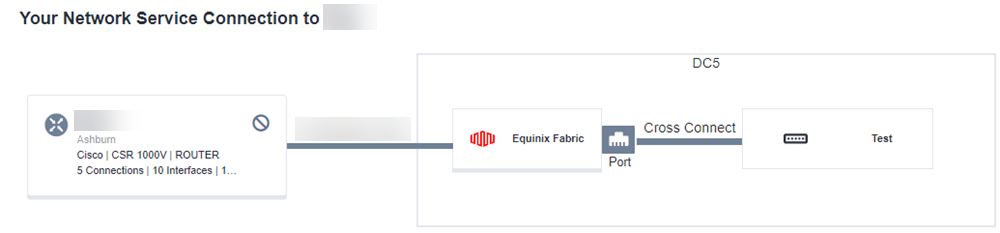
You can check the status of your connection order by going to the BYOC Inventory and clicking on the connection. The preview at the top of the page will display a diagram of the connection you configured.
The Status Tracker will display the current status of your order, including the progress of the order and the estimated time of completion.
![]()
Click Refresh Status to get the most up-to-date status.

Order Summary
The Order Summary section provides the port, Network Service Provider, and Virtual Connection details as well as a pricing summary.
Bring Your Own Connections Inventory
From the Network Edge menu, select Bring Your Own Connections to access your inventory.
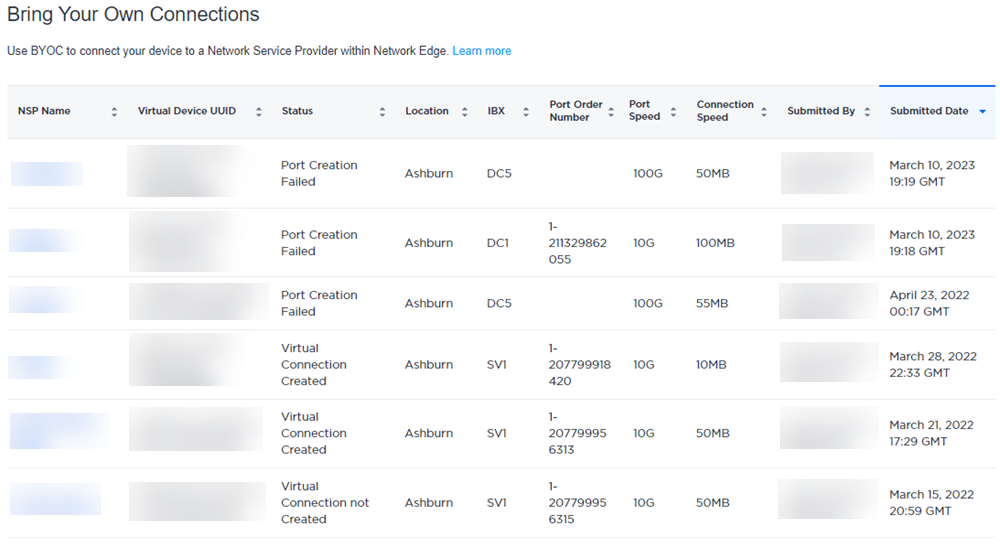
Your connections display in a table. Columns include:
- NSP Name – Network Service Provider name
- Virtual Device UUID – Your device’s universally unique identifier (UUID)
- Status – Connections status
- Location
- IBX
- Port Order Number
- Port Speed
- Connection Speed
- Submitted By
- Submitted Date
BYOC Details
Click on any connection in your inventory to view BYOC Details and check the status of your connection order.
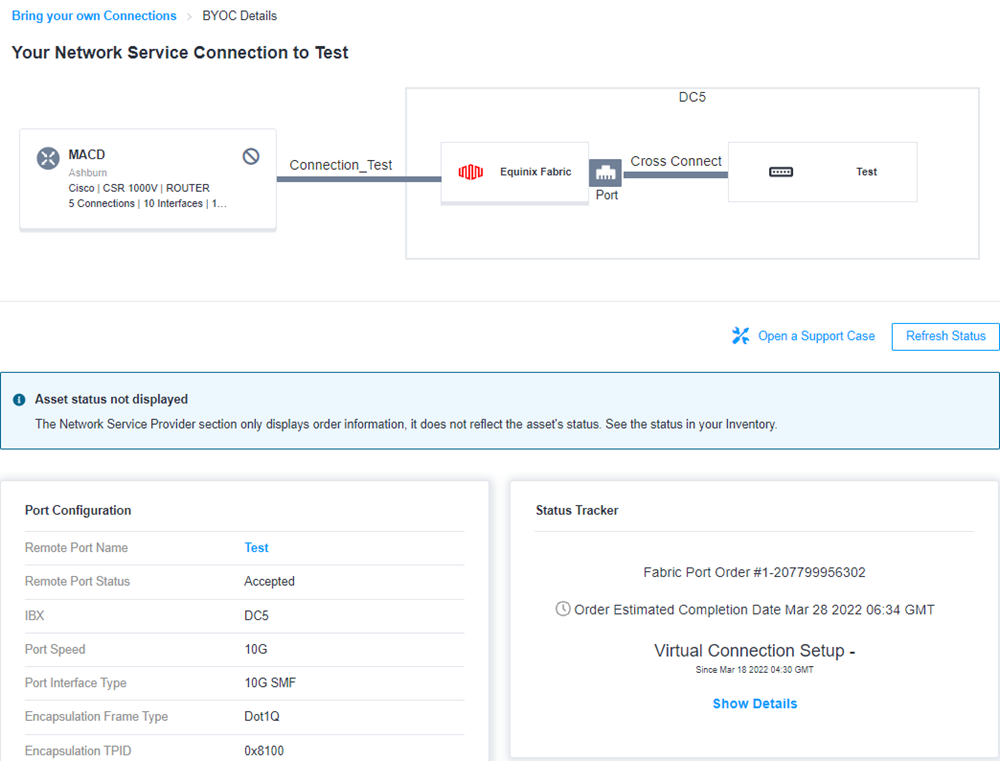
The preview at the top of the page will display a diagram of the connection you configured.