Portal - Connecting to AWS Direct Connect
Connect to Amazon Web Services (AWS) Direct Connect from a Fabric port, a Fabric Cloud Router, a Network Edge Device, or using a service token.
Prerequisites
- An AWS account.
- An Equinix Fabric account, with the following IAM roles assigned: Fabric Connections Manager.
- A Fabric port, an A-side service token, or a Fabric Cloud Router.
Creating a Connection to AWS Direct Connect
-
Log in to the Customer Portal > Fabric Dashboard.
-
Use the Context Switcher and select the project under which you want to create the connection. For more information on projects, see Managing Projects.
-
From the Connections menu, select Create Connection.
-
In the A Service Provider card, click Connect to a Service Provider.

-
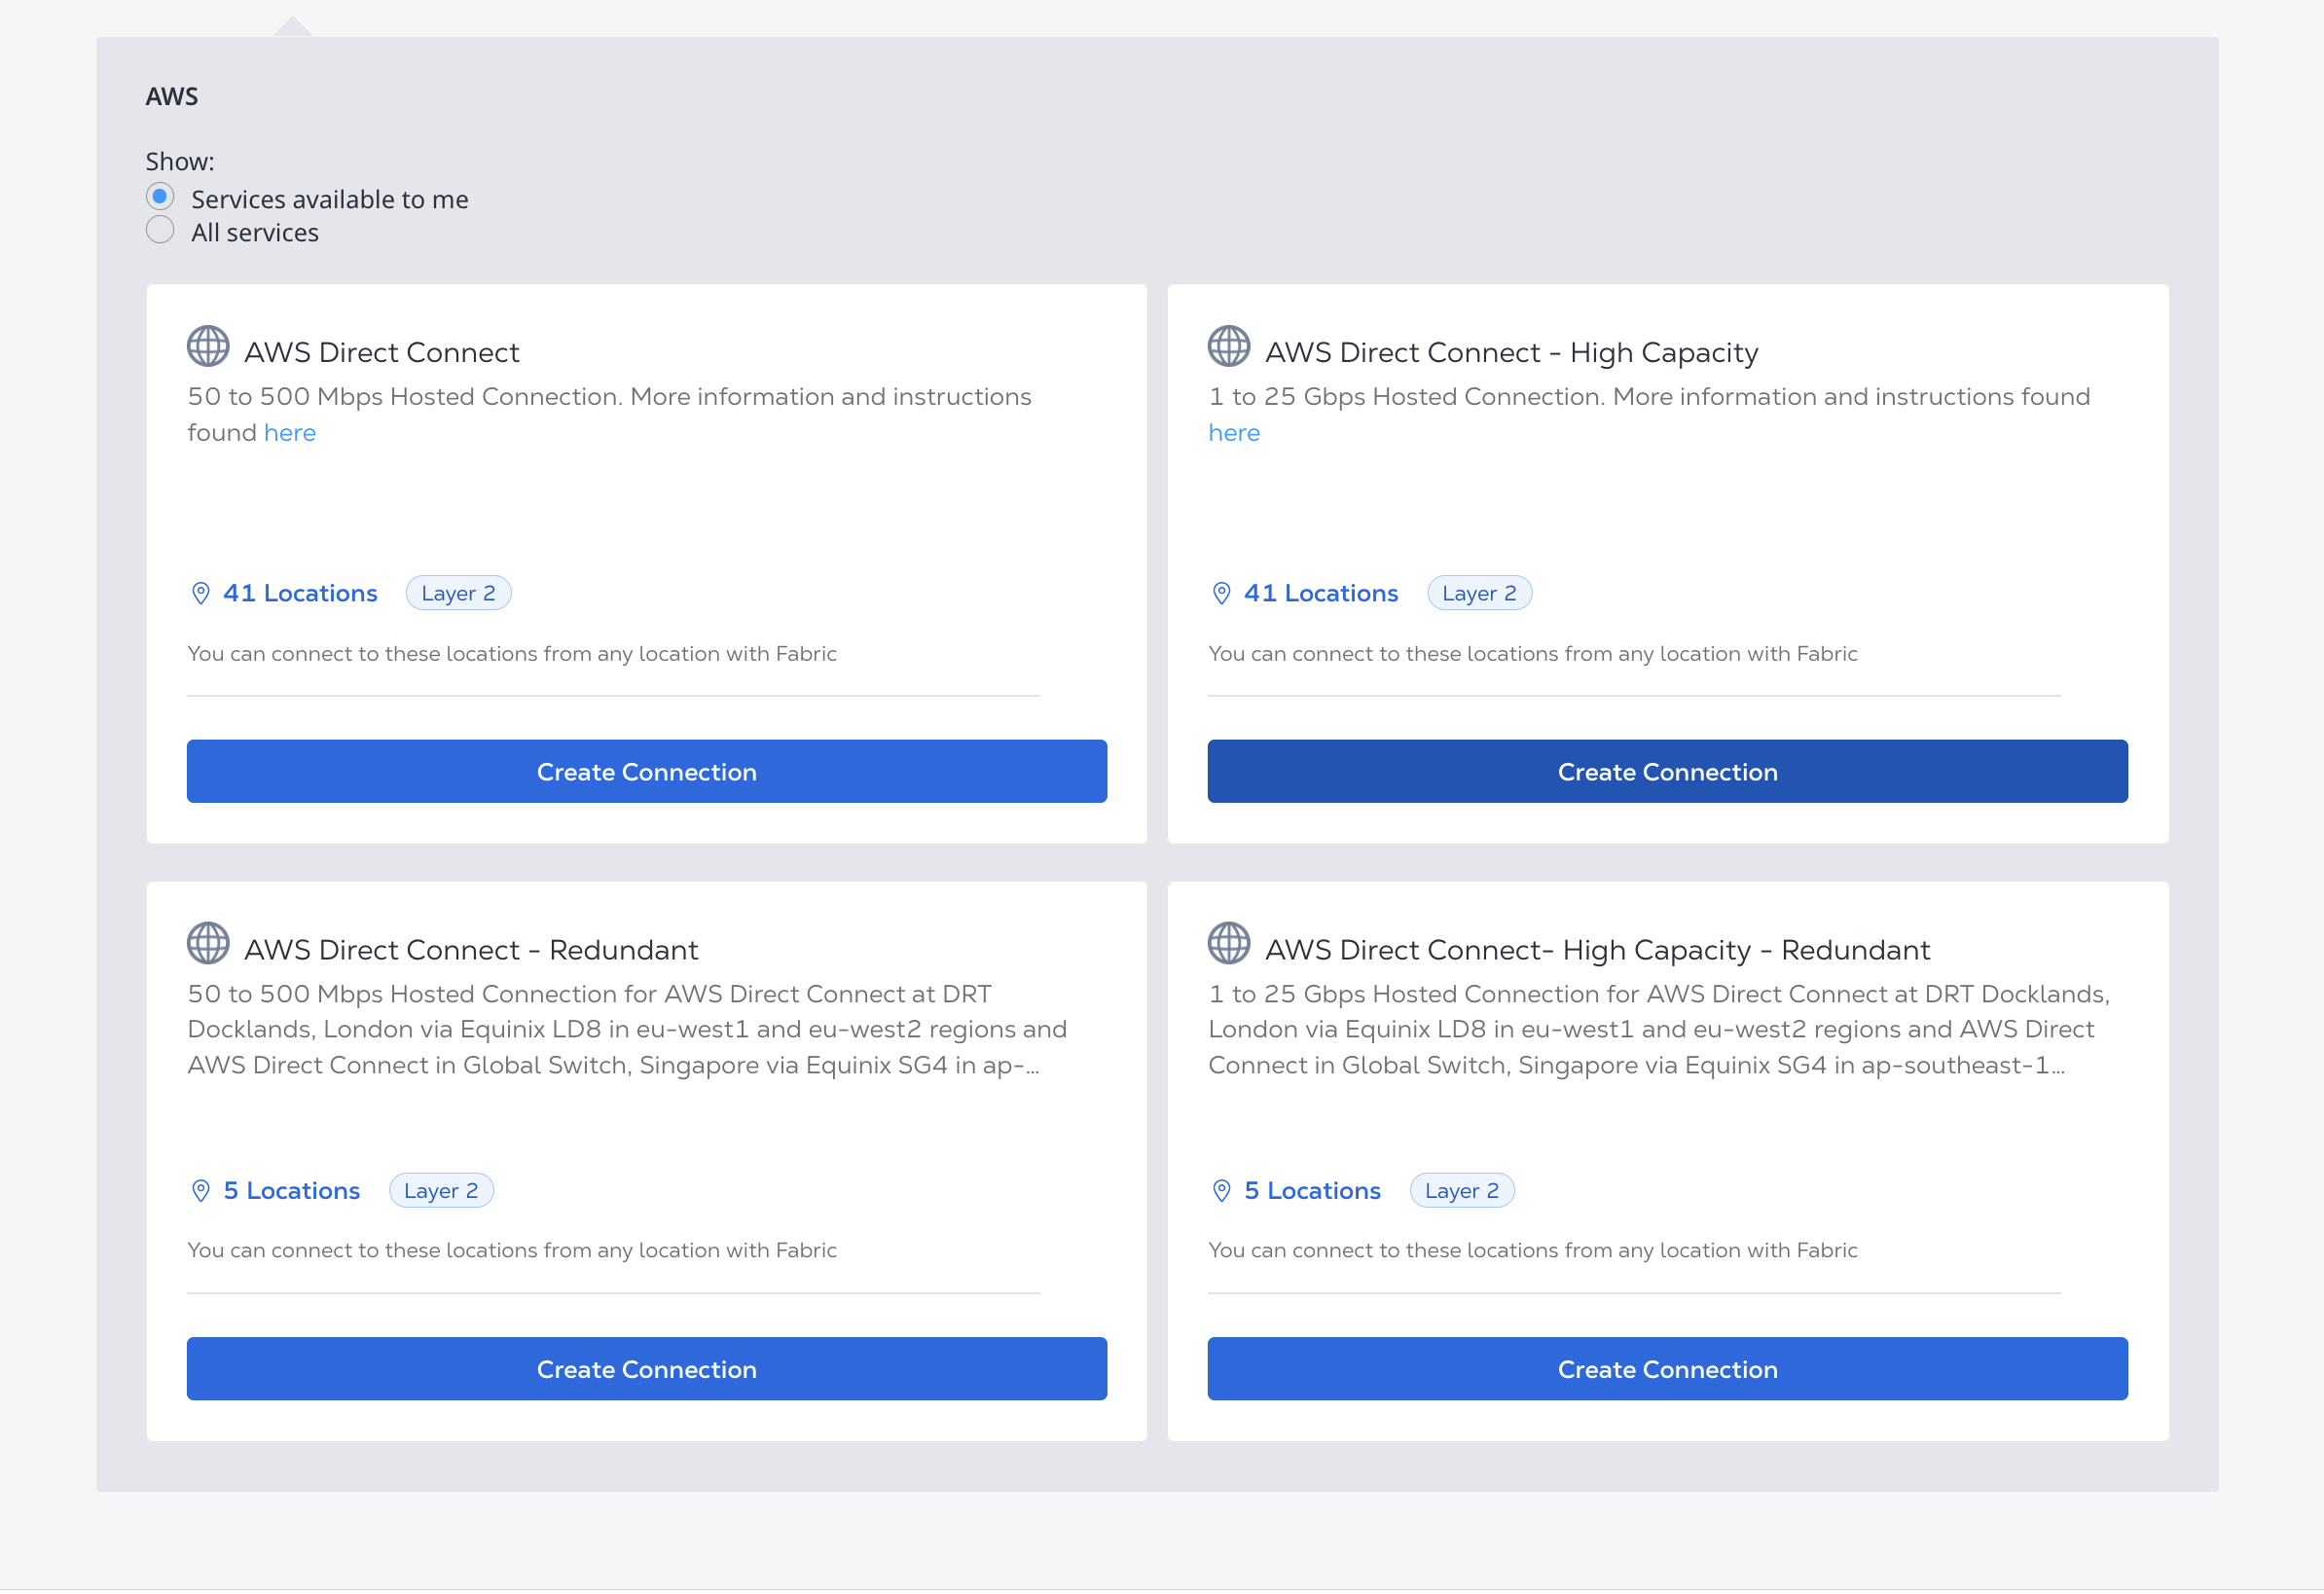
On the Amazon Web Services card, identify the AWS Direct Connect service profile you want to use, then click Create Connection. More information on which service profile you should choose is on the AWS Direct Connect Overview page.
-
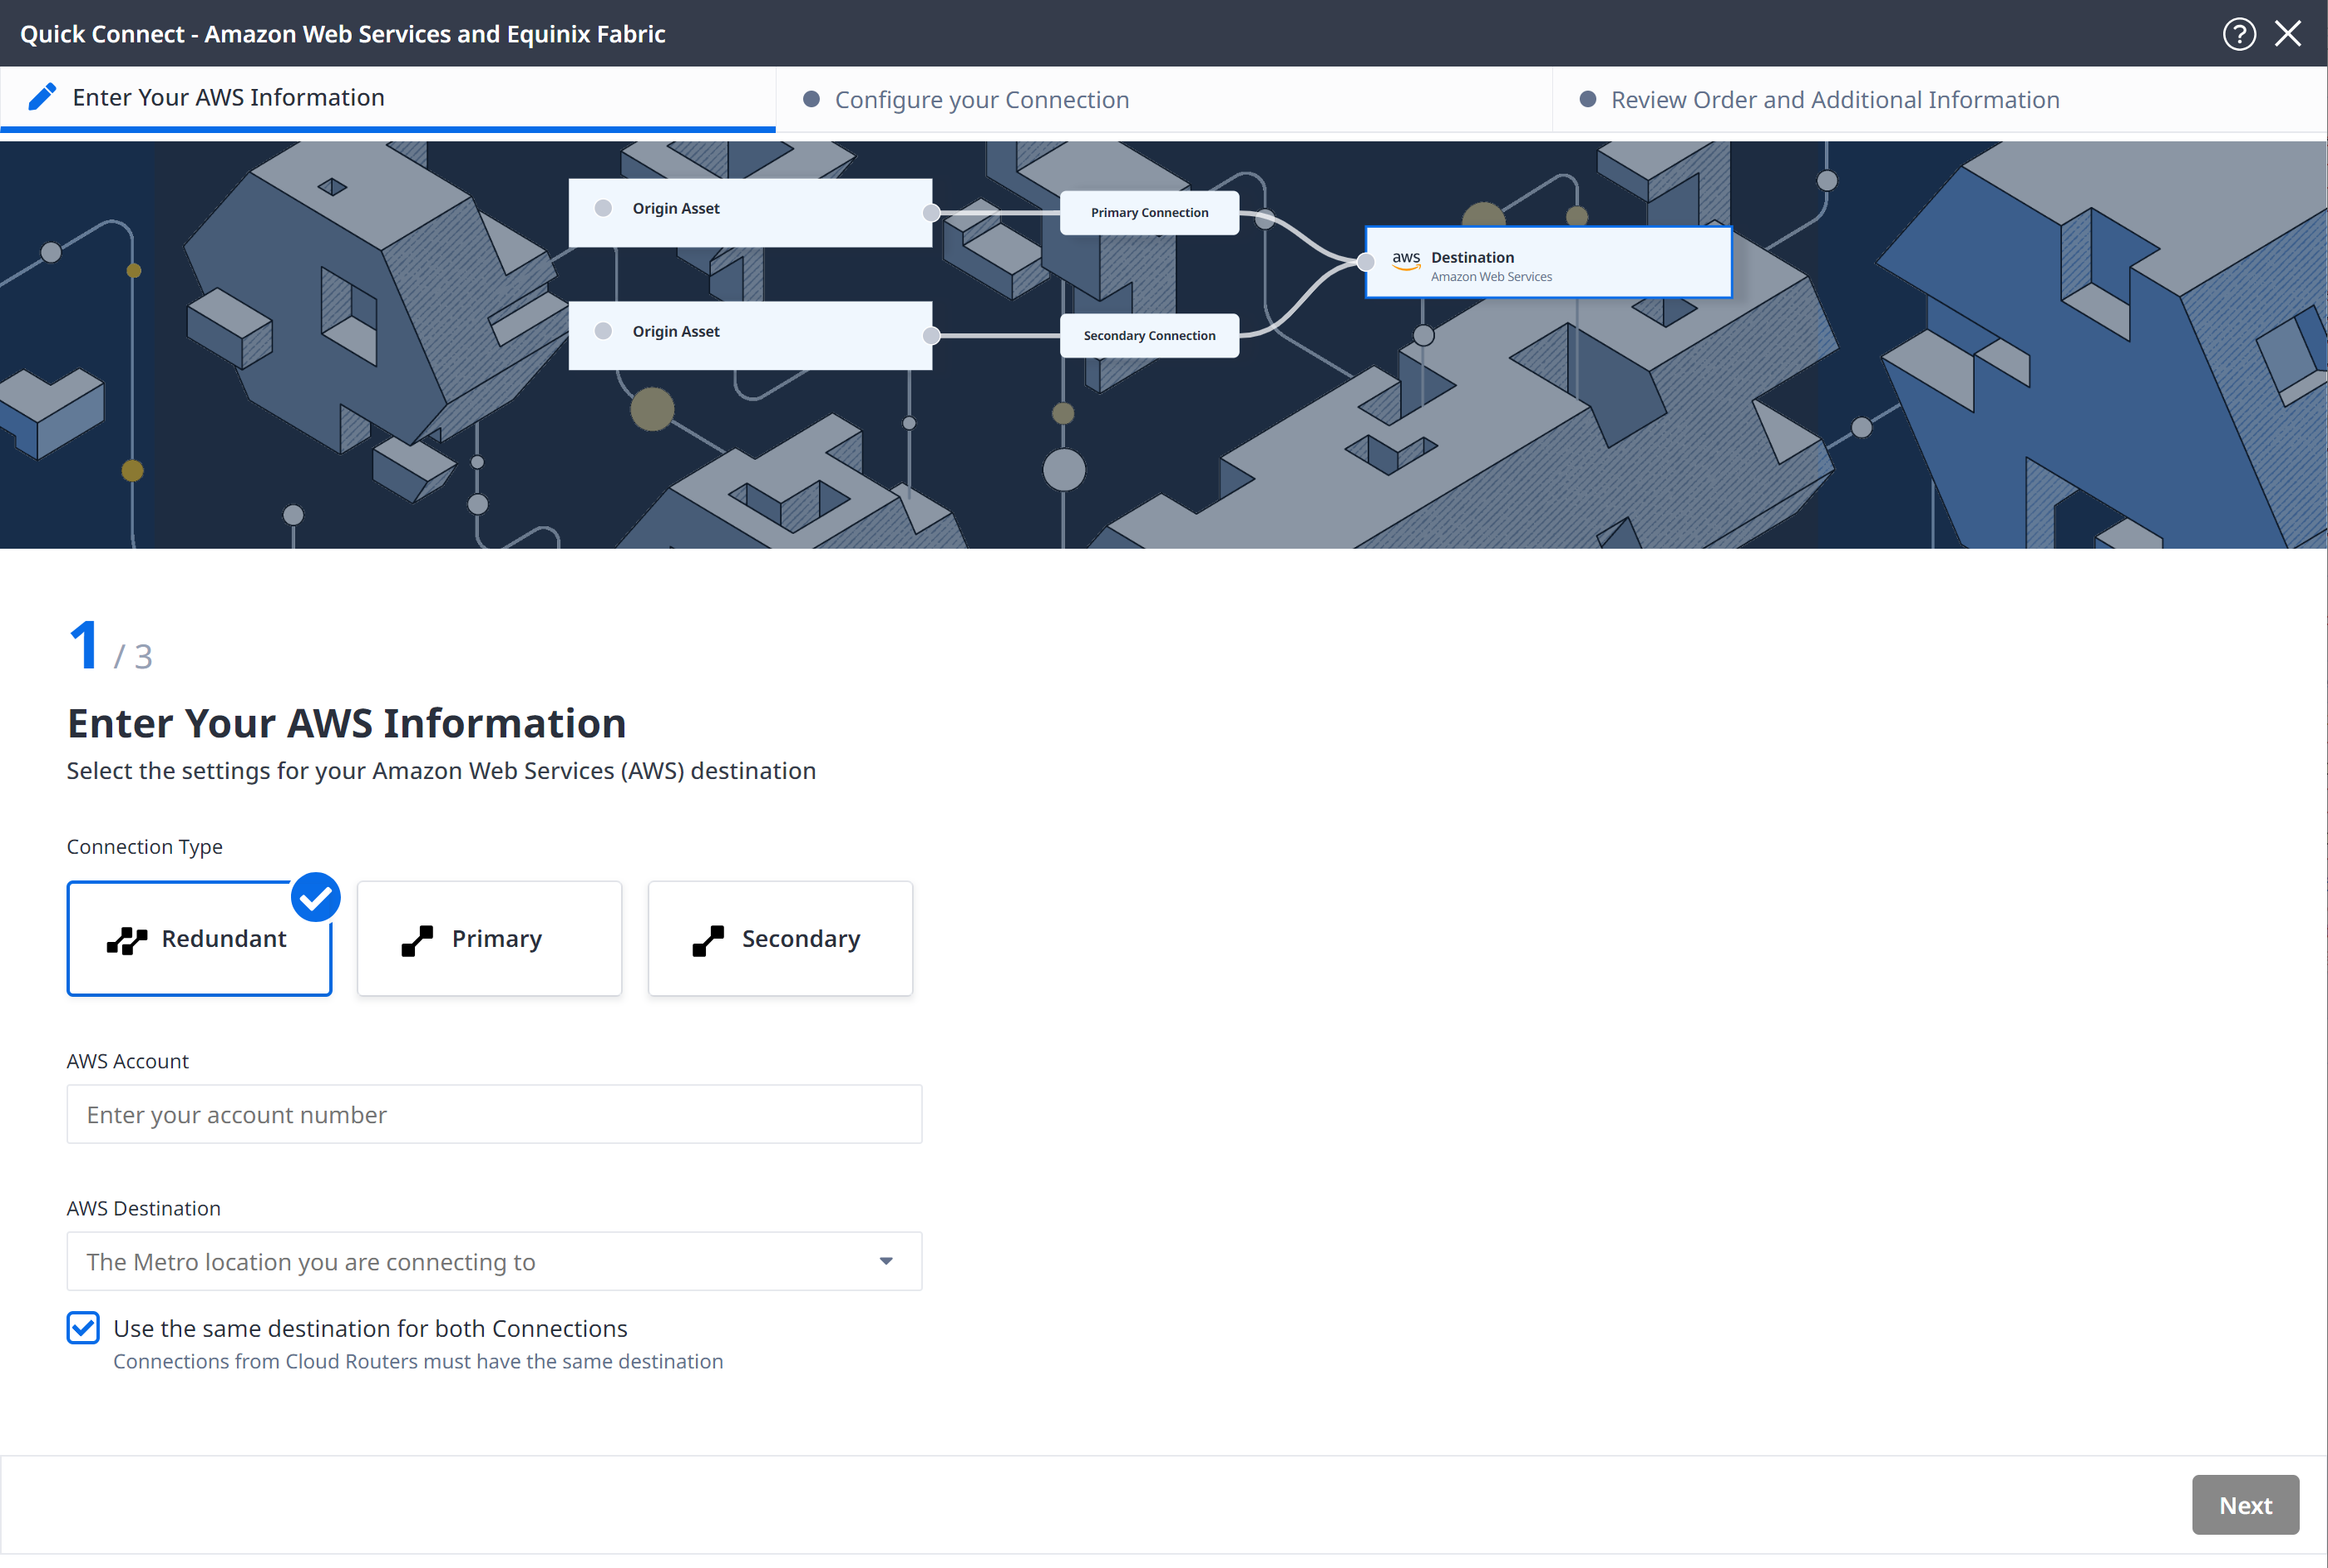
Select connection type:
- Redundant - Create a redundant pair of connections.
- Primary - Create a single, primary connection.
- Secondary - Create a single, secondary connection.
-
Enter your AWS account identifier and click Next. To retrieve your AWS account identifier, log in to the AWS Management Console. When you paste your account ID, make sure to remove dash characters.
-
Select the Equinix Fabric and AWS destination metro. If you want to terminate your primary and secondary connections in different locations, deselect the Use the same destination for both Connections option and select the metro for each connection individually.
Configuring Your Connection
Configure your connection depending on the origin asset type.
Resizing (upgrading or downgrading) the bandwidth of an existing Direct Connect connection is NOT available as AWS does not support automated bandwidth resizing of partner connections. See Resizing AWS Connections for more information.
Port
From the Origin Asset Type drop-down list, select Port.
-
Select the Port or Ports to make your connection from.
-
Click + Select Primary Port, then select your primary connection port. Only ports marked as Primary in the Priority column ports are available for selection. in the and click Select Port.
-
Click + Select Secondary Port, then select your secondary connection port. Only ports marked as Secondary in the Priority column ports are available for selection. and click Select Port.
-
-
Give the connection a name, or give both the primary and secondary connection names.
-
For each connection, if you are using Dot1q ports, enter a VLAN ID. If you are using Qinq ports, enter aCustomer VLAN Tag (C-tag) and a Service VLAN Tag (S-tag).
-
Select the bandwidth for the connection or connections.
-
Select the Term Length for the connection or connections.
-
Click Next.
Service Token
From the Origin Asset Type drop-down list, select Service Token.
-
Enter the Primary Service Token, Secondary Service Token, or both depending on whether you selected Redundant, Primary, or Secondary connection type.
-
Click Redeem Service Token and verify the information provided by the service token on the a-side of your connection.
-
Give the connection a name, or give both the primary and secondary connection names.
-
Select a bandwidth for the connection or connections.
Click Next.
Cloud Router
From the Origin Asset Type drop-down list, select Cloud Router.
-
Click + Select Cloud Router, select a cloud router instance, then click Select Cloud Router.
-
In the Primary Connection section:
- Enter the primary connection name.
- Select a bandwidth.
noteThe bandwidth value you select will also apply to the secondary connection.
-
In the Secondary Connection section, enter your secondary connection name.
-
Click Next.
Network Edge Device
From the Origin Asset Type drop-down list, select Virtual Device.
-
Under Virtual Device Type select whether to connect from a Single Device, Redundant Devices, or a Cluster. Options are filtered based on your selection of Redundant, Primary, or Secondary connection type.
-
Select the specific Virtual Device, Devices, or Cluster.
-
Give the connection a name, or give both the primary and secondary connection names.
-
Select the bandwidth for the connection or connections.
-
Select the Term Length for the connection or connections.
-
Reserve an interface on your device or devices for the connection. This interface will be reserved for all incoming Connections to this device. It will not be available to create connections to any other service provider. You can either choose:
- Automatically select the next available interface on my device(s).
- I will select the interface on my device and then select the interface from the drop-down menu.
-
Click Next.
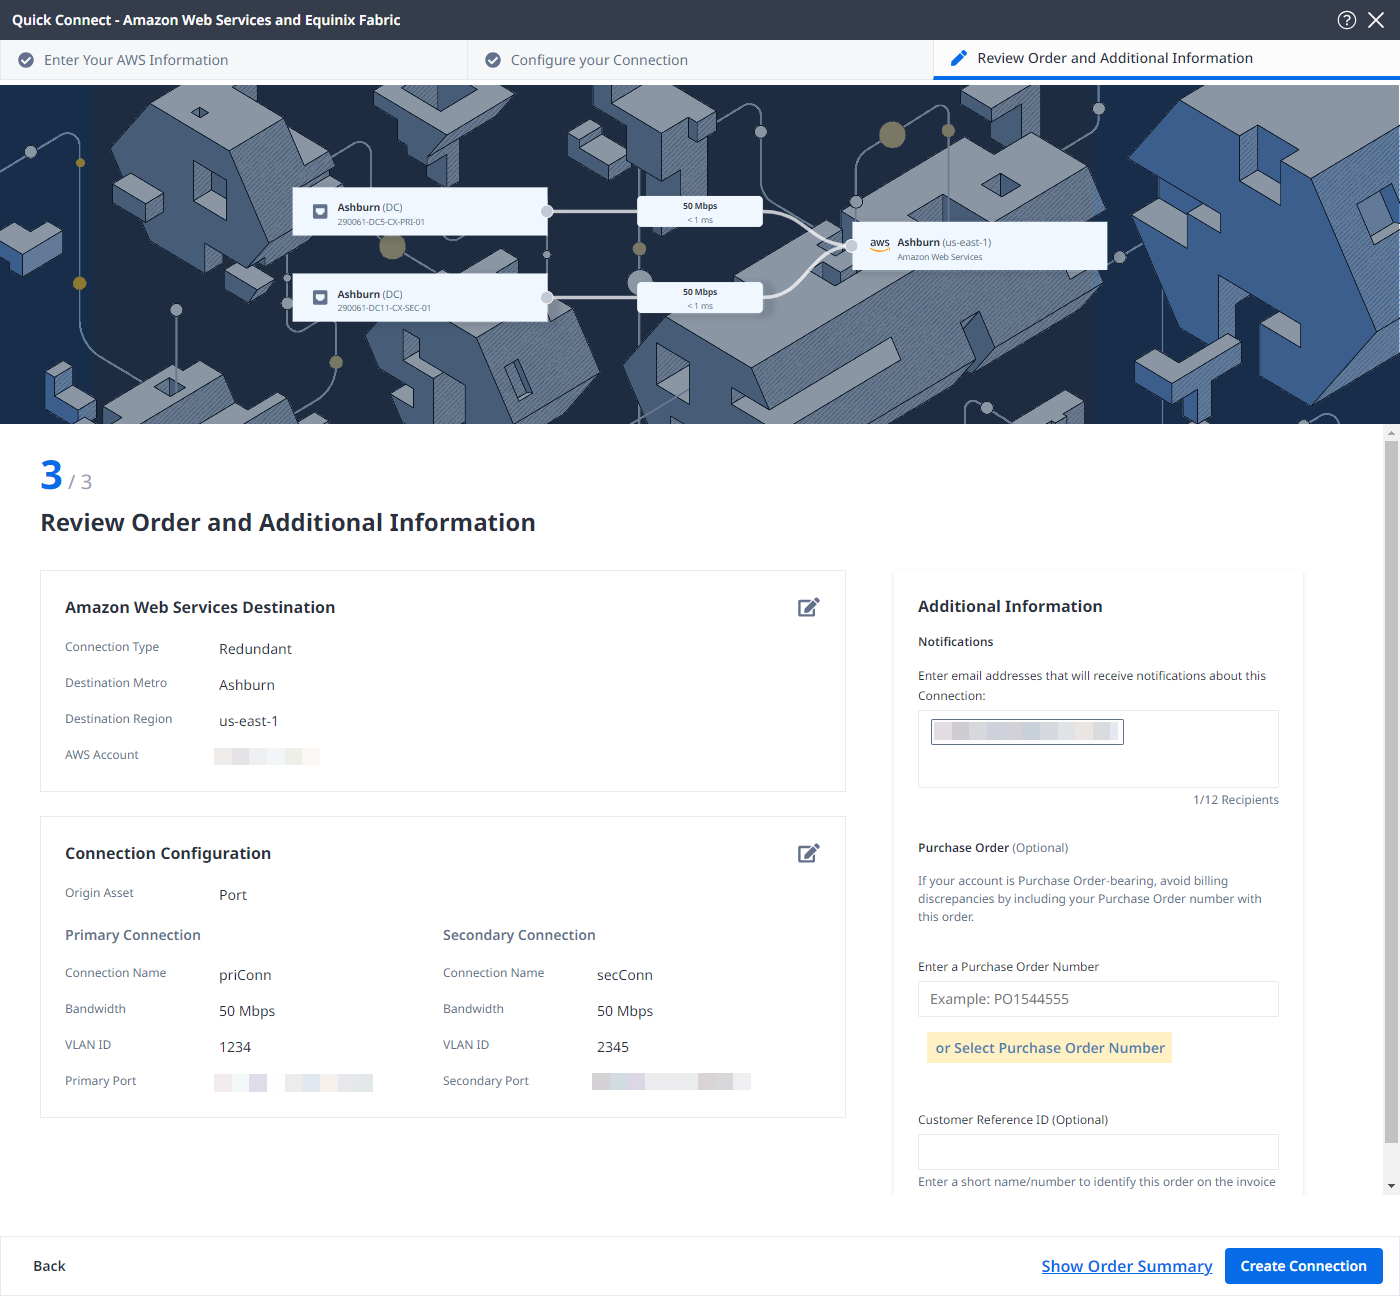
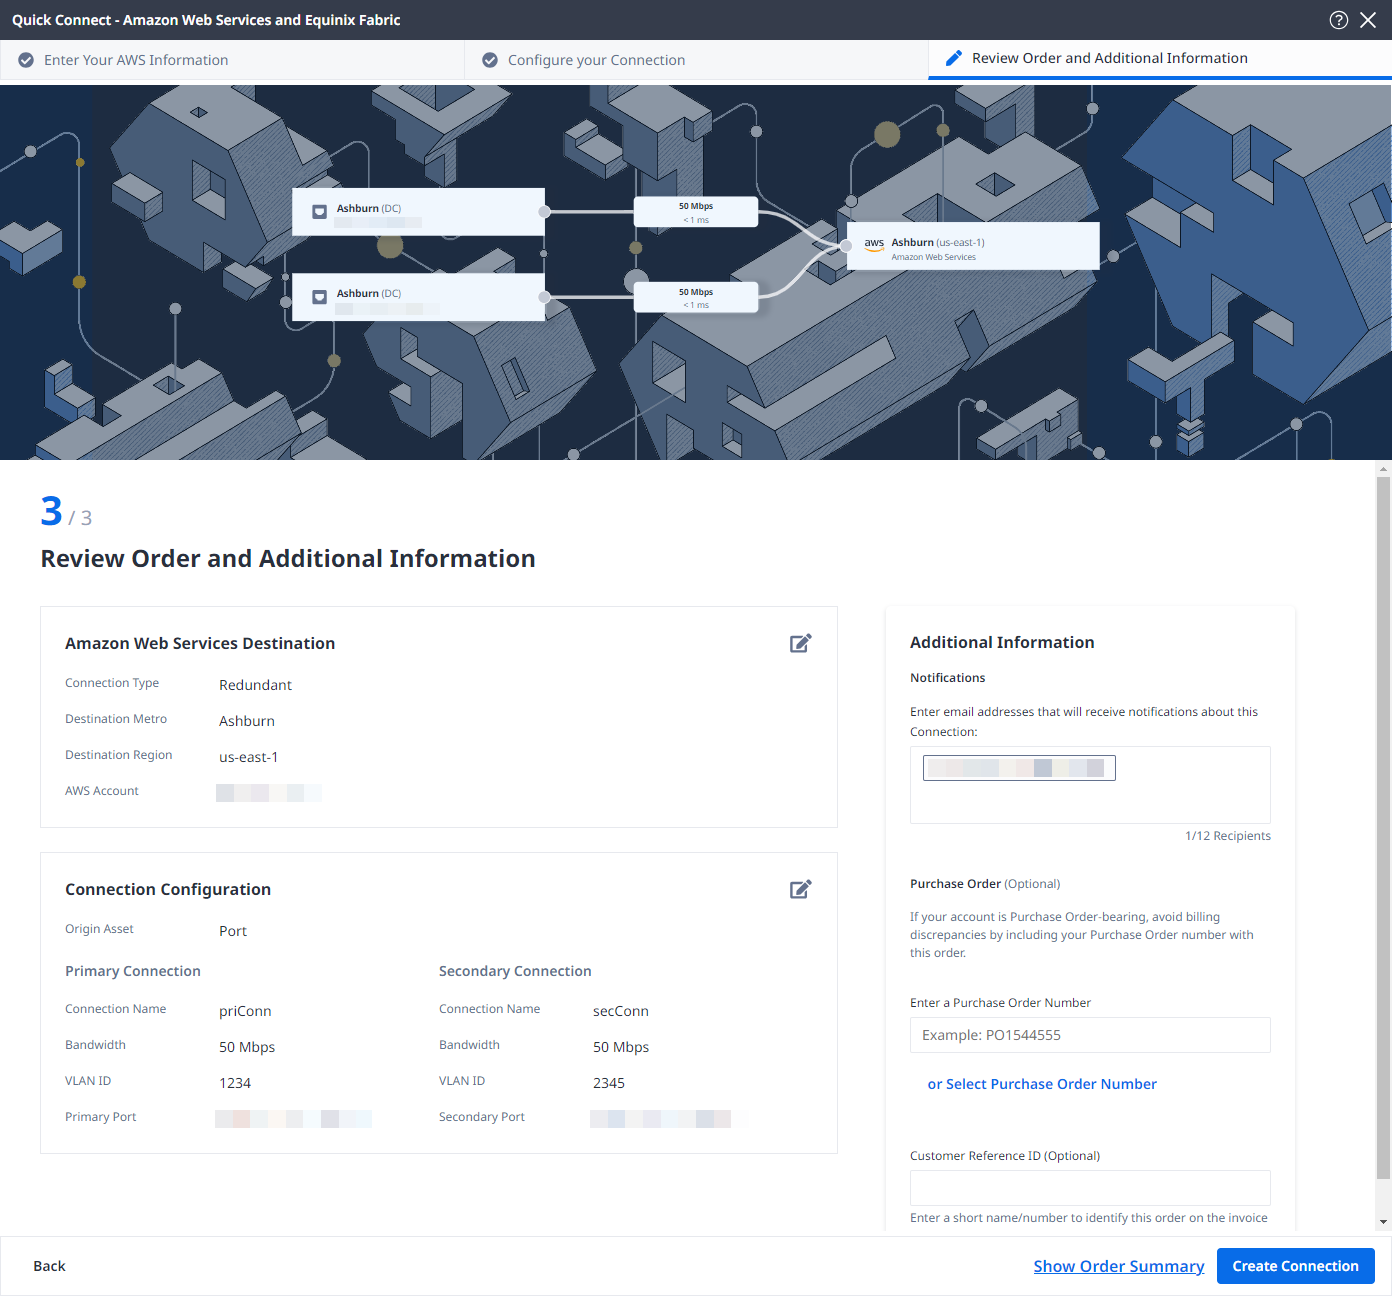
Review and Submit
On the Review Order and Additional Information page:
-
Review the information in the AWS Web Services Destination and Connection Configuration sections.
-
Use the Notifications field to provide the email addresses of the recipients to be notified about the connection's status. You can add up to 12 email addresses.
-
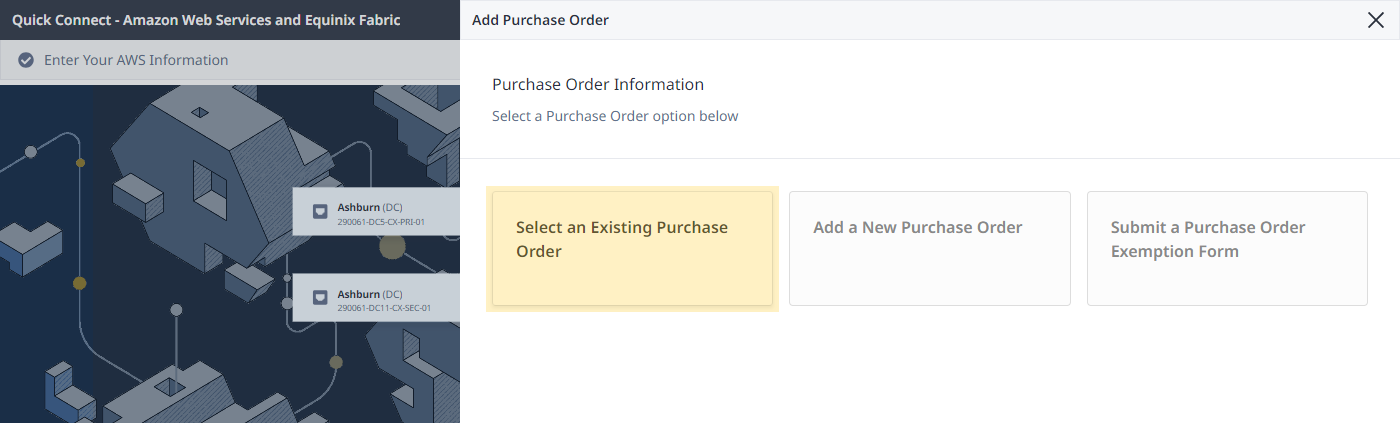
(Optional) Enter or add order information in the Purchase Order section.
-
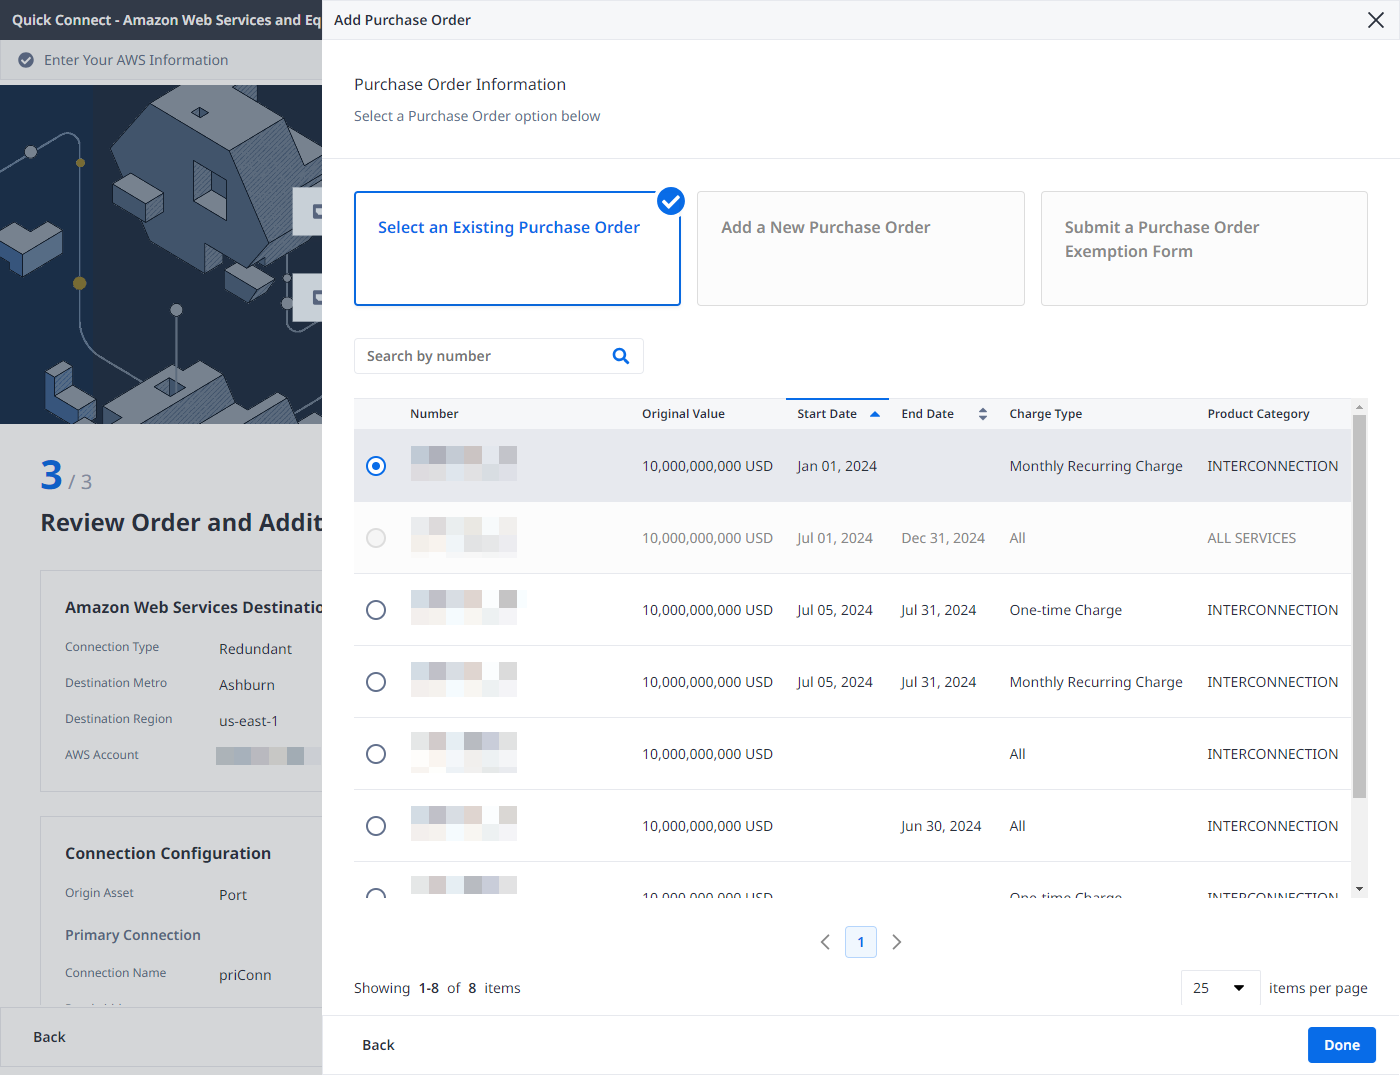
Click Select Purchase Order Number.
-
Click Select an Existing Purchase Order.
-
Select purchase order number you want to apply to your order, then click Done.
-
-
Provide customer reference identifier, that will help you identify this order on your invoice.
-
Click Show Order Summary to see order details and connection pricing information.
When you are ready, click Create Connection.
Monitoring the Connection Status
Once you have created the connection, it appears in your Connections Inventory where you can monitor its status.
equinixStatus attribute values | providerStatus attribute values | AWS Direct Connect State | Description |
|---|---|---|---|
PROVISIONING | PROVISIONING | Connection request has not been sent to AWS yet. | |
PROVISIONED | PENDING_APPROVAL | Ordering -> Requested | The connection awaits for acceptance. |
PROVISIONED | PROVISIONING | Pending | Connection establishment in progress. |
PROVISIONED | PROVISIONED | Pending -> Available | The connection has been accepted. |
Before using the connection you must complete Accepting the Connection.