Connect to AWS
Set up and provision a new connection between Fabric Cloud Router and Amazon Web Services (AWS) by using the Equinix Customer portal.
Prerequisites
-
An existing Fabric Cloud Router in the relevant Equinix metro, to establish the desired cloud-to-cloud networking. (See Create a Fabric Cloud Router.)
-
A valid AWS account with the ability to create and modify AWS DirectConnect circuits.
Create a Connection
-
Sign into the Equinix Customer Portal and navigate to Fabric.
-
If your Fabric account has been transitioned to Equinix Identity and Access Management (IAM) platform, use the Context Switcher drop-down list to access your project and its assets. For more information, see Identity and Access Management.
-
From the Connections menu, select Create Connection.
-
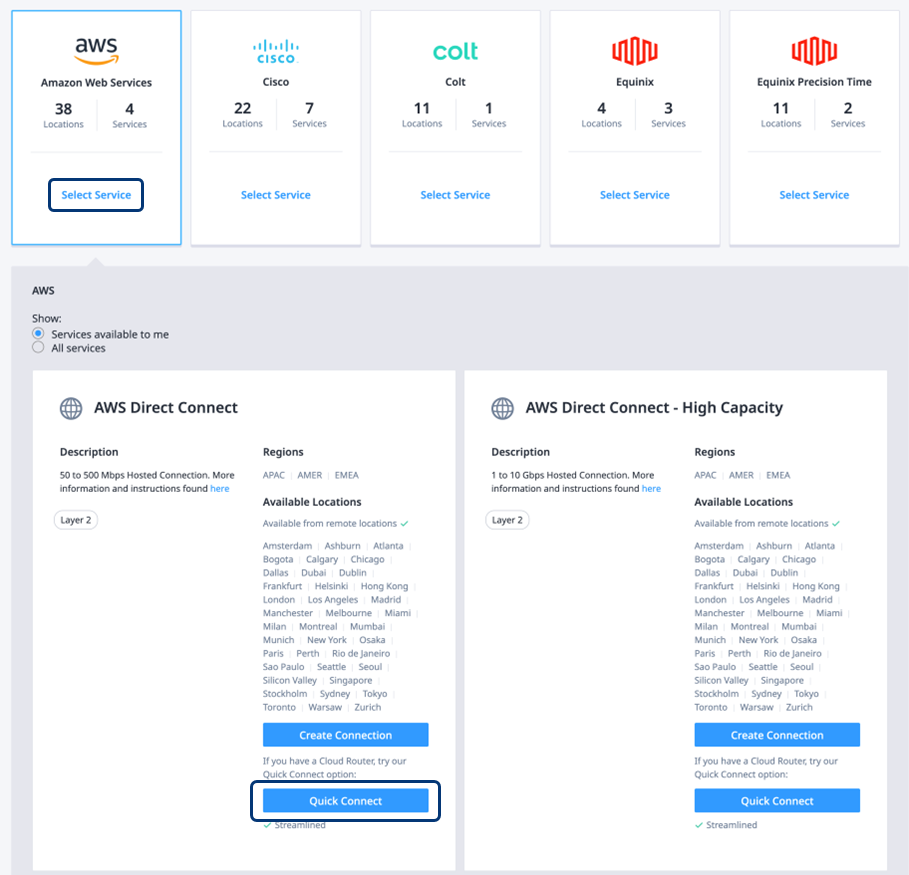
In the Frequent Connections section, click Select Services in the Amazon Web Services card to expand the available services.
-
Based on the desired throughput of the Direct Connect, click Connect under the appropriate profile.
Connect – Amazon Web Services and Equinix Fabric
-
Select the Connection Type:
- Redundant – Create a redundant pair of connections.
- Primary – Create a single, primary connection.
- Secondary – Create a single, secondary connection.
-
Select the Equinix Metro that is associated with the AWS Cloud Region to which you want to create a connection.
-
Enter the AWS Account Number of the AWS account that this Direct Connect will be associated with.
noteEquinix doesn't ask for AWS account credentials. Instead, the new Direct Connect must be accepted from the AWS – Direct Connect portal after you complete this Create Connection procedure.
-
Click Next.
Equinix Configuration
-
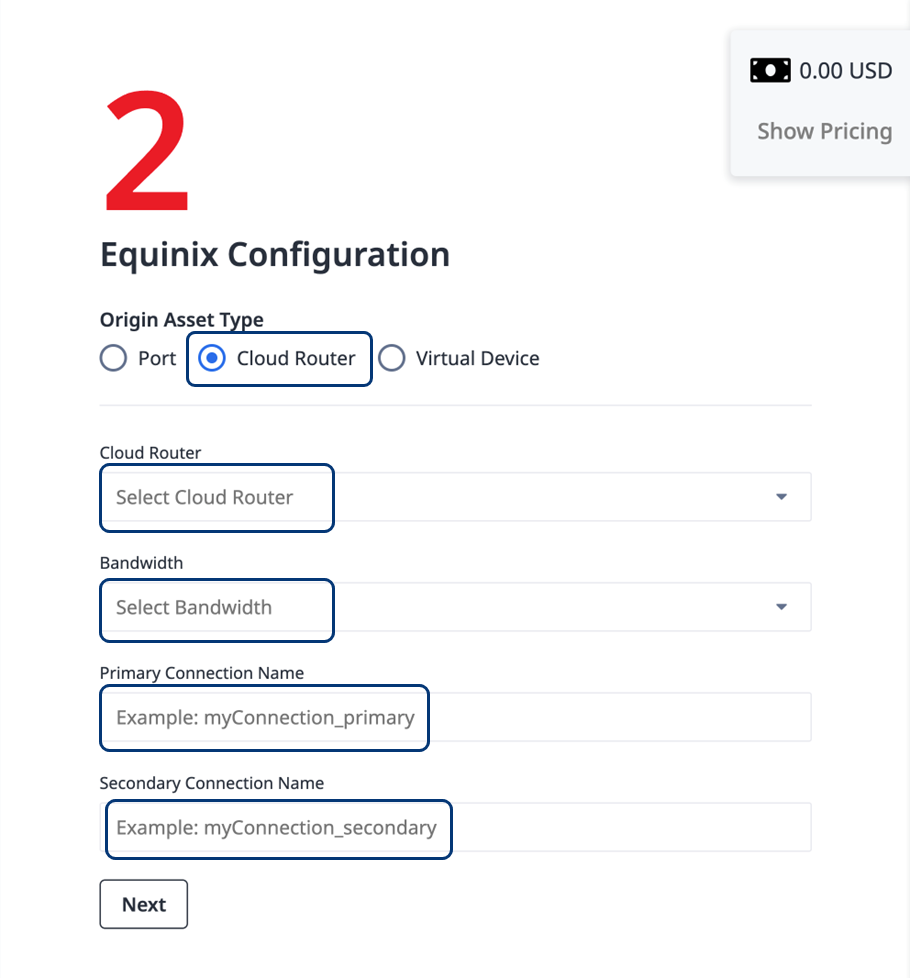
For the Origin Asset Type, click Cloud Router.
-
From the Fabric Cloud Router drop-down list, choose the Cloud Router that you want to use.
-
From the Bandwidth drop-down list, select the bandwidth you would like to use for the connection(s).
-
Enter a unique Connection Name for each new connection, depending on the Connection Type that you selected in the Connect – Amazon Web Services section.
-
Click Next.
Contact Information
- Review the email address for notifications. If needed, change the address, or add additional addresses as desired.
- Enter a Purchase Order Number and a Purchase Reference ID.
- Click Create Connection. A confirmation page displays a success message and the overview of your new connection.
- In the confirmation page, click View this Connection in your Fabric Inventory to continue configuring the routing details.
To proceed beyond this step: Using the AWS account that you provided in the Connect – Amazon Web Services section, you must accept the Direct Connect circuit(s) from the AWS – Direct Connect Portal.
Configure Routing Details
The Connections inventory is displayed, including your newly created connection.
-
Ensure that the appropriate AWS Direct Connect that you selected in the previous section is fully configured in AWS, including the Private VIF.
-
From the Connection Name list, click the name of your new connection. Start with your primary connection, if it's not configured yet.
 .
.
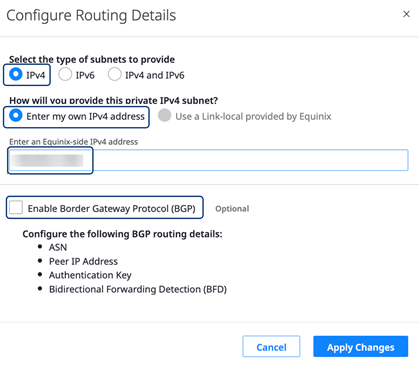
- Select the Routing Details tab and click Configure Routing. The Configure Routing Details form is displayed.
-
Select the type of subnet to provide: Enter my own IPv4 address.
-
Enter an Equinix-side IPv4 address with CIDR.
/30is sufficient, but/28and/29also are permitted. -
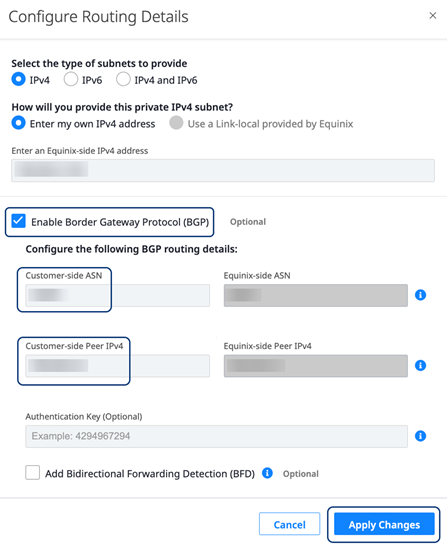
Select Enable Border Gateway Protocol (BGP). Enter a Customer-side ASN, which should typically be the ASN defined on your Direct Connect Gateway, and a Customer-side Peer IPv4 host address.
-
If you are using BGP Authentication, enter the shared secret. Ensure that the secret is appropriately configured and matches on the Direct Connect circuit in the AWS portal as well.
-
If you would like to use Bidirectional Forwarding Detection (BFD), select Enable BFD and set the appropriate interval in milliseconds. The BFD interval must match on both sides of the connection.
-
Click Apply Changes. The Routing Details are updated, and the Fabric side of the connection is provisioned.
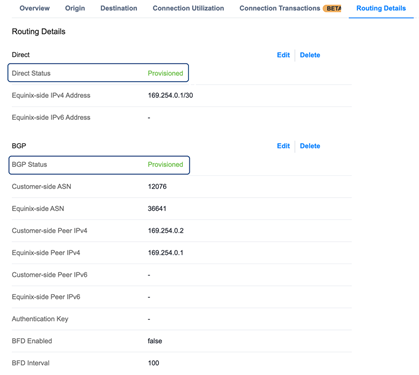
- If you created a secondary connection to AWS, repeat the steps to configure the second connection.
To complete the configuration of the end-to-end connection, make the corresponding routing changes in AWS.
Connect to AWS Using API
You can use Fabric Cloud Router API to automate this procedure and integrate it with your internal systems. For details, see Connect Fabric Cloud Router to Amazon Web Services.