Manage Route Tables
You can load, search, and manage the Route Table for your Fabric Cloud Routers. You can also view the Received Prefixes and Advertised Prefixes towards BGP peers on individual Cloud Router connections.
View and Export the Active Routes for the Cloud Router
After creating a Cloud Router and creating one or more connections to remote BGP peers, you can view the Active Routes that are installed in the Cloud Router's route table.
Active Routes are routes that have been selected as part of the route selection.
Routes listed in the Active Routes table have had route filter policies applied to them and to any BGP inbound policies (for example, inbound MED modification).
Only routes that have been selected as valid and preferred by the BGP route selection process on the Cloud Router will be installed in the Active Routes table.
-
Navigate to the Fabric Cloud Routers Details page.
-
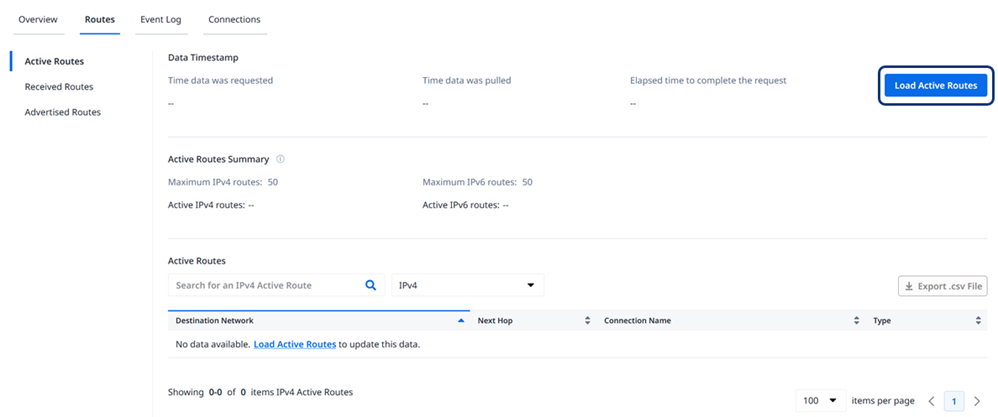
Select the Routes tab. The Active Routes view is displayed. The first time that you view the Active Routes for the Cloud Router, no routes are visible. The Active Routes table must be loaded and is not refreshed automatically. Information is displayed on the page once the routes are loaded.
-
Click Load Active Routes. Once the Active Routes are loaded, the timestamp of the last load request is displayed. These routes are not loaded automatically from the network. If new routes are advertised to the Cloud Router from its peers, you must Load Active Routes to view those routes in the table.
-
The Active Routes Summary displays the maximum IPv4 and IPv6 routes allowed by the Cloud Router package, as well as a total count of Active Routes retrieved in the network for that Cloud Router.
The Active Routes table displays the following information:
- Destination Network – The prefix that has been advertised to the Cloud Router.
- Next-Hop – The BGP peer from which the Cloud Router has learned and installed the prefix. For prefixes learned from remote Cloud Routers through an IP-WAN connection, this next hop is translated to the “IPWAN Name \– Metro Code” of the remote Cloud Router.
- Connection Name – The connection from which the prefix is learned and installed.
- Type – The protocol from which the route is installed. Supported types are: Direct and BGP.
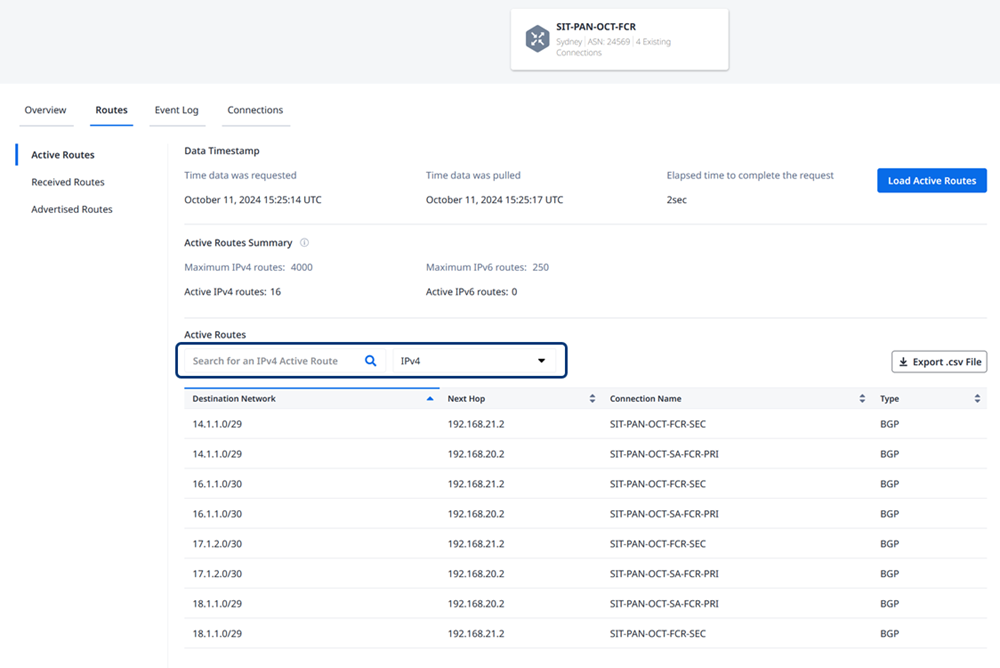
Above the Active Routes table, you can search for a specific prefix, next-hop or connection name. This is an easy way to find if the Cloud Router has installed a route from a particular connection or not.
Additionally, you can select between IPv4 and IPv6 from the dropdown option above the table. Both IPv4 and IPv6 prefixes are loaded at the same time from the network.
To export the table into a .csv file for offline management, click Export .csv File.
View and Export the Received BGP Routes
To better understand whether a particular route or prefix is being sent to the Cloud Router, you can use the Received Routes table. In this table, users can retrieve the received BGP routes on a particular connection and its associated BGP peer. The Received Routes table also displays additional BGP attribute information for these routes.
Received Routes are displayed as Active or Inactive. This is because not all routes advertised from a BGP peer might be installed on the Active Routes table. The cause might be a route filter policy configured on the Cloud Router, or a better route learned from a different BGP peer has been preferred as part of the BGP selection process on the Cloud Router.
-
Navigate to the Fabric Cloud Routers Details page.
-
Select the Routes tab and navigate to Received Routes.
-
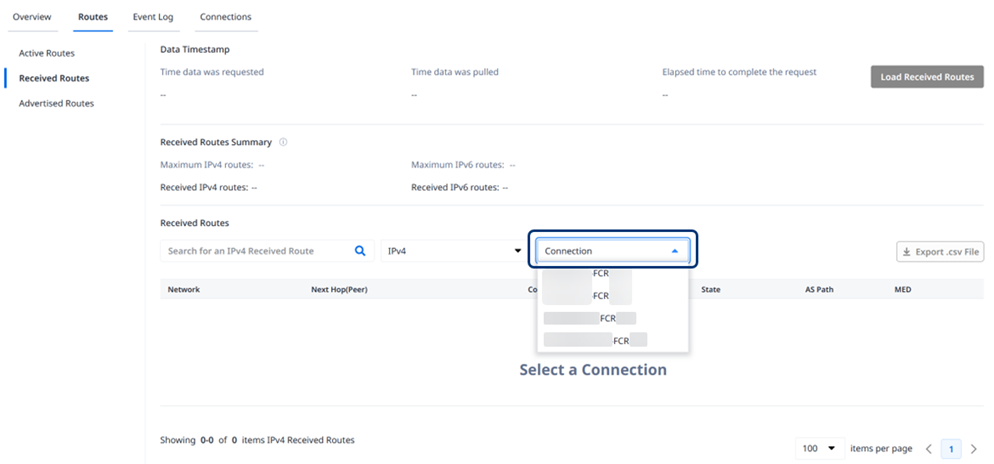
In the Received Routes page, you must select a connection to be able to load the Received Routes from that connection. The Load Received Routes is disabled until you select a connection.
-
From the Connection drop-down list, select an associated connection on that Fabric Cloud Router.
-
Once you've selected a connection from the dropdown, click Load Received Routes. Received Routes are retrieved from the network for that connection and associated BGP peer.
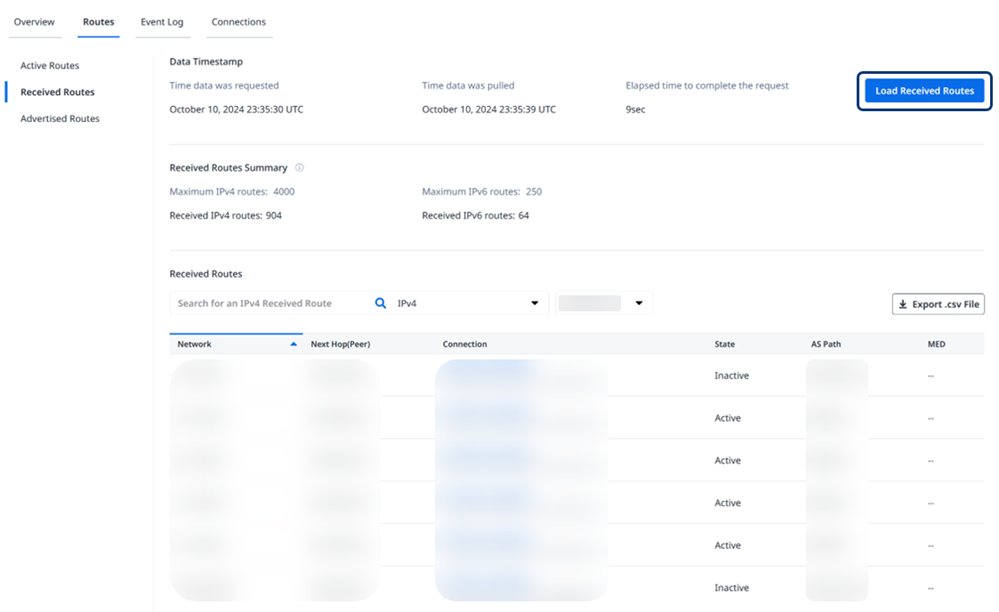
Each time you want to view updated information, you must load the Received Routes. Received routes are not automatically updated on the Customer portal.
The date and timestamp of the last load request for those received routes is displayed. A summary of the total IPv4 and IPv6 Received Routes is also displayed.
The Received Routes table displays the following information:
- Network – The route received as part of the BGP update from the peer on the connection.
- Next-Hop – The next-hop for the route.
- Connection Name – The name and UUID of the connection associated to that received route.
- State – Reflects whether the route is active or inactive. If the state is inactive, it means that the Cloud Router has not installed the route from that connection into the Active Routes table.
- AS Path – A BGP attribute sent as part of the route advertisement from the Cloud Router peer on the connection. The AS Path is displayed as a comma-separated value, with the originating AS for the route at the rightmost of the path.
- MED – The multi-exit discriminator (MED) received as part of the route advertisement. If you have any inbound MED policies to override this value, it is not included on this table. The values here are the MED values received from the peer, before any inbound policies are applied.
You can search for a specific prefix of interest by using the field above the Received Routes table.
Select between IPv4 and IPv6 from the drop-down option above the table. Both IPv4 and IPv6 prefixes are loaded at the same time from the network.
To export the table into a .csv file for offline management, click Export .csv File.
View and Export the Advertised BGP Routes
To better troubleshoot whether a particular route or prefix is advertised by the Cloud Router, you can use the Advertised Routes tables. In these tables, users can retrieve the advertised BGP routes from the Cloud Router on a particular connection. The Advertised Routes table also displays additional BGP attribute information for these routes.
Routes displayed in the Advertised Routes tables are routes that have outbound policies applied to the connection (for example, an AS Path Prepend or outbound MED configuration). The BGP attributes displayed in the tables are the attributes that the Cloud Router’s peer will receive.
-
Navigate to the Fabric Cloud Routers Details page.
-
Select the Routes tab and navigate to Advertised Routes.
-
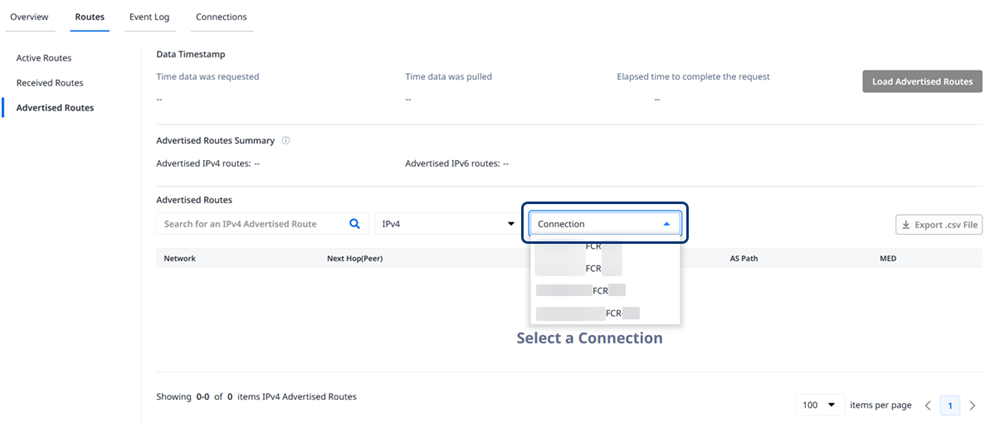
In the Advertised Routes page, you must select a connection to be able to load the Advertised Routes from that connection. Load Advertised Routes is disabled until you select a connection.
-
From the Connection drop-down list, select an associated connection on that Fabric Cloud Router.
-
Once you've selected a connection from the dropdown, click Load Advertised Routes.
Advertised Routes are retrieved from the network for that connection and its associated BGP peer.

Each time you want to view updated information, you must load the Advertised Routes . Received routes are not automatically updated on the Customer portal.
The date and timestamp of the last load request for those received routes is displayed. A summary of the total IPv4 and IPv6 Received Routes is also displayed.
The Advertised Routes table displays the following information:
- Network – The route advertised as part of the BGP update from the Cloud Router to its peer.
- Next-Hop (Peer) – The next-hop for the route. In this case, the Cloud Router’s direct IP address for the connection.
- Connection – The name and UUID of the connection associated to that received route.
- AS Path – A BGP attribute sent as part of the route advertisement from the Cloud Router to its peer on the connection. The AS Path is displayed as a comma-separated value, with the originating AS for the route at the rightmost of the path.
- MED – The multi-exit discriminator (MED) received as part of the route advertisement. If you have any inbound MED policies to override this value, it is not included on this table. The values here are the MED values received from the peer, before any inbound policies are applied.
You can search for a specific prefix of interest by using the field above the Advertised Routes table.
Select between IPv4 and IPv6 from the drop-down option above the table. Both IPv4 and IPv6 prefixes are loaded at the same time from the network.
To export the table into a .csv file for offline management, click Export .csv File.
Manage Route Tables Using APIs
You can use Fabric Cloud Router API to automate this procedure and integrate it with your internal systems. For details, see Manage Routing Tables.