Connecting to FastConnect
Use the Equinix Customer Portal or API to create the connection from your Fabric Port, Fabric Cloud Router, or Network Edge virtual device to Oracle Cloud.
Prerequisites
-
A valid Oracle Cloud account with the ability to create and modify FastConnect circuits, including:
- an Oracle Virtual Cloud Network instance.
- A Dynamic Routing Gateway in the Oracle Console with an attached Virtual Cloud Network.
- FastConnect Virtual Circuit(s). One or more FastConnect circuits must be created before creating the virtual connection in Equinix Fabric, because Oracle Cloud ID keys are required during the connection creation process.
For more information, see Connection Set Up in the Oracle Console
-
A Fabric port, an A-side service token, a Fabric Cloud Router, or a Network Edge virtual device
-
In order to create connections in Fabric, you must have the
Fabric Connections Managerrole.
Creating a Connection
- Portal
- API
- Terraform
-
Log in to the Customer Portal > Fabric Dashboard.
-
Use the Context Switcher and select the project under which you want to create the connection. For more information on projects, see Managing Projects.
-
From the Connections menu, select Create Connection.
-
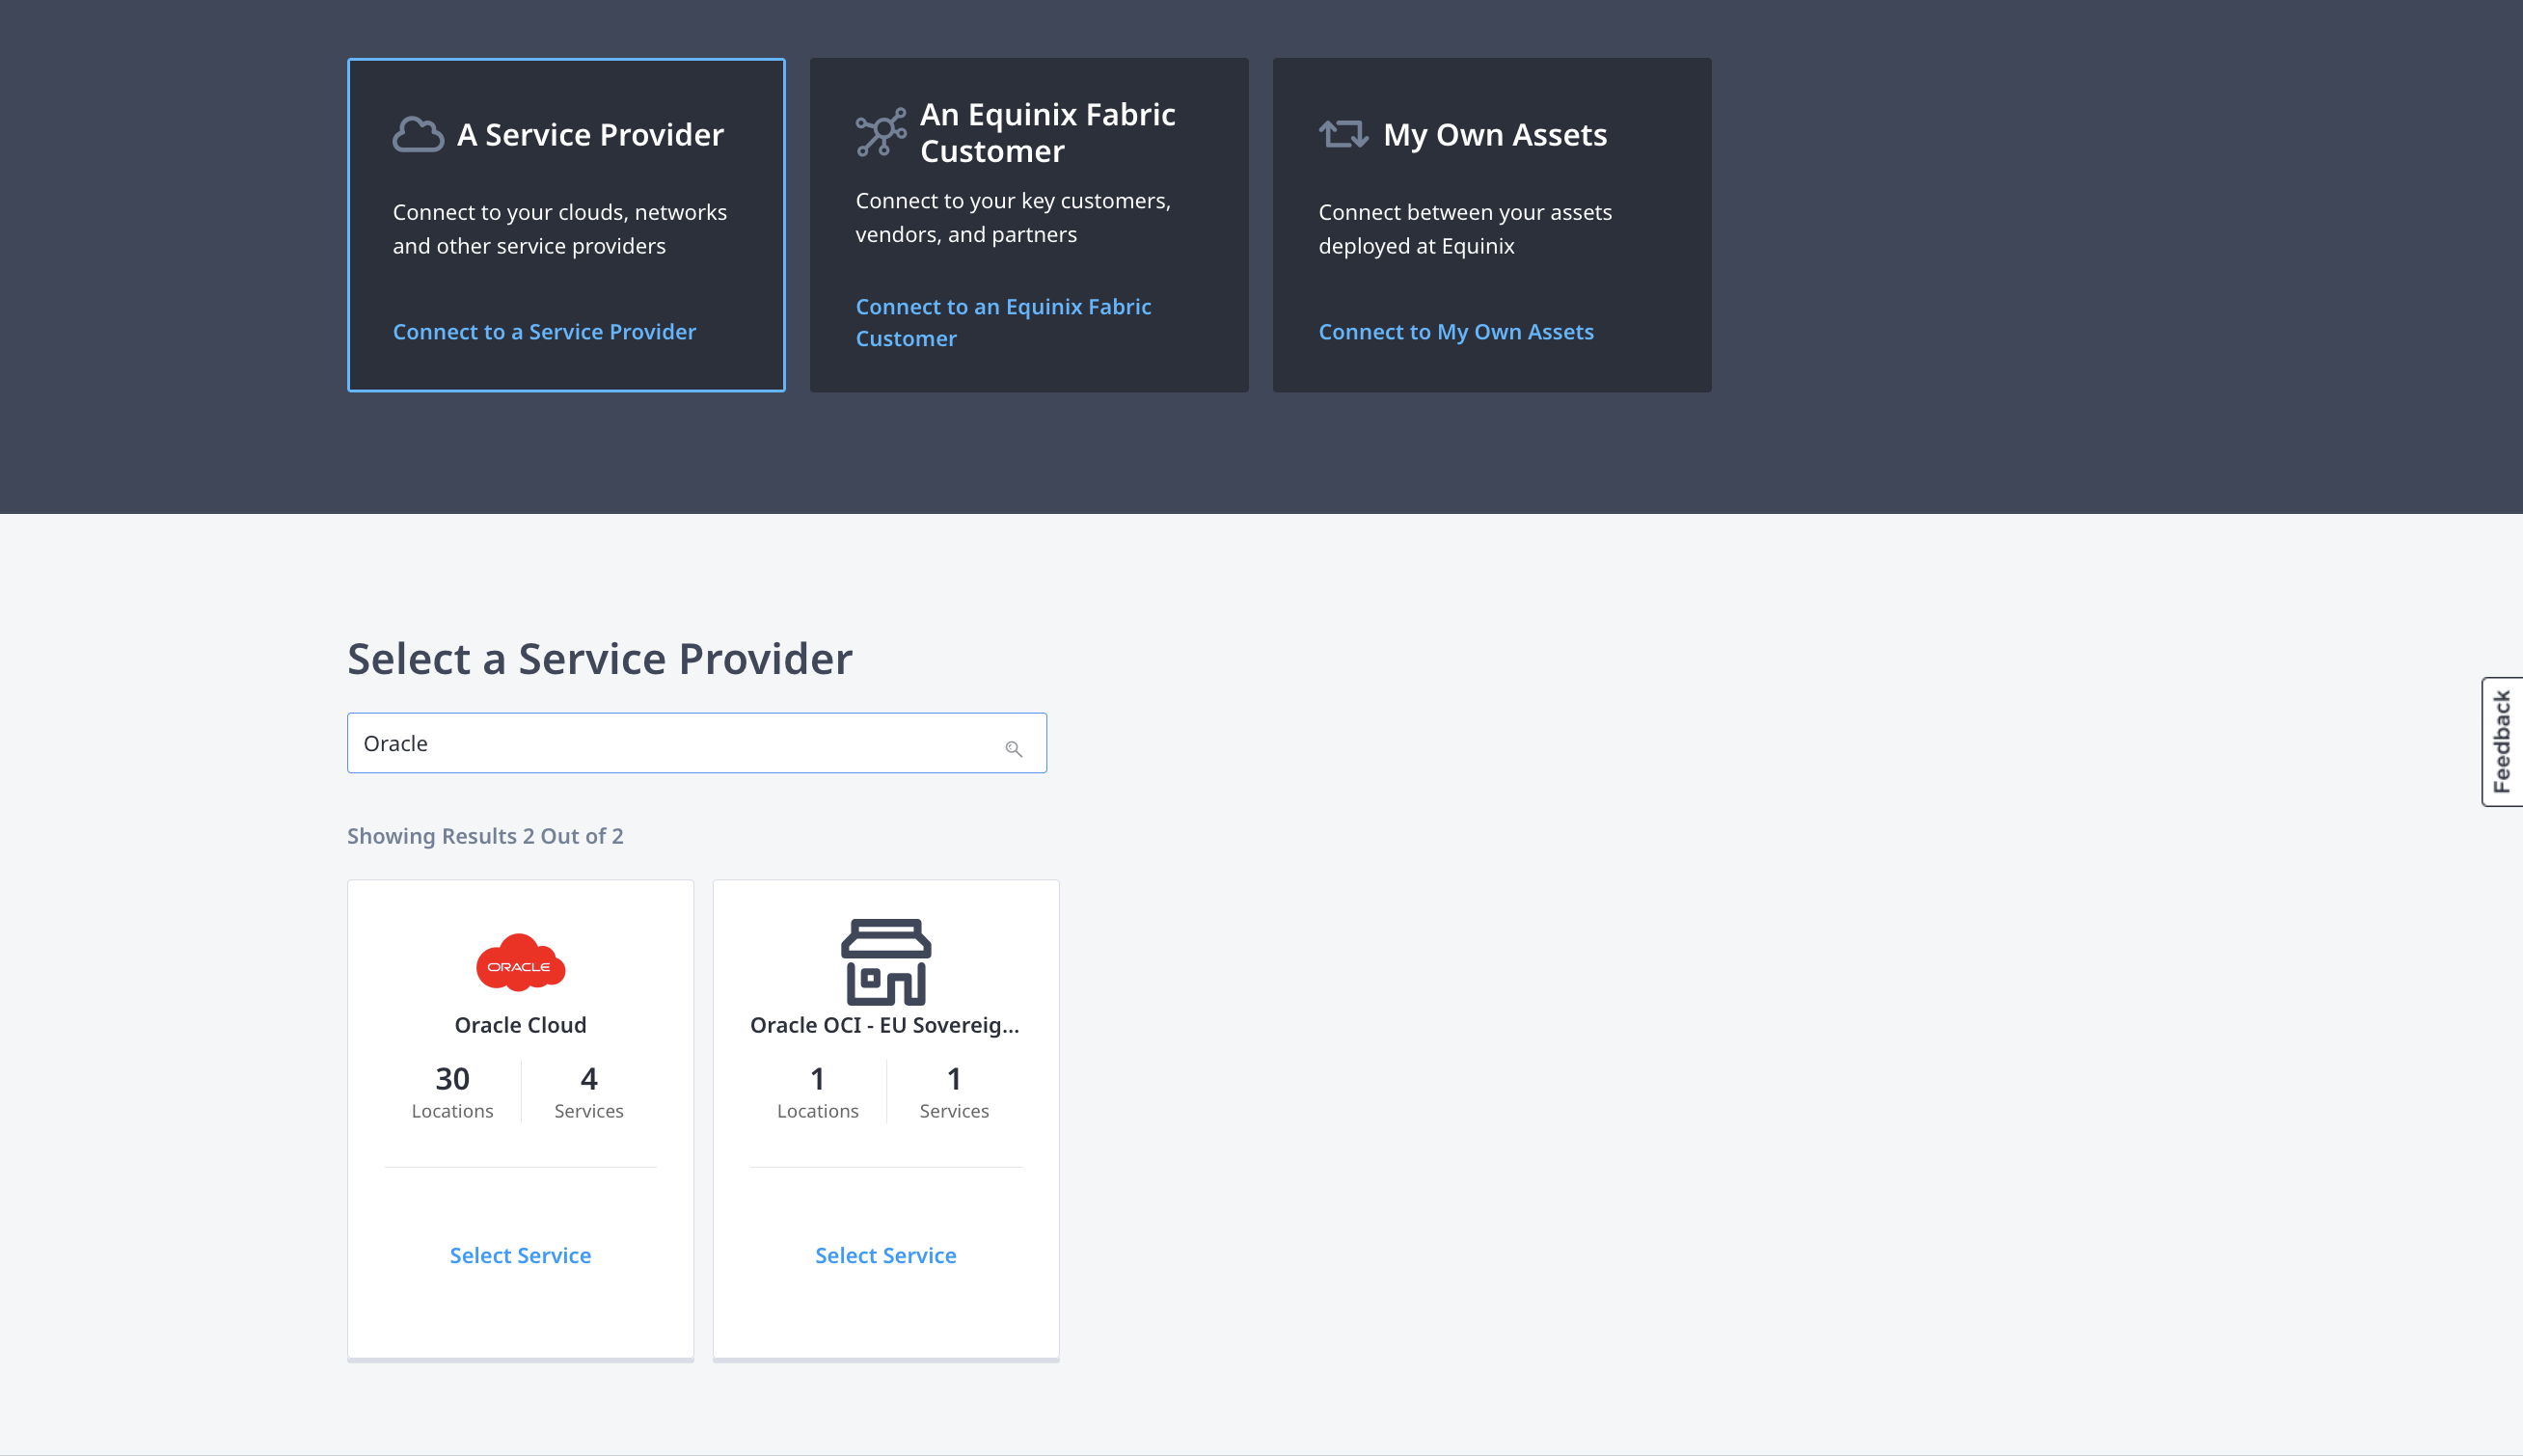
In the A Service Provider card, click Connect to a Service Provider.

-
Search for Oracle.
-
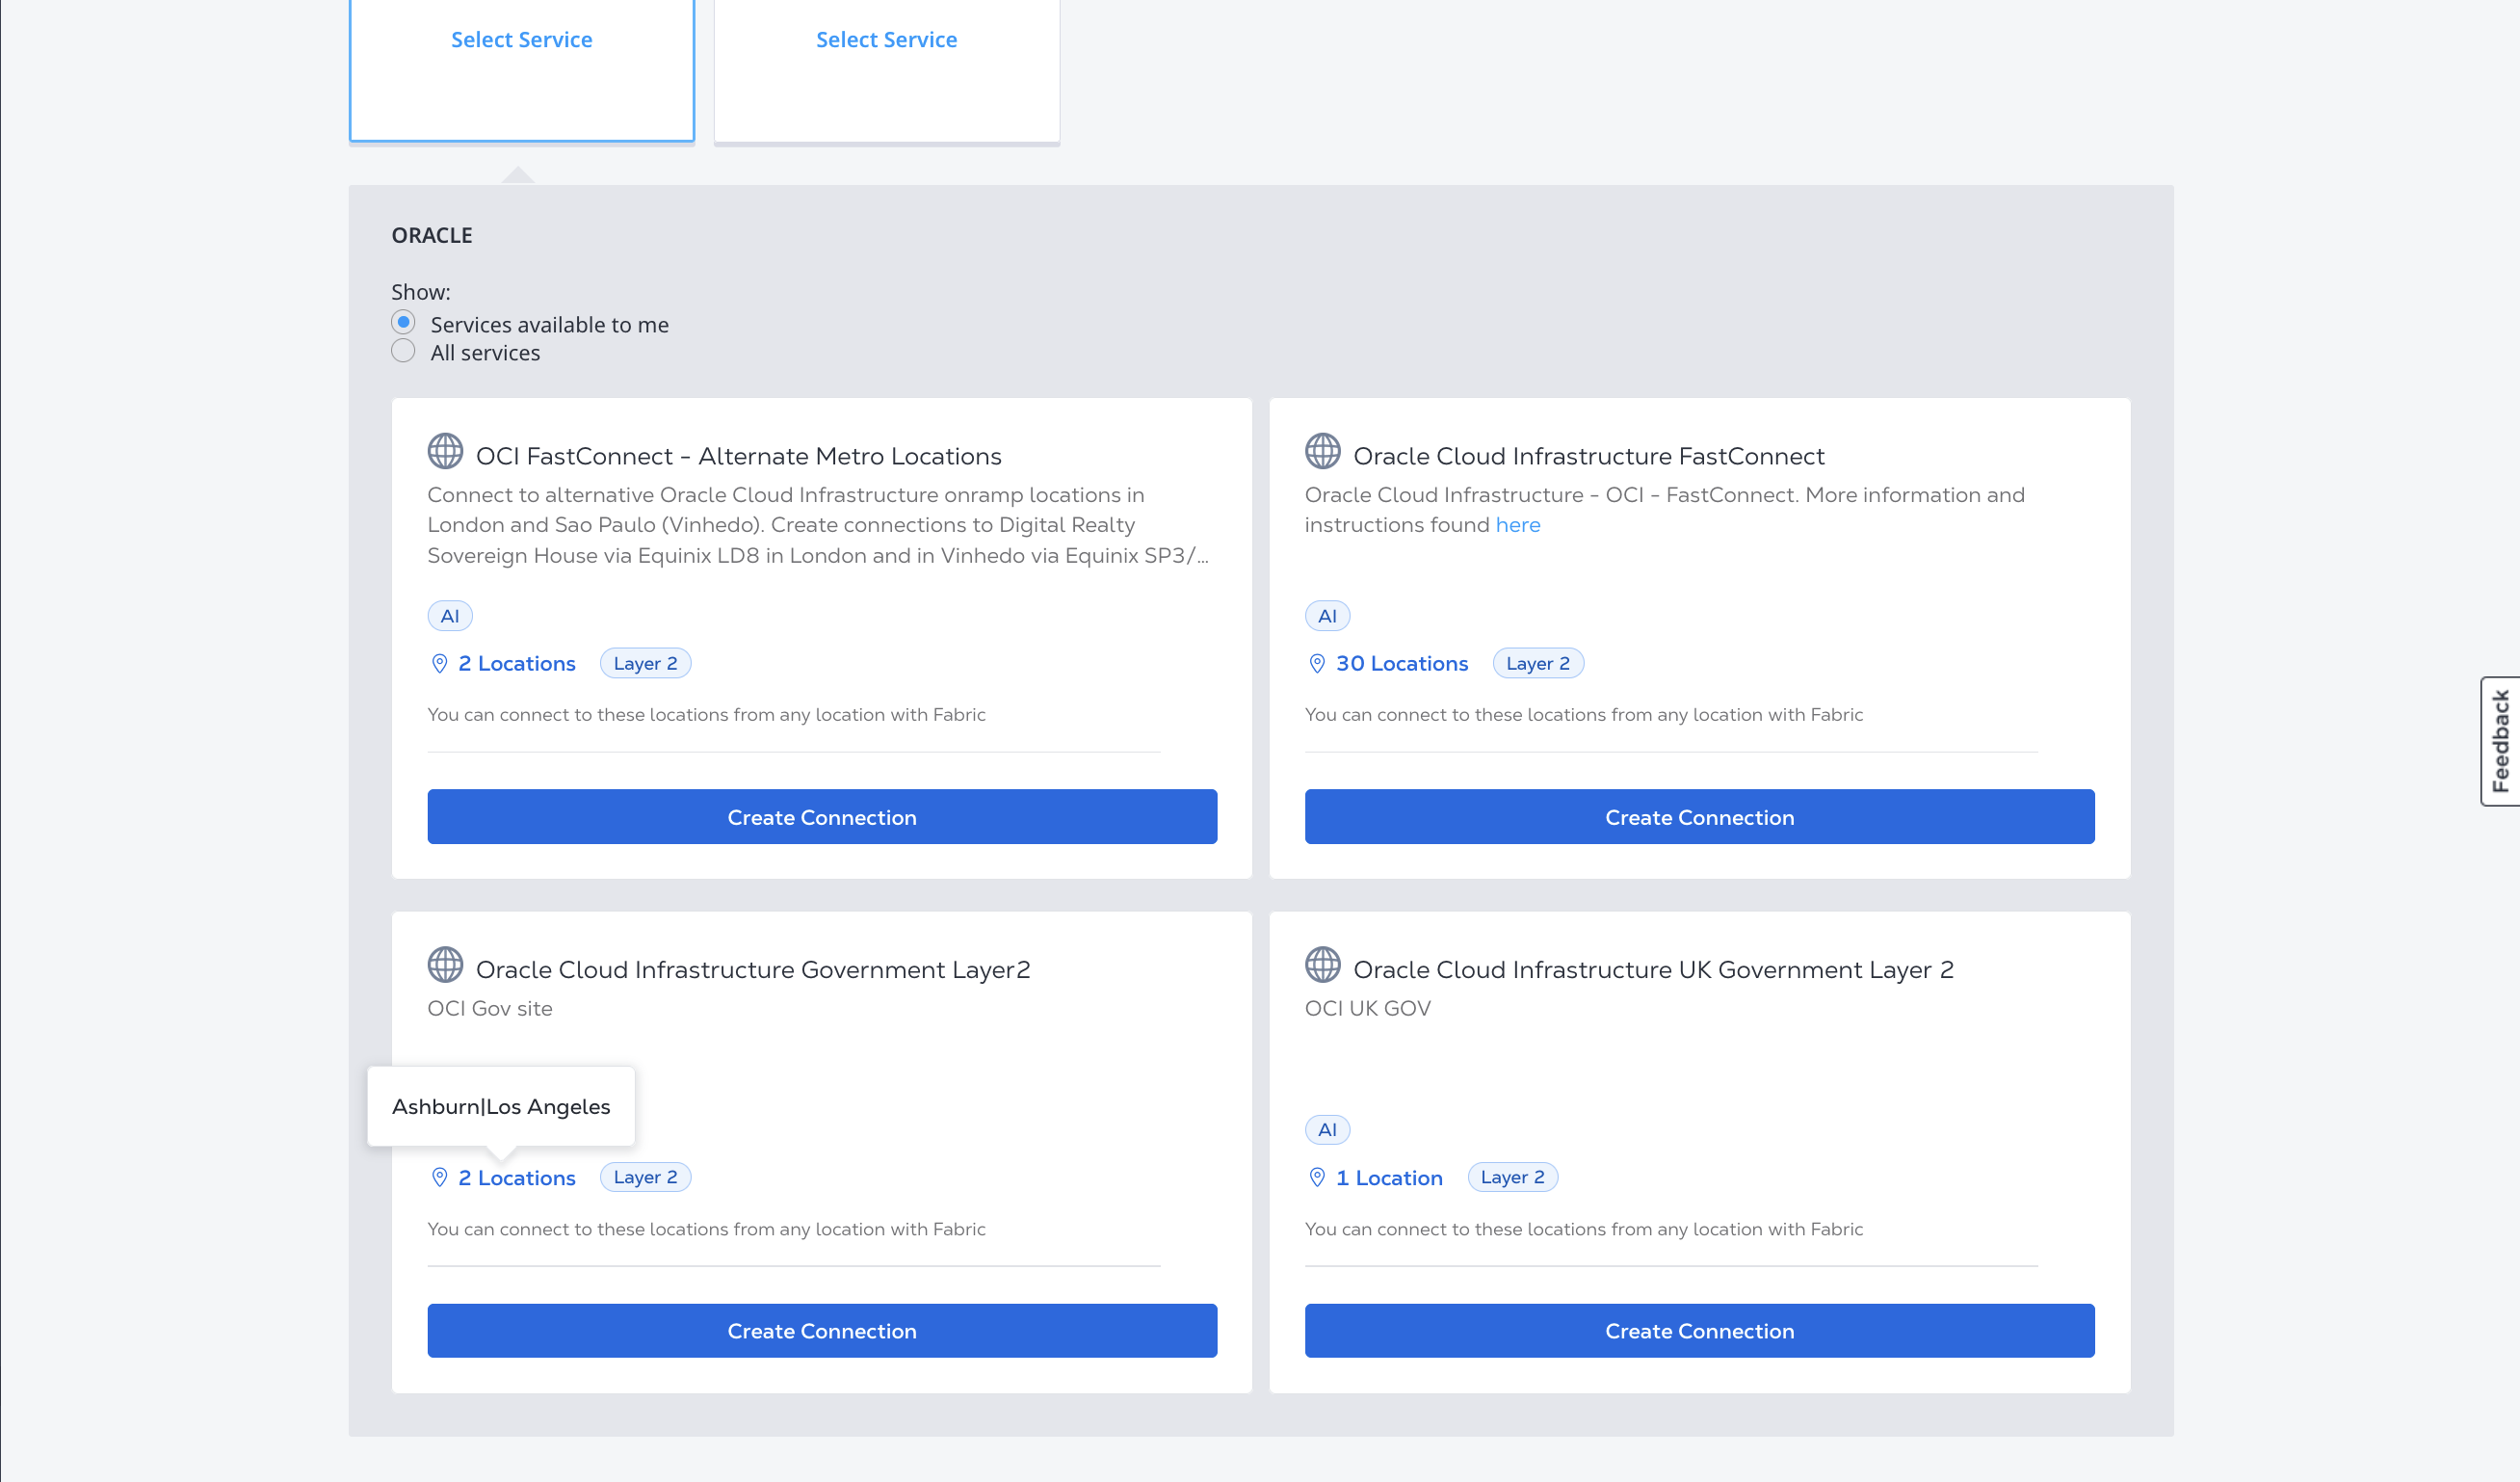
On the Oracle Cloud card, click Select Service, then click Create Connection.
-
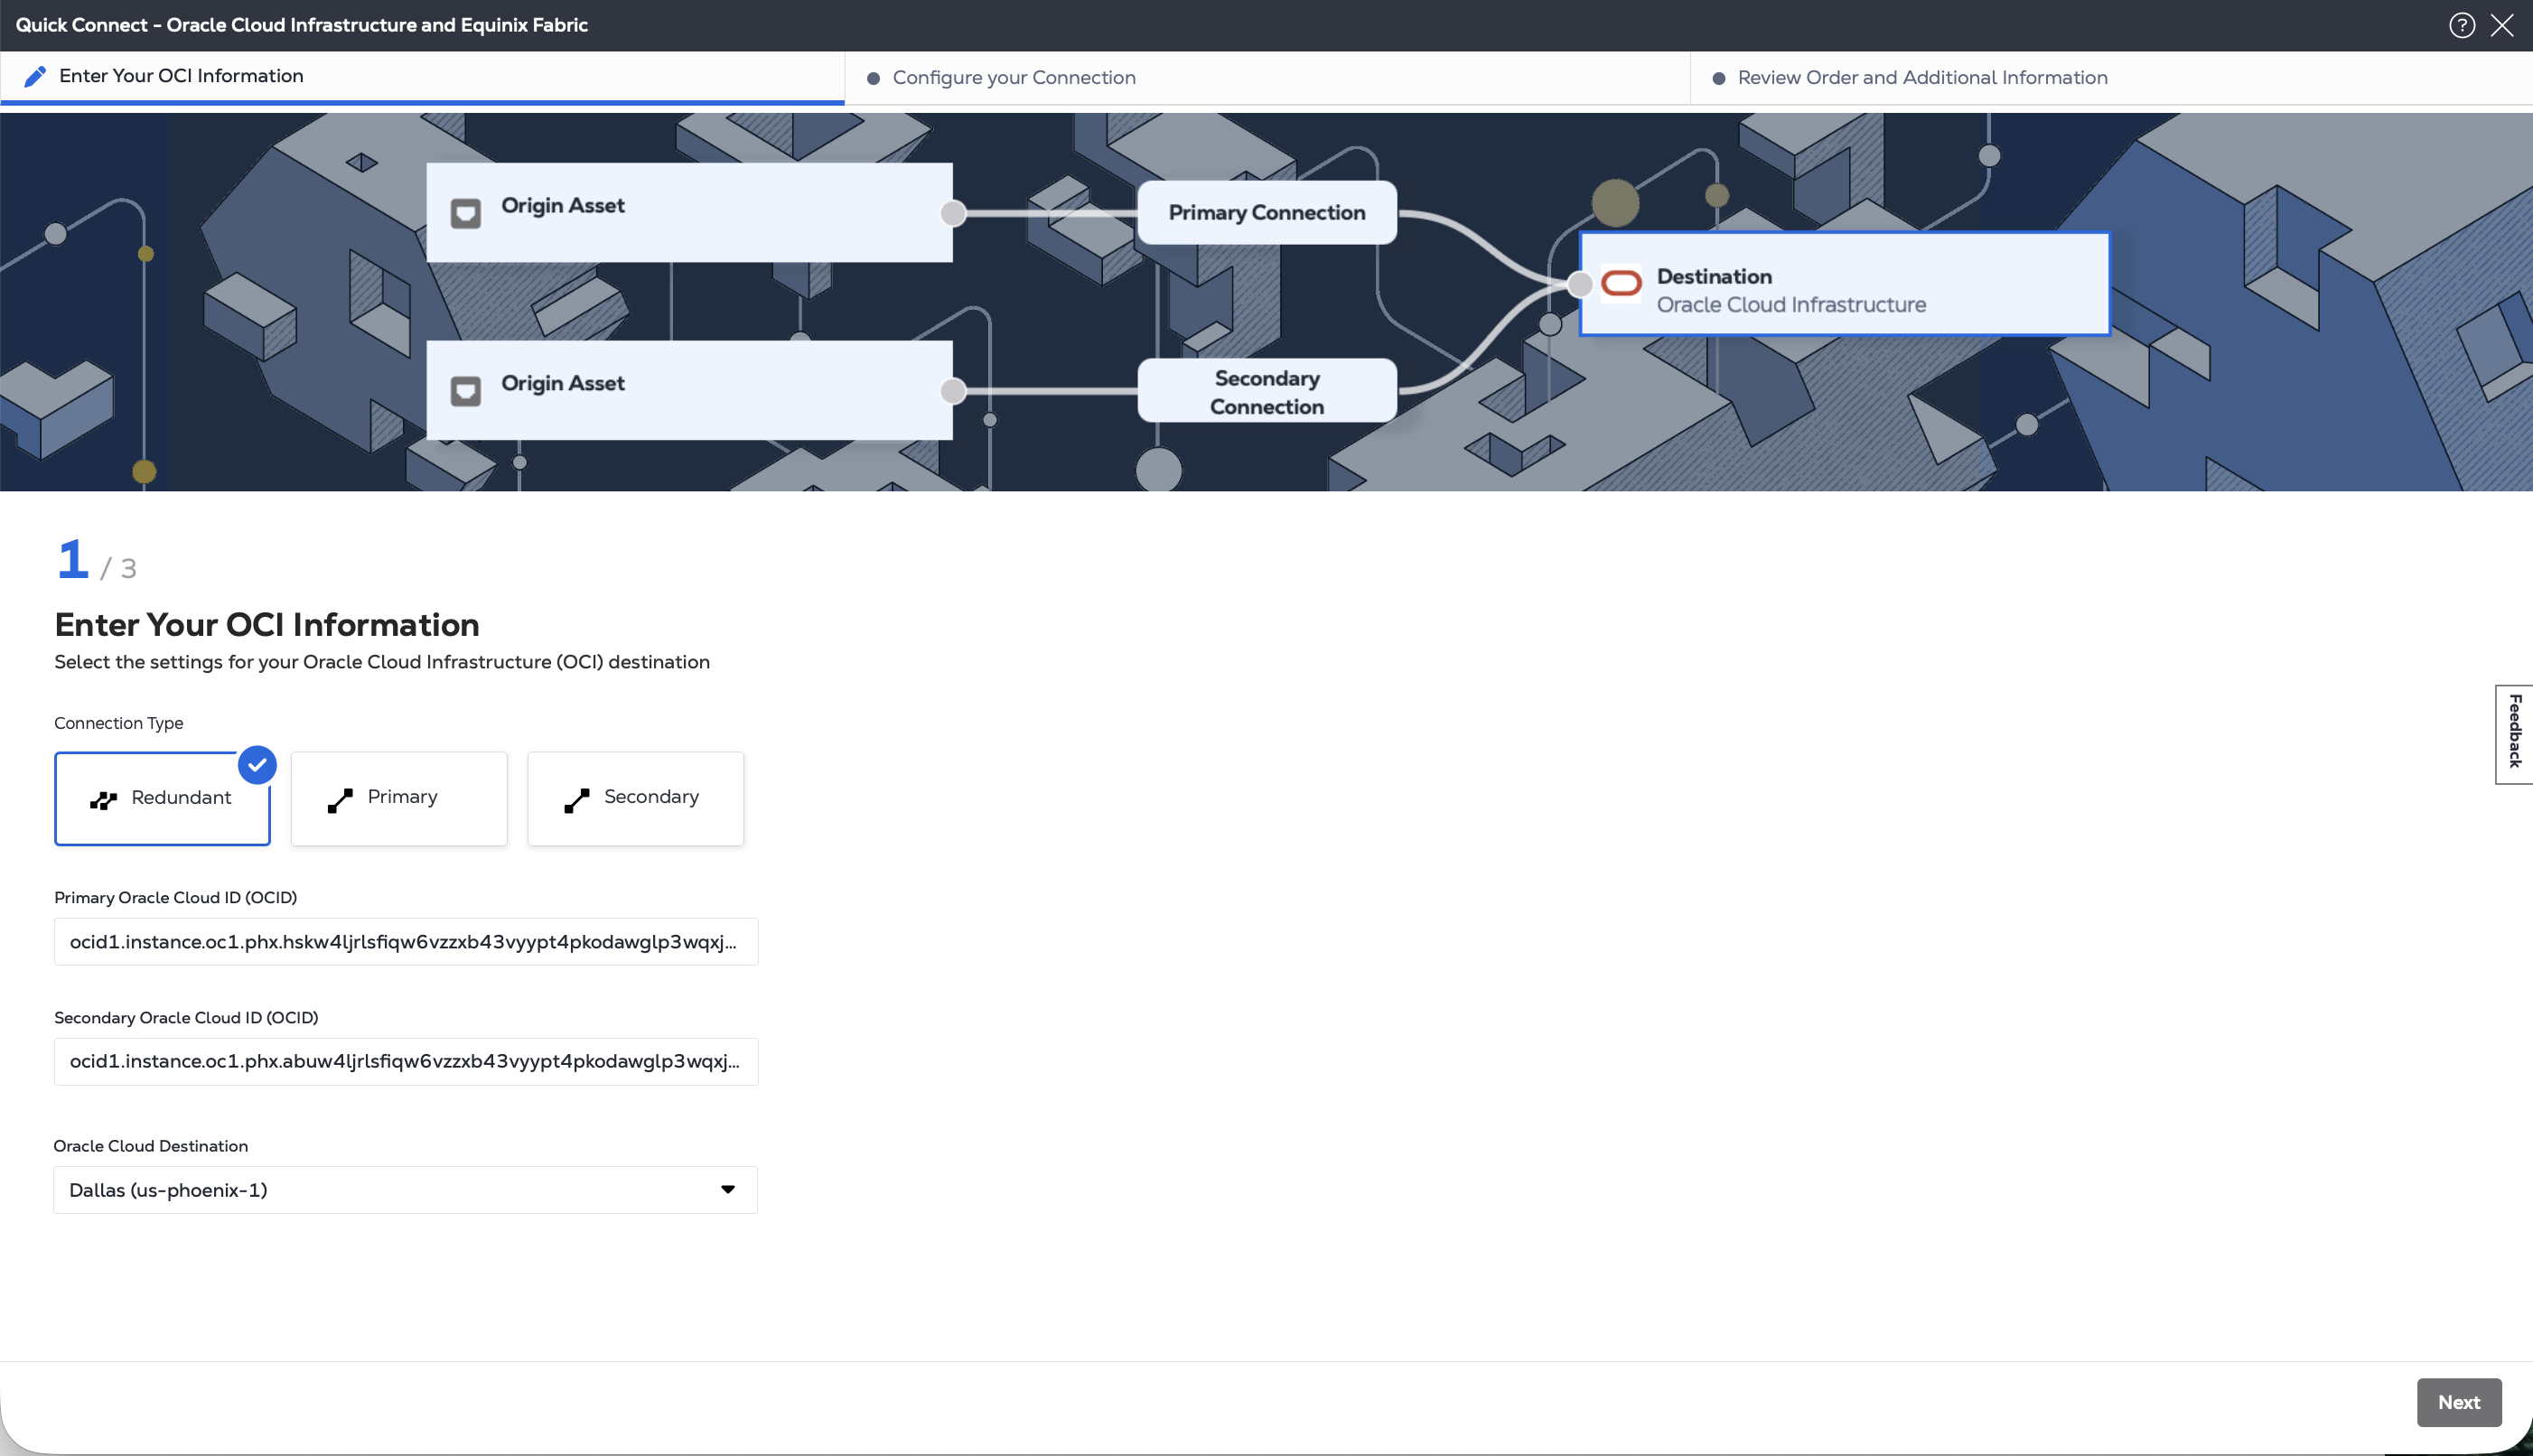
Select connection type:
- Redundant - Create a redundant pair of connections.
- Primary - Create a single, primary connection.
- Secondary - Create a single, secondary connection.
-
Enter primary and secondary Oracle Cloud ID.
-
From the Oracle Destination drop-down list, select the region and metro where your FastConnect circuits and your assets are located. Equinix Fabric Metros that have on-ramps to OCI Regions might be located in different cities. These are still considered to be local connections in Fabric.
-
Click Next to configure your connection based on origin asset type: port, service token, cloud router, or virtual device.
-
Authenticate - Submit your user credentials, Client ID, and Client Secret for OAuth2 authentication. Refer to API Authentication for instructions on how to call OAuth API to validate and authenticate your credentials.
-
Determine Your A-side Information. Either:
- Determine your Equinix Fabric ports information by sending a
GETrequest to the/fabric/v4/portsendpoint. You need the port UUID(s) and the link protocol type (DOT1Q or QINQ).
OR
- Retrieve your a-side service token or tokens. The a-side token provides the relevant information to configure the a-side of the connection. If you were issued a token by a third-party or another service provider, you need the token's UUID. If you are using an a-side token that you created from your own assets, you can send a
GETrequest to the/fabric/v4/serviceTokensendpoint to find your service tokens.
OR
- Determine your Fabric Cloud Router information. Check your available cloud routers by sending a
POSTrequest to the/fabric/v4/routers/searchendpoint. You need the router's UUID.
OR
- Determine your Network Edge virtual device information. Check your available virtual devices and clusters by sending a
GETrequest to the/ne/v1/devicesendpoint. You need the device UUID(s). Send aGETrequest to the/ne/v1/devices/{device_id}endpoint to get the specifics of a device. You may choose any available interface on the device for your connection. If you do not specify one, the connection is automatically assigned to the next available interface.
- Determine your Equinix Fabric ports information by sending a
-
Identify the Oracle Cloud FastConnect service profile and location information. More information on which service profile you should choose is on the Overview page.
Use the Retrieve Service Profiles API request to search for a specific service profile or use the Get Service Profiles API request to list all available service profiles, and identify the profile you want to connect to.
- Oracle Cloud Infrastructure FastConnect -
60ef0382-cdaa-44e7-bd36-b803731816b8 - Oracle Cloud Infrastructure FastConnect - Alternate Metro Locations -
36ee4f7c-8f2a-4398-9e20-e2eb3c0a294e - Oracle Cloud Infrastructure Government Layer 2 -
40b327eb-b222-4d63-8baf-76800a859aad - Oracle Cloud Infrastructure UK Government Layer 2 -
f8de27b9-eda6-4898-be45-b659f4179384 - Oracle Cloud Infrastructure EU Sovereign Cloud -
e8cf4180-ae75-4b27-9a65-d307f0fd5b67 - Oracle Cloud Infrastructure US DoD -
e33d0083-db2d-44b2-8e73-78f598194f12
Use the Get All Metros API request to find all metros where Equinix Fabric is available and determine destination location.
- Oracle Cloud Infrastructure FastConnect -
-
Validate your Authorization Key. Use the Validate Connection Authorization Key API request to verify that your Oracle OCID can be used to create a connection to the selected service profile in the given metro.
-
Determine Your A-side Information. Either:
- Determine your Equinix Fabric ports information. Use the
equinix_fabric_portsto fetch your ports. You need the port UUID(s) and the link protocol type (DOT1Q or QINQ).
OR
- Retrieve your a-side service token or tokens. The a-side token provides the relevant information to configure the a-side of the connection. If you were issued a token by a third-party or another service provider, you need the token's UUID. If you are using an a-side token that you created from your own assets, use the
equinix_fabric_service_tokensdata source to find your service tokens.
OR
- Determine your Fabric Cloud Router information. Check your available cloud routers using the
equinix_fabric_cloud_routersdata source. You need the router's UUID.
OR
- Determine your Network Edge virtual device information. Use the
equinix_network_devicedata source to get virtual device details. You need the device(s) UUID. You may choose any available interface on the device for your connection, so you optionally need interface information. If you do not specify one, the connection is automatically assigned to the next available interface.
- Determine your Equinix Fabric ports information. Use the
-
Identify the Oracle Cloud FastConnect service profile and location information. More information on which service profile you should choose is on the Overview page. Use the
equinix_fabric_service_profilesdata source to search for a specific service profile. You need the service provider's profile UUID.- Oracle Cloud Infrastructure FastConnect -
60ef0382-cdaa-44e7-bd36-b803731816b8 - Oracle Cloud Infrastructure FastConnect - Alternate Metro Locations -
36ee4f7c-8f2a-4398-9e20-e2eb3c0a294e - Oracle Cloud Infrastructure Government Layer 2 -
40b327eb-b222-4d63-8baf-76800a859aad - Oracle Cloud Infrastructure UK Government Layer 2 -
f8de27b9-eda6-4898-be45-b659f4179384 - Oracle Cloud Infrastructure EU Sovereign Cloud -
e8cf4180-ae75-4b27-9a65-d307f0fd5b67 - Oracle Cloud Infrastructure US DoD -
e33d0083-db2d-44b2-8e73-78f598194f12
- Oracle Cloud Infrastructure FastConnect -
Connecting from a Port
- Portal
- API
- Terraform
-
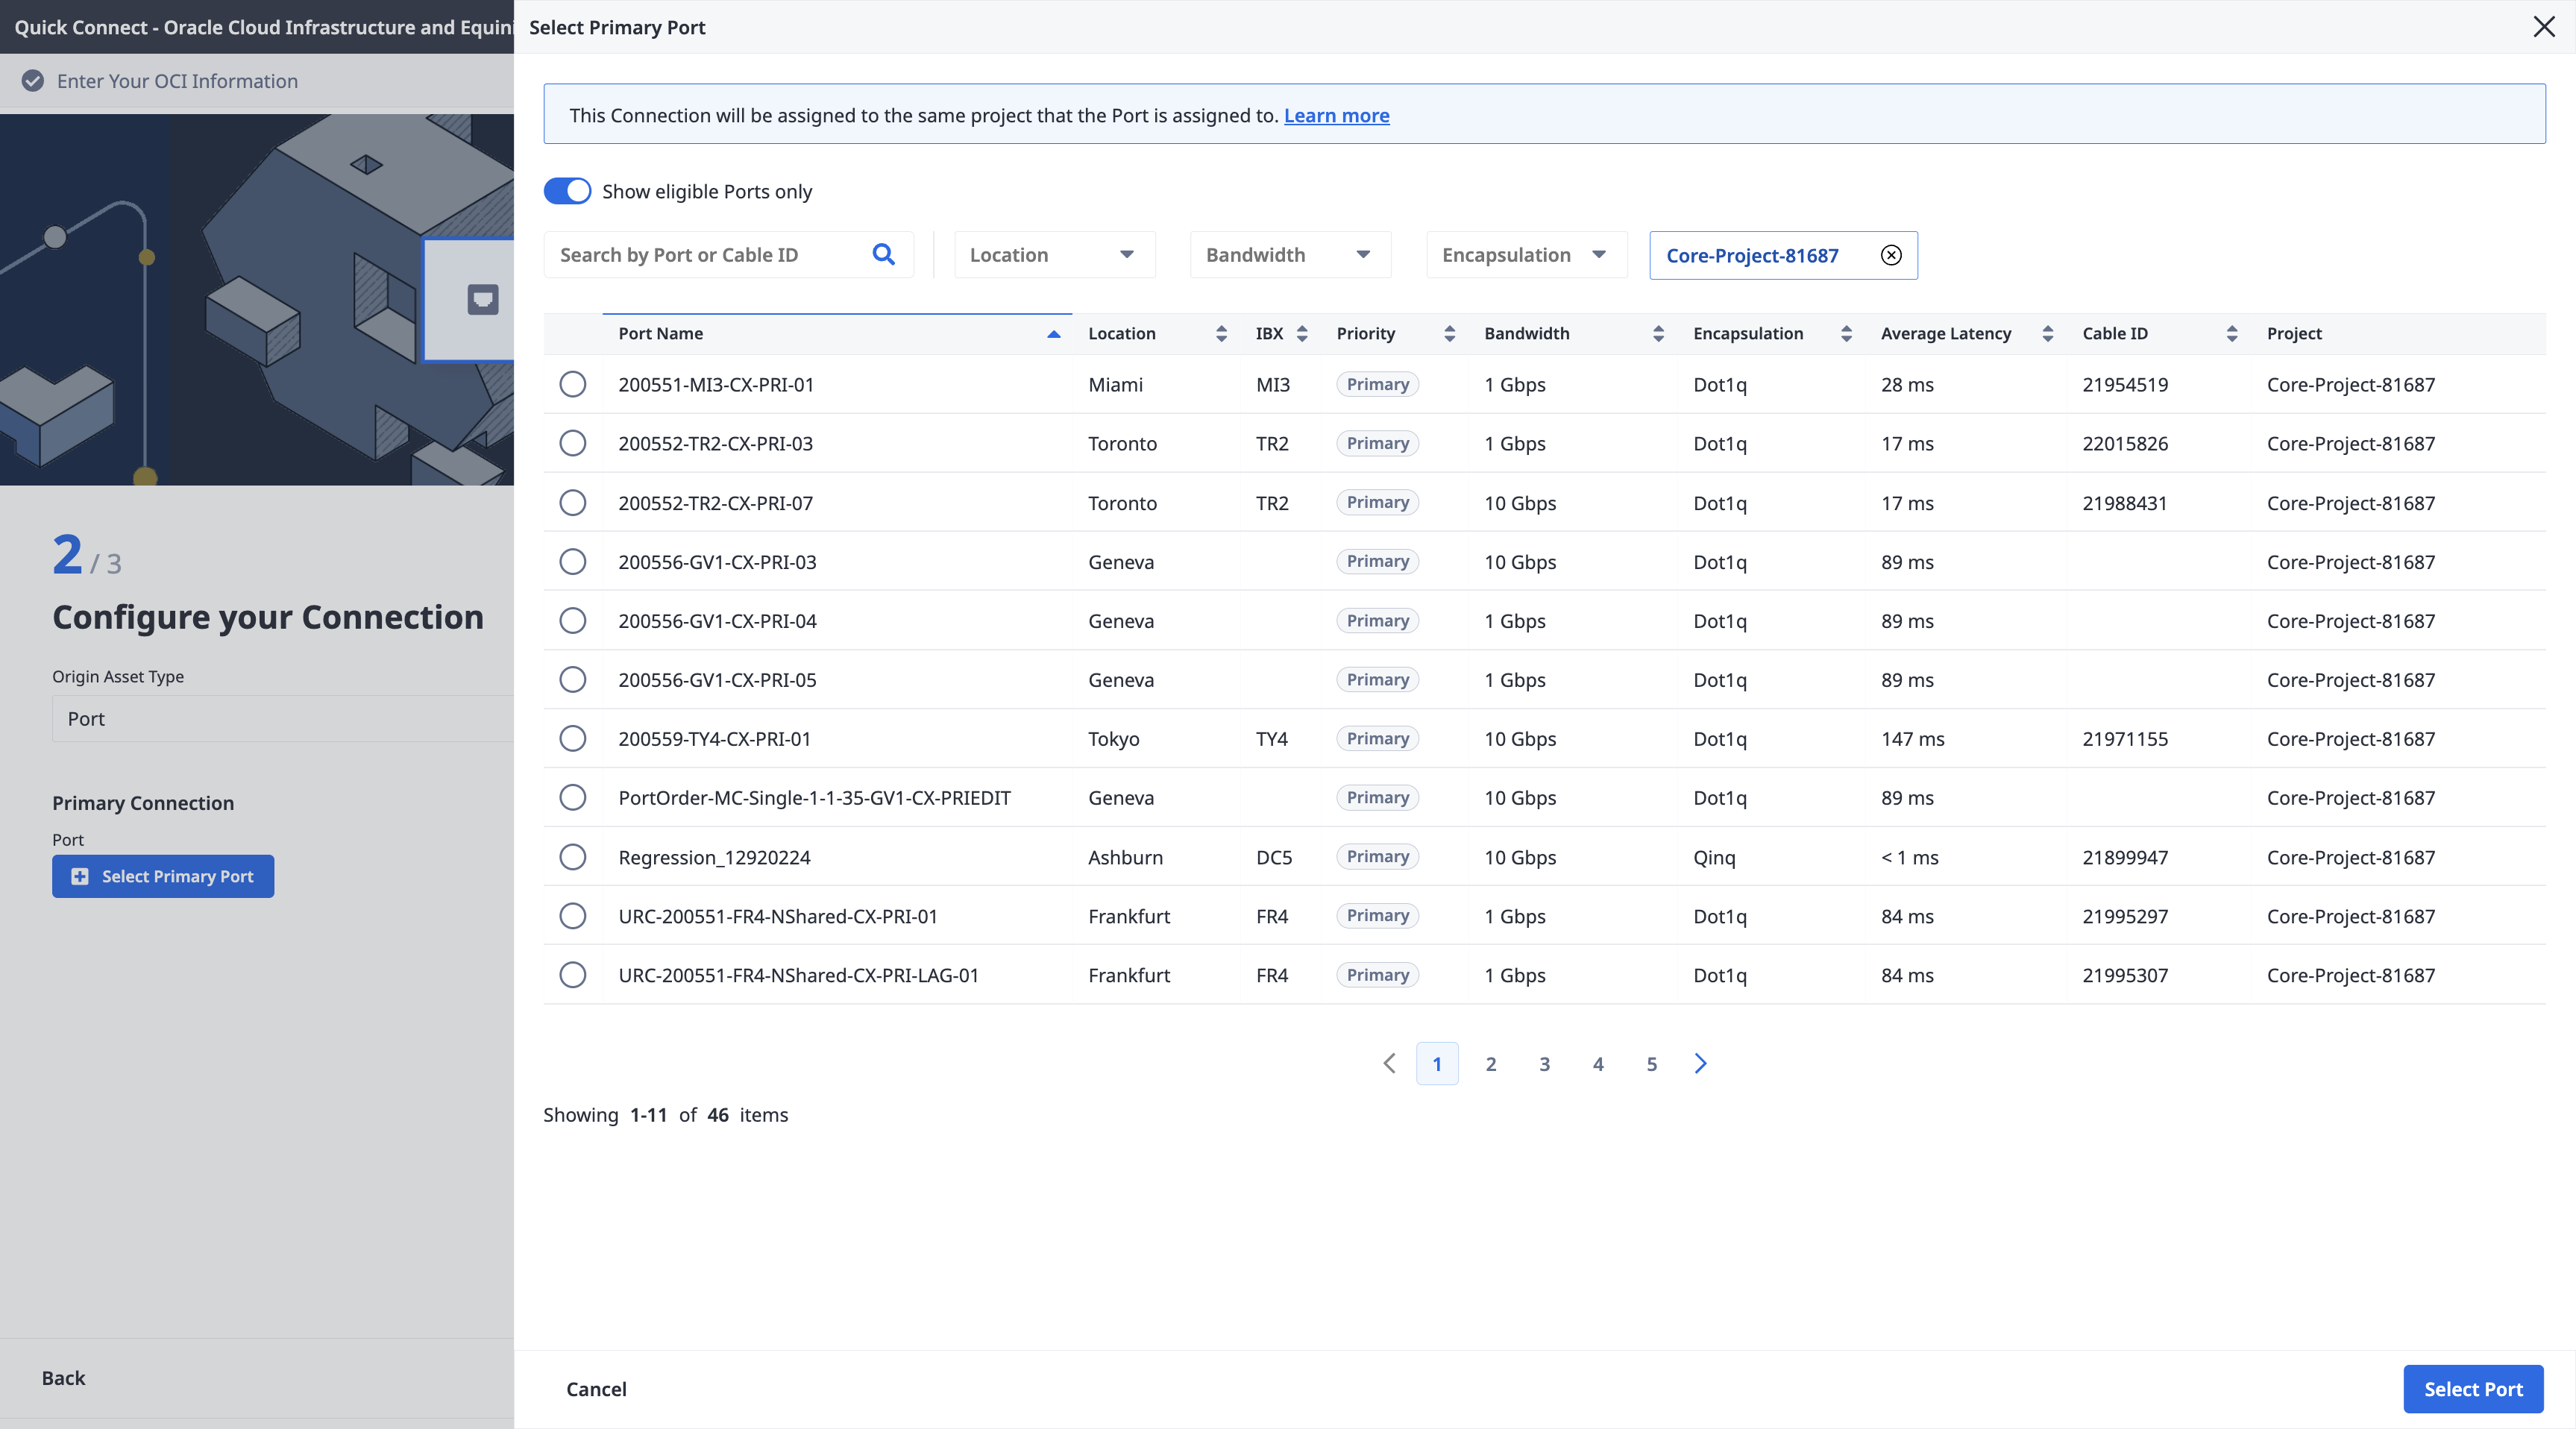
From the Origin Asset Type drop-down list, select Port.
-
In the Primary Connection section:
-
Click + Select Primary Port, then select your primary connection port and click Select Port. Only primary ports are available for selection.
-
Enter the primary connection name.
-
Select a bandwidth.
-
Enter a VLAN ID (applicable to Dot1q ports) or a Customer VLAN Tag (C-tag) and a Service VLAN Tag (S-tag) (applicable to Qinq ports).
-
-
In the Secondary Connection section:
- Click + Select Secondary Port, then select your secondary connection port and click Select Port. Only secondary ports are available for selection.
- Enter the secondary connection name.
- Select a bandwidth.
- Enter a VLAN ID (applicable to Dot1q ports) or a Customer VLAN Tag (C-tag) and a Service VLAN Tag (S-tag) (applicable to Qinq ports).
-
Click Next.

-
On the Review Order and Additional Information page, review the information in the Connection Configuration sections.
-
Use the Notifications field to provide the email addresses of the recipients to be notified about the connection's status. You can add up to 12 email addresses.
-
(Optional) Enter or add order information in the Purchase Order section.
-
Provide a customer reference identifier that will help you identify this order on your invoice.
-
Click Show Order Summary to see order details and connection pricing information.
When you are ready, click Create Connection.
To create a connection from your DOT1Q port to FastConnect, send a POST request to the /fabric/v4/connections endpoint. The connection type is EVPL_VC.
Provide your port information in the aSide object including:
accessPoint.typeasCOLO- Provide your port's UUID to
port.uuid - linkProtocol.type as
DOT1Q - Provide the VLAN ID to
linkProtocol.vlanTag
Provide the FastConnect details and location details in the zSide object including:
- Set
accessPoint.typeasSP. - Set
profile.typeasL2_PROFILE. - Specify the Oracle service profile you are connecting to in
profile.uuid. - Specify the Equinix Metro location you are connecting to in
location.metroCode. - Specify the Oracle region associated with the Equinix Metro in
sellerRegion. - Set
authenticationKeyas your OCID.
Sample cURL request:
curl -X POST 'https://api.equinix.com/fabric/v4/connections' \
-H 'content-type: application/json' \
-H 'authorization: Bearer <token>' \
-d '{
  "type": "EVPL_VC",
  "name": "<connection-name>",
  "bandwidth": <bandwidth-speed>,
  "redundancy": {
    "priority": "PRIMARY"
  },
  "aSide": {
    "accessPoint": {
      "type": "COLO",
      "port": {
        "uuid": "<port-uuid>"
      },
      "linkProtocol": {
        "type": "DOT1Q",
        "vlanTag": <vlan-id>
      }
    }
  },
  "zSide": {
    "accessPoint": {
      "type": "SP",
      "profile": {
        "type": "L2_PROFILE",
        "uuid": "<oracle-service-profile-uuid>"
      },
      "location": {
        "metroCode": "<equinix-metro-code>"
      },
      "authenticationKey": "<oracle-OCID>",
      "sellerRegion": "<oracle-region-id>"
    }
  },
  "project": {
    "projectId": "<project-id>"
  },
  "notifications": [
    {
      "type": "ALL",
      "emails": [
        "<contact-email-address>"
      ]
    }
  ]
}'
To create a connection from your QINQ port to FastConnect, send a POST request to the /fabric/v4/connections endpoint. The connection type is EVPL_VC.
Provide your port information in the aSide object including:
- Set
accessPoint.typeasCOLO - Provide your port's UUID to
port.uuid linkProtocol.typeasQINQ- Provide the inner tag ID to
linkProtocol.vlanCTag - Provide the outer tag ID to
linkProtocol.vlanSTag
Provide the FastConnect details and location details in the zSide object including:
- Set
accessPoint.typeasSP. - Set
profile.typeasL2_PROFILE. - Specify the FastConnect service profile you are connecting to in
profile.uuid. - Specify the Equinix Metro location you are connecting to in
location.metroCode. - Specify the Oracle region associated with the Equinix Metro in
sellerRegion. - Set
authenticationKeyas your OCID.
Sample cURL Request:
curl -X POST 'https://api.equinix.com/fabric/v4/connections' \
-H 'content-type: application/json' \
-H 'authorization: Bearer <token>' \
-d '{
"type": "EVPL_VC",
  "name": "<connection-name>",
  "bandwidth": <bandwidth-speed>,
  "redundancy": {
    "priority": "PRIMARY"
  },
  "aSide": {
    "accessPoint": {
      "type": "COLO",
      "port": {
        "uuid": "<port-uuid>"
      },
      "linkProtocol": {
        "type": "QINQ",
        "vlanCTag": <vlan-id>,
        "vlanSTag": <vlan-id>
      }
    }
  },
  "zSide": {
    "accessPoint": {
      "type": "SP",
      "profile": {
        "type": "L2_PROFILE",
        "uuid": "<oracle-service-profile-uuid>"
      },
      "location": {
        "metroCode": "<equinix-metro-code>"
      },
      "authenticationKey": "<oracle-OCID>",
      "sellerRegion": "<oracle-region-id>"
    }
  },
  "project": {
    "projectId": "<project-id>"
  },
  "notifications": [
    {
      "type": "ALL",
      "emails": [
        "<contact-email-address>"
      ]
    }
  ]
}'
To create a connection from your DOT1Q port to FastConnect, use the equinix_fabric_connection resource.
Provide your port information in the a_side object including:
- Set
access_point.typeasCOLO - Provide your port's UUID to
port.uuid link_protocol.typeasDOT1Q- Provide the VLAN ID to
link_protocol.vlan_tag
Provide the FastConnect details and location details in the z_side object including:
- Set
access_point.typeasSP. - Set
profile.typeasL2_PROFILE. - Specify the FastConnect service profile you are connecting to in
profile.uuid. - Specify the Equinix Metro location you are connecting to in
location.metro_code. - Specify the Oracle region associated with the Equinix Metro in
seller_region. - Set
authentication_keyas your OCID.
resource "equinix_fabric_connection" "port2oracle" {
  name = "<connection_name>"
  type = "EVPL_VC"
  notifications {
    type = "ALL"
    emails = ["<contact_email>","<contact_email>"]
  }
  bandwidth = <bandwidth_speed>
  redundancy { priority = "PRIMARY" }
  a_side {
    access_point {
      type = "COLO"
      port {
        uuid = "<port_uuid>"
      }
      link_protocol {
        type = "DOT1Q"
        vlan_tag = "<vlan_tag>"
      }
    }
  }
  z_side {
    access_point {
      type = "SP"
      authentication_key = "<oracle_OCID>"
      seller_region = "<oracle_region_id>"
      profile {
        type = "L2_PROFILE"
        uuid = "<oracle_service_profile_uuid>"
      }
      location {
        metro_code = "<equinix_metro_code>"
      }
    }
  }
}
To create a connection from your QINQ port to FastConnect, use the equinix_fabric_connection resource.
Provide your port information in the a_side object including:
- Set
access_point.typeasCOLO - Provide your port's UUID to
port.uuid link_protocol.typeasQINQ- Provide the inner tag ID to
link_protocol.vlan_c_tag - Provide the outer tag ID to
link_protocol.vlan_s_tag
Provide the FastConnect details and location details in the z_side object including:
- Set
access_point.typeasSP. - Set
profile.typeasL2_PROFILE. - Specify the FastConnect service profile you are connecting to in
profile.uuid. - Specify the Equinix Metro location you are connecting to in
location.metro_code. - Specify the Oracle region associated with the Equinix Metro in
seller_region. - Set
authentication_keyas your OCID.
resource "equinix_fabric_connection" "port2oracle" {
  name = "<connection_name>"
  type = "EVPL_VC"
  notifications {
    type = "ALL"
    emails = ["<contact_email>","<contact_email>"]
  }
  bandwidth = <bandwidth_speed>
  redundancy { priority = "PRIMARY" }
  a_side {
    access_point {
      type = "COLO"
      port {
        uuid = "<port_uuid>"
      }
      link_protocol {
        type = "QINQ"
        vlan_s_tag = "<vlan_id>"
        vlan_c_tag = "<vlan_id>"
      }
    }
  }
  z_side {
    access_point {
      type = "SP"
      authentication_key = "<oracle_OCID>"
      seller_region = "<oracle_region_id>"
      profile {
        type = "L2_PROFILE"
        uuid = "<oracle_service_profile_uuid>"
      }
      location {
        metro_code = "<equinix_metro_code>"
      }
    }
  }
}
Connecting Using a Service Token
- Portal
- API
- Terraform
-
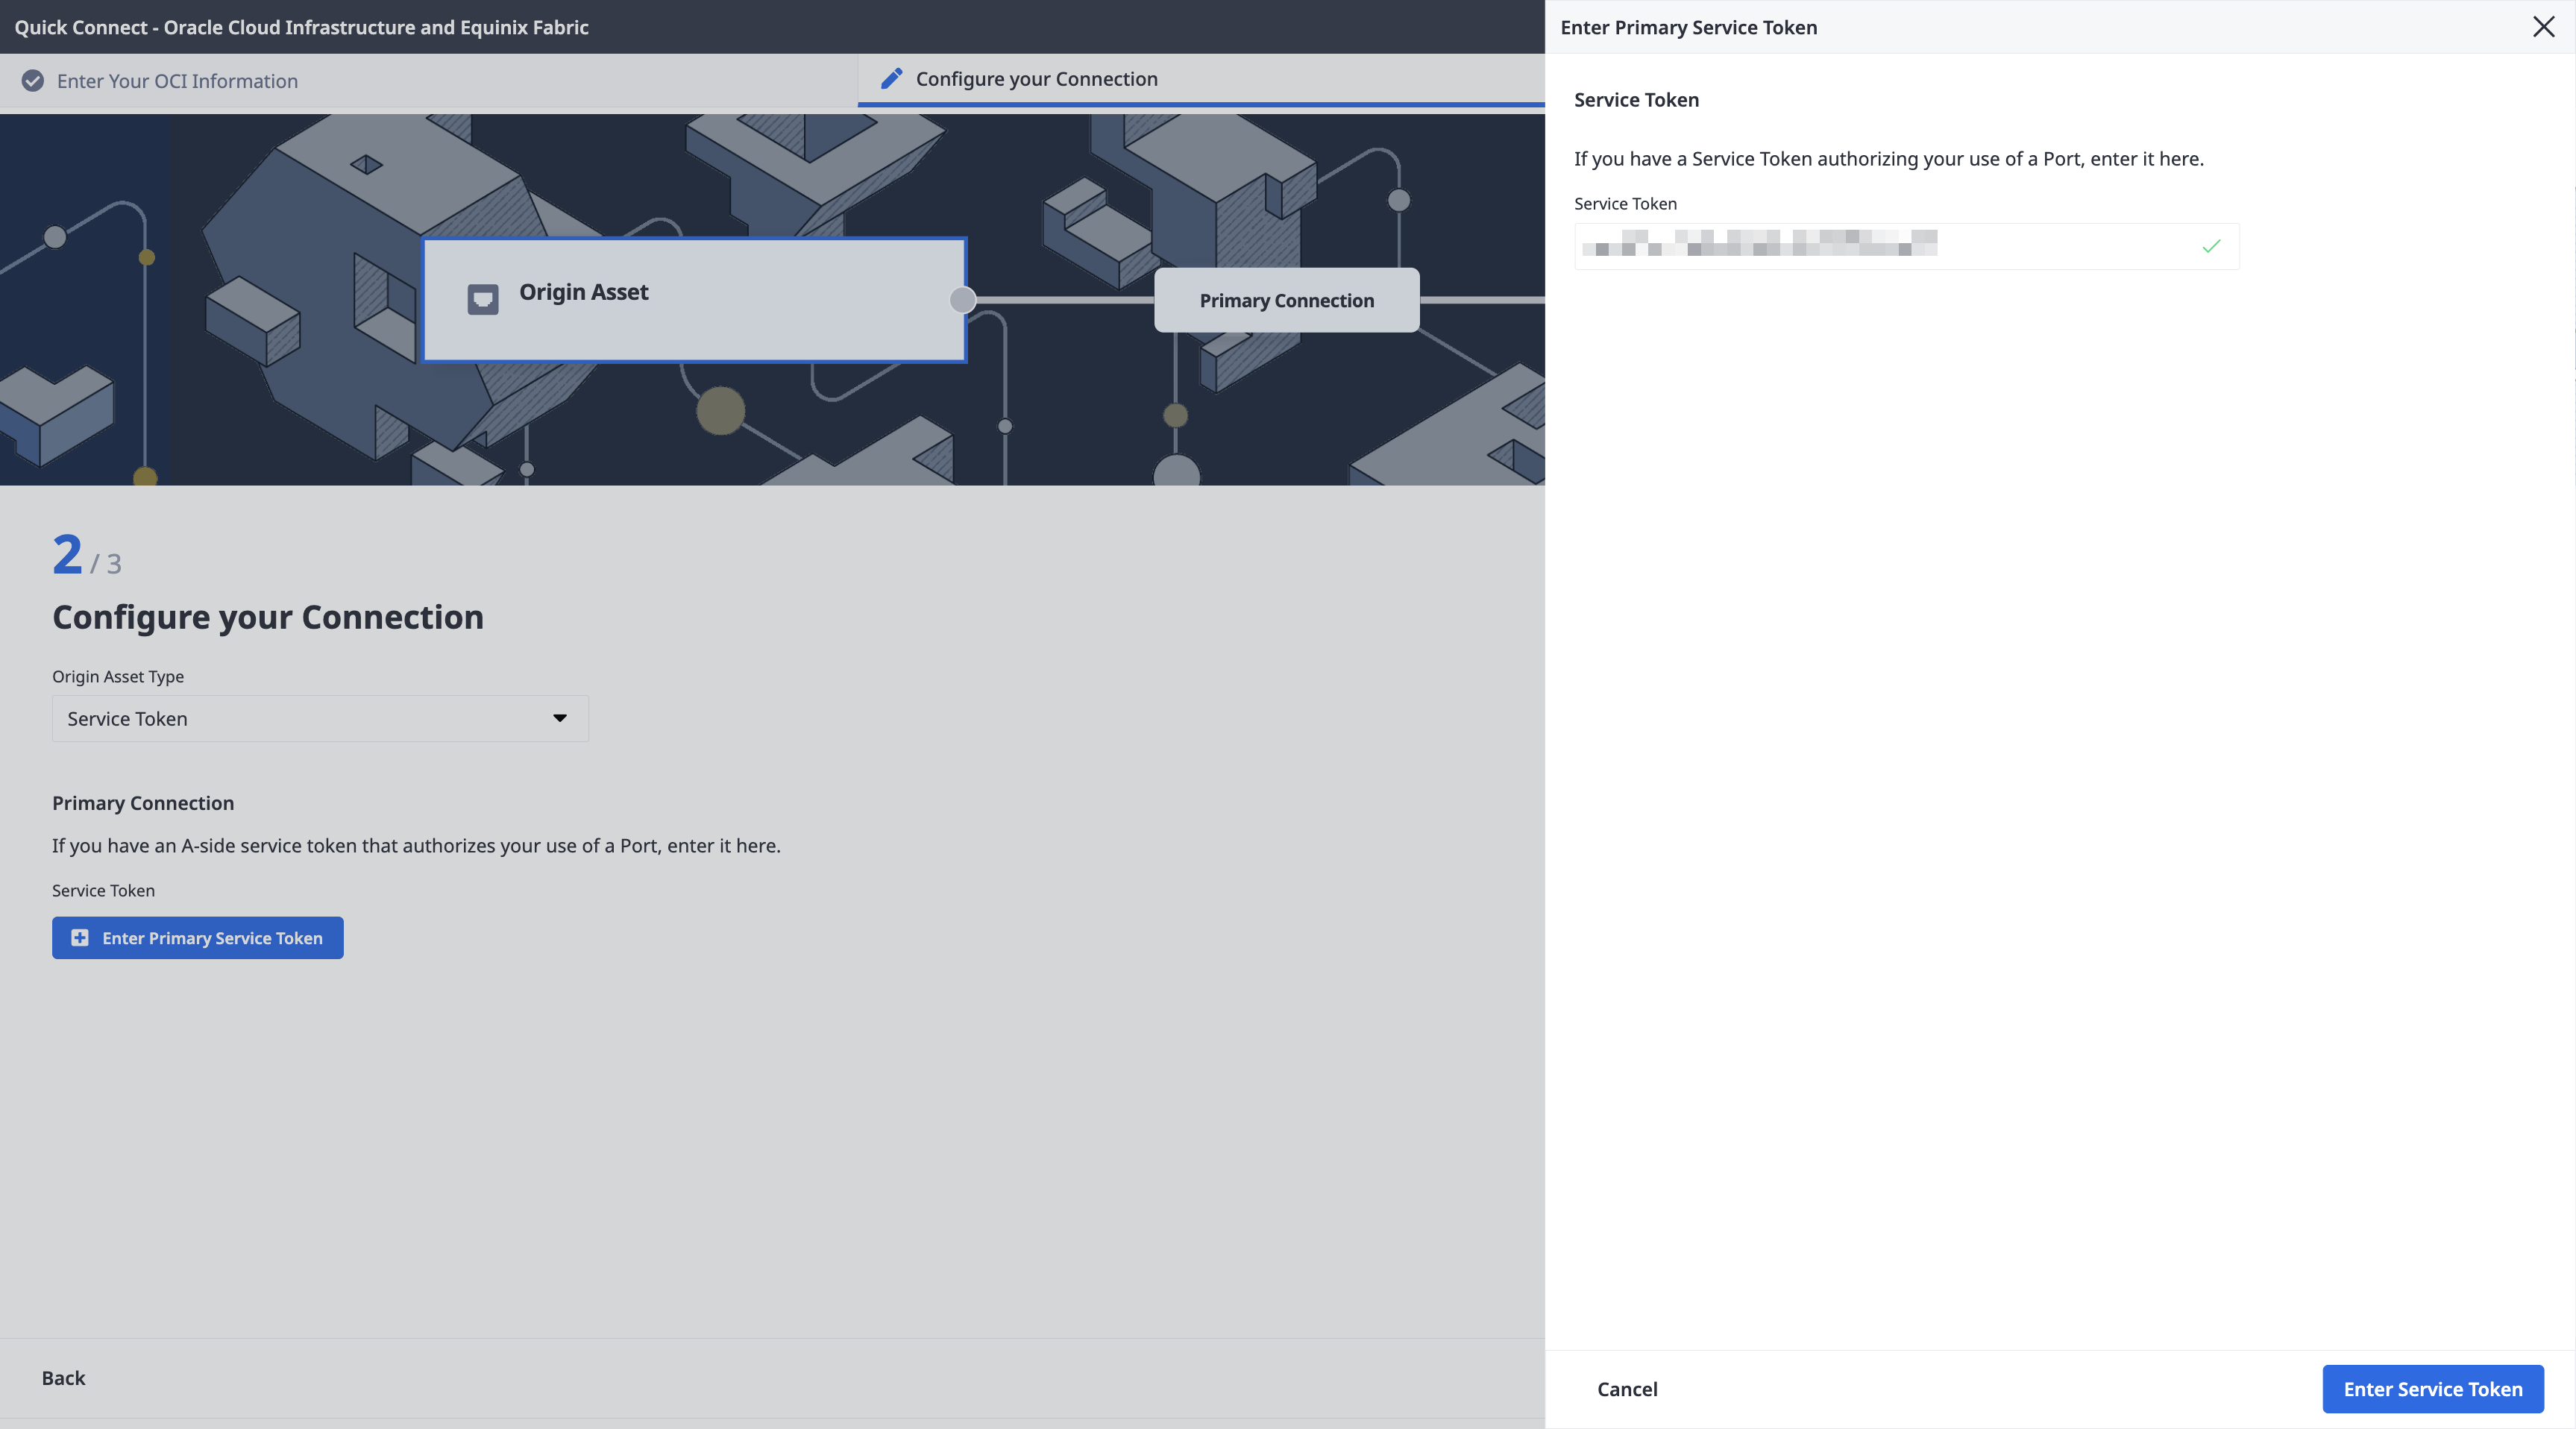
From the Origin Asset Type drop-down list, select Service Token.
-
In the Primary Connection section:
-
Click + Enter Primary Service Token, provide the service token, then click Enter Service Token.
-
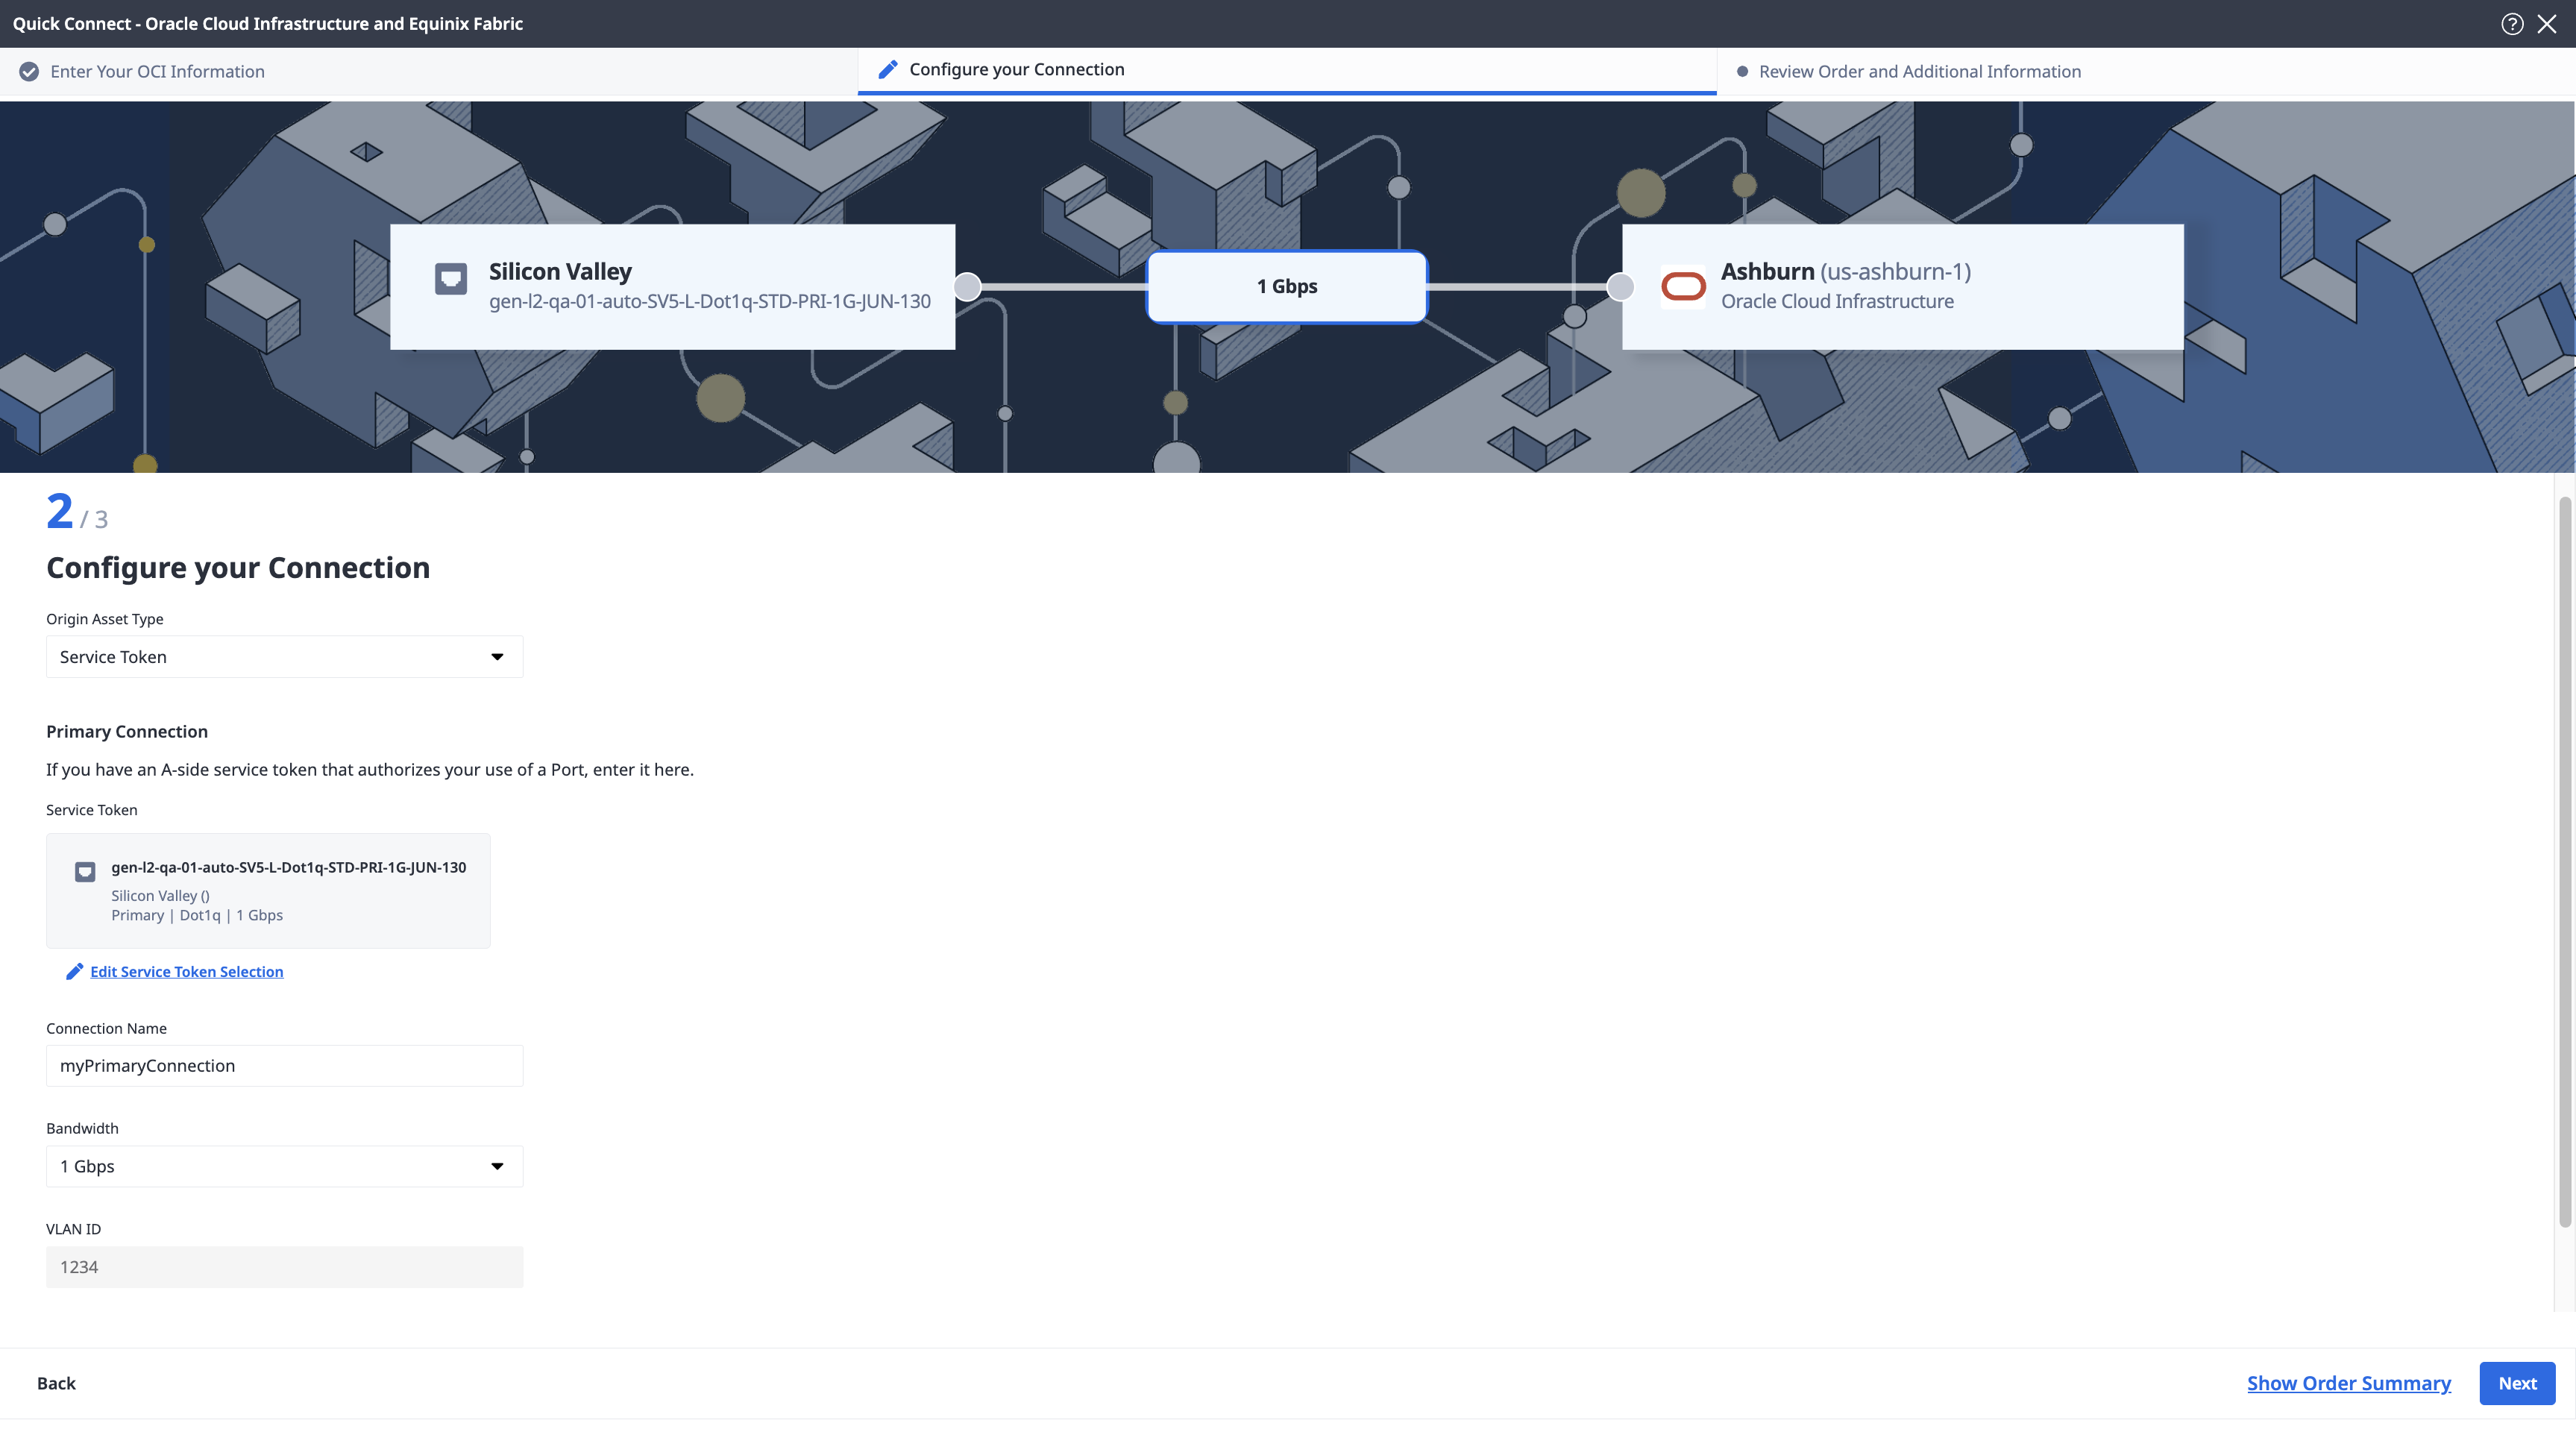
Enter the primary connection name.
-
Select a bandwidth.
-
-
In the Secondary Connection section:
- Click + Enter Secondary Service Token, provide the service token, then click Enter Service Token.
- Enter the secondary connection name.
- Select a bandwidth.
-
Click Next.
-
On the Review Order and Additional Information page, review the information in the Connection Configuration sections.
-
Use the Notifications field to provide the email addresses of the recipients to be notified about the connection's status. You can add up to 12 email addresses.
-
(Optional) Enter or add order information in the Purchase Order section.
-
Provide a customer reference identifier that will help you identify this order on your invoice.
-
Click Show Order Summary to see order details and connection pricing information.
When you are ready, click Create Connection.
To create a connection to FastConnect using an A-side Service Token, send a POST request to the /fabric/v4/connections endpoint. The connection type is EVPL_VC.
Provide your Service Token UUID in the aSide object. The service token provides all other necessary information to establish the connection.
Provide the FastConnect details and location details in the zSide object including:
- Set
accessPoint.typeasSP. - Set
profile.typeasL2_PROFILE. - Specify the Oracle service profile you are connecting to in
profile.uuid. - Specify the Equinix Metro location you are connecting to in
location.metroCode. - Specify the Oracle region associated with the Equinix Metro in
sellerRegion. - Set
authenticationKeyas your OCID.
Sample cURL Request:
curl -X
POST 'https://api.equinix.com/fabric/v4/connections'
-H 'content-type: application/json'
-H 'authorization: Bearer <token>'
-d '{
  "type": "EVPL_VC",
  "name": "<your_connection_name>",
  "bandwidth": <connection_speed>,
  "redundancy": {
    "priority": "<redundancy_code>"
  },
  "aSide": {
    "serviceToken": {
      "uuid": "<service-token-uuid>"
    }
  },
  "zSide": {
    "accessPoint": {
      "type": "SP",
      "profile": {
        "type": "L2_PROFILE",
        "uuid": "<oracle-service-profile-uuid>"
      },
      "location": {
        "metroCode": "<equinix-metro-code>"
      },
      "authenticationKey": "<oracle-OCID>",
      "sellerRegion": "<oracle-region-id>"
    }
  },
  "project": {
    "projectId": "<project-id>"
  },
  "notifications": [
    {
      "type": "ALL",
      "emails": [
        "<contact-email-address>"
      ]
    }
  ]
}'
To create a connection to FastConnect using an A-side Service Token, use the equinix_fabric_connection resource. The connection type is EVPL_VC.
Provide your Service Token UUID in the a_side object. The service token provides all other necessary information to establish the connection.
Provide the FastConnect details and location details in the z_side object including:
- Set
access_point.typeasSP. - Set
profile.typeasL2_PROFILE. - Specify the FastConnect service profile you are connecting to in
profile.uuid. - Specify the Equinix Metro location you are connecting to in
location.metro_code. - Specify the Oracle region associated with the Equinix Metro in
seller_region. - Set
authentication_keyas your OCID.
resource "equinix_fabric_connection" "token2oracle" {
  name = "<connection_name>"
  type = "EVPL_VC"
  notifications {
    type = "ALL"
    emails = ["<contact_email>","<contact_email>"]
  }
  bandwidth = <bandwidth_speed>
  redundancy { priority = "PRIMARY" }
  a_side {
    service_token {
      uuid = "<service_token_uuid>"
    }
  }
  z_side {
    access_point {
      type = "SP"
      authentication_key = "<oracle_OCID>"
      seller_region = "<oracle_region_id>"
      profile {
        type = "L2_PROFILE"
        uuid = "<oracle_service_profile_uuid>"
      }
      location {
        metro_code = "<equinix_metro_code>"
      }
    }
  }
}
Connecting from a Cloud Router
- Portal
- API
- Terraform
-
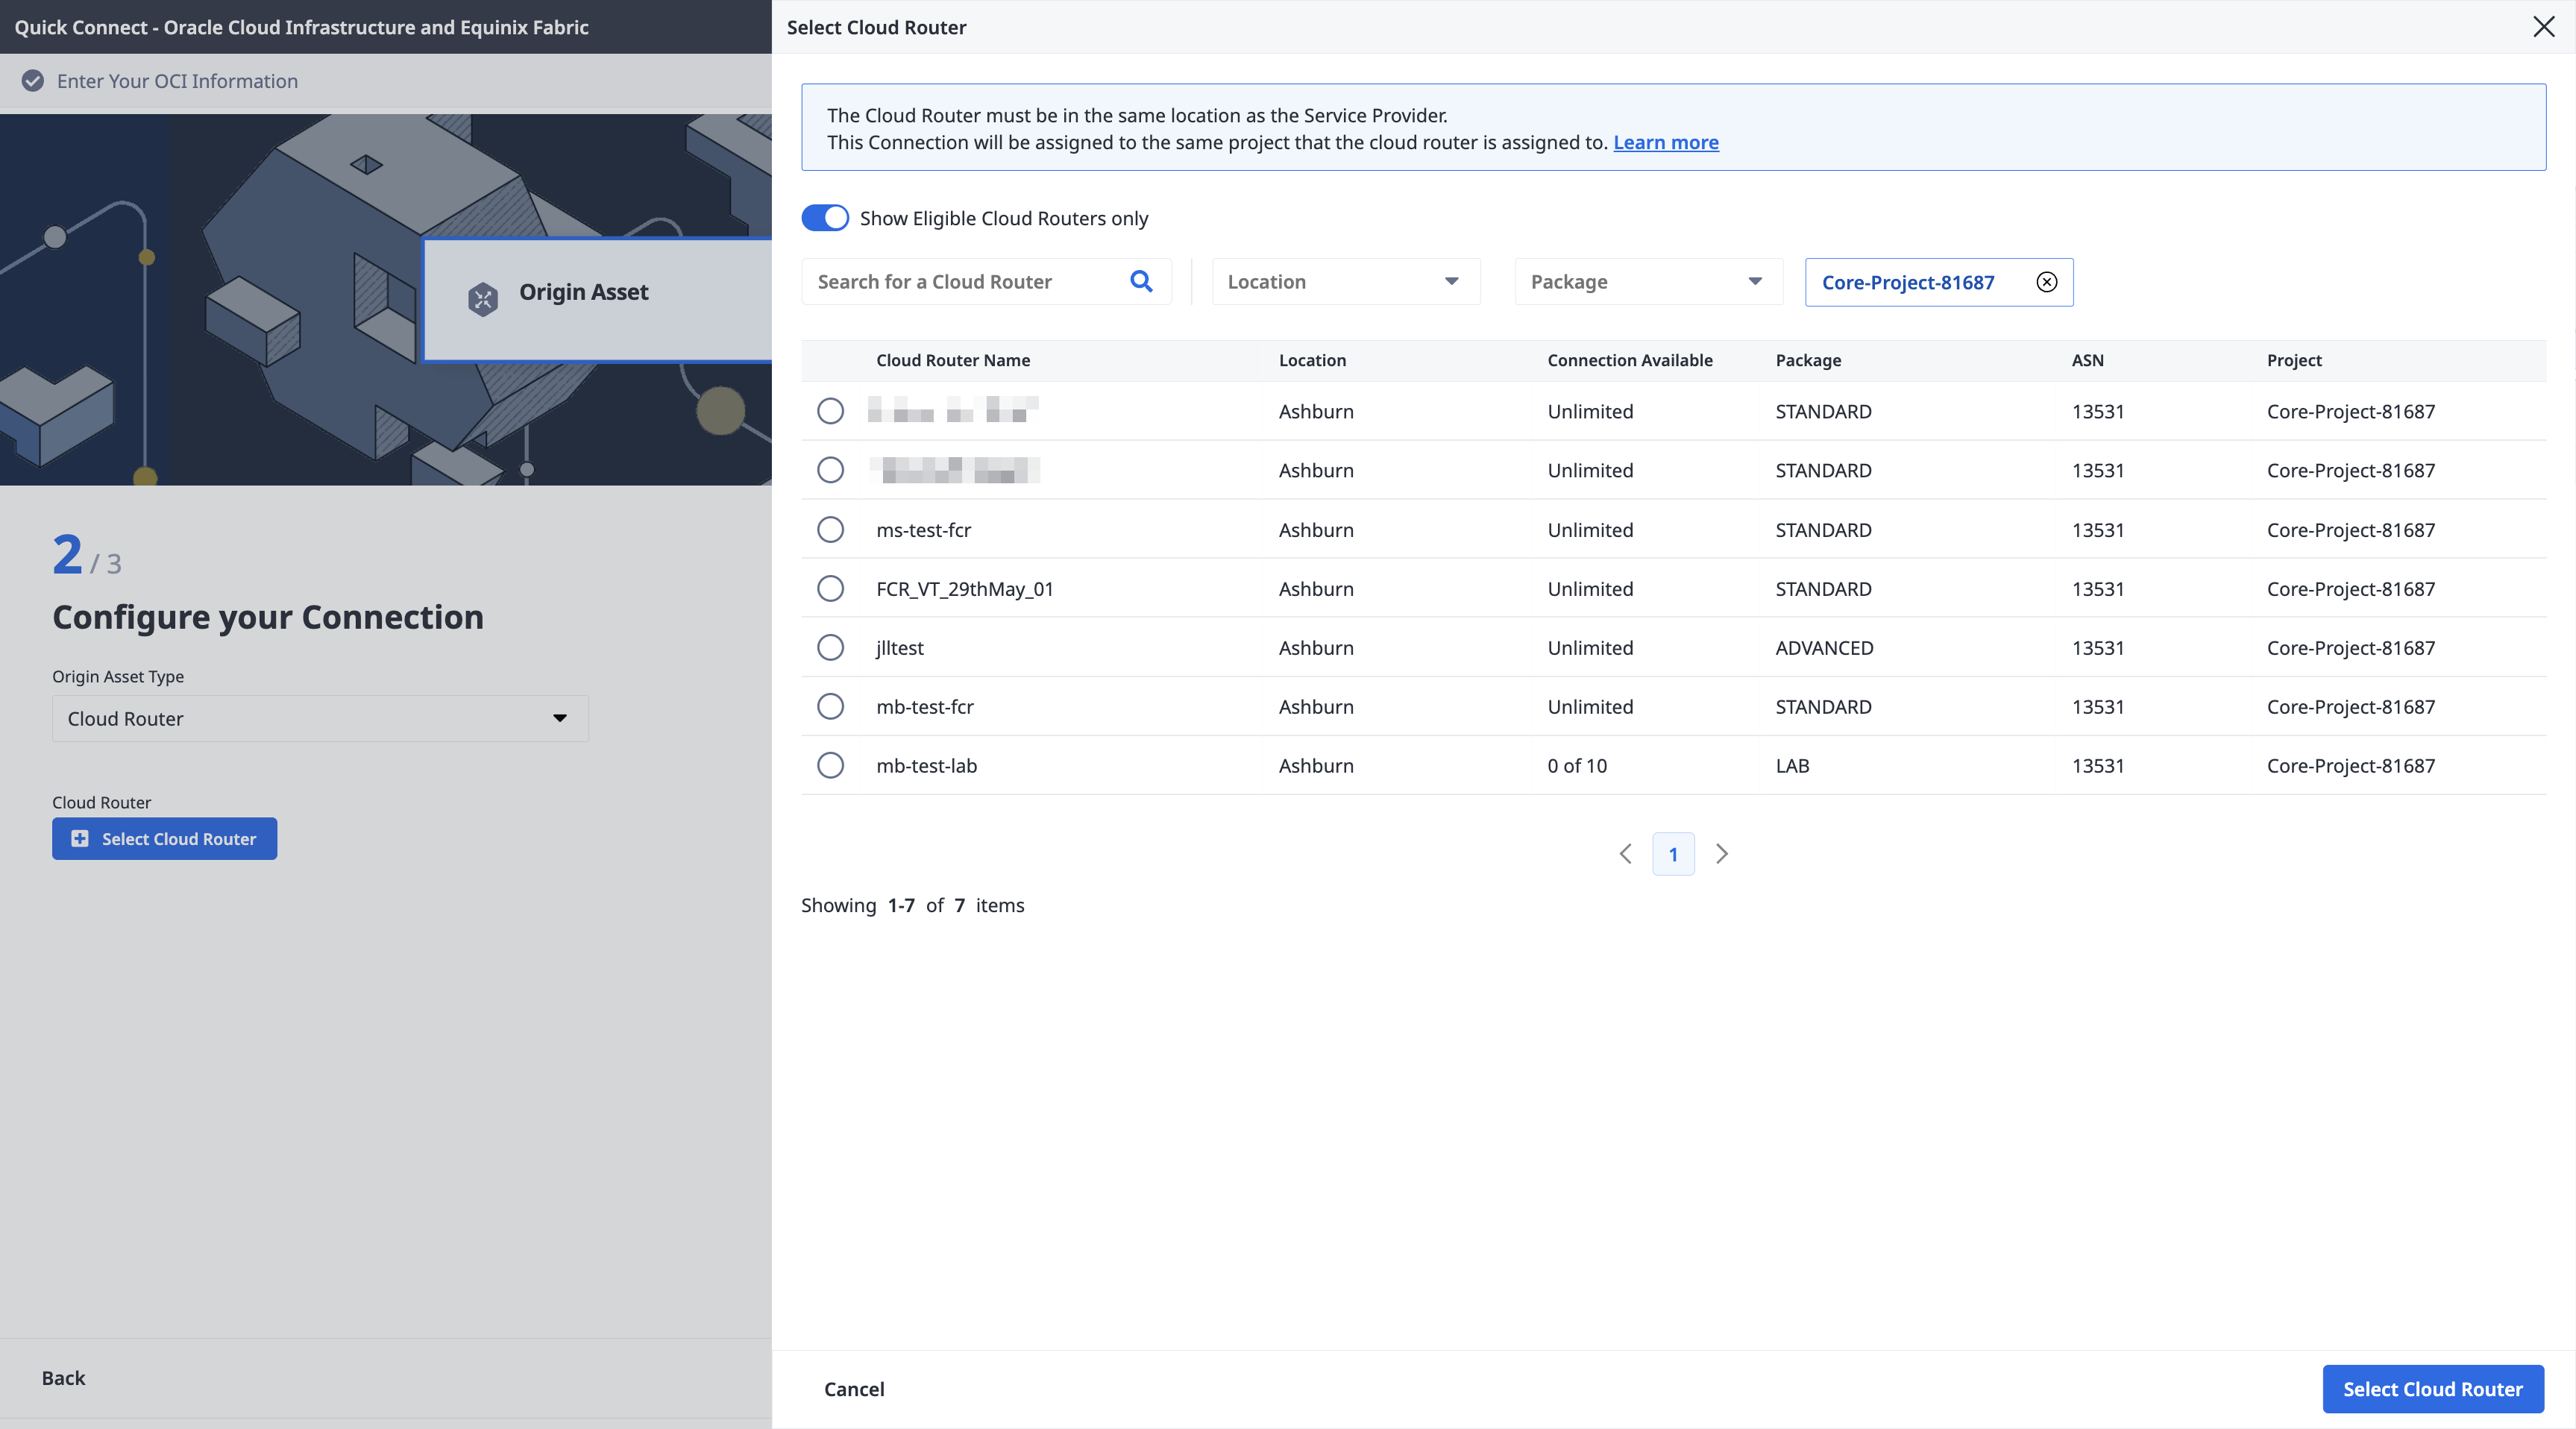
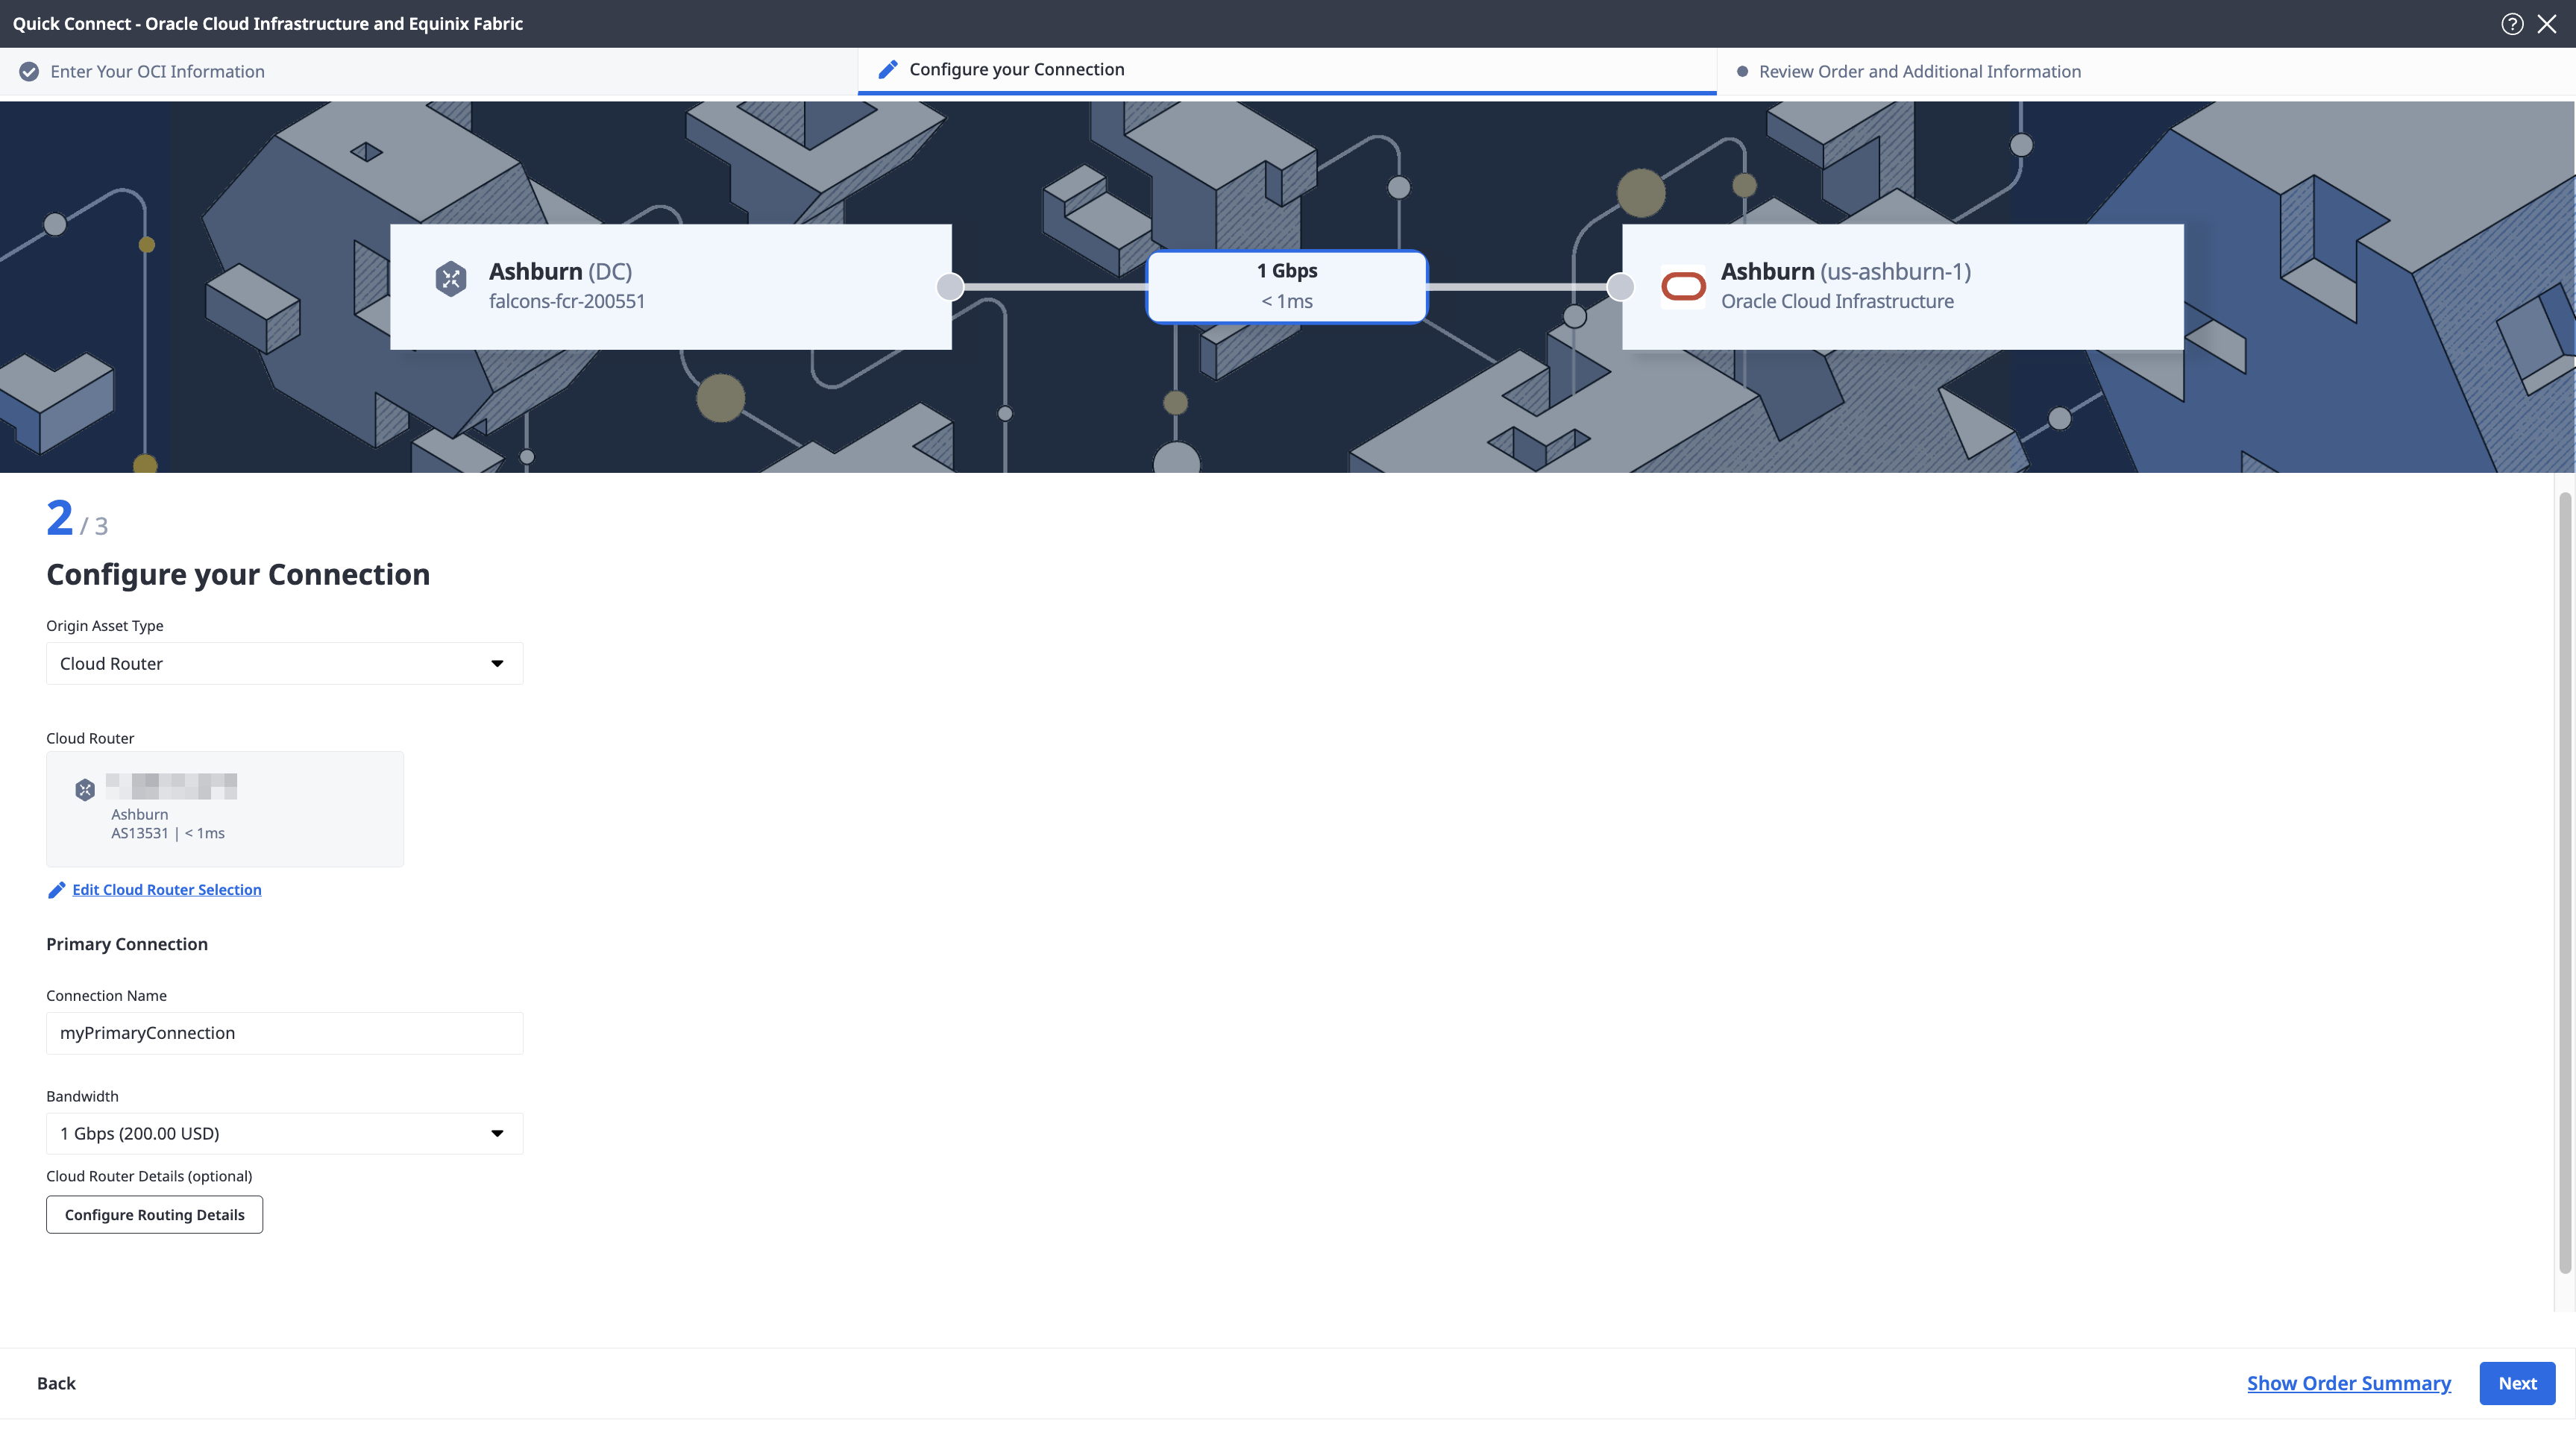
From the Origin Asset Type drop-down list, select Cloud Router.
-
Click + Select Cloud Router, select a cloud router instance, then click Select Cloud Router.
-
In the Primary Connection section:
- Enter the primary connection name.
- Select a bandwidth. The bandwidth value you select will also apply to the secondary connection. Even though FastConnect OCID keys can only be created with speeds of 1 Gbps or greater, Equinix Fabric allows you to create the Fabric connection with any of the standard bandwidth tiers that are available on Fabric. If the bandwidth speed for the connection is lower than the speed of the OCID key, Fabric will rate-limit traffic to the connection speed.
-
If you are creating a Redundant Connection, enter your secondary connection name in the Secondary Connection section. The bandwidth value you selected for the primary connection is also applied to the secondary connection.
-
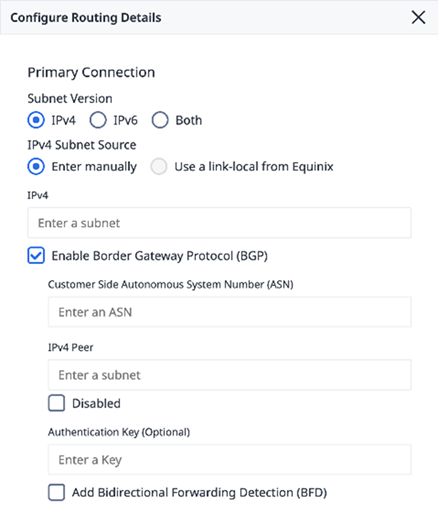
(Optional) You can configure Border Gateway Protocol (BGP) routing details, or wait to configure BGP after the connection creation process is complete. Select Configure Routing Details and provide the required information. See Configure Routing Details for additional guidance.
-
Click Next.
-
On the Review Order and Additional Information page, review the information in the Connection Configuration sections.
-
Use the Notifications field to provide the email addresses of the recipients to be notified about the connection's status. You can add up to 12 email addresses.
-
(Optional) Enter or add order information in the Purchase Order section.
-
Provide a customer reference identifier that will help you identify this order on your invoice.
-
Click Show Order Summary to see order details and connection pricing information.
When you are ready, click Create Connection.
To create a connection from your cloud router to FastConnect, send a POST request to the /fabric/v4/connections endpoint. The connection type is IP_VC.
Specify your Fabric Cloud Router in the aSide object including:
- Set
accessPoint.typeasCLOUD_ROUTER. - Set
router.uuidas your router's UUID.
Provide the FastConnect details and location details in the zSide object including:
- Set
accessPoint.typeasSP. - Set
profile.typeasL2_PROFILE. - Specify the Oracle service profile you are connecting to in
profile.uuid. - Specify the Equinix Metro location you are connecting to in
location.metroCode. - Specify the Oracle region associated with the Equinix Metro in
sellerRegion. - Set
authenticationKeyas your OCID.
Sample cURL Request:
curl -X POST 'https://api.equinix.com/fabric/v4/connections' \
-H 'content-type: application/json' \
-H 'authorization: Bearer <token>' \
-d '{
  "type": "IP_VC",
  "name": "<your_connection_name>",
  "bandwidth": <connection_speed>,
  "redundancy": {
  "priority": "<redundancy_code>"
  },
  "aSide": {
    "accessPoint": {
      "type": "CLOUD_ROUTER",
      "router": {
        "uuid": "<cloud_router_uuid>"
      }
    }
  },
  "zSide": {
    "accessPoint": {
      "type": "SP",
      "profile": {
        "type": "L2_PROFILE",
        "uuid": "<oracle-service-profile-uuid>"
      },
      "location": {
        "metroCode": "<equinix-metro-code>"
      },
      "authenticationKey": "<oracle-OCID>",
      "sellerRegion": "<oracle-region-id>"
    }
  },
  "project": {
    "projectId": "<project-id>"
  },
  "notifications": [
    {
      "type": "ALL",
      "emails": [
        "<contact-email-address>"
      ]
    }
  ]
}'
To create a connection to FastConnect using a cloud router, use the equinix_fabric_connection resource. The connection type is IP_VC.
Specify your Fabric Cloud Router in the a_side object including:
- Set
access_point.typeasCLOUD_ROUTER. - Set
router.uuidas your router's UUID.
Provide the FastConnect details and location details in the z_side object including:
- Set
access_point.typeasSP. - Set
profile.typeasL2_PROFILE. - Specify the FastConnect service profile you are connecting to in
profile.uuid. - Specify the Equinix Metro location you are connecting to in
location.metro_code. - Specify the Oracle region associated with the Equinix Metro in
seller_region. - Set
authentication_keyas your OCID.
resource "equinix_fabric_connection" "token2oracle" {
  name = "<connection_name>"
  type = "IP_VC"
  notifications {
    type = "ALL"
    emails = ["<contact_email>","<contact_email>"]
  }
  bandwidth = <bandwidth_speed>
  redundancy { priority = "PRIMARY" }
  a_side {
    access_point {
      type = "CLOUD_ROUTER"
      router {
        uuid = "<cloud_router_uuid>"
      }
    }
  }
  z_side {
    access_point {
      type = "SP"
      authentication_key = "<oracle_OCID>"
      seller_region = "<oracle_region_id>"
      profile {
        type = "L2_PROFILE"
        uuid = "<oracle_service_profile_uuid>"
      }
      location {
        metro_code = "<equinix_metro_code>"
      }
    }
  }
}
Connecting from a Virtual Device
- Portal
- API
- Terraform
-
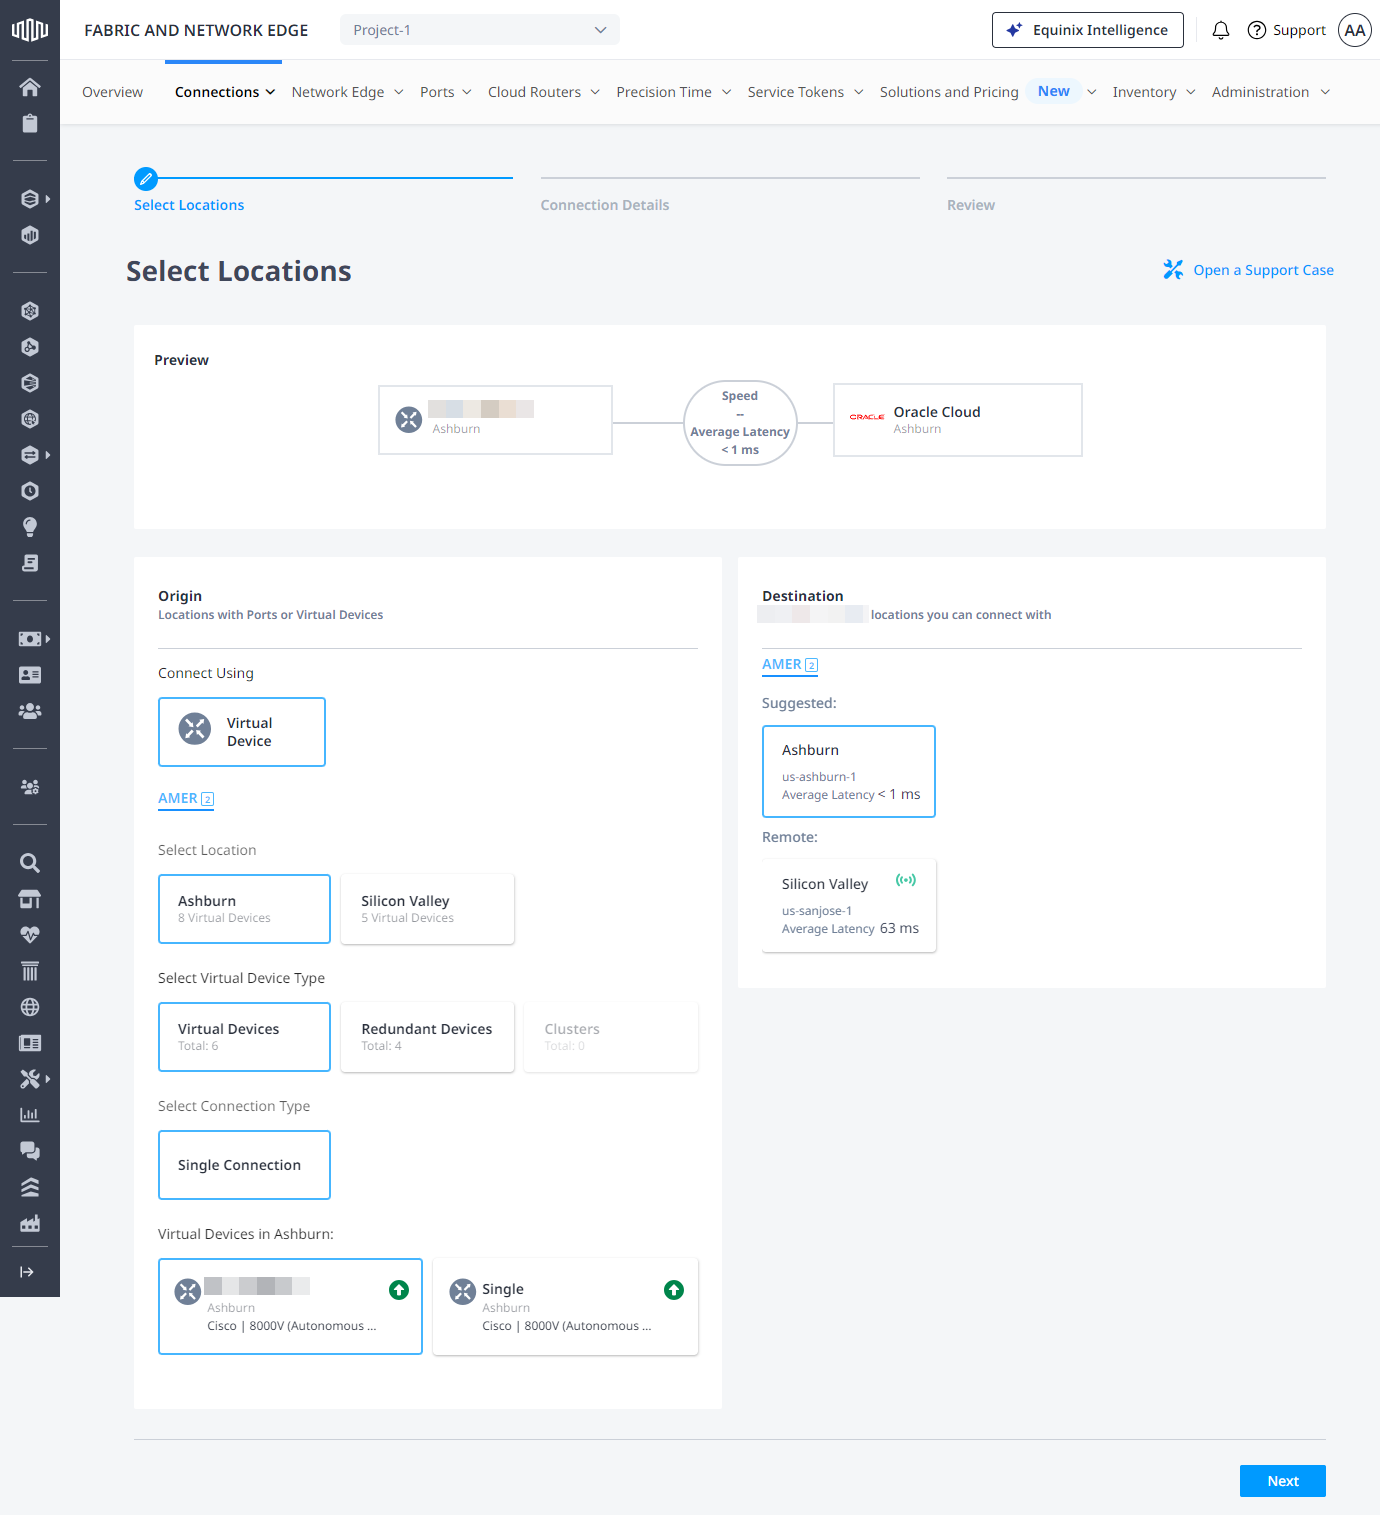
Locate the Oracle Cloud card, click Select Service, then click Create Connection (Network Edge Device).
-
In the Origin section, click Virtual Device. If the Virtual Device option is disabled, there are no virtual devices available in the selected project. Choose a different project, that has virtual devices assigned to it, or create a new virtual device in this project.
-
Select a Metro.
-
Choose virtual device type, select connection type, then select a virtual device instance.
-
In the Destination section select a metro where you want to terminate your connection, then click Next.
-
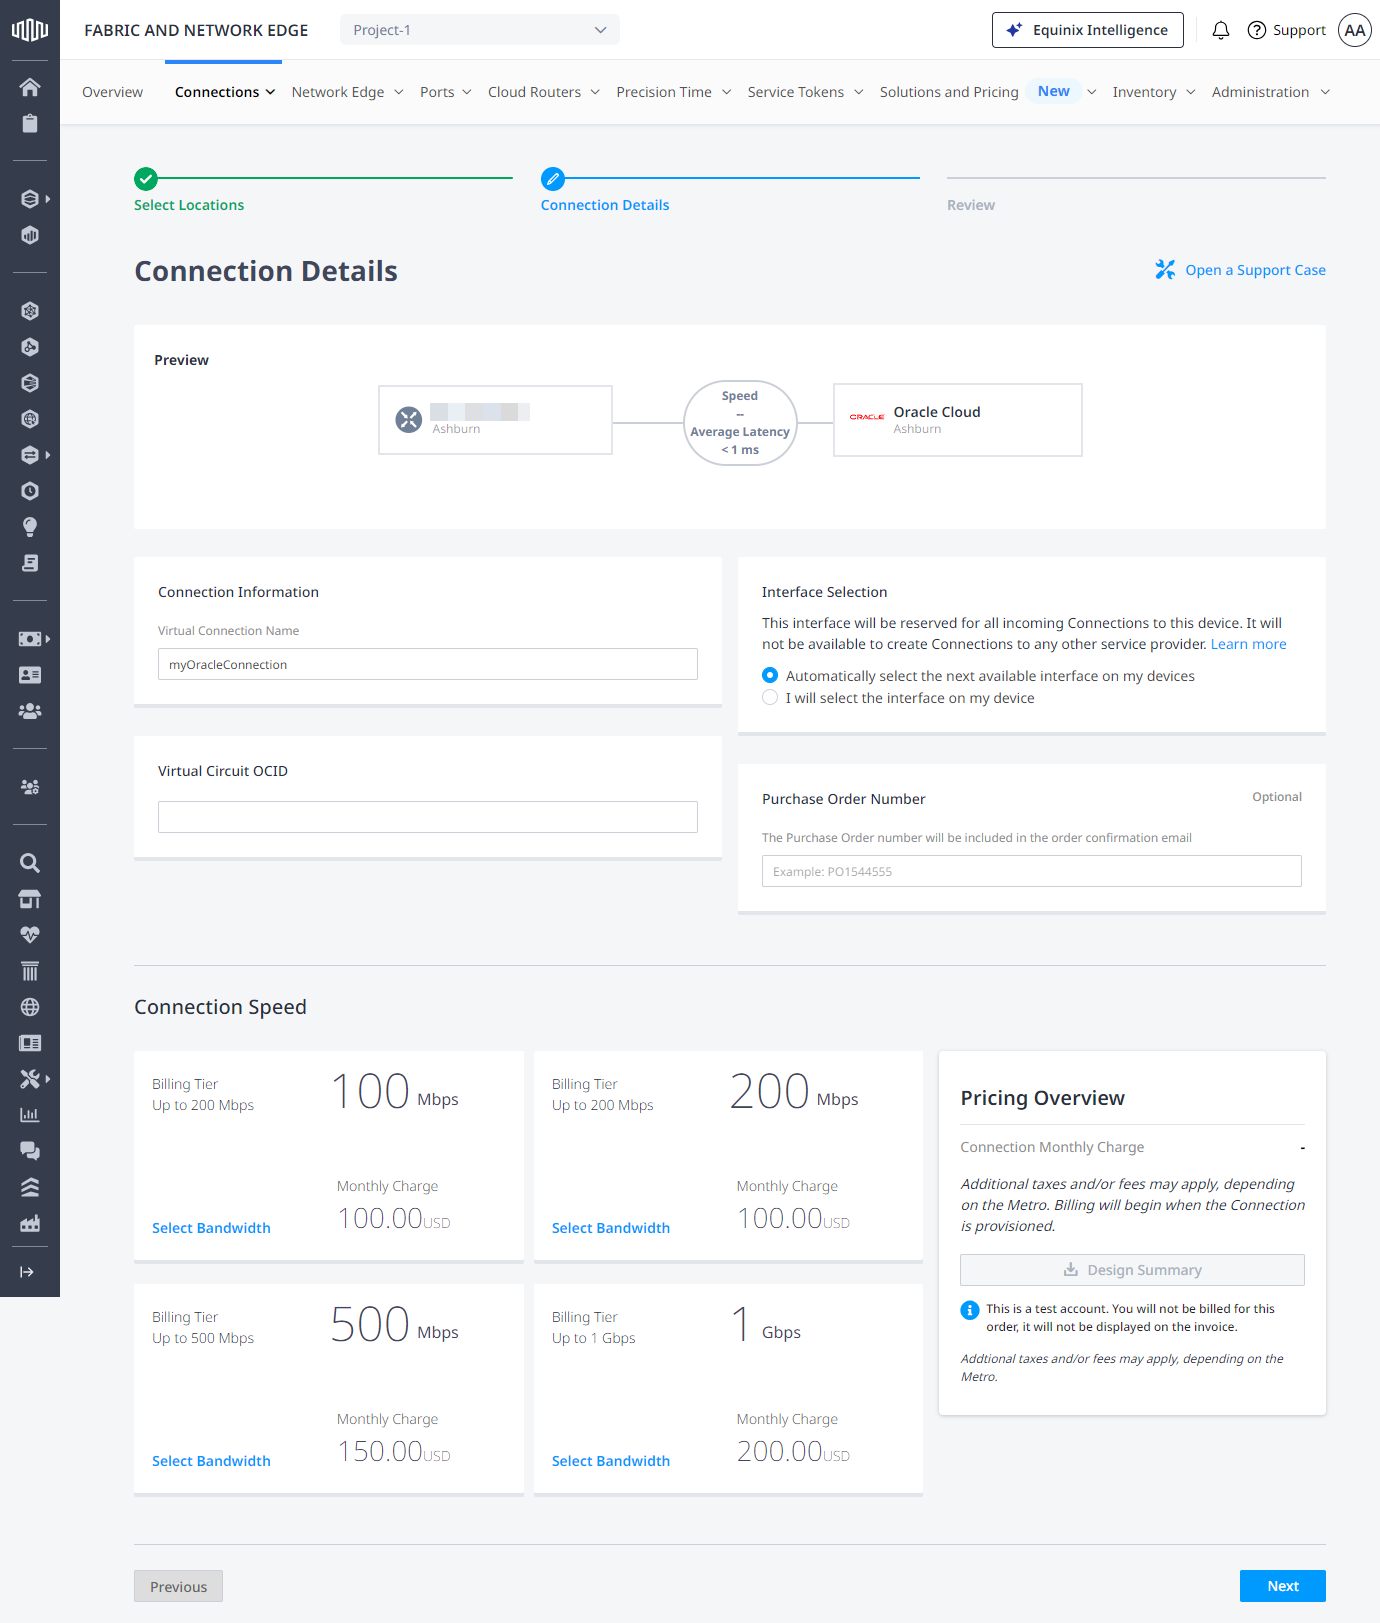
Enter a connection name.
-
Enter a virtual circuit identifier.
-
Select network interface on your virtual device.
-
Enter a purchase order number.
-
Select connection speed, then click Next.
-
On the Review Order and Additional Information page, review the information in the Connection Configuration sections.
-
Use the Notifications field to provide the email addresses of the recipients to be notified about the connection's status. You can add up to 12 email addresses.
-
(Optional) Enter or add order information in the Purchase Order section.
-
Provide a customer reference identifier that will help you identify this order on your invoice.
-
Click Show Order Summary to see order details and connection pricing information.
When you are ready, click Create Connection.
To create a connection from your Network Edge device to FastConnect, send a POST request to the /fabric/v4/connections endpoint. The connection type is EVPL_VC.
Define your Network Edge device in the aSide object including:
accessPoint.typeasVDvirtualDevice.typeasEDGEvirtualDevice.uuidas your device's UUID
Provide the FastConnect details and location details in the zSide object including:
- Set
accessPoint.typeasSP. - Set
profile.typeasL2_PROFILE. - Specify the Oracle service profile you are connecting to in
profile.uuid. - Specify the Equinix Metro location you are connecting to in
location.metroCode. - Specify the Oracle region associated with the Equinix Metro in
sellerRegion. - Set
authenticationKeyas your OCID.
Sample cURL Request:
curl -X POST 'https://api.equinix.com/fabric/v4/connections' \
-H 'content-type: application/json' \
-H 'authorization: Bearer <token>' \
-d '{
  "type": "EVPL_VC",
  "name": "<connection-name>",
  "bandwidth": <bandwidth-speed>,
  "aSide": {
    "accessPoint": {
      "type": "VD",
      "virtualDevice": {
        "type": "EDGE",
        "uuid": "<virtual-device-uuid>"
      }
    }
  },
  "zSide": {
    "accessPoint": {
      "type": "SP",
      "profile": {
        "type": "L2_PROFILE",
        "uuid": "<oracle-service-profile-uuid>"
      },
      "location": {
        "metroCode": "<equinix-metro-code>"
      },
      "authenticationKey": "<oracle-OCID>",
      "sellerRegion": "<oracle-region-id>"
    }
  },
  "project": {
    "projectId": "<project-id>"
  },
  "notifications": [
    {
      "type": "ALL",
      "emails": [
        "<contact-email-address>"
      ]
    }
  ]
}'
To create a connection from your Network Edge virtual device to FastConnect, use the equinix_fabric_connection resource. The connection type is EVPL_VC.
Define your Network Edge device in the a_side object including:
access_point.typeasVD.virtual_device.typeasEDGE.virtual_device.uuidas your device's UUID.
Provide the FastConnect details and location details in the z_side object including:
- Set
access_point.typeasSP. - Set
profile.typeasL2_PROFILE. - Specify the FastConnect service profile you are connecting to in
profile.uuid. - Specify the Equinix Metro location you are connecting to in
location.metro_code. - Specify the Oracle region associated with the Equinix Metro in
seller_region. - Set
authentication_keyas your OCID.
resource "equinix_fabric_connection" "virtual_device2oracle" {
  name = "<connection_name>"
  type = "EVPL_VC"
  notifications {
    type = "ALL"
    emails = ["<contact_email>","<contact_email>"]
  }
  bandwidth = <bandwidth_speed>
  redundancy { priority = "PRIMARY" }
  a_side {
    access_point {
      type = "VD"
      virtual_device {
        type = "EDGE"
        uuid = "<device_uuid>"
      }
    }
  }
  z_side {
    access_point {
      type = "SP"
      authentication_key = "<oracle_OCID>"
      seller_region = "<oracle_region_id>"
      profile {
        type = "L2_PROFILE"
        uuid = "<oracle_service_profile_uuid>"
      }
      location {
        metro_code = "<equinix_metro_code>"
      }
    }
  }
}
Monitoring the Connection Status
- Portal
- API
- Terraform
Once you have created the connection, it appears in your Connections Inventory where you can monitor its status.
Once you have created the connection, send a GET request to the fabric/v4/connections/{connectionId} endpoint to monitor connection status.
Fetch the connection status with the equinix_fabric_connections data source.
equinixStatus parameter values | providerStatus attribute values | Description |
|---|---|---|
PROVISIONING | PROVISIONING | Connection request has not been sent to Oracle yet. |
PROVISIONED | PROVISIONING | Connection establishment in progress. |
PROVISIONED | PROVISIONED | Connection established. |
Configure Routing Details
To complete your connection, you need to update the routing configuration. Note that Oracle’s ASN is 31898 which is needed when setting up the BGP peering session.
-
If you are connecting from a cloud router, configure the routing in the Customer Portal or API. Note that these configuration steps can be completed during the connection ordering process. If configured previously, you can skip this step.
-
If you are connecting from a virtual device, configure the routing on the virtual device according to the VNF's instructions and configuration settings.
-
If you are connecting from a port, configure the routing on your customer-provided equipment that is providing routing for your port.
If you created a redundant connection to Oracle Cloud, repeat the configuration on both connections.
To complete the configuration of the end-to-end connection, make the corresponding routing changes in Oracle Cloud.